Work Lists
This screen is used to display the Work Lists - ie the list of tasks and their status. The buttons allow you to move the task through its various stages from pending to completed. For background see Concepts|Schedules, Work Lists and Workflow.
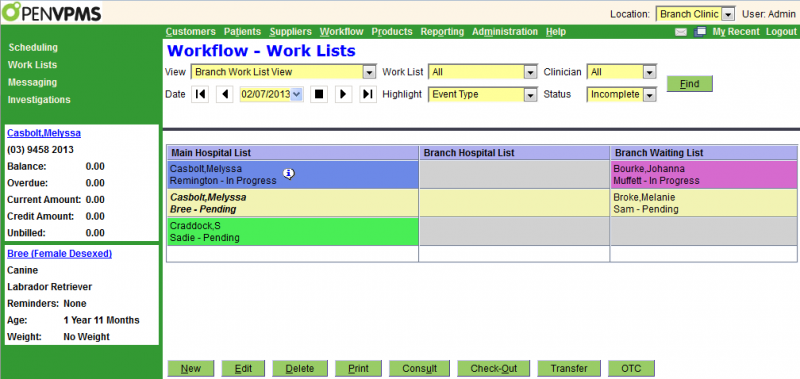
The screen displays data in two modes, multi-list and single list. Note that the left hand panel displays the current customer and patient. This will change as the different tasks are selected. Below the Casbolt/Bree task is selected (note the italic font).
First the multi-list display.
This is essentially a select screen. The selection fields area as follows:
View - this is used to select the Work List View to be used
Work List - this can be set to All or any one of the Work Lists that are part of the current Work List View. If you select other that All, then the work list will be displayed in single list mode - see below.
Clinician - this can be set to All or any one of the clinicians. If you select a clinician, then all the tasks for clinicians other that the one selected will be 'greyed out'.
Date - the date selector  allows you to enter a date, go back or forth one day, or one week (the outer arrows), or, with the black square, select today. Note that the date controls what is displayed as:
startTime <= day 23:59:59 and (endTime >= day 0:0:0 or endTime is null)
Functionally, this means that completed tasks will only be displayed if they were completed on the selected date.
Highlight - this can be set to Clinician, Event Type or Status and changes the colours used to display each task
Status - this can be set to All, Incomplete, or Complete
The display area consists of one column per work list, each showing the tasks that match the selection conditions. What is displayed for each task is set via the Administration|Organisation|Work List View screen. Here you can see that this view is set to display, the customer, patient and status (but not the clinician). The i balloon  indicates that there is a note for the task - clicking the balloon will display the note. (If the task has been created as a result of checking-in a patient, then the task note will generated from the appointment reason and any appointment note.)
The buttons are as follows: (see below for when the various buttons are displayed)
New - create a new task in the currently selected work list. You may find it more obvious to click in the half slot at the bottom of the tasks in the desired work list column - this will display  in the slot, then click it again (or press the New button) and the New Task screen will open.
Edit - edit the selected task.
Delete - delete the selected task.
Print - print the selected task.
Mail - email the selected task.
Consult - opens the Visit Editor window. } click here for details
Check-Out - initiates the check-out process . }
Transfer - transfers the task to another work list. If the target work list has:
- templates or Use All Templates is ticked, a Print window will be displayed listing the available templates to print.
- Create Flow Sheet ticked and Smart Flow Sheet is configured and the patient has a current Visit and no Flow Sheet, one will be created.
OTC - Over The Counter sale - opens the New Counter Sale window to allow you to make an OTC sale.
New Flow Sheet - creates a Smart Flow Sheet for the patient associated with a task.
The single-list display is as follows:

The selection fields and buttons are the same as for the multi-list display.
The display area columns are as follows:
Started - the time at which the task was created - not that only hours and minutes are shown even if the task was started say 3 days ago
Status - the task status - which will be (in logical order) one of Pending, In Progress, Billed, Completed, or Cancelled
Task Type - the type of task - those available are set via Administration|Types|Task Type
Customer - the customer - note that the name is a link - clicking on it will take you to the Customers|Information screen
Patient - the patient - note that the name is a link - clicking on it will take you to the Patients|Medical Records screen
Notes - the notes for the task
Time - the time (in hours and minutes) since the task was started
Available Buttons
The following table shows when each button is displayed.
| Button | Displayed When |
|---|---|
| OTC | always |
| New | work list selected |
| Edit | task selected |
| Delete | task selected |
| task selected | |
| task selected | |
| Consult | status = In-Progress, Billed |
| Check-Out | status = In-Progress, Billed |
| Transfer | status = Pending, In-Progress, Billed |
| New Flow Sheet | a task is selected, and Smart Flow Sheet is configured for the Practice Location |
Task
This window is used to create and edit a Work List Task.

If you are creating a new Follow-Up task the screen will look like:

The fields are:
Customer - the customer - this is a mandatory field
Patient - the patient - this is an optional field
Work List - (present only when creating a new Follow-Up task) - used to select the work list to which the task is to be added. The available worklist are those set for the current clinician, current user and current practice location (via Administration|Users and Administration|Organisation|Practice Location). The initially selected one is that set as the first on the clinician's list of Follow-Up work lists; and if s/he has none, the from the user's list and if they have none then from the Practice Location's list.
Task Type - the task type - see Administration|Types|Task Type
Started - the date and time that the task was started
Completed - the date and time that the task was completed
Notes - any pertinent notes
Clinician - the clinician - this is an optional field
Status - the status can be one of (in logical order) Pending, In Progress, Billed, Completed or Cancelled
Note that normally both the status and the completed date/time are updated by the system when you use the Consult (sets status In Progress) and Check-Out (sets status Completed and the Completed date/time) buttons on the Work List screen, and Complete/Finalise (sets status Billed) button on the Invoice screen.
Confirm Delete
This screen is displayed when you initiate the deletion of a task on the Workflow|Work Lists screen.
Press OK to confirm else Cancel.
Worklist Document Print
This print window is displayed if there are documents available for printing as part of the worklist transfer process. Those available are defined by the Template settings for the Work List - see Administration|Organisation|Worklists.

Check those documents to be printed, and then press OK to process them. Press Skip to skip printing any documents.
If a letter to be printed has parameters, a prompt will be displayed allowing them to be entered.
The documents selected will be saved, available from Patients|Medical Records|Documents.
The standard Print window will be displayed. Pressing OK on this will print the documents. Press Cancel if you do not want them printed - the documents will be available in Patients|Medical Records|Documents.