Introduction
This section contains basic information to help you use the system.
Common Buttons
The following table shows the buttons that appear on many screens.
| Button | Meaning |
|---|---|
| Apply |
update the record with the changes made, but allow further editing to continue |
| Cancel |
close the window without updating the record (note that any changes made by pressing the Apply button will be preserved) |
| Delete |
delete the selected item. Note that this is normally a bad idea - it is better to Deactivate the item. Also in many cases, you will not be able to delete the item because it is referred to by others. If this is the case you will be offered the option of deactivating it. |
| Edit |
edit the selected item. You can also normally edit an item by clicking again on the selected item. |
| New | create a new item |
| Next | go forward to the next record. If you have been editing, you will be asked if the changes are to be saved or discarded. |
| OK | update the record and close the window |
| Previous | go back to the previous record. If you have been editing, you will be asked if the changes are to be saved or discarded. |
| print the selected item | |
| View | view the selected item |
| (Alt-V) | on screens where there is a Print button and no View button, you can use the Alt-V keyboard shortcut to preview the print without calling up the Print screen. |
Common Screens
The system has a number of screens that are very similar - such as the various select, email and print screens. Rather than document each in detail, one of each set is documented here and the pages for the individual screens are referred on to these.
Edit
The system has numerous edit screens which all work the same way as the following example (the Customer Information edit screen).

The screen consists of three areas:
(1) basic information - this area contains the things that there is only one of for the item being edited
(2) the bottom buttons as follows: (there may be others as well but these are the standard ones)
Apply - update the item with the changes made but do not close the screen
OK - apply the changes made and close the screen
Cancel - close the screen losing any changes made. Note that if you have previously used Apply, then the 'applied' changes will not be lost.
(3) the tab area - this area contains the tabs for the sub-items of which there are usually more than one - in the above example there are 7. The tab area consists of three or more sub-areas as follows:
(4) the tab buttons as follows:
Add - add a sub-item - you will be able to enter it's details, and if you then click Add a second time, those will be accepted and cleared to allow you to enter another sub-item. Note that the tab button line will sometimes contain pull-downs that allow you to select the type of sub-item being added - in the above example you can see that there is a pull-down to select the type of contact. If so, you will need to select the type before clicking the Add button.
Delete - delete the current sub-item
Previous and Next - these are used to navigate backwards and forwards though the sub-items changing the currently selected one. The buttons will be disabled (greyed out) when you are at the beginning/end of the sub-items.
(5) sub-item table - this displays the sub-items - click on one to select it
(6) sub-item details - here you can enter/view the details of the current sub-item
(7) sub-item tabs - if needed there will be tabs here to allow the editing of part of the sub-item. In the above example you can see there is a Purpose tab to allow the purpose of the contact to be set.
All the Write Email screens look like the following:

(1) At the top there are a set of buttons:
Send - sends the email
Template - fills the email subject and text with content from a template
Attach - allows you to attach a relevant document (a select window will open allowing you to find the required document from those belonging to the current customer/supplier/etc)
Attach File - allows you attach any file (a browse window will open allowing you to select any file on your computer)
Cancel - cancels the write email operation
(2) the From/To/CC/BCC/Subject block:
From - will display the preferred email address for the current Practice Location, but if you have multiple email addresses defined, then you can use the pull-down to select another. For example:

Note that in the pull-down, the name of the Practice Location is shown in brackets - but this is removed when the address is selected.
You cannot enter an arbitary From email address - you must use one of the practice location's email addresses selected from the pull-down.
To/CC/BCC - you can either use the pull-downs to select an address, or enter addresses directly.
If you use the pull-downs then the selected address in the pull-down will replace any existing address(es). All relevant addresses will be shown. For example:

In the above case, the email was invoked from the Patient screen and hence includes the referring vet addresses. If this was invoked from the Customer screen, then the vets would not be shown. So use the pull-downs for quick and easy selection of the relevant addresses.
Note that in the pull-down, the name of the entity is shown in brackets so that you can see where the address is coming from. Hence the 2nd line shows Bill Bourke, but we know that this must be an email address listed for the customer Bourke,Johanna. Again, the name in brackets is not included when the line is selected from the pull-down. The last two lines appear as shown because the veteast.com.au email contact has the email name 'Email Address', whereas the veteast[at]gmail[dot]com contact has the email name 'Veteast'.
For more flexibility, you can also either enter an email address (eg bloggs[at]gmail[dot]com) or enter all or part of a name (eg bloggs,fred or bloggs, or blo, or %,fred) and then press the Enter key. If there is a single match this will be filled in. Otherwise the Address Book screen will be displayed showing the matches. Note that as indicated by the last example, you can use % as a wildcard; %,fred will find all who have Fred (or Frederick) as a first name, whereas %fred would also find names (like Alfred,John) containing 'fred'. If you press the Enter key with the cursor positioned on an empty line, the Address Book will open showing all email addresses in the system.
You can use multiple addressees separated by semi-colons (;).
You must have at least one To addressee, the CC and BCC addressees are optional.
Subject - enter an appropriate subject. Note that this is a mandatory field.
(3) the Text area - enter the text of the email. To enter macros, use:
- Ctrl-M to insert the text of a macro (assuming you know its code)
- Alt-M to display available macros, and insert the text of the selected macro
Note that the text coming in from the macro expansion retains its formatting so that long lines will not be wrapped at the margin, and any spaces at the start of the line(s) or within the line(s) will be retained. Thus columns and indents are preserved.
(4) the formatting controls - each of the icons has a top tip, so hovering the mouse over an icon will tell you what it does. The three boxes with pull-downs above the icons allow you to select the style, font and size respectively.
(5) the attachments area - as you add documents and files, they will be shown here. Note that if you want to delete one on them, click on the attachment to select it and then press the Delete key. Actually it's a little more tricky than this. When the item is first attached it looks 'white' like the following:  . If you click it in the middle (or anywhere except the icon at the left end), then the attachment becomes selected and the background goes cream like:
  . You can now press delete to delete it.
If you click on the icon at the left end, then the item will be downloaded to your browser (and displayed if possible).
Address Book
Below is an example of the Address Book screen. The user has entered just 'sm' as the email address - the system checked and found more than one matching name and displayed them

Click on the required line to select the addressee. Alternatively enter a new search string and press Find.
If the Type is left at the default 'All', the address book shows all types. You can use the pull-down to select just say Users (if you were looking for a staff member).
Note that the search is done on the name of the contact, not the email address or the email address name.
If the contact has an email address name, then this will be shown in brackets. In the above, all the matching contacts have an email address name except the Supplier(Person) on the second line. We can also see that Mrs Kay Smith is in fact a second email contact for the customer Smith,Michael. Note that the user SM has been included because his user name is SM, although he is Dr Sam Michaels.
Template
The Template button displays a list of the available templates that may be used to fill emails with content.
If a template has parameters, these will be prompted for.
Attach Document
This is a typical document select screen displayed when you click the Attach button on the Email write screen. (This one is for selecting customer documents.)
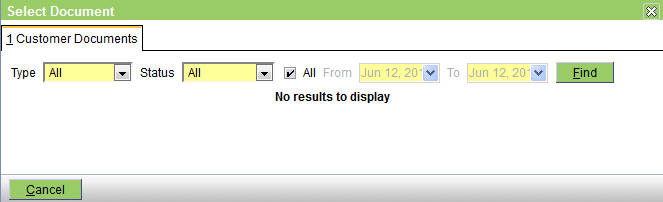
The fields are:
Type - a pull-down to select the type of document (eg for customer documents, this contains All, Attachment, Form, and Letter)
Status - a pull-down to select the document status (All, Completed, Finalised, or In Progress)
All - uncheck this box to enable selection by date
From and To - the from and to dates if you are using date selection
Click the Find button to perform the search, and on the list of those found, click the desired document to attach it to the email.
Attach File
This is the attach file screen displayed when you click the Attach File button on the Email write screen.
Press the Browse button to browse the files on your machine and select one. Then press Send to attach the file to the email.
 .
.
When you press the Print button on a screen, a window will appear as follows:

The fields are:
Printer - shows the default printer for your current location - if this is defined (see Administration|Organisation|Practice Location), otherwise the first available printer. Use the pull-down to select the required printer.
Copies - set the number of copies required
Press OK to print on the selected printer. Press Cancel if printing is not required.
The Preview button will generate and display a copy of the document in your browser. Note that on most screens that have a Print button that invokes this screen, you can use the shortcut Alt-V to immediately preview the output without calling up this screen.
The Mail button will generate a copy of the document and bring up an email window so that you can email the document.
Select
The Product Select screen below is a typical select screen - all the select screens work the same way and have a similar appearance. But see the Mode discussion at the botton of this page.
First - this is the screen in its 'empty' state - ie before the Find button has been pressed. 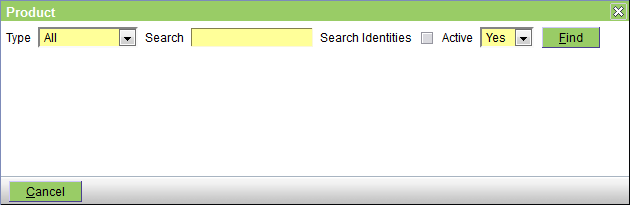
If you press Find with nothing in the search field then it will return everything and we get the screen below.

The components are as follows:
(1) The Select area - this is where you define what you are looking for - it is not exactly the same on each select screen, but all have the same components:
- a pull-down list of what to search (this is not always present) - in this case you can select the type of product to search
- one or more boxes in which to enter the search value - this this case there is only one since you can only search by product name. In these you enter the search term: you can enter nothing (will return all items), or the first few characters of what you are looking for. Note that the case does not matter, ie 'b' or 'B' will both find items starting with 'B' or 'b'. You can also use wildcards.
Note that if you press the Enter key immediately after keying something into the search box, the system will react as though you had clicked the Find button and perform the search. - a 'Search Identities' checkbox - checking this searches the item's Identities rather than their names
- an 'Active' pulldown list - this can be set to Yes (active items only), No (Deactivated items only) and Both. The latter setting causes the Active column to be included indicating whether or not the item is Active.
- a Find button - click this (or press Alt-F) to perform the search
(2) The Page navigation area - this appears whenever there are more than 20 items found. Click the First  or Last
  icons to jump to the first or last pages; click the Previous
  or Next
  icons to go to the previous or next pages; use the page number pull-down
  to go to a specific page. The 'of at least N' comment will initially display the full number of pages if less than 4 (ie less than a total of 60 items), but if there are more, then it will not display the full number of pages until you go to the last one.
You can also use the PgUp and PgDn keys to move to the previous/next page - but for these keys to work you must have an item in the item display area (see below) selected.
(3) The item display area. This is arranged in columns. In many cases you can click a column header to sort the items by that heading. Clicking it again will reverse the sort order. A small up or down arrow will show that the column is sorted and in which order. In this case the items are sorted in ascending order by Name. Note that not all columns will be sortable. If you click the column heading and nothing happens, then you can't sort by that column.
You select an item by clicking anywhere in its row or you can move the blue highlighting using the up & down arrows. See also the Mode discussion below.
(4) The Button area. Here you can see that there is one button, Cancel, but sometimes there are more. See also Common Buttons.
Mode
The select screens operate in two modes, 'select an item', and 'display'. You can tell which by the buttons at the bottom of the screen - if there is a Cancel button then you are in 'select an item' mode, and you will have got to this select screen from the previous screen by pressing the select button, or a binoculars icon. If there is no Cancel button, then the screen is in 'display' mode, and you will have to got to this screen via the menu, for example you clicked Products on the top line, or Workflow|Messaging, or Administration|Templates, etc.
In 'select an item' mode, clicking on an item will select the item and return you to the previous screen. Pressing the Enter key selects the blue highlighted item (and you can move this with the up/down arrow keys) and returns you to the previous screen
In 'display' mode, clicking an item selects it. If there is an Edit button, then a second click opens it for editing. Similarly, with the keyboard you can use the up/down arrows and then press Enter to select the item, and if there is an Edit button, pressing Enter a second time opens it for editing.
Upload File
This window is displayed when you need to upload a file.
Press the Browse button to browse for a file, then Send to upload it.

Getting Around
OpenVPMS provides links and keyboard shortcuts to help you efficiently navigate around the system.
If you look at the typical screen below, you will see the following:
- Certain items on the screen are shown in blue with an underline (ie Bourke,Johanna, bourke[at]foo.com[dot]au, and Muffett). This indicates that you can click these and jump to the appropriate screen. Note that if you try the first, you will find that it does not appear to do anything. This is because it takes you to the Customer Information screen and we are already there. If you click on Charges, and then on the customer name, you will be returned to the information screen.
- Many of the menu and button names have a single letter underlined (eg the t in Patients, the S in Suppliers, the l in Select). This indicates that holding down the Alt key on the keyboard and pressing the underlined letter is the equivalent of clicking the menu item or button.
- All the items that can be clicked change colour/background when you hover the mouse over them. You can see that 'Charges' in the left panel has changed.
NOTE: Don't try to use your browser's Back button to get to a previous screen - you will immediately be logged out.

Screen Layout
The screen below (actually the screen displayed immediately after you log in) shows the standard layout used by OpenVPMS. Note that because of the customisation that is possible, your screen may look different - see below for an example.

The various areas are as follows:
(1) The top menu allows you select the 'workspace' that you require, ie Customers, Patients, etc. You select by clicking the required item, or by keying Alt-x where x is the underlined letter (eg C for Customers, T for Patients). Note that this Alt-x shortcut is also available with the various buttons, Alt-L for the Select button, Alt-N for the New button.
(2) The left menu (which is different for each workspace) lets you select the sub-component. There are no Alt-x shortcuts here, you click on the required item.
(3) The blue title (in this case 'Patient- Information') shows the workspace/component that you have selected.
(4) The lower left part of the screen is used to display summary information. In this case, it displays the summaries of the selected customer and patient. In this example, the customer's account information is displayed. It is possible to suppress this information via the user Preferences.
(5) This is the main working area of the screen.
(6) The upper right of the screen contains the following:

These items are as follows:
(1) Location: this shows the current Practice Location. Depending on what your administrator has set up, you may or may not be able to select another location.
(2) User: this shows the User Id that you have logged on with.
(3) Button to change user Preferences.
(4) Clicking the envelope icon will take you to the messages screen. The envelope will have a small red indicator in its top right corner if you have unread messages. (This is showing in the above.)
(5) Clicking the new screen icon will open another window. This is useful if you want to keep the current screen as is, but lookup or do something else. When you are finished with the other window you just close it or leave it open and switch back to the other one. When you log off, you will be warned if you have other windows open. If you are getting synchronisation errors, see here.
(6) Clicking 'My Recent' (or using the Alt-Y shortcut) opens a window displaying the customer/patient pairs that you have been working with so that you can quickly re-select them. A maximum of 25 will be stored and remembered across sessions. These are stored for each user, so that if user 'Nurse' is logged in on three workstations, all three share a common 'My Recent' list.
(7) Clicking Logout will log you out.
Customised display example
The following display has been customised to adjust its background colour, the menu font size, adding a location branding, right adjusting the labels, and changing the 'unread mail' icon.

Clicks and Keys
Clicks
OpenVPMS, because it runs in a web browser, does not recognise double clicks. So if you are a windows person used to double clicking on things then you may get confused.
Always use single clicks - or if you like to think of it this way, a slow double click.
So for example, on the schedule screen, to create a new appointment, don't double click the time slot, click it once (to make the New... appear) and then again to create the appointment.
Similarly, on the products (or any other select) screen, click the item of interest to select it, and then click again to open it for editing.
Keys
The following keys are really useful:
Alt-F - Holding down Alt and then pressing the F key is equivalent to clicking the Find button. Hence on the Schedule or Work List (or any other select) screen, you can use Alt-F to cause a refresh of what you are looking at.
Alt-V - On most screens that have a Print button, you can hold down the Alt key and then press the V key to immediately preview the output without calling up the Print screen.
Enter - Pressing the Enter key means ‘do want you can with the stuff I have entered’. On a select screen, with the cursor in a search field, it is equivalent to pressing the Find button; on a data entry window, with the cursor in any data field, it will expand any macros, do any propercasing and look up any search fields.
Note however, that pressing the Enter key is not equivalent to pressing the Apply button because the record will not be saved until you press either Apply or OK.
Tab - Pressing the Tab key will jump you to the next field on the screen, Shift-Tab to the previous one.
PgUp/PgDn - where information is being presented in pages (like on the Products|Information screen), pressing the Page Up and Down keys will display the previous/next page of data - provided that you currently have one of the data items selected. (That is, if you have the cursor positioned in one of the select fields, then the Page Up and Down keys will have no effect.)
Data Entry
Below are various things that need to be understood when entering data into OpenVPMS.
The headings in this section are Data Validation, Data Search, Macros, Spelling, Dates, The Enter Key, Propercase, Note Fields, Tab Edits, and Conflicting Updates.
Data Validation
For various data fields (eg species, breed), you cannot enter any value, you must select a value from a pull-down list. Click the field or its down-arrow and then click on the required value, or type the first letter to display the allowed values starting with that letter. You can also use the up and down arrow keys, the page up and down keys, and the home and end keys to navigate up and down the list of items.
Your administrator can add new values using the Administration|Lookups facility.
Data Search
Where you see the binoculars icon after a field like the following
 this means that the data search facility is available. This makes it easy to find things (in this case a product). You proceed as follows:
- Type in as much as you want (using wildcards if needed), and then either click the binoculars, or press Enter. 'b' will find all the items starting with 'b'; 'bon' those starting with 'bon', 'b%pl' those starting with a 'b' and with 'pl' somewhere in the name. Note that the case does not matter, ie 'b' or 'B' will both find items starting with 'B' or 'b'. Although in most cases the search is done on a 'starts with' basis, for some items it is done on a 'contains' basis. This occurs only for items where there is a limited set and using 'contains' does not impose a performance penalty - specifically for visit reasons, alert types, diagnosis and presenting complaints. Hence entering 'x' for the reason on the appointment create/edit screen might return Desexing, Discuss X-Ray, and X-Ray. If needed you can also force a 'contains' search by prefixing the % wildcard. Hence entering %surgery for a product will find all products containing 'surgery'.
- If there is more than one matching item, then a select screen will be displayed showing the matches. If what you want is not there, you can adjust the selection parameters on the select screen and press its Find button.
You then click the required item and you will be returned to the data entry screen with the item filled in. - If there is only one matching item, then the select screen will not be displayed, and the name of the matching item will be filled in. For example, if only 'Bone Plate 6 Hole' matches 'b%pl', then 'Bone Plate 6 Hole' will immediately replace the 'b%pl' you typed.
- If there are no matching items, the select screen will be displayed with what you entered showing in its Search field. Adjust what you typed, eg 'bonr' to 'bone' or 'bon' and press Enter to do the search.
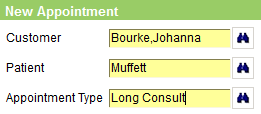
In fact, you don't need to press the Enter key or click the binoculars. When you complete your data entry by using the Apply or OK buttons, the system will check for any incomplete entries and process them. For example, on the New Appointments screen there are three fields with binoculars. You can fill in each with an abbreviated form of the entry and then press OK or Apply. If your abbreviations match only single items, then the three entries will be automatically completed. As an illustration, on the system used to create these examples, there is only one customer with a name starting 'bo', and she has only one pet with a name starting with 'm', and there is only one appointment type starting with 'l'. Hence, entering bo, m, and l in the three fields and then using Apply resulted immediately in the following:
If any of your entries do not match single items (eg Johanna had another pet called Molly), then a select screen will be presented for each non-unique entry.
Macros
The Macro facility enables you quickly enter common phrases and paragraphs.
Spelling
Because you are using a web browser, what you enter in a text field is checked by the browser's spelling checker. If this is enabled, then spelling errors will be shown with a wavy red underline, eg  . If you right-click on the word, corrections will be suggested (in this case Please or Passel). You also have the option to turn off the spelling checker.
Dates
When entering a date you can do any of the following:
- enter the date as say 15/3/13 (you can't just enter the day or day and month)
- click the pull-down icon or press the down-arrow key - this will display a date-picker calendar to use
- enter a 'relative date' using formats like
- -10w3d meaning 10 weeks and 3 days ago
- 5y3m meaning 5 years and 3 months from today
- 1m meaning one month from today
- -14d meaning 14 days ago
- you can also use the suffix s (meaning start) or e (meaning end), and hence -1ys means 1 Jan of the previous year and -1ye meand 31 Dec of the previous year
- 0 as the count means 'current' - hence 0me means the last day of the current month
- you can use q (quarter). If you do not use the s or e suffixes, the q means 3 months, ie -2q is exactly the same as -6m. However, if you use the s or e suffix then q means financial quarter, so -1qs means the start of the previous financial quarter.
- you can go back then forward, ie -1y+3ms means back one year, add 3 months and use the start date of that month
The Enter Key
Pressing the Enter key means ‘do what you can with the stuff I have entered’. On a Select window, with the cursor in a search field, it is equivalent to pressing the Find button; on a data entry window, with the cursor in any data field, it will do any required calculations, expand any macros, do any propercasing and look up any search fields.
Note however, that pressing the Enter key is not equivalent to pressing the Apply button because the record will not be saved until you press either Apply or OK.
Propercase
When you enter data in 'name' fields, OpenVPMS will apply 'propercasing', Thus if you enter SMITH or smith or smITH, this will be corrected to Smith. In most cases the adjusted casing will be correct, but in some cases (eg with a company name like 'ABC Industries', ABC will be changed to Abc). When this happens just edit it back to ABC and your correction will 'stick'.
Your administrator or integrator can adjust the propercase facility so that specific words, abbreviations and acronyms are handled correctly. See Reference|Setup.
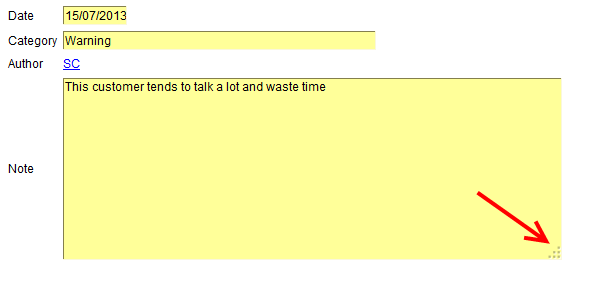
Note Fields
In a number of screens there are Notes fields. These hold lots of text, and you may want to expand the size of the field so you can see all your text. As you can see below, the bottom right corner appears to be stippled - if you put your mouse on this you will find you can drag the corner to expand (or contract) the size of the notes window.
Tab Edits
If you need to edit a number of items, where the data to be updated is located in a tab (for example the Type of a number of products), then because the system remembers the current tab, it is most efficient to proceed as follows:
- select the items as tightly as possible (eg Merchandise, name starts RC)
- press the Edit button with the first item selected
- click the required tab (eg Type)
- make the required change
- press Alt-Y to apply
- press Alt-X to select the next item
- if this one needs no update, just press Alt-X again
- go to 4 unless finished
Conflicting Updates
In general, OpenVPMS uses a technique called optimistic locking to ensure that multiple users editing the same object don't overwrite each other's changes. If two users edit the same object, the first user to save wins, and the second user's changes are rolled back. When this happens the second user will see a message like (here both users were editing a merchandise product at the same time):

However, invoices, counter sales and customer credits are automatically saved when the Add button is pressed to add a new item if:
- the charge is valid; and
- has been saved previously; and
- is not Finalised
This limits data entry loss if two users happen to edit the same charge simultaneously. The second user to save will see an error message like:

and (when the OK button is clicked) the second user will see the updated items and can re-enter just the last item that they added.
Wildcards
OpenVPMS allows the use of the 'wildcards' *, % and _ (underscore). Both * and % mean any number of characters, while _ means one character.
Thus a*b and a%b will find everything starting with 'a' following by zero or more characters, then a 'b'. There is also an implicit * added at the end of what you enter.
Hence a*b will find Abbie, Abe, Amber, and Annabelle. Note that the case you use does not matter, ie A*B will find the same names.
Using sm_th will find Smith and Smyth but not Smooth.
Note that since an implicit * is added to what you enter, leaving the Search field empty is equivalent to entering * and this will find all records.
Reporting
As a user you need not really be concerned with how the reporting system works, that is, you don't need to worry about how an invoice, drug label, stock list, etc is generated, only how to ask for it.
It is worth noting that when printing things, it is normally possible to preview the document before actually printing it, and also to email the document without printing it. When running reports, it is also possible to 'export' the data in CSV format so that it can be used in spreadsheet and other programs. See also Concepts|Printing.
All printing in OpenVPMS is customisable. If you don't like the way the invoices look, this can be changed. Similarly, if you need a report listing all dogs by name, it is possible to make this.
Skip the remainder unless you are an administrator or want to know "what's under the hood".
All documents and reports are controlled by 'Document Templates' which specify how and what to do to generate the document or report. Two facilities are used to form up the content: JasperReports and OpenOffice.
OpenOffice is used for simple documents (like patient certificates). You use an OpenOffice document template to specify the document content. Since OpenOffice can also handle Microsoft Word documents, you can also use these. They are held in files with the extension .odt (or for Word, .doc). Anyone with normal word processing skills should be able to create and modify these templates. Note that OpenOffice cannot handle the default .docx format used by Word 2007 and beyond. If you are using Word, you need save documents to be used by OpenVPMS/OpenOffce in .doc (ie Word 97-2003) format.
JasperReports is used for more complex documents such as invoices, statements, reports etc as these typically have multiple rows of data and require groupings and other data processing functions not available in OpenOffice. The iReports program is used to design, test and maintain these reports. They are held in files with the extension .jrxml. Using iReports requires a reasonable skill level, but anyone with some programming experience should have no trouble. As always, it is easier to proceed by cloning an existing report than building one from scratch.
If you do need to create and modify reports and documents, see Reference|Reports and Forms.
Press Alt-F1 for Help
You can press Alt Function Key 1 on any screen to get help with that screen.
If you are reading this, you are probably new to the system. You should look at the Introduction and Concepts sections.
Note also that if you scroll these help pages down to the bottom you will find a navigation section that you can use to jump to any other page.