How to Setup Ubuntu Server ready to Install OpenVPMS
Install the Operating System
Install the appropriate Ubuntu Server operating system. If want a GUI you can do this with ubuntu desktop and then install all the dependencies as described. This setup has been tested on Ubuntu 9.10 but should work at least on 8.10 or more recent. If you are installing the server edition install mysql, tomcat6, LAMP stack and printer server when prompted during the installation process.
Install Required Software
From a command prompt install the following packages and their dependancies if they are not already installed:
sudo apt-get install mysql-server phpmyadmin tomcat6 tomcat6-admin libmysql-java
Make Required Configuration Changes
Increase Memory Limit of PHP
sudo nano /etc/php5/apache2/php.ini
Increase upload_max_filesize from 2M to 20M
This will allow you to import the database using phpmyadmin
Create a symbolic link for the mysql-java connector in tomcat
sudo ln -s /usr/share/java/mysql-connector* /usr/share/tomcat6/lib/
Change the ubuntu default settings in tomcat6
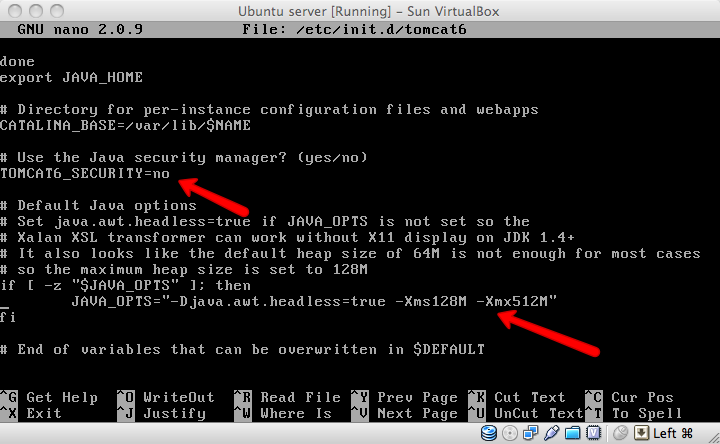
sudo nano /etc/default/tomcat6
- Increase tomcat memory by adding the following to the JAVA_OPTS line: -Xms128M -Xmx512M (This amount of memory seems to work well for me.)
- Disable the tomcat6 java security manager by changing the following line from the default '=yes' to: TOMCAT6_SECURITY=no. I'm no java security expert but from my reading this default setting is probably overkill and the webapp won't run with it turned on. Please correct me if there's a better way.

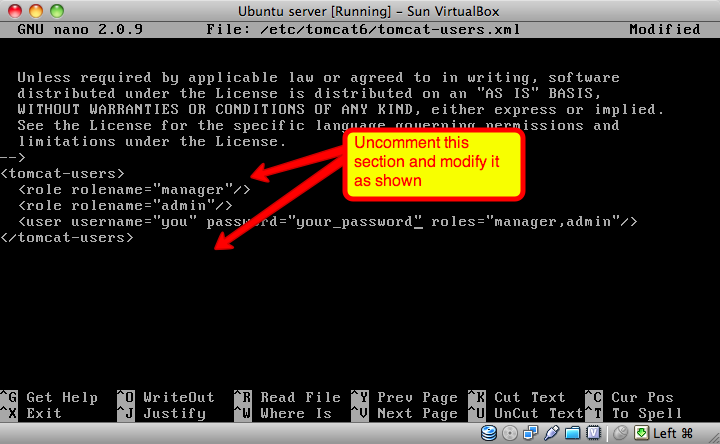
- Add a user to tomcat with admin and manager roles so you can access the web-manager
sudo nano /etc/tomcat6/tomcat-users.xml

Restart the services:
- Restart apache
sudo /etc/init.d/apache2 restart
- Restart tomcat
sudo /etc/init.d/tomcat6 restart
Note: if you get the message "Could not reliably determine the server’s fully qualified domain name, using 127.0.1.1 for ServerName" starting Apache, then you need to edit /etc/apache2/httpd.conf (which will initially be empty) to contain the one line
ServerName localhost
Then restart apache and the error should not appear.
Now we are ready to install OpenVPMS
Firstly, need to get the IP address of your server? Use the ifconfig command.
OpenVPMS installation instructions to follow
Enable OpenVPMS Logging in Ubuntu
Ubuntu mucks up the path for the log files to be written so by default it is trying to right them in the root directory and gets permission denied so you don't get any output.
To fix it correct the path in the log4.properties file in your OpenVPMS install:
sudo nano /var/lib/tomcat6/webapps/openvpms/WEB-INF/classes/log4j.properties
Change log4j.appender.fileout.File=openvpms.log to log4j.appender.fileout.File=/var/lib/tomcat6/webapps/openvpms.log
and
Change log4j.appender.fullout.File=openvpms-full.log to log4j.appender.fullout.File=/var/lib/tomcat6/webapps/openvpms-full.log
Now save your changes and restart tomcat and your log files should now be there.
Install Openoffice headless as a service in Ubuntu
It's taken me forever to figure out to get this going so now that I've found it out here's the solution (thanks to this post: http://code.google.com/p/openmeetings/wiki/OpenOfficeConverter#Starting_OO_in_headless_with_Version_OpenOffice_3.0_++)
First of all install the headless openoffice from the repositories:
sudo apt-get install openoffice.org-headless openoffice.org-writer openoffice.org-draw
The 2 latter packages are required or you will get an error message: This url is not supported
Now you need to create a script to start it as a service:
sudo nano /etc/init.d/openoffice.sh
Paste the following code into that file:
#!/bin/bash
# openoffice.org headless server script
#
# chkconfig: 2345 80 30
# description: headless openoffice server script
# processname: openoffice
#
# Author: Vic Vijayakumar
# Modified by Federico Ch. Tomasczik
#
OOo_HOME=/usr/bin
SOFFICE_PATH=$OOo_HOME/soffice
PIDFILE=/var/run/openoffice-server.pidset -e
case "$1" in
start)
if [ -f $PIDFILE ]; then
echo "OpenOffice headless server has already started."
sleep 5
exit
fi
echo "Starting OpenOffice headless server"
$SOFFICE_PATH -headless -nologo -nofirststartwizard -accept="socket,host=127.0.0.1,port=8100;urp" & > /dev/null 2>&1
touch $PIDFILE
;;
stop)
if [ -f $PIDFILE ]; then
echo "Stopping OpenOffice headless server."
killall -9 soffice && killall -9 soffice.bin
rm -f $PIDFILE
exit
fi
echo "Openoffice headless server is not running."
exit
;;
*)
echo "Usage: $0 {start|stop}"
exit 1
esac
exit 0
Exit the nano text editor saving the file as you do.
Now make the script executable:
sudo chmod 0755 /etc/init.d/openoffice.sh
Make it start automatically on reboot by executing this command:
sudo update-rc.d openoffice.sh defaults
Now start the service by running
sudo /etc/init.d/openoffice.sh start
Now all should be good!