Create/Edit Payment
This is the screen used to create and edit customer payments.

The header fields are as follows:
|
The amount of the current invoice, if any. |
|
The customer's current overdue balance. |
|
The date on which the payment was created. |
|
The amount of the payment - this is the sum of the line item amounts. |
|
This checkbox will be checked when the payment is printed. |
|
This is initially set to Finalised, and can also be set to In Progress or On Hold. |
|
The customers balance at the end of the last accounting cycle. |
|
The total balance owed by the customer. |
|
Any relevant notes. |
|
Any appropriate reference number/code. |
|
The till into which the money is to be paid. |
|
The practice location where the payment was created. |
The Items tab allows you to add, delete, view and edit the item items. The buttons allows you to select the payment type to be one of EFT, Cash, Cheque, Credit Card, Other, or Discount. Note that the last is a 'negative' payment - you can use this payment type to include a discount for the customer.
By default, an EFT payment is added. The default payment type can be changed using the Default Payment Type Practice option.
The table shows the line items - normally there will be only one, but multiple are supported for split payments.
The item detail area changes depend on the payment type, as described below.
EFT
The EFT fields are as follows:
|
This will default to the amount owed. |
|
Enter any cash out amount. |
|
Allows the EFTPOS terminal to be selected, if there are EFTPOS terminals linked to the selected Till. |
When an EFTPOS Terminal is selected, clicking Apply or OK initiates communication with the terminal.
Cash
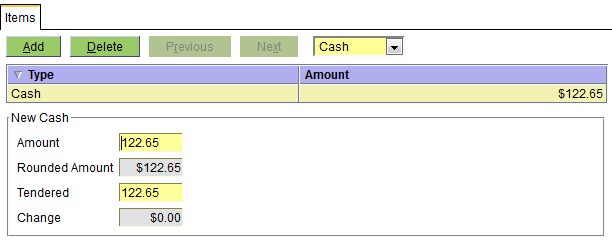
The Cash fields are as follows:
|
This will default to the amount owed. |
|
This is the rounded equivalent of Amount using the minimum cash denomination and rounding mode set for the currency - see Administration - Lookups - Currency. |
|
The amount tendered. |
|
This will be Tendered less Rounded Amount. |
Cheque

The Cheque fields are as follows:
|
This will default to the amount owed. |
|
The name of the drawer of the cheque. |
|
Something that identifies the branch of the bank. For Australian usage this is the BSB (Bank State Branch) number. |
|
Select the bank using the pull-down. The values allowed are set via Administration - Lookups - Bank. |
Credit Card

The Credit Card fields are as follows:
|
This will default to the amount owed. |
|
Select the credit card using the pull-down. The values allowed are set via Administration - Lookups - Credit Card. |
Other

The Other fields are as follows:
|
This will default to the amount owed. |
|
Select the payment type using the pull-down. The values allowed are set via Administration - Lookups - Custom Payment Type. |
Discount
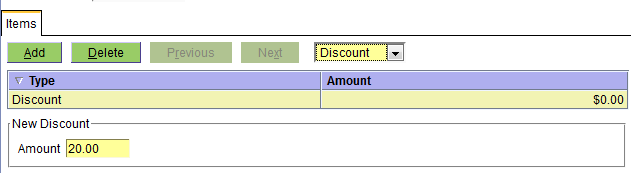
The Discount fields are as follows:
|
The discount amount being given. |
Payment Allocation
If a payment covers charges being claimed in a current gap Insurance Claim, an Allocate Payment window will be displayed.
This allows the user to allocate the payment to different charges; if a gap insurance claim is paid by the customer, they cannot claim the benefit amount.
The window displays:
|
The order in which the payment will be allocated to charges |
|
The charge identifier |
|
The charge type |
|
The charge date |
|
The total charge amount. An insurance claim may claim part of this total. |
|
The amount of the charge that has been paid already. |
|
The amount of the charge still to pay |
|
How much of the payment is being allocated to the charge |
|
Any charge notes |
|
The clinician responsible for the charge, if any. |
|
Ticked if part or all of the charge is being claimed. |
The payment will be allocated to the first charge. If there any remaining funds, it will be allocated to the second, and so on.
The allocation order can be changed by selecting one of the charges, and using the Move Up or Move Down buttons.
Any Insurance Claim that claims the selected charge will be summarised beneath the allocation table.
If OK is clicked, and the payment is:
- allocated to one or more charges being claimed, a Pay Claim window will be displayed.
- not allocated to any claimed charges, the payment window will close
Pay Claim
The Pay Claim window is displayed if a payment is allocated to a charge being claimed in a current gap Insurance Claim.
The window displays:
|
The patient that the claim is for |
|
The insurer that is handling the claim |
|
The total claim amount |
|
The amount the insurer has agreed to pay |
|
The total amount the customer must pay |
|
The amount the customer has already paid |
|
The current allocation towards paying the claim |
Clicking OK confirms payment towards the claim.
Clicking Cancel returns to the Allocate Payment window.