Account
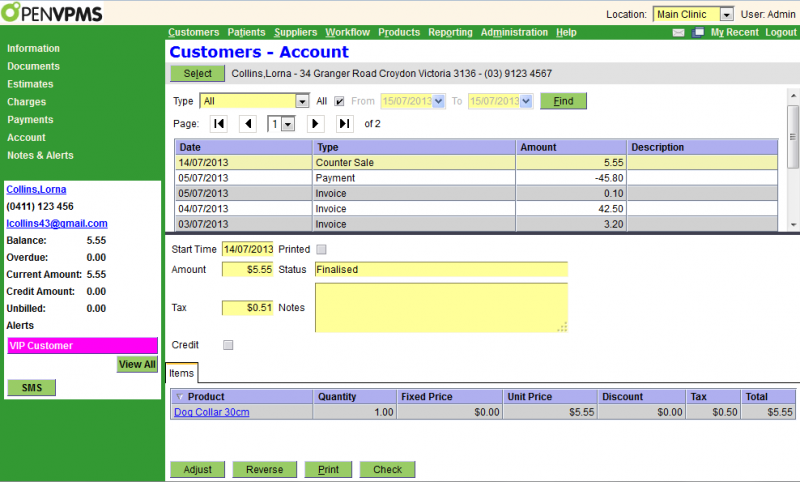
This screen displays the account for the current customer - or if there is no current customer, a Select button allowing you to select a customer.
Note this screen displays the completed financial transactions (ie invoices, payments, etc etc). If you need to look at invoices and payments that are in progress, then you need to use the Customers|Charges or Customers|Payments screens. See also Concepts|Accounting for background information.

The top half of this screen functions like a standard select screen. As well as by date, you can select by:
Type - this can be set to All (ie all transaction types), or one of the various transaction types (just that type)
The bottom half of the screen shows the selected transaction (in the above example a Counter Sale), as well as any line items in the transaction.
The display data will change for each transaction type with the exception of Allocation. If you need help with the meaning of the fields, consult the Charges, Payments and Adjustments documentation.
The Buttons are as follows:
Edit - administratively change the payment types for finalised payments.
This can be used to correct payment types.
If a payment type is changed (e.g., an EFT replaced with Cash), this will be displayed in an Audit field on the payment, including the time and user name of the person who made the change.
Statement - print, preview, or email a statement for the customer.
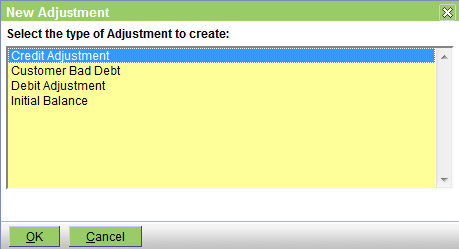
Adjust - this allows you to create an adjustment transaction. A confirmation window will open to allow you to select the transaction type.
Reverse - this will generate a transction that will reverse the effects of the selected one. A confirmation window will appear, and if you OK this, the appropriate transaction will be created. This will have its Notes field set to identify the reversed transaction - eg "Reversal of Invoice 123456". Note that you cannot reverse a transaction that has previously been reversed - if you do attempt to do this a message will be displayed giving the Id of the reversing transaction.
By default, when reversing a transaction in the current accounting period, both the reversing and reversed transactions will be flagged as hidden - this option is shown on the confirmation window. However, when reversing a transaction in a prior period, the reversing and reversed transactions will not be hidden - BUT if necessary you can use the Hide button to manually hide them (but this may/will cause 'unbalanced hidden transaction' problems when you print the statement). See also Concepts|Accounting|Hidden Transactions.
Print - prints the selected transaction.
Mail - emails the selected transaction.
Check - checks the customer's balance.
Hide - sets the 'Hide' flag of the selected transaction. The button will only be displayed if the transaction can be hidden, ie it has been reversed, or be a reversal. The transaction will be hidden in customer statements.
Unhide - unsets the 'Hide' flag of the selected transaction. The button will only be displayed if the transaction is flagged as 'Hidden'. The transaction will be displayed in customer statements.
Enable Reminders - turns on the Send Reminder flag on the selected Invoice or Counter Sale.
Disable Reminders - turns off the Send Reminder flag on the selected Invoice or Counter Sale.
Note that the Edit, Check, Hide, and Unhide buttons will not be displayed unless the user is a member of the Administrator category - see Concepts|Users.
Allocation
The Allocation tab in each transaction displays:
- Allocated Amount - the total amount that has been allocated.
E.g., for invoices this is how much of the invoice that has been paid off - Unallocated Amount - the amount left to allocate.
E.g., for invoices this is how much of the invoice that is left to be paid - the individual transactions that were allocated
Statement
This window can be used to print, preview and email customer statements.
The fields are:
|
Print the current statement for the customer. This statement is not finalised. |
|
If selected, any Completed charges will be included when printing the current statement. These are excluded by default, as they can still be edited. By default, only Finalised charges are included. |
|
If selected, include an indicative accounting fee for overdue charges when printing the current statement. |
|
Print an issued statement. If a customer has no statements, this will not be displayed. |
|
Print all transactions between the two dates inclusive. |
|
Shows the default printer for the current location, if this is defined (see Administration - Organisation- Practice Location), otherwise the first available printer. Use the pull-down to select the required printer. |
|
Sets the number of copies required. |
Press:
|
to print on the selected printer |
|
to cancel printing |
|
to generate and display a copy of the statement as a PDF. |
|
|
to generate a copy of the statement and bring up an email window to email it. |
Adjustments
This is the upper level page for the various adjustment transactions.
Note that you can only create an Initial Balance transaction for an account that has no other tranactions.
Bad Debt Adjustment
This screen is used to create a Bad Debt Adjustment.

The fields are as follows:
Date - the date of the transaction - defaults to the current date
Amount - the tax-included amount of the bad debt adjustment
Tax - this shows the tax included in the above amount
Status - the is set to POSTED and cannot be changed
Notes - any applicable notes
Reference - any applicable reference number/code
Credit - this is always unchecked
Printed - this box will be ticked after the transaction is printed
Credit Adjustment
This screen is used to create a Credit Adjustment.

The fields are as follows:
Date - the date of the transaction - defaults to the current date
Amount - the tax-included amount of the credit adjustment
Tax - this shows the tax included in the above amount
Status - the is set to POSTED and cannot be changed
Notes - any applicable notes
Reference - any applicable reference number/code
Credit - this is always checked
Printed - this box will be ticked after the transaction is printed
Debit Adjustment
This screen is used to create a Debit Adjustment.

The fields are as follows:
Date - the date of the transaction - defaults to the current date
Amount - the tax-included amount of the debit adjustment
Tax - this shows the tax included in the above amount
Status - the is set to POSTED and cannot be changed
Notes - any applicable notes
Reference - any applicable reference number/code
Credit - this is always unchecked
Printed - this box will be ticked after the transaction is printed
Opening Balance
This screen is used to create an Opening Balance transaction. You only need this if, for some reason, you want to bring a new customer on board with a non-zero opening balance.

The fields are as follows:
Date - the date of the transaction - defaults to the current date
Amount - the tax-included amount of the opening balance
Tax - this shows the tax included in the above amount
Status - the is set to POSTED and cannot be changed
Notes - any applicable notes
Reference - any applicable reference number/code
Credit - this is always checked
Printed - this box will be ticked after the transaction is printed
Balance Check
When you press theCheck button on the Customers|Account screen, one of the following windows will be displayed:

Press OK to regenerate the balance, or Cancel to abort.
If there is no problem, then the window will be displayed as follows - press OK to close it.

Confirm Adjust
This window allows you to select the type of adjustment transaction to be created. Select the required one and press OK, else Cancel to abort.
Note that you can only create an Initial Balance transaction for an account that has no other tranactions. The 'Initial Balance' option will not be present if the customer has other accounting transactions.

Confirm Reverse
When you press the Reverse button on the Customers|Account screen to reverse a transaction, a confirmation window will appear.
The fields are as follows:
- Notes - notes to include in the reversal. This defaults to "Reversal of <Transaction Type> <Transaction Id>"
- Reference - the reversal reference. This defaults to the identifier of the transaction being reversed
- Suppress transaction and reversal in customer statement - this option is displayed if the transaction being reversed is not hidden, and not from a prior statement. If selected, it enables transactions and their reversals to be hidden in customer statements.
Press OK to confirm or Cancel to abort.