Schedule
This screen is used to create/edit/view the Schedules. These together with the views (see Organisation|Schedule View) determine how the Workflow|Scheduling screen works. It also sets options to control the check-in behaviour.
The fields are as follows:
Name - the name of the schedule
Description - serves to clarify the name
Slot Size - the size of each slot in the schedule.
Max Duration - the maximum duration for an appointment or calendar block. This is used to improve query response times. For daily schedules, this should be no longer than 24 hours. For boarding schedules, it should be no greater than the maximum boarding period.
Allow Double Booking - check this box to allow multiple appointments to be scheduled at the same time.
Active - uncheck this box to deactivate the schedule. Note that if you do deactivate a schedule because it is no longer needed, then you should also remove this schedule from any schedule views in which it is used, otherwise the Workflow|Scheduling screen will happily display and let you use a schedule that has been deactivated.
Start & End Time - these define the work day - ie the times between which appointments can be booked. If left unset, they default to 08:00 to 18:00 respectively. Enter either in hh:mm or hhmm format. If you enter just the hour the minute portion will be set to the current time (ie 9 yields 9:13 if the current time is 11:13).
If you set say 18:00 as the end time, then the last slot shown on the schedule will start at the slot size before this, ie 17:45 if you have a 15 minute slot size.
For a practice that operates on a 24 hour basis, you should set the start time to 00:00 and the end to 24:00.
Use All Work Lists - if this box is checked, then when an appointment if checked-in from this schedule, you will be able to choose any work list, otherwise only the worklists defined in the Work Lists tab will be available
Input Weight - if this box is checked, then as part of the check-in, the New Weight screen will be displayed so that the patient's weight can be entered
Use All Templates - if this box is checked, then as part of the check-in, all patient form and letter document templates will be displayed for you to select from, otherwise only those defined in the Templates tab will be available
Send Appointment Reminders - if this box is checked, SMS reminders may be sent automatically for appointments in the schedule. If not checked, then SMS reminders can still be sent manually.
Online Booking - determines if this schedule is available for online booking
Online Booking Times - specifies alternative times to the Start and End Times for online bookings.
Location - this field is mandatory and is used to set the Practice Location to be associated with this schedule when sending out SMS appointment reminders.
Cage Type - identifies a schedule as being a physical cage, used for boarding or in-hospital stay.
Views tab - used to set the Schedule Views which this Schedule is included in
Appointments Types tab - as shown below, this is used to view, add and delete the Appointment Types that are valid for this Schedule.

The fields are as follows:
Appointment Type - the appointment type (the available types are determined by the Administration|Types|Appointment screen)
No of Slots - the lenght of this appointment type in this schedule
Default - check this box if this is the default appointment type.
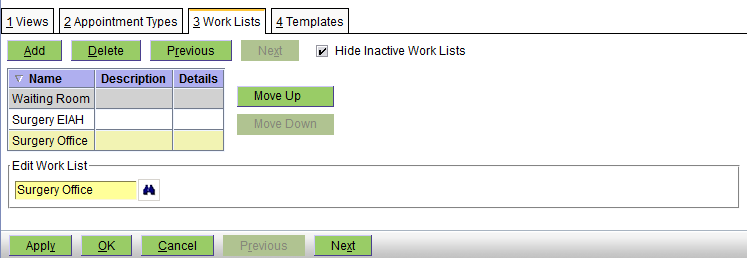
Work Lists tab - as shown below, this is used to view, add and delete the Work Lists you can choose from when checking-in an appointment on this schedule.
These only apply when Use All Work Lists is not selected.
If a Work List has its Default flag selected, it will be pre-selected at patient Check-In.
The Work List flagged as the Default will be pre-selected

Templates tab - as shown below, this is used to view, add and delete the patient form and letter document templates that will be presented to choose from when checking-in an appointment to this schedule.
The templates will only be used if Use All Templates is not selected.
As you can see you can add, delete and modify the list of templates.
The Print option allows a template to be pre-selected for printing. Use this if a template is always printed when a patient is checked in to the schedule.
Select
This is the screen used to select a Schedule. It works like a standard select screen.