Linux
install problem
Tony, I'm trying to do a fresh build, and I'm failing at the step To build the archetypes: > cd openvpms-archetypes > maven -Dmaven.test.skip jar:install Based on the error (shown below) and poking around the ibibio site, it looks like at least one of the directories that it's looking for do not exist. Where would I fix this? Thanks Lee Error text: __ __ | \/ |__ _Apache__ ___ | |\/| / _` \ V / -_) ' \ ~ intelligent projects ~ |_| |_\__,_|\_/\___|_||_| v. 1.0.2 Attempting to download spring-aop-1.2.5.jar. Error retrieving artifact from [http://www.ibiblio.org/maven/springframework/jar s/spring-aop-1.2.5.jar]: java.io.IOException: Unknown error downloading; status code was: 301 WARNING: Failed to download spring-aop-1.2.5.jar. Attempting to download aopalliance-1.0.jar. Error retrieving artifact from [http://www.ibiblio.org/maven/aopalliance/jars/ao palliance-1.0.jar]: java.io.IOException: Unknown error downloading; status code was: 301 WARNING: Failed to download aopalliance-1.0.jar. Attempting to download drools-all-jdk5-2.1.jar. Error retrieving artifact from [http://www.ibiblio.org/maven/drools/jars/drools- all-jdk5-2.1.jar]: java.io.IOException: Unknown error downloading; status code w as: 301 WARNING: Failed to download drools-all-jdk5-2.1.jar. Attempting to download janino-2.3.8.jar. Error retrieving artifact from [http://www.ibiblio.org/maven/janino/jars/janino- 2.3.8.jar]: java.io.IOException: Unknown error downloading; status code was: 301 WARNING: Failed to download janino-2.3.8.jar. Attempting to download commons-beanutils-core-1.7.0.jar. Error retrieving artifact from [http://www.ibiblio.org/maven/commons-beanutils/j ars/commons-beanutils-core-1.7.0.jar]: java.io.IOException: Unknown error downlo ading; status code was: 301 WARNING: Failed to download commons-beanutils-core-1.7.0.jar. Attempting to download oro-2.0.8.jar. Error retrieving artifact from [http://www.ibiblio.org/maven/oro/jars/oro-2.0.8. jar]: java.io.IOException: Unknown error downloading; status code was: 301 WARNING: Failed to download oro-2.0.8.jar. The build cannot continue because of the following unsatisfied dependencies: spring-aop-1.2.5.jar (try downloading from http://www.springframework.org/) aopalliance-1.0.jar (try downloading from http://www.aopalliance.org/) drools-all-jdk5-2.1.jar (try downloading from http://drools.codehaus.org/) janino-2.3.8.jar (try downloading from http://www.janino.net/) commons-beanutils-core-1.7.0.jar (try downloading from http://jakarta.apache.org /commons/jxpath/) oro-2.0.8.jar (try downloading from http://jakarta.apache.org) Total time: 9 seconds Finished at: Sun Jan 14 23:10:54 EST 2007 C:\openvpms\openvpms-archetypes>Installing on FreeBSD...
Hi:
Just wondering if anyone has tried installing this on FreeBSD 7.0 RELEASE?
We have Tomcat5.5, Mysql 5.0.33, Sun JDK 1.5.0_13 running on a FreeBSD Machine and I can't seem to figure out how to get the database loaded.
If anyone has any experience or installation instructions, I would appreciate your help....
Regards,
Fred Schnittke
How to Setup Ubuntu Server ready to Install OpenVPMS
Install the Operating System
Install the appropriate Ubuntu Server operating system. If want a GUI you can do this with ubuntu desktop and then install all the dependencies as described. This setup has been tested on Ubuntu 9.10 but should work at least on 8.10 or more recent. If you are installing the server edition install mysql, tomcat6, LAMP stack and printer server when prompted during the installation process.
Install Required Software
From a command prompt install the following packages and their dependancies if they are not already installed:
sudo apt-get install mysql-server phpmyadmin tomcat6 tomcat6-admin libmysql-java
Make Required Configuration Changes
Increase Memory Limit of PHP
sudo nano /etc/php5/apache2/php.ini
Increase upload_max_filesize from 2M to 20M
This will allow you to import the database using phpmyadmin
Create a symbolic link for the mysql-java connector in tomcat
sudo ln -s /usr/share/java/mysql-connector* /usr/share/tomcat6/lib/
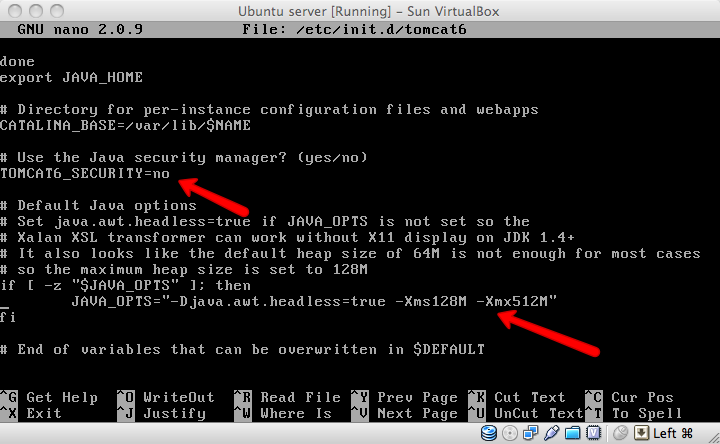
Change the ubuntu default settings in tomcat6
sudo nano /etc/default/tomcat6
- Increase tomcat memory by adding the following to the JAVA_OPTS line: -Xms128M -Xmx512M (This amount of memory seems to work well for me.)
- Disable the tomcat6 java security manager by changing the following line from the default '=yes' to: TOMCAT6_SECURITY=no. I'm no java security expert but from my reading this default setting is probably overkill and the webapp won't run with it turned on. Please correct me if there's a better way.
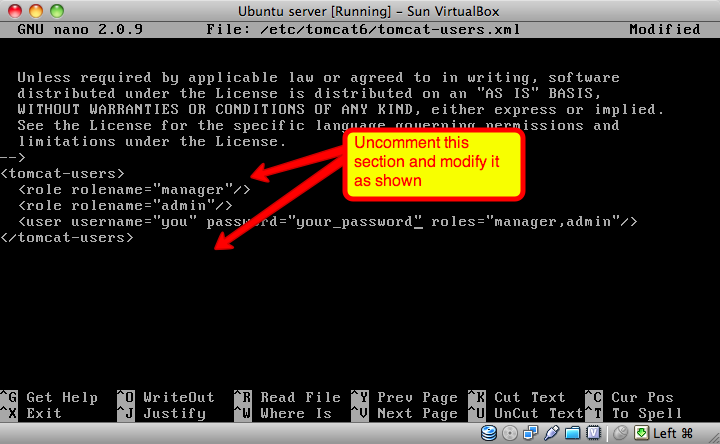
- Add a user to tomcat with admin and manager roles so you can access the web-manager
sudo nano /etc/tomcat6/tomcat-users.xml
Restart the services:
- Restart apache
sudo /etc/init.d/apache2 restart
- Restart tomcat
sudo /etc/init.d/tomcat6 restart
Note: if you get the message "Could not reliably determine the server’s fully qualified domain name, using 127.0.1.1 for ServerName" starting Apache, then you need to edit /etc/apache2/httpd.conf (which will initially be empty) to contain the one line
ServerName localhost
Then restart apache and the error should not appear.
Now we are ready to install OpenVPMS
Firstly, need to get the IP address of your server? Use the ifconfig command.
OpenVPMS installation instructions to follow
Enable OpenVPMS Logging in Ubuntu
Ubuntu mucks up the path for the log files to be written so by default it is trying to right them in the root directory and gets permission denied so you don't get any output.
To fix it correct the path in the log4.properties file in your OpenVPMS install:
sudo nano /var/lib/tomcat6/webapps/openvpms/WEB-INF/classes/log4j.properties
Change log4j.appender.fileout.File=openvpms.log to log4j.appender.fileout.File=/var/lib/tomcat6/webapps/openvpms.log
and
Change log4j.appender.fullout.File=openvpms-full.log to log4j.appender.fullout.File=/var/lib/tomcat6/webapps/openvpms-full.log
Now save your changes and restart tomcat and your log files should now be there.
Install Openoffice headless as a service in Ubuntu
It's taken me forever to figure out to get this going so now that I've found it out here's the solution (thanks to this post: http://code.google.com/p/openmeetings/wiki/OpenOfficeConverter#Starting_OO_in_headless_with_Version_OpenOffice_3.0_++)
First of all install the headless openoffice from the repositories:
sudo apt-get install openoffice.org-headless openoffice.org-writer openoffice.org-draw
The 2 latter packages are required or you will get an error message: This url is not supported
Now you need to create a script to start it as a service:
sudo nano /etc/init.d/openoffice.sh
Paste the following code into that file:
#!/bin/bash
# openoffice.org headless server script
#
# chkconfig: 2345 80 30
# description: headless openoffice server script
# processname: openoffice
#
# Author: Vic Vijayakumar
# Modified by Federico Ch. Tomasczik
#
OOo_HOME=/usr/bin
SOFFICE_PATH=$OOo_HOME/soffice
PIDFILE=/var/run/openoffice-server.pidset -e
case "$1" in
start)
if [ -f $PIDFILE ]; then
echo "OpenOffice headless server has already started."
sleep 5
exit
fi
echo "Starting OpenOffice headless server"
$SOFFICE_PATH -headless -nologo -nofirststartwizard -accept="socket,host=127.0.0.1,port=8100;urp" & > /dev/null 2>&1
touch $PIDFILE
;;
stop)
if [ -f $PIDFILE ]; then
echo "Stopping OpenOffice headless server."
killall -9 soffice && killall -9 soffice.bin
rm -f $PIDFILE
exit
fi
echo "Openoffice headless server is not running."
exit
;;
*)
echo "Usage: $0 {start|stop}"
exit 1
esac
exit 0
Exit the nano text editor saving the file as you do.
Now make the script executable:
sudo chmod 0755 /etc/init.d/openoffice.sh
Make it start automatically on reboot by executing this command:
sudo update-rc.d openoffice.sh defaults
Now start the service by running
sudo /etc/init.d/openoffice.sh start
Now all should be good!
Linux Install Guide
Introduction
This guide describes how to install OpenVPMS on your veterinary clinic.
The guide is intentionally brief and describes the most typical installation for OpenVPMS. After completing the installation, you will be ready to start using OpenVPMS for your veterinary clinic.
Installation checklist
OpenVPMS will run on most standard Sun JavaEE environments with an additional component of OpenOffice (used for document generation). You will need to make sure your einvornment includes:
- Java Development Kit
- Java Application Server
- Relational database with a type 4 database driver
- OpenOffice (headless version)
We have tested the following Sun JavaEE environments
- Apache Tomcat with mySQL
- IBM WebSphere Application Server Community Edition with mySQL and mySQL Connector/J
Note: Sun JavaEE applications like OpenVPMS can run on many different type of operating systems like Microsoft Windows, Mac OS X, Linux and more!
If you need help installing the prerequiste software, please see the Install Guide for those products.
Download and Install OpenVPMS
To perform the installation you will need to download and unpack the OpenVPMS installation files.
Download the latest installation archive from: http://www.openvpms.org/download
After downloading, unpack the ZIP file in a directory - <openvpms_tmp>.
Install the OpenVPMS database schema
Configures the database to store data using UTF8 (to support english and double-byte characters like Chinese). By default, mysql uses latin1 instead of UTF8 to store data. You need to add a configuration setting into your database so that the server and client does everything by UTF8.
MySQL Configuration - Linux (my.cnf) or Windows (my.ini):
[mysqld]
character-set-server=utf8
default-collation=utf8_unicode_ci

[client]
default-character-set=utf8
This populates the database with the database structure.
	Linux/Windows:
cd <openvpms_tmp>
cd db
mysql -u root -p
mysql> drop database openvpms;
mysql> source createdb.sql;
mysql> use openvpms;
mysql> source db.sql;
mysql> quit;
Note: This will create a database "openvpms" with username of "openvpms" and password of "openvpms".
Load default OpenVPMS data
This will load the database with the initial data needed for the application. It will setup a one vet veterinary clinic in Australia.
	Linux:
cd <openvpms_tmp>
cd bin
./dataload.sh setup

Windows:
cd <openvpms_tmp>
cd bin
dataload.sh setup
Note: This will create an administrator user account with username of "admin" and password of "admin". Retain this information for later when we first login to the system.
Configure the Java Application Server to support JasperSoft Reporting
JasperSoft needs to be configured to run in a headless mode for it to generate reports like invoices.
	Linux with IBM WebSphere Application Server Community Edition:
export GERONIMO_OPTS=-Djava.awt.headless=true

Linux with Apache Tomcat:
export CATALINA_OPTS=-Djava.awt.headless=true
Note: Suggested to put environmental settings in your shell startup so that you do not need to execute the command at each time before Java Application Server startup.
Start the OpenOffice daemon
OpenVPMS uses OpenOffice for form generation. As a result, we have to run OpenOffice in a headless mode so that when we generate form slike vaccinations certificates.
	Linux:
soffice.bin -headless -nofirststartwizard -accept="socket,port=8100;urp;" &
Note for Linux: It may help that you add soffice.bin in your path and make the OpenOffice daemon a startup service.
Start the OpenVPMS Document Import daemon
OpenVPMS has the ability to automatically import customer and patient records and patient investigations into the system. This daemon uses the automatic scheduling utility ("at" in Microsoft Windows or "cron" in Linux) provided by the operating system.
	Linux/Windows:
mkdir <openvpms-tmp>/docimport <openvpms-tmp>/docarchive
Within your automatic scheduling utility, set the OpenVPMS document import daemon to run.
	Linux:
echo "cd <openvpms-tmp>/bin/" > /etc/cron.hourly/openvpms-docimport.sh
echo "./docload.sh --byid --source <openvpms-tmp>/docimport --dest <openvpms-tmp>/docarchive --verbose" >> /etc/cron.hourly/openvpms-docimport.sh
chmod 755 /etc/cron.hourly/openvpms-docimport.sh
Install the Database type 4 driver
A database type 4 driver is used to connect the Java Application Server to the database.
Download and copy the mySQL connector/j jar file to <java_home>/jre/lib/ext. This will allow you to skip manually modifying your Java classpath.
Start the Java Application Server daemon
Follow the startup instructions in your Java Application Server.
Install the OpenVPMS Sun JavaEE Web Application Archive (WAR)
Follow the instructions in your Java Application Server to install WARs.
Start the OpenVPMS Sun JavaEE application
Follow the instructions in your Java Application Server to start WARs.
Configure the OpenVPMS
You're almost done. You'll need to setup Scheduling and Work List and once you're done, you'll have a fully working veterinary practice management software system.
Logging in for the first time
By default, the application would be available at http://localhost:8080/openvpms/. Use the username of "admin" and password of "admin" to first login to the system.
Setting up Scheduling
Navigate to "Administration" -> "Organization". Modify the "Main Appointment Schedule" and "Main Surgery Schedule" with start and end hours. Create a new "Schedule View" called "Schedule View". Add the "Main Appointment Schedule" and "Main Surgery Schedule". Click "Ok". Navigate back to "Administration" -> "Organization" and find "Main Clinic". Edit the "Main Clinic" and in the "Scheduling Views", add the "Schedule View" you just created. Save, logout and then re-login and you should be able to navigate to "Scheduling" and be able to add, modify and remove appointments.
Setting up Work List
Navigate to "Administration" -> "Organization". Create a new "Work List View" called "Work List View". Add the "Main Hospital List" and "Main WaitingList". Click "Ok". Navigate back to "Administration" -> "Organization" and find "Main Clinic". Edit the "Main Clinic" and in the "Work List Views", add the "Work List View" you just created. Save, logout and then re-login and you should be able to navigate to "Work List" and be able to add, modify and remove customers/clients on and off lists.
Note: Stock/Inventory Management module is not enabled by default.
Congratuations!
Your veterinary practice management software is now installed!
From this point, here are some other things you might need to customize before "production" use.
- Load customers
- Load patients
- Load products
- Documents templates
- And more!