Online Documentation (1.7)
This is the top level page for the online documentation for OpenVPMS version 1.7
Whilst most of these pages have been created to provide help when you press Alt-F1, the information can also be browsed like a book. The structure basically follows that of the OpenVPMS menu system. However, there are also Introduction, Concepts, and Reference sections.
New users should browse the Introduction and Concepts sections.
Note also that if you scroll these help pages down to the bottom you will find a navigation section that you can use to jump to any other page.
Introduction
This section contains basic information to help you use the system.
Screen Layout
The screen below (actually the screen displayed immediately after you log in) shows the standard layout used by OpenVPMS.

The various areas are as follows:
(1) The top menu allows you select the 'workspace' that you require, ie Customers, Patients, etc. You select by clicking the required item, or by keying Alt-x where x is the underlined letter (eg C for Customers, T for Patients). Note that this Alt-x shortcut is also available with the various buttons, Alt-L for the Select button, Alt-N for the New button.
(2) The left menu (which is different for each workspace) lets you select the sub-component. There are no Alt-x shortcuts here, you click on the required item.
(3) The blue title (in this case 'Customer - Information') shows the workspace/component that you have selected.
(4) The lower left part of the screen is used to display relevant information. Thus, if a customer has been selected this will show their account details and any alerts.
(5) This is the main working area of the screen. As you can see in this case (because in this snapshot there is no current customer) it contains only a Select and a New button.
(6) The upper right of the screen contains the following:

These items are as follows:
(1) Location: this shows the current Practice Location. Depending on what your administrator has set up, you may or may not be able to select another location.
(2) User: this shows the User Id that you have logged on with.
(3) Clicking the envelope icon will take you to the messages screen. The envelope will have a small red indicator in its top right corner if you have unread messages. (This is showing in the above.)
(4) Clicking the new screen icon will open another window. This is useful if you want to keep the current screen as is, but lookup or do something else. When you are finished with the other window you just close it or leave it open and switch back to the other one. When you log off, you will be warned if you have other windows open. If you are getting synchronisation errors, see here.
(5) Clicking 'My Recent' (or using the Alt-Y shortcut) opens a window displaying the customers and patients that you have been working with so that you can quickly re-select them. Note that this information is forgotten when you log out.
(6) Clicking Logout will log you out.
Getting Around
OpenVPMS provides links and keyboard shortcuts to help you efficiently navigate around the system.
If you look at the typical screen below, you will see the following:
- Certain items on the screen are shown in blue with an underline (ie Bourke,Johanna, bourke[at]foo.com[dot]au, and Muffett). This indicates that you can click these and jump to the appropriate screen. Note that if you try the first, you will find that it does not appear to do anything. This is because it takes you to the Customer Information screen and we are already there. If you click on Charges, and then on the customer name, you will be returned to the information screen.
- Many of the menu and button names have a single letter underlined (eg the t in Patients, the S in Suppliers, the l in Select). This indicates that holding down the Alt key on the keyboard and pressing the underlined letter is the equivalent of clicking the menu item or button.
- All the items that can be clicked change colour/background when you hover the mouse over them. You can see that 'Charges' in the left panel has changed.
NOTE: Don't try to use your browser's Back button to get to a previous screen - you will immediately be logged out.

Clicks and Keys
Clicks
OpenVPMS, because it runs in a web browser, does not recognise double clicks. So if you are a windows person used to double clicking on things then you may get confused.
Always use single clicks - or if you like to think on it this way, a slow double click.
So for example, on the schedule screen, to create a new appointment, don't double click the time slot, click it once (to make the New... appear) and then again to create the appointment.
Similarly, on the products (or any other select) screen, click the item of interest to select it, and then click again to open it for editing.
Keys
The following keys are really useful:
Alt-F - Holding down Alt and then pressing the F key is equivalent to clicking the Find button. Hence on the Schedule or Work List (or any other select) screen, you can use Alt-F to cause a refresh of what you are looking at.
Enter - Pressing the Enter key means ‘do want you can with the stuff I have entered’. On a select screen, with the cursor in a search field, it is equivalent to pressing the Find button; on a data entry window, with the cursor in any data field, it will expand any macros, do any propercasing and look up any search fields.
Note however, that pressing the Enter key is not equivalent to pressing the Apply button because the record will not be saved until you press either Apply or OK.
Tab - Pressing the Tab key will jump you to the next field on the screen, Shift-Tab to the previous one.
PgUp/PgDn - where information is being presented in pages (like on the Products|Information screen), pressing the Page Up and Down keys will display the previous/next page of data - provided that you currently have one of the data items selected. (That is, if you have the cursor positioned in one or the select fields, then the Page Up and Down keys will have no effect.)
Common Buttons
The following table shows the buttons that appear on many screens.
| Button | Meaning |
|---|---|
|
Apply |
update the record with the changes made, but allow further editing to continue |
|
Cancel |
close the window without updating the record (note that any changes made by pressing the Apply button will be preserved) |
|
Delete |
delete the selected item. Note that this is normally a bad idea - it is better to Deactivate the item. Also in many cases, you will not be able to delete the item because it is referred to by others. If this is the case you will be offered the option of deactivating it. |
|
Edit |
edit the selected item. You can also normally edit an item by clicking again on the selected item. |
| New | create a new item |
| Next | go forward to the next record. If you have been editing, you will be asked if the changes are to be saved or discarded. |
| OK | update the record and close the window |
| Previous | go back to the previous record. If you have been editing, you will be asked if the changes are to be saved or discarded. |
| print the selected item | |
| View | view the selected item |
Data Entry
Below are various things that need to be understood when entering data into OpenVPMS.
The headings in this section are Data Validation, Data Search, Macros, Spelling, Dates, The Enter Key, Propercase, Note Fields, and Tab Edits.
Data Validation
For various data fields (eg species, breed), you cannot enter any value, you must select a value from a pull-down list. Click the field or its down-arrow and then click on the required value, or type the first letter to display the allowed values starting with that letter. You can also use the up and down arrow keys, the page up and down keys, and the home and end keys to navigate up and down the list of items.
Your administrator can add new values using the Administration|Lookups facility.
Data Search
Where you see the binoculars icon after a field like the following
 this means that the data search facility is available. This makes it easy to find things (in this case a product). You proceed as follows:
- Type in as much as you want (using wildcards if needed), and then either click the binoculars, or press Enter. 'b' will find all the items starting with 'b'; 'bon' those starting with 'bon', 'b%pl' those starting with a 'b' and with 'pl' somewhere in the name. Note that the case does not matter, ie 'b' or 'B' will both find items starting with 'B' or 'b'.
- If there is more than one matching item, then a select screen will be displayed showing the matches. If what you want is not there, you can adjust the selection parameters on the select screen and press its Find button.
You then click the required item and you will be returned to the data entry screen with the item filled in. - If there is only one matching item, then the select screen will not be displayed, and the name of the matching item will be filled in. For example, if only 'Bone Plate 6 Hole' matches 'b%pl', then 'Bone Plate 6 Hole' will immediately replace the 'b%pl' you typed.
- If there are no matching items, the select screen will be displayed with what you entered showing in its Search field. Adjust what you typed, eg 'bonr' to 'bone' or 'bon' and press Enter to do the search.
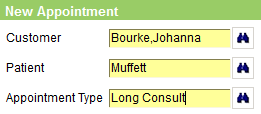
In fact, you don't need to press the Enter key or click the binoculars. When you complete your data entry by using the Apply or OK buttons, the system will check for any incomplete entries and process them. For example, on the New Appointments screen there are three fields with binoculars. You can fill in each with an abbreviated form of the entry and then press OK or Apply. If your abbreviations match only single items, then the three entries will be automatically completed. As an illustration, on the system used to create these examples, there is only one customer with a name starting 'bo', and she has only one pet with a name starting with 'm', and there is only one appointment type starting with 'l'. Hence, entering bo, m, and l in the three fields and then using Apply resulted immediately in the following:
If any of your entries do not match single items (eg Johanna had another pet called Molly), then a select screen will be presented for each non-unique entry.
Macros
The Macro facility enables you quickly enter common phrases and paragraphs.
Spelling
Because you are using a web browser, what you enter in a text field is checked by the browser's spelling checker. If this is enabled, then spelling errors will be shown with a wavy red underline, eg  . If you right-click on the word, corrections will be suggested (in this case Please or Passel). You also have the option to turn off the spelling checker.
Dates
When entering a date you can do any of the following:
- enter the date as say 15/3/13 (you can't just enter the day or day and month)
- click the pull-down icon or press the down-arrow key - this will display a date-picker calendar to use
- enter a 'relative date' using formats like
- -10w3d meaning 10 weeks and 3 days ago
- 5y3m meaning 5 years and 3 months from today
- 1m meaning one month from today
- -14d meaning 14 days ago
The Enter Key
Pressing the Enter key means ‘do what you can with the stuff I have entered’. On a Select window, with the cursor in a search field, it is equivalent to pressing the Find button; on a data entry window, with the cursor in any data field, it will do any required calculations, expand any macros, do any propercasing and look up any search fields.
Note however, that pressing the Enter key is not equivalent to pressing the Apply button because the record will not be saved until you press either Apply or OK.
Propercase
When you enter data in 'name' fields, OpenVPMS will apply 'propercasing', Thus if you enter SMITH or smith or smITH, this will be corrected to Smith. In most cases the adjusted casing will be correct, but in some cases (eg with a company name like 'ABC Industries', ABC will be changed to Abc). When this happens just edit it back to ABC and your correction will 'stick'.
Your administrator or integrator can adjust the propercase facility so that specific words, abbreviations and acronyms are handled correctly. See Reference|Setup.
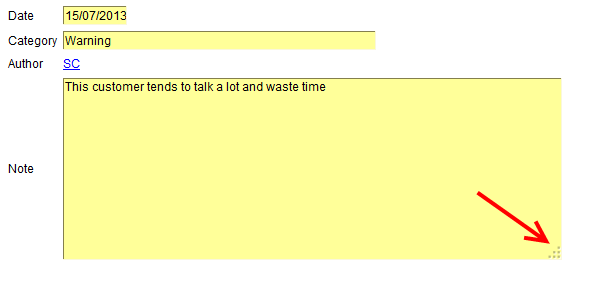
Note Fields
In a number of screens there are Notes fields. These hold lots of text, and you may want to expand the size of the field so you can see all your text. As you can see below, the bottom right corner appears to be stippled - if you put your mouse on this you will find you can drag the corner to expand (or contract) the size of the notes window.
Tab Edits
If you need to edit a number of items, where the data to be updated is located in a tab (for example the Type of a number of products), then because the system remembers the current tab, it is most efficient to proceed as follows:
- select the items as tightly as possible (eg Merchandise, name starts RC)
- press the Edit button with the first item selected
- click the required tab (eg Type)
- make the required change
- press Alt-Y to apply
- press Alt-X to select the next item
- if this one needs no update, just press Alt-X again
- go to 4 unless finished
Wildcards
OpenVPMS allows the use of the 'wildcards' % and _ (underscore). % means any number of characters, _ means one character.
Thus a%b will find everything starting with 'a' following by zero or more characters, then a 'b'. There is also an implicit % added at the end of what you enter.
Hence a%b will find Abbie, Abe, Amber, and Annabelle. Note that the case you use does not matter, ie A%B will find the same names.
Using sm_th will find Smith and Smyth but not Smooth.
Note that since an implicit % is added to what you enter, leaving the Search field empty is equivalent to entering % and this will find all records.
Common Screens
The system has a number of screens that are very similar - such as the various select, email and print screens. Rather than document each in detail, one of each set is documented here and the pages for the individual screens are referred on to these.
Edit
The system has numerous edit screens which all work the same way as the following example (the Customer Information edit screen).

The screen consists of three areas:
(1) basic information - this area contains the things that there is only one of for the item being edited
(2) the bottom buttons as follows: (there may be others as well but these are the standard ones)
Apply - update the item with the changes made but do not close the screen
OK - apply the changes made and close the screen
Cancel - close the screen losing any changes made. Note that if you have previously used Apply, then the 'applied' changes will not be lost.
(3) the tab area - this area contains the tabs for the sub-items of which there are usually more than one - in the above example there are 7. The tab area consists of three or more sub-areas as follows:
(4) the tab buttons as follows:
Add - add a sub-item - you will be able to enter it's details, and if you then click Add a second time, those will be accepted and cleared to allow you to enter another sub-item. Note that the tab button line will sometimes contain pull-downs that allow you to select the type of sub-item being added - in the above example you can see that there is a pull-down to select the type of contact. If so, you will need to select the type before clicking the Add button.
Delete - delete the current sub-item
Previous and Next - these are used to navigate backwards and forwards though the sub-items changing the currently selected one. The buttons will be disabled (greyed out) when you are at the beginning/end of the sub-items.
(5) sub-item table - this displays the sub-items - click on one to select it
(6) sub-item details - here you can enter/view the details of the current sub-item
(7) sub-item tabs - if needed there will be tabs here to allow the editing of part of the sub-item. In the above example you can see there is a Purpose tab to allow the purpose of the contact to be set.
All the Write Email screens look like the following:

(1) At the top there are a set of buttons:
Send - sends the email
Attach - allows you to attach a relevant document (a select window will open allowing you to find the required document from those belonging to the current customer/supplier/etc)
Attach File - allows you attach any file (a browse window will open allowing you to select any file on your computer)
Cancel - cancels the write email operation
(2) a From/To/Subject block:
From - will display the preferred email address for the current Practice Location, but if you have multiple email address defined, then you can use the pull-down to select another. Note that you cannot enter an arbitary email address here.
To - the pull-down will show the available relevant email addresses, either choose one, or type in another.
Subject - enter an appropriate subject. Note that this is a mandatory field.
(3) the Text area - enter the text of the email. Remember that you can use macros here.
(4) the attachments area - as you add documents and files, they will be shown here. Note that if you want to delete one on them, click on the attachment to select it and then press the Delete key. Actually it's a little more tricky than this. When the item is first attached it looks 'white' like the following:  . If you click it in the middle (or anywhere except the icon at the left end), then the attachment becomes selected and the background goes cream like:
  . You can now press delete to delete it.
If you click on the icon at the left end, then the item will be downloaded to your browser (and displayed if possible).
Attach Document
This is a typical document select screen displayed when you click the Attach button on the Email write screen. (This one is for selecting customer documents.)
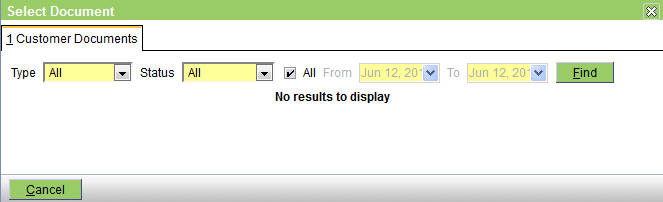
The fields are:
Type - a pull-down to select the type of document (eg for customer documents, this contains All, Attachment, Form, and Letter)
Status - a pull-down to select the document status (All, Completed, Finalised, or In Progress)
All - uncheck this box to enable selection by date
From and To - the from and to dates if you are using date selection
Click the Find button to perform the search, and on the list of those found, click the desired document to attach it to the email.
Attach File
This is the attach file screen displayed when you click the Attach File button on the Email write screen.
Press the Browse button to browse the files on your machine and select one. Then press Send to attach the file to the email.
 .
.
When you press the Print button on a screen, a window will appear as follows:

The fields are:
Printer - shows the default printer for your current location - if this is defined (see Administration|Organisation|Practice Location), otherwise the first available printer. Use the pull-down to select the required printer.
Copies - set the number of copies required
The Preview button will generate and display a copy of the document in your browser.
The Mail button will generate a copy of the document and bring up an email window so that you can email the document.
Select
The Product Select screen below is a typical select screen - all the select screens work the same way and have a similar appearance. But see the Mode discussion at the botton of this page.
First - this is the screen in its 'empty' state - ie before the Find button has been pressed. 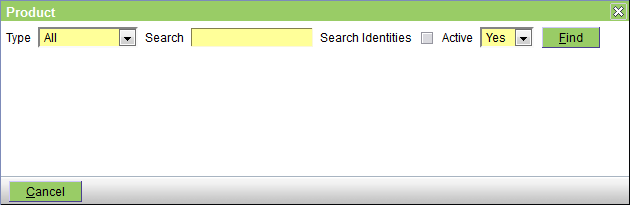
If you press Find with nothing in the search field then it will return everything and we get the screen below.

The components are as follows:
(1) The Select area - this is where you define what you are looking for - it is not exactly the same on each select screen, but all have the same components:
- a pull-down list of what to search (this is not always present) - in this case you can select the type of product to search
- one or more boxes in which to enter the search value - this this case there is only one since you can only search by product name. In these you enter the search term: you can enter nothing (will return all items), or the first few characters of what you are looking for. Note that the case does not matter, ie 'b' or 'B' will both find items starting with 'B' or 'b'. You can also use wildcards.
Note that if you press the Enter key immediately after keying something into the search box, the system will react as though you had clicked the Find button and perform the search. - a 'Search Identities' checkbox - checking this searches the item's Identities rather than their names
- an 'Active' pulldown list - this can be set to Yes (active items only), No (Deactivated items only) and Both. The latter setting causes the Active column to be included indicating whether or not the item is Active.
- a Find button - click this (or press Alt-F) to perform the search
(2) The Page navigation area - this appears whenever there are more than 20 items found. Click the First  or Last
  icons to jump to the first or last pages; click the Previous
  or Next
  icons to go to the previous or next pages; use the page number pull-down
  to go to a specific page. The 'of at least N' comment will initially display the full number of pages if less than 4 (ie less than a total of 60 items), but if there are more, then it will not display the full number of pages until you go to the last one.
You can also use the PgUp and PgDn keys to move to the previous/next page - but for these keys to work you must have an item in the item display area (see below) selected.
(3) The item display area. This is arranged in columns. In many cases you can click a column header to sort the items by that heading. Clicking it again will reverse the sort order. A small up or down arrow will show that the column is sorted and in which order. In this case the items are sorted in ascending order by Name. Note that not all columns will be sortable. If you click the column heading and nothing happens, then you can't sort by that column.
You select an item by clicking anywhere in its row or you can move the blue highlighting using the up & down arrows. See also the Mode discussion below.
(4) The Button area. Here you can see that there is one button, Cancel, but sometimes there are more. See also Common Buttons.
Mode
The select screens operate in two modes, 'select an item', and 'display'. You can tell which by the buttons at the bottom of the screen - if there is a Cancel button then you are in 'select an item' mode, and you will have got to this select screen from the previous screen by pressing the select button, or a binoculars icon. If there is no Cancel button, then the screen is in 'display' mode, and you will have to got to this screen via the menu, for example you clicked Products on the top line, or Workflow|Messaging, or Administration|Templates, etc.
In 'select an item' mode, clicking on an item will select the item and return you to the previous screen. Pressing the Enter key selects the blue highlighted item (and you can move this with the up/down arrow keys) and returns you to the previous screen
In 'display' mode, clicking an item selects it. If there is an Edit button, then a second click opens it for editing. Similarly, with the keyboard you can use the up/down arrows and then press Enter to select the item, and if there is an Edit button, pressing Enter a second time opens it for editing.
Upload File
This window is displayed when you need to upload a file.
Press the Browse button to browse for a file, then Send to upload it.

Reporting
As a user you need not really be concerned with how the reporting system works, that is, you don't need to worry about how an invoice, drug label, stock list, etc is generated, only how to ask for it.
It is worth noting that when printing things, it is normally possible to preview the document before actually printing it, and also to email the document without printing it. When running reports, it is also possible to 'export' the data in CSV format so that it can be used in spreadsheet and other programs. See also Concepts|Printing.
All printing in OpenVPMS is customisable. If you don't like the way the invoices look, this can be changed. Similarly, if you need a report listing all dogs by name, it is possible to make this.
Skip the remainder unless you are an administrator or want to know "what's under the hood".
All documents and reports are controlled by 'Document Templates' which specify how and what to do to generate the document or report. Two facilities are used to form up the content: JasperReports and OpenOffice.
OpenOffice is used for simple documents (like patient certificates). You use an OpenOffice document template to specify the document content. Since OpenOffice can also handle Microsoft Word documents, you can also use these. They are held in files with the extension .odt (or for Word, .doc). Anyone with normal word processing skills should be able to create and modify these templates. Note that OpenOffice cannot handle the default .docx format used by Word 2007 and beyond. If you are using Word, you need save documents to be used by OpenVPMS/OpenOffce in .doc (ie Word 97-2003) format.
JasperReports is used for more complex documents such as invoices, statements, reports etc as these typically have multiple rows of data and require groupings and other data processing functions not available in OpenOffice. The iReports program is used to design, test and maintain these reports. They are held in files with the extension .jrxml. Using iReports requires a reasonable skill level, but anyone with some programming experience should have no trouble. As always, it is easier to proceed by cloning an existing report than building one from scratch.
If you do need to create and modify reports and documents, see Reference|Reports and Forms.
Press Alt-F1 for Help
You can press Alt Function Key 1 on any screen to get help with that screen.
If you are reading this, you are probably new to the system. You should look at the Introduction and Concepts sections.
Note also that if you scroll these help pages down to the bottom you will find a navigation section that you can use to jump to any other page.
Concepts
This section contains information on various concepts used in OpenVPMS. It is also functionally a glossary of terms used in the system.
The sub-sections are ordered aphabetically.
Accounting
OpenVPMS includes only enough financial processing as is necessary. Whilst it keeps track of invoices, payments etc for the veterinary side of the business, it does not keep full track of your bank accounts. Hence you will almost certainly need to run a separate accounting system.
However, since it does handle all the customer and supplier invoicing and payments, there is no need to export the detailed invoice and payment information to your accounting system. Your accountant should be quite content with the data from the Bank Deposit Report. (This shows the total of the cash and all the detail of the EFT, credit card, and cheque payments.)
On the supplier side, since you need to make payments to the suppliers, you will need to enter the individual supplier invoices into your accounting system so that they can be paid and it can track the payments. However, you can omit the line item detail because OpenVPMS will handle this as it tracks the orders and deliveries.
The Accounting Cycle
Typically this proceeds as follows:
- at the end of each day the till is balanced using the Reporting|Till Balancing screen and the appropriate amount of cash and all the cheques, credit card slips etc removed from the till - note that you do not actually have to stop the business - you can do a till balance and still continue operating
- when appropriate (maybe immediately after the till is balanced, maybe every couple of days) use the Reporting|Bank Deposits screen to generate the Deposit Report, and then take this and all the money to the bank and deposit it
- when desired use the Reporting|Work In Progress screen to check that things are moving along and that no invoices have been stalled for some reason
- when desired use the Reporting|Debtors screen to check on overdue customer accounts
- at the end of the month (or whatever your accounting period is), use the Reporting|Debtors screen to do the Period End processing and then generate and print or email statements
Note that the system does not support multiple accounting periods. That is, you cannot have a group of customers with monthly accounts and another with quarterly accounts.
Period End Processing & Statement Generation These two facilities (invoked using the Reporting|Debtors screen) look at all or selected customer accounts and do as follows:
- period end: process all accounts. For any account with an overdue balance (see Administration|Customer Account Type), check whether accounting fees should be applied, and if so generate the required Debit Adjustment transaction. For any account with transactions since the previous Opening Balance transaction (if any), generate both a Closing Balance and an Opening Balance transaction for the current account balance.
- statement generation: process the selected accounts. Statements will be generated for accounts:
- which match the selection conditions (which allow selection by customer account type, name and overdue status)
- with transactions in the period between the statement date and the previous Opening Balance transaction (if any),
- if there is an outstanding balance
- if the statement has not been already printed - however a 'Reprint Statements' option allows this to be overridden. This can be used for example to first print the statements of accounts overdue for more than 60 days so that you can include in the envelope a note suggesting that the account should be settled - and then printing the statements for all customers with no selection conditions. The 60 day overdue customer statements will not be printed again on the second run.
Payments and Invoices
Since the system allows you to receive payment for an invoice after it is finalised, there is a tendency to think that the system marks indivual invoices as being paid. This is not the case: payments are applied to all outstanding invoices, starting with the oldest and allocating the payment to each one until all of the payment amount has been allocated. This follows standard accounting practice.
Thus consider a customer with an invoice for $100 and an account balance of $100. If we now create a new invoice for $150 and the customer pays $150, then when the $150 invoice is printed, it will show the Amount Paid as $50 (because $100 got used to pay the older $100 invoice) and the account balance will now be $100 (ie $100+$150-$150).
Active/Deactivated
We need to keep old items (customers, patients, products etc) in the system, but we want to be able to ignore these most of the time.
For example, if a given product is no longer used, we can't just delete it, because there will be other references to this product recording its use. In fact, a good working rule is 'NEVER DELETE ANYTHING'. Essentially the only time you should be deleting things is immediately after you created them and you made an error creating them. [A good example is creating a new product with the wrong type, ie you set it as merchandise rather than medication. You can't change the type, so you have to delete and re-create the product.]
To suppress unwanted items you deactivate them by un-ticking their 'Active' checkbox.
If you need to find deactivated items, just set the 'Active' pull-down to 'No' or 'Both' on the search screen.
Addresses
The system is designed to handle location addresses in a structured manner, ie one or more address lines, a suburb, a postcode, and a state. Note however that you do not explicitly set the country - although this is implicit in the state (since each is associated with a country).
If you have to hold addresses in different countries, there are two possible approaches:
- put the whole address in the address lines, and leave the suburb, postcode, and state fields empty
- create the states and suburbs for each 'foreign' country
The second approach will potentially result in a long list of states (since it will include those from all countries). Hence the best approach is probably the first.
Alerts
You can set 'Alerts' for both customers and patients. You can set them for individual customers and patients, and when this is done, you can add a reason, an end date (after which the alert is not shown in the left panel), and notes.
You can also make an alert show for all customers of a given Account Type.
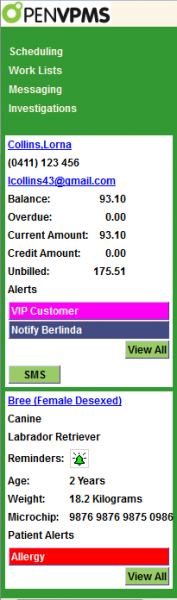 |
Customer alerts display in the left panel when the customer is displayed, and similarly for the patient alerts. On the Workflow|Scheduling and Worklist screens, if you select an appointment or task the customer & patient's summary information is shown in the left panel and this shows the alerts as in the snippet shown on the left. Common usages of alerts are to flag important customers, bad debtors, aggressive patients, and patient allergies. The administrator creates the available alerts with different ones for customers and patients. (Hence if you want an Aggressive alert that can be shown for both patients and customers, then the administrator needs to create one for customers and and one for patients.) See Administration|Lookups|Customer Alert and |
Barcodes
The system supports the use of barcodes so that you can use a barcode scanner to quickly and accurately enter product identification.
That is, instead of entering 'Advantix X Large Dog 3 Pack (25Kg+)' (probably by keying 'adv' then pressing Enter and then selecting from the long list of Advantix products), you can use the scanner to enter its barcode, and this will be used to find the product.
To get this to work, you need to enter the barcodes as product identities for each of the products that you want to be able to scan, and the scanner will be really useful when you enter this data as it saves keying the 12 digit number.
What is actually happening is as follows: if you enter a product (say on an invoice) as a number, then the system does an identity search of the products for that number, and if it finds only one, then it uses that product, otherwise it displays the select screen.
Note that there is no reason why you should not 'barcode' your own products and services. There are free programs available that will generate the required graphics, and you could print up a page listing these and keep it near the work station so that scanning ![]() calls up 'Consultation (9pm-Midnight)'.
calls up 'Consultation (9pm-Midnight)'.
A final warning: if you do use your own barcodes, make them long. As explained in identities, the IDs are also searched, so a barcode of 123 will find any IDs starting 123.
Categories and Classifications
OpenVPMS allows you to categorise and classify products, customers and suppliers. You don't have to use these, and the system does not require them to be set up. They are simply to enable you to report on breakdowns of categories and classifications.
For each, the available values are set via the Administration|Lookups facility. The following table gives the name of the lookup for each classification and category.
| Classification/Category | Lookup |
|---|---|
| Product Classification |
Product Group Product Income Type |
| Customer Category | Customer Type |
| Supplier - Organisation Category |
Supplier Type Supplier Account Type |
| Supplier - Person Category | Supplier Type |
| Supplier - Veterinary Practice Category | Practice Type |
| Supplier - Veterinarian Category | Veterinary Specialty |
| User Category | User Type |
Contacts
Customers, Suppliers, Practice Locations, and the Practice itself all can have 'Contacts' defined.
The screen shots below are taken from the Customer Edit screen (and hence the other tabs).
There are four types: Email, Location, Phone and Fax. The entity can have zero, one or more of each type of contact. Each contact can be set as the default contact for each type, and each can be given 'purposes'.
The available purposes are set via Administration|Lookups|Contact Purpose. Each contact can have zero, one or more purposes. In general these are just for information purposes. However, in two cases they are very important. As discussed in Reporting|Reminders, the system looks for a contact with the purpose 'Reminder' in order to decide how to send out reminders. Similarly, as discussed in Reporting|Debtors, the system looks for an email contact with the purpose 'Billing', and if found emails the customer's statement rather than printing it.
To set the purpose(s) use the arrows to move the selected item from the Available list to the Selected list and vice versa.

The fields are as follows:
Name - this is the 'name' of the contact - by default it is set to 'Email Address' but you modify it to anything more useful
Email Address - the email address - note that this is not checked to be valid - if you get it wrong, you won't know until an email that you send to the address results in a failure message to the sender
Preferred - check this box if this is the preferred email address. Note that the system will not object if you set two preferred email addresses - if will just use the first one it finds.

The fields are as follows:
Name - this is the 'name' of the contact - by default it is set to 'Location' but you modify it to anything more useful
Address - as discussed in Concepts|Addresses this can either be the address lines (not including the suburb etc) or a complete address including the country
Suburb - choose the suburb from the pull-down list - those available are set via Administration|Lookups|Suburb. For international addresses, use 'None'.
Postcode - enter the postcode/zip code
State - choose the state from the pull-down list - those available are set via Administration|Lookups|State. For international addresses, use 'None'.
Preferred - check this box if this is the preferred location. Note that the system will not object if you set two preferred locations - if will just use the first one it finds.

The fields are as follows:
Name - this is the 'name' of the contact - by default it is set to 'Phone Number' but you modify it to anything more useful
Area Code - the area code part of the phone number
Telephone Number - the phone number
Preferred - check this box if this is the preferred phone number. Note that the system will not object if you set two preferred phone numbers - if will just use the first one it finds.
Allow SMS - check this box if SMS is possible via this number. Note that if you flag multiple numbers as SMS capable, then when you send a SMS, there will be a pull-down list to select the required number.
For Fax contacts:
Note that the system cannot send faxes - this information is just for documentation purposes.

The fields are as follows:
Name - this is the 'name' of the contact - by default it is set to 'Fax Number' but you modify it to anything more useful
Area Code - the area code part of the fax number
Fax Number - the fax number
Deposit Accounts
The Deposit Accounts represent the actual bank accounts that you deposit money into. Each location can have its own account(s) or the accounts can be shared between locations.
Note that these Deposit Accounts are not like the bank accounts in your accounting system - ie they do not hold all the account transactions and you don't reconcile them. The Deposit Account record simply holds sufficient information to print deposit slips.
The only time you need the deposit account is when you use the Reporting|Deposit screen after having cleared the till.
The deposit accounts are set up by your administrator using Administration|Organisation|Deposit Account
Discounts
There is an extensive discount system. Discounts can be provided at the customer, patient, and product level. You can also give a discount at payment time.
Discount Types
The Administrator defines the various Discount Types using Administration|Types|Discount. For each (eg Staff Discount, Valued Customer, ...) they define the type (percentage or fixed), the rate, and whether the discount applies to the fixed component of the product price as well as the unit component.
One or more discount types can be included in a Discount Type Group (see Administration|Types|Discount Group) in which a start & end date can be specified for each Discount Type.
Customers and Patients
For each customer and each patient you can define what discount types and/or discount type groups they have, and their start/end dates.
Products
For each product you can define what discount types apply to the product and their start/end dates. However, since you can specify discounts for each product type (see Administration|Types|Product Type), it is normal to set the discounts at the type level rather than for each individual product. If there are discounts on both the product and type, then they will be merged. If a discount appears on both a product and its type, it will only be applied once.
Calculation
When the charge is calculated, the only discounts that apply are those that are common to both product and customer/patient.
Hence if the customer has a staff discount, but the product they are buying has no staff discount, then they don't get the discount.
If the same discount has been set for both the customer and the patient, then the discount is only applied once.
However, if there are different discounts set (eg Valued Client for the customer, and Blood Donor for the patient) then both apply (provided that the product has both set).
If there are multiple applicable discounts (ie staff + valued customer) then both are applied. However, you cannot reduce the charge below the max discount set for the product - ie if staff is 20% and valued is 30%, but the maximum product discount is 35% then you don't get 20+30=50% but only 35%.
Note that all the above logic simply calculates and displays the applicable discount. The user creating the invoice/charge can override the calculated discount.
Quantity Breaks
These are not currently supported by the system. There is a proposed design for them, but it's not a currently funded project.
Payment Discounts
You can give a discount at payment time. When the payment is being entered, you simply a payment type of 'Discount' and enter the discount amount. Thus if the customer is paying $1234, this can be 'paid' by a $1000 cheque and a $234 discount. The Till Balance report will show these discount payments and their total.
Documents
See Reports, Forms, Letters and Documents for background. See Reference|Reports and Documents if you need to build reports and documents.
The system has the ability to store documents for patients, customers and suppliers.
Products and emails can also have documents attached - see here and here respectively.
First a word on 'document templates' - as described here, these control things like what the document contains, and how and where to print it. Each template has a 'type' and this defines how information is provided when the document itself is generated using the template. Thus a 'Patient Form' is provided with information about the current patient, a 'Customer Form' is provided with information about the current customer, etc.
For patients, customers and suppliers, there are three types of documents as follows:
Attachments - these can be uploaded from any file that you have access to. They can be pdf files, word processing documents or spreadsheets, or plain text document - anything. They can also be image files - so you can keep a photo of each of your customers etc if you want. Note however, that for patients, there is a specific image facility to add images.
Forms - these are things that are based on document templates of type Patient Form, Customer Form, or Supplier Form depending on whether you are attaching the form to a patient, customer or supplier. As part of the process of creating the attached form, the template will be used to generate the form with the appropriate patient/customer/supplier details inserted, and this is stored.
Letters - these are things that are normally based on document templates of type Patient Letter, Customer Letter, or Supplier Letter depending on whether you are attaching the letter to a patient, customer or supplier. As part of the process of creating the attached letter, the template will be used to generate the letter with the appropriate patient/customer/supplier details inserted, and this is stored. However, the template used is also stored. For both the generated letter and template, the system stores the actual word processing document and a pdf that can be used to print it. Hence for letters, you can either print another copy of the letter, or download the word processing document and edit this to make changes to the letter.
However, you can also bypass the use of the document template, and upload any file just as you can with an attachment. The downside is that you are bypassing the template's ability to insert the customer's/patient's/supplier's details into the document. The upside is that anything you upload is classed as a letter - even if it is the scanned image of something that you typed up and signed, or even hand wrote.
Note that for all three types:
- the document is stored in the database, ie the actual document is stored, not the name of the file in which the document may be found
- except for forms, you can have multiple versions of the document - these could be real 'versions' of the document, ie revisions 1, 2 and 3, or they could be say multiple x-rays taken at the same session which you wish to group together
- since it the document is being stored, rather than a link to it, there is no problem in uploading what are in fact different documents from files of the same name - ie it does not matter if your scanned images are always scanned into a file scan001.jpg
-
each document record has the following fields:
- the date and description
- a printed flag indicating whether or not it has been printed
- the status which can be In Progress, Completed, or Finalised. In Progress implies that you are still working on it; Completed implies that you have finished - but the entry can still be editied; and Finalised means that it is really complete and can no longer be changed.
- for patient documents, the clinician - note however, that there is no facility for 'signing' the document.
Patient documents also include Images and Investigations. Images work in exactly the same way as Attachments (and in fact you can happily add a text or pdf file as an 'image'). Images are simply there to allow you to logically separate them from other sorts of attachments.
Investigations are also like Attachments in the sense that any sort of file can be attached as the Investigation 'Report'. However, as discussed in Concepts|Investigations, there is built-in support for tracking the status of the investigation and automatically attaching the report files to the Investigation record.
Products
You can attach documents to a product. Here you are not attaching an attachment, form or letter, but instead a document template. When you use the product (ie call it up in an invoice) then the required document will be generated from the template and can be printed etc. The obvious use is to attach a vaccination certificate to a vaccination product. Note that because what you have attached is the template (and not the actual certificate) the generated certificate can include the patient and product details.
Emails
You can attach two sorts of things to emails: files and documents. Files are any files that you can access on your workstation, documents are customer, patient and supplier documents stored for the current customer/patient/supplier.
ESCI
ESCI stands for e-Supply Chain Interface - it is a facility for automating the orders/deliveries/invoices dialog between the practice and its suppliers.
You don't have to use it, and it requires setting up at both the OpenVPMS and supplier ends. Both Lyppards and Provet in Australia have implemented their parts.
To quote from the documentation:
The OpenVPMS ESCI (e-Supply Chain Interface) is a standards-based API to enable OpenVPMS to electronically place orders on suppliers and to receive order responses and invoices from suppliers . It is based on the exchange of Universal Business Language (UBL) 2.0 documents via web services.
ESCI defines a number of web services which are implemented by the supplier, namely:
- Order – enables clients to submit orders to the supplier
- Inbox – enables clients to receive documents posted by the supplier
- Registry - provides a simple lookup mechanism to resolve the other supplier web services
It works as follows:
- OpenVPMS creates UBL Order documents and submits these to the supplier via the supplier’s Order web service.
- Orders are processed asynchronously by the supplier.
- A UBL OrderResponseSimple document is placed in practice’s Inbox, indicating success or failure.
- When an order has been shipped, the supplier invoices the practice by placing an UBL Invoice document in its Inbox.
- OpenVPMS checks the Inbox web service regularly to process any incoming Order Response and/or Invoice documents.
If you are going to set up ESCI, then this link provides useful information.
Error Handling
If you make an error entering data you will get an error screen like the one below. (Here we have omitted to enter the product - a mandatory entry.) You will see at times, that you could have suggested a better message like 'Please select the product - you must have one'. The messages are generated automatically and are not all individually created. However, you will always be able to understand what the problem is. Simply click OK and try again.

If an internal error occurs you will get screen like the one below. Note the extra 'Report Error' button. This indicates that the problem should not have occurred and perhaps should be reported to OpenVPMS. If you do not want to report it, simply click OK.
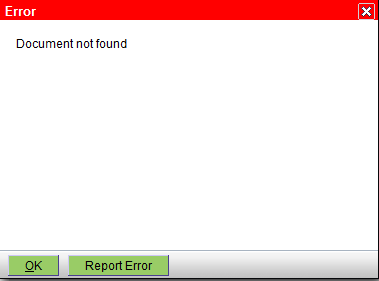
If you click the Report Error button, then the screen below will appear.

Press the Send Error Report button to send the report, otherwise use Don't Send. If you click the blue 'click here' link a screen like the one below will appear. If you are not a programmer, it's gobbledygook, if you are it's useful.
Note:
- the error sender uses the email setup for the current location. If this is not set up (ie you cannot send email to customers) then the error report will not be sent (and you won't be informed that it could not be sent).
- there is no site specific information (such as your practice name, etc) included apart from the version and revision information you can see below

Estimates
An 'estimate' is a quotation for work to be done and/or goods to be provided. You create and manage estimates using the Customer|Estimates screen. You can also access the estimates for the current patient on the Estimates Tab of the Visit Editor.
On the estimate you can provide, for each line item, an estimate of the fixed price and low and high limits for the unit prices and quantities.
The estimate can be printed and given to the customer. It can also be used to create the invoice for the services and goods quoted for.
IDs
Almost everything in OpenVPMS has an 'ID'. This is simply a number and it is unique - ie if there is a customer with ID 1234, then there cannot be a patient with ID 1234. Most of the time you don't need the ID. However, it can be useful in identifying the exact patient, customer etc, and hence it is normally printed on things like invoices. Thus if there are two Mr Smith's each with a dog called Rover, the ID will identify which Mr Smith and which Rover.
An Identity search includes a search of IDs. Thus, when you search for say a customer with an Identity 1234, those found will include those with ID's starting 1234.
Although almost everything has an ID, the ID is normally not displayed unless there is a mechanism to search for it. Thus it is displayed on the on the customer, patient and supplier information screens, but not on the Workflow|Scheduling screen - although each appointment does have an ID.
Identities
A number of things such as customers, patients and products can be given 'identities'. There are a number of different types of identities such as Alias, Microchip, Barcode, etc. These are essentially just different ways of identifying the item.
The select screens, where applicable, allow you to search by identity. Note that when doing so you are not able to search a specific type of identity, the search is done across all identities as well as the IDs.
Hence searching patients for the identity '123' will return any that have microchips, pet tags, aliases, or IDs starting 123.
Insurance
Support for insurance is currently very limited. All that is supported is a field on the customer information screen showing the Insurance Plan. However, most insurance policies are against the patient rather than the customer.
Providing better support is a current project that is under discussion.
Some practices have implemented a system of using a Patient Alert to indicate that the patient is insured.
The Patient Discount tab was originally designed to hold this type of information as it also provides start and end dates which are important. You do not necessarily need to apply any specific discount (i.e no need to setup discounts attached to the discount group) so it can be used for insurance purposes. What is missing is for this information to be clearly visible to the user when a customer/patient is selected and the ability to use this information to identity and process insurance claims.
Investigations
Investigations are any internal or external clinical test or procedure. The facilities to support these are as follows:
- as many different types of investigations as you want each with its own request form and supplier (ie the lab or organisation that does the test or procedure)
- the request forms are defined by document templates which enable the generation and printing of customisable forms including the automatically merged customer/patient/clinician details
- investigations can be initiated either manually or automatically when a product is added to an invoice
- the investigations and any attached results are displayed in the Patient's Medical record as part of the visit details
- the request forms can be reprinted
- investigations are assigned a unique Request Id
- the document loader program can be used to automatically attach result files (ie reports and images) to the appropriate investigation - this is done via the request id
- you can have multiple revisions of results files
- the result files can be of any type (eg .jpg, .png, .doc, .odt, .csv, .xls, .txt, .xyz, .abc, .anything)
- the ability to list all investigations by status and/or date range. This displays date, patient, supplier, investigation type, request Id, status and any attached results. This is ideal for monitoring both internal and external investigation requests.
The tools to set up and use investigations are:
- Administration|Types|Investigation Types to setup and maintain each Investigation Type
- Administration|Templates to define the Document Templates used by each investigation type to define the content of the investigation request form
- Products|Information to attach investigations to the products so that when the product is invoiced, an investigation is created
- Patients|Medical Records to display and perhaps add an investigation for a patient
- Workflow|Investigations to display in-progress (or other status) investigations
Each investigation has a status - one of:
- In Progress - the initial status
- Received - results back
- Preliminary - results returned but preliminary
- Final - results returned and final
- Completed - vet reviewed and owners contacted and whatever other steps were needed
- Cancelled - investigation has been cancelled
All of these can be set manually. The document loader program sets the status to Received when it imports the results file.
Local Procedures
The information presented here is generally applicable but does not include conventions and procedures used in your own local practice.
If your practice does have specific ways of doing things, your administrator may have created local documentation that can be accessed via a bookmark or other mechanism such as the Help item in the top menu of the OpenVPMS screen. (See here for how to set this up.)
Macros
Macros are similar to the "auto correct" facility in Microsoft Word where a small string of text can be expanded into a sentence or even paragraphs of text. The macros can also be set up to use the prefixed number, eg so that 5@w expands to 'for 5 weeks'. They can also be set up to include relevant data like the customer's name so that @dear expands to 'Dear Joanna' (assuming that the current customer's first name is Joanna). Finally it is possible to call a report to generate text for things like a referral email that includes the patient's medical history.
Macros can be used in any text field. Note however that certain macros will be context dependent. For example, the @bid macro is designed for use when creating a Dispensing Label and uses information from the product record. If you use @bid when there is no current product, then the macro simply will not expand and the '3@bid' that you typed will be left unaltered.
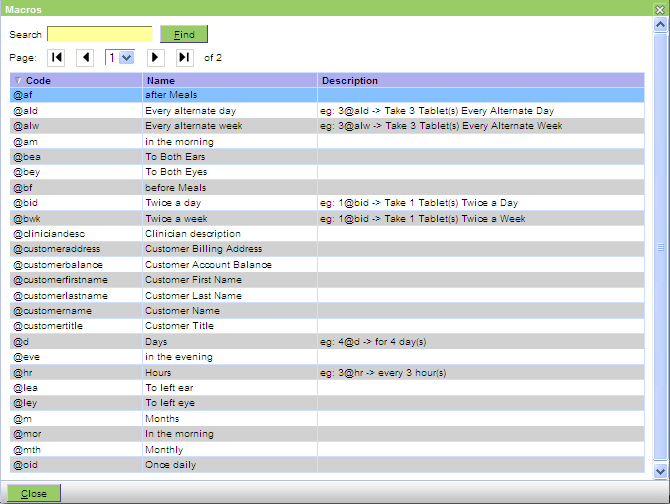
You don't need to remember the macros, pressing Alt-M will display a Macro Select screen like that shown below. You can simply click on the macro you want to invoke it.
Note that the search facility searches both the code of the macros and their names. Hence entering say 'dg' will find all macros with code starting 'dg' and all macros whose name starts 'dg'.
The macros are set up by your administrator using the Administration|Lookups|Macro and Administration|Lookups|Report Macro facilities.
Messages
The system includes a simple messaging system that enables messages to be sent to other users and user-groups. You can reply to and forward messages. When initially received, the message is flagged as pending. After it's read by the addressee it is flagged as read. When a message is finished with, you can either delete it completely or flag it as complete.
There are two types of messages, user and system. System messages are those used by scheduled processes to notify of status updates or errors. (Currently only the ESCI system generates system messages.)
Note that the messaging system is very simple. Specifically:
- messages have only To addressees and no CC and BCC addressees
- a message to a user group generates copies to each individual user
- a user looking at a message sent to a group cannot see that it was in fact sent to the group rather than him/herself (unless of course the sender puts in the text "To all Reception staff" or similar)
- messages are not private, that is a message to one user can be read (and responded to or deleted) by another
- there is no 'sent tray', ie you cannot see the list of messages that you have sent, only those that you have received. But since you can look at the messages sent to anyone, you see those that you sent.
- the message status only changes from pending to read when it is read by the addressee. The status stays as pending if it read by anyone else.
- quick 'subject only' messages with no next are allowed
Global ToDo list: Because messages are not private, you can set up a global todo list. The administrator creates a user called ToDo (with a password known only to the administrator so that nobody can login as ToDo). Messages sent to ToDo can be seen by everyone, and individuals can respond to and delete these messages. Thus we have a public todo notice board. You could also create a Work List for this 'todo' function but there is the benefit of being able to easily reply to or forward the messages.
Administrators note: since Message Delete is a specific 'authority' it is possible to block the deletion of message by specific users if you want them to only be able to set complete status when a message is finished with, rather than deleting it.
Names
Almost everthing (ie customers, patients, products, reports, etc) has a name. The names do not have to be unique - this is obvious for things like patients (where there are likely to be many Rovers, Busters and Scruffys) but less obvious with things like reports.
Everything has an ID and this is unique. Hence the system can quite happily handle two products named 'Best Dog Biscuits', or two reports named 'Stock Listing', but users will get confused.
Hence it is best to use unique names where appropriate.
OTC - Over The Counter
Over The Counter (OTC) transactions are used to perform sales where no customer and no patient is to be recorded. There is an OTC button on both the Workflow|Scheduling and Workflow|Work Lists screens. This allows reception staff to quickly make OTC sales.
There is normally one OTC account per Practice Location - though it is possible for multiple locations to share the same OTC account. They are set up using the Administration|Organisation|OTC facility.
The OTC account is effectively a special customer account where the customer is anonymous.
Note that there is also a concept of a 'Counter Sale' to a given customer (accessed via Customer|Charges|New|Counter Sale) where the customer is recorded but there is no patient recorded. If you need the patient recorded, then you use Customer|Charges|New|Invoice.
As indicated above, the OTC account is a special customer account. If you call up the Customers|Charges or Customers|Account screen and then press the Select button, you will find that there is a Type pull-down - see below. Choosing OTC will allow you to access the account.

The Customer|Account screen - see below - is the most useful. Most of the time, the only OTC transaction you need is the sale - accessed using the OTC button of the Scheduling and Work List screens. However, if you need to reverse the transaction or print the payment receipt again, this is where you come. It works in exactly the same way as the Customers|Account screen for a normal customer.

Payment Types
The system allows for customer payments by the following methods:
- cash - with support for rounding (ie cases where the amount is $12.33 and the smallest coin is 5 cents) and change calculation
- credit card
- EFT - with support for 'cash out'
- cheque
You can also include a discount at payment time. ie the amount payable is $100 and this is paid by $80 credit card payment plus a $20 discount.
One payment can also consist of multiple types, ie $100.75 can be paid by a $100 cheque and 0.75 cents cash.
The system also supports a payment type of 'Other', and Administration|Lookups|Custom Payment Type is used to define these.
The system also support payments by BPAY (an Australian payment portal) in that a facility is provided to generate the required Customer Reference Number to be shown on the invoice.
Practice and Locations
OpenVPMS structures the business as consisting of a single 'practice' with one or more 'practice locations'. These locations may represent branches at different addresses, or another component of the business (eg the after hours clinic) that operates at the same address.
It is normal (but not mandatory) to have different tills, bank and OTC accounts, and stock locations for each practice location.
There is no concept of customers (and their patients) 'belonging' to a practice location. That is, a patient can 'visit' any practice location. However, it is possible to report on activity by practice location.
Prescriptions
OpenVPMS provides support for managing and using prescriptions. The features are as follows:
-
the prescription information includes the:
- medication to dispense
- quantity to be dispensed
- number of repeats
- expiry date of the prescription
- label text; and
- clinician who created the prescription
-
the system tracks the times dispensed and will not allow dispensing if:
- it has been fully dispensed; or
- the prescription expiry date has passed
- a default prescription expiry interval is set for the Practice
-
prescriptions are managed via:
- the Prescriptions tab on the Patients|Medical Records screen
- the Prescriptions tab on the Visit Editor screen, used in the Check In and Consult workflows
- prescriptions can be printed
- prescriptions that have been dispensed cannot be deleted - this prevents the loss of the information about when and by whom the prescription was originally created
- when invoice line items are being added, the system checks to see whether there is a valid current prescription for the selected product - if so the user is prompted to see if they want to dispense using the selected prescription or not. If not the standard medication dispensing process is used.
As indicated above, you do need to set the Prescription Expiry interval for the practice using Administration|Organisation|Practice.
Pricing
OpenVPMS has a powerful and flexible product pricing system.
Price makeup
Products have two components to their price:
Fixed - this is the fixed component - it is effectively the 'flag fall'
Unit - this is the 'per item' component
Hence if something has a fixed price of $10 and a unit price of $1, then the total price for 4 is $14.
In general things that have no overhead such as cans of food will have no fixed price, and only a unit price. Things that have an overhead - such as tablets where you want to charge a dispensing fee as well as the per-tablet price, will have a fixed price representing the dispensing fee and a unit price for the tablet. You can also use this approach for services, where you might want to set a fixed price for some surgery, and a unit price that represents the per-hour charge for the theatre time. [Note that an alterative to this appoach is to have mutiple fixed prices - see below - so that you have different prices for different lenght operations.]
Note that the fixed and unit prices always include any applicable taxes. Hence on the Product screen and when you are looking at invoices, the fixed and unit prices are 'tax-inc' prices.
When you are setting the price, you can provide an ex-tax cost price and a markup percentage, and the system will calculate the resulting tax included price (as (C x (1 + M/100)) x (1 + T/100)). Alternatively, you can set the tax-include price over-riding any cost and markup.
Dates
Prices also have from/to applicability dates. This allows you to keep previous prices for reference purposes. It also allows you to set future prices, ie one that will take effect on some future date.
Templates
A product can have its price set from a 'price template'. This allows the Fixed price component of a number of products to be set from a standard value.
Multiple Prices
It is possible to set multiple fixed prices for a product, each with its own name. When the product is called up when generating an invoice, the fixed price field will have a pull-down which can be used to show the available prices (with their names) as follows. Note that here the 150/medium price has been set as the default and so is initially displayed.

Negative Prices
You can set as price as a negative amount - although this is not really kosher. Negative prices are used with a product that is in fact a discount. This enables you to have a discount line item on the invoice. For the standard way to apply discounts, see Concepts|Discounts.
Pricing Updates
Prices in OpenVPMS can be updated:
- by editing products individually
- via Export Prices and Import Prices
To update a large set of prices, the latter is the preferred approach. The process is as follows:
- on the Products|Information screen, press the Export button to display the Export Prices screen
- fill in the parameters to select the products to export and press the Export button
- this will export the data in CSV format in a file named 'products-yyyy-mm-dd.csv' (where yyyy-mm-dd gives the current date)
- use a spreadsheet program to make the required changes and save the new data in CSV format.
- on the Products|Information screen, press the Import button to display the Upload window and upload the new data file
- the Import Prices screen will then be displayed showing the products be updated and any errors. If there are no errors, press the OK button to apply the updates. If there are any errors, these must be corrected in the spreadsheet before re-importing it.
Note that the format of the CSV file being imported must match that exported. You cannot have extra columns (such as 'Old Fixed Price') and the column headers must match.
A relatively simple way to achieve this is to copy all the data to a second sheet (called say Sheet1). On the top sheet you can then replace the original data by formulas where you want to do updates. Thus inserting the formula:
=IF(Sheet1!E2>0,ROUND(Sheet1!E2*1.2,2),"")
in cell E2 of the top sheet and then copying this to all cells below it in the E column will:
- increase all fixed prices by 20%; and
- round them to 2 decimal places
where there is an existing fixed price.
You then save the top sheet in CSV format and import that.
This technique can be used to both create and update prices. To maintain a price history, it is recommended to create new prices.
Creating new Fixed Prices
To create new fixed prices:
1. Clear the Fixed Price Id column contents
Clear the D column, starting in cell D2. This ensures that new fixed prices are created rather than updating existing fixed prices.
2. Change the Fixed Price column
E.g. to increase fixed prices by 50%, add the following to the E2 cell, and copy to the remaining E column cells:
=IF(Sheet1!E2>0,ROUND(Sheet1!E2*1.5,2),"")3. Change the Fixed Price Start Date column
The prices should be given a new start date, so that they don't overlap existing fixed prices. The existing fixed prices will have their To Date set to the Fixed Start Date - 1.
E.g. to date the prices 30 days from the existing prices. add the following to the G2 cell, and copy to the remaining G column cells.
=IF(Sheet1!G2>0,Sheet1!G2+30,"")
The Default Fixed Price column can be used to specify if a fixed price is the default price. This only applies if multiple fixed prices are active for a product at a given time. Valid values are false and true.
Updating Fixed Prices
To update fixed prices, retain the Fixed Price Id column contents, and change the Fixed Price, Fixed Cost, Fixed Price Start Date, Fixed Price End Date and Default Fixed Price columns as required.
Creating new Unit Prices
To create new unit prices:
1. Clear the Unit Price Id column contents
Clear the J column, starting in cell J2. This ensures that new unit prices are created rather than updating existing unit prices.
2. Change the Unit Price column
E.g. to increase unit prices by 50%, add the following to the K2 cell, and copy to the remaining K column cells:
=IF(Sheet1!K2>0,ROUND(Sheet1!K2*1.2,2),"")
3. Change the Unit Price Start Date column
The prices should be given a new start date, so that they don't overlap existing fixed prices. The existing fixed prices will have their To Date set to the Fixed Start Date - 1.
E.g. to date the prices 30 days from the existing prices. add the following to the M2 cell, and copy to the remaining M column cells.
=IF(Sheet1!M2>0,Sheet1!M2+30,"")
Updating Unit Prices
To update unit prices, retain the Unit Price Id column contents, and change the Unit Price, Unit Cost, Unit Price Start Date, and Unit Price End Date columns as required.
Updating Product Printed Names
To change the Printed Name of a product, enter a value in the appropriate Product Printed Name cell.
Product Price Templates
Exported fixed prices can include prices linked from Product Price Templates if the "Include Linked Prices" option is selected when exporting prices.
Where this occurs, a warning will be displayed in the Notes column. E.g.:
Warning: fixed price is linked from Basic Surgery Fee (1047)
Linked prices cannot be updated via the product that links them; the Product Price Template must be updated instead.
Printing
The system is quite flexible when it comes to printing. The standard print request window enables you to print to any available printer, but also to email and preview the document. If you request a preview, the pdf file will be downloaded to your browser from where you can save it or print it.
For many documents, ie invoices, receipts, etc, the system maintains a 'Printed' flag. If set it means that someone has printed the item. However, note that previewing or emailing it does not count as printing.
The administrator can set a default printer for each practice location using Administration|Organisation|Practice Location.
It is also possible to set a default printer for each type of document. More correctly, you can specify the default printer for each document template - see Administration|Templates. You can also set the document to print to a specific printer without displaying the print request window. This is useful with dispensing labels where you always want these printed on the label printer rather than on a standard printer.
These templates also allow flexible control of when documents are printed - see the above link.
Note that these printers are the printers that are available to the server running the database and application. Unless you are running everything on your own machine, the server's printers may be different from your own. If the server has no printers then you can still print - a pdf will be generated and downloaded just as though you pressed the Preview button.
If you have a situation in which your office is split over two floors and you want different default label and standard printers for each floor, then you can accomplish this as follows:
- Clone the primary practice location (say Main) to define a second location, Main-Upstairs. This is a clone of Main (ie same Shedule & Worklist Views, same Stock Location etc) but with a different default printer set.
- For any templates for which you want to specify the printer to be used, edit the template to set the printer for each location. Normally this will only necessary for the Drug Label template.
- If you wish, change the name of the Main location to say Main-Downstairs.
- If there is a standard printer for Upstairs, set this as the default for the Main-Upstairs location.
- For users who work upstairs, set their default location set to Main-Upstairs.
Note that if you are using reports that report stuff by practice location, you will need to combine the the information for Main-Upstairs and Main-Downstairs in order to get the totals for the Main location.
Problems
The system provides the clinician with the ability to create a "Problem" in a patient's medical records, and then enter notes and medication against that problem.
The Problem can have a lifetime that spans multiple visits and provides a way of looking at the notes and medication related to the problem. When looking at the the Medical Records summary, the items belong to the problem will be spread throughout the medical history, however, by using the Problems tab, one can see all the items associated with the one problem gathered together.
Note however, that caution should be exercised if medication entries are made against the problem because these will not be charged for, ie no invoice line item will be created for the medication.
The problem has a status which is set to either Un-Resolved or Resolved.
Products
OpenVPMS has a number of ways of grouping or classifying products as follows:
Type of Product
There are five types of product as follows:
| Service
|
These just have a name (and other optional attributes like prices, discounts, taxes etc etc). They are not stocked items and you cannot run out of them. Example: Consultation |
| Merchandise |
Things that are sold and hence also have a Selling Unit (eg Box, Vial, Unit etc) and associated supplier details. Example: Dog Collar |
| Medication |
In addition to the details held for Merchandise items, these can have drug labels, dispensing notes, a drug schedule and list of active ingredients. Example: Baytril Otic |
| Product Price Template
|
These just have a name and a price and are used to set common pricing for a number of products (by linking the fixed price of the product to this template rather than setting its own). Example: Dispensing Fee - Standard |
| Template |
These are used to group a number of products together. They are commonly used for procedures. When you use the template product when creating an invoice, it will be expanded into its component items. The template can include a note to be put on the invoice, and a note to be added to the patient's medical record. Hence, sometimes it is useful to have a template that includes only one product - because of this ability to automatically generate these notes. Example: Cat Spay |
Note that some things that are logically services - eg cremations (and in fact any services that you offer which are in fact drawn from an outside supplier) need to be set as Merchandise so that you can record the supplier of that service.
Product Type
(Note that ‘Product Type’ is not the same as ‘Type of Product’.)
Each Service, Merchandise and Medication product can be set to be one of a number of Product Types. Examples might be: Administration, Anaesthesia, Consultation, Consumables, Desexing, Dental, etc. As well as enabling reporting by the sort of product, discounts can be set by product type. Also one can determine the appearance of invoices by the order in which items are shown and whether or not items of the same type are combined into one line item.
Product Classification
This is another method for grouping or selecting products for reporting purposes. Your administrator can set up Product Groups and Product Income Types, and you can set a product to belong to one or more of the classifications.
Reminders
OpenVPMS has a powerful and flexible system for sending out reminders to clients that their animals are due for a vaccination, dental check, annual check, etc. Its features include:
- as many different types of reminders as you want, each with its own settings and formats of reminder notifications
- automatic generation of a reminder when a product is used or service provided (ie recording that a vaccination was done can generate the reminder for the repeat due in 12 months time)
- support for sending out reminders by post, email, or generating a list of customers to contact, or a set of address labels. The data can also be exported to CSV format for processing by a 3rd party.
- a group flag that enables optional grouping of reminders so that a customer having multiple animals each with multiple reminders receives only one reminder document listing all the individual reminders
- the ability to define when a given reminder is due, eg 12 months for this product/service, 3 years for another, together with the facility to override this
- flexible definition of when reminders become overdue and what to send out on the first, second, third etc reminders
- automatic cancellation of old reminders
- automatic completion of one reminder by another by making them members of the same Reminder Group. For example you may set a puppy vaccination and an annual canine vaccination as two different reminder types, but belonging to the same reminder group (eg Vaccination), so that when generating a subsequent invoice for a canine annual vaccination, the Canine Annual reminder will automatically "complete" any previous Canine Puppy or Annual reminder.
- highlighting of reminder status on the Patient screens
- colour coding of whether the reminder is not yet due, currently due, or overdue (as green, yellow and red respectively) with the ability to set the length of the 'currently due' window
The tools to set up and use reminders are:
- Administration|Types|Reminder Types to setup and maintain each Reminder Type
- Administration|Lookups|ReminderGroups to define the Reminder Groups used to group different reminder types together
- Administration|Templates to define the Document Templates used by each reminder type to define the content of the reminder notifications
- Products|Information to attach reminders to the products so that when the product is invoiced, a reminder is created
- Customers|Information to display and edit the contact information to check and update how reminders are to be notified (ie which contact has the purpose 'Reminder')
- Patients|Medical Records to display and perhaps add a reminder for a patient
- Reporting|Reminders to display and generate the reminder notifications
- Administration|Organisation|Practice to configure the file format when exporting reminders
A reminder can be in one of 3 states as follows:
- In Progress - is active, ie neither completed nor cancelled
- Completed - what should have happened has (eg the next vaccination)
- Cancelled - the reminder either became too old and was automatically cancelled or it was manually cancelled
Only In Progress reminders are processed by Reporting|Reminders. The possible actions depend on the age of the reminder, whether the reminder type has a template, the 'reminder count' (how many reminders have been sent previously) and associated template, and the customer's contact details. The actions are as follows:
- Post - the reminder will be printed and will have to be posted to the customer
- Email - the reminder will be emailed to the customer
- List - the details will be listed on the Patient Reminders Report (the standard version of this lists the customers names with their pet's name and the reminder type, but it is possible to modify the report to generate address labels)
- Export - the details will be exported to file. See Reminder Export format for a description of the file
- Cancel - the reminder will be cancelled because it is too old and has reached it's cancellation date
- Skip - no processing will be done either because there is no template at all specified for the reminder type, or because there is no template with the current reminder count
For a full discussion of how reminders are processed, see Reporting|Reminders
Reports, Forms, Letters and Documents
There are various sorts of things that the system can generate for printing. They are as follows:
Reports - these are invoked for the Reporting|Reports screen. Typically a report has some input parameters (eg the from and to dates, the product type, etc). As well as printing the report, you can also generate a PDF file, or export the data for use in a spreadsheet. Reports can be give a 'level', and only users with a 'level' equal to above that will be able to run the report. A number of standard reports are included with the system distribution, more are available from the community resource. If you want/need to modify or create reports, this is possible but need technical skills - see here.
Forms - these are what they sound like - forms that the system can generate that can include merged-in information about the current patient, customer or supplier. You can modify or create these with a standard word processor. See here for further information.
Letters - these are not quite what they sound like - in fact, they are just forms with input parameters. They are thus used where it is necessary to show information that is not available from the system. For example, if we have a 'Health Check for Purchase' form, then although the system can automatically fill in the patient details, comments on items like Eyes, Ears, Teeth & Mouth, Chest Auscultation, etc need to be provided by the vet. Rather than printing the form and then filling these in, the system can prompt for this information and enter it on the form. Since you can use macros when entering the prompted-for data, you can quickly enter standard information.
System Documents - these are the things like invoices, receipts, etc that the system generates. The system distribution includes these, but it may be desirable to modify them. If you need to do this, see here.
SMS
The system supports sending SMS messages. The SMS messages are sent using the 'email to SMS' facility provided by various companies.
SMS messages can be sent to any customer or supplier who has a Phone Number Contact with "Allow SMS" ticked.
SMS messages can be sent by clicking the SMS button:
- in the Customer Summary panel on the left of the screen
- in the Customer's Phone Number contact display (on the Customers|Information screen)
- in the Supplier's Phone Number contact display (on the Suppliers|Information screen)
The message length is limited to the standard SMS limit of 160 characters - ie the linking of multiple SMS messages to send longer message is not supported.
Two companies are supported via tailored configuration screens, SMSGlobal and Clickatell. Other companies can be accomodated via a general configuration screen.
See also Reference|Setup|SMS and Customers|SMS.
Schedules, Work Lists and Workflow
Schedules, Work Lists and Workflow - these are the things that make OpenVPMS easy to use. Reception staff and clinicians can almost carry out all their work starting from the Scheduling and Work List screens. The system has a concept called 'workflow' which automates many of the necessary steps to get from an appointment being made to having the visit and invoicing all completed and the patient happily checked out.
Note that you do not have to used either schedules or work lists - you can check a patient in from their Patients|Information screen. But it really does make life easier - the schedule(s) allow you set up an orderly system to enable customers to be serviced with minimum delay, and the work lists allow you to see the queue of things to be done and monitor what is happening.
This page contains the following headings: Schedules, Work Lists, Workflow, Check-In, Consult, Check-Out, Appointment status, Task status, Status Updates, Multi-Day Resource Bookings, Staff Availability, and Tools.
Schedules
A schedule is a simply a diary of appointments. The following features are provided:
- as many schedules as you need - you will probably want one per clinician (or perhaps per on-duty clinician) and one for 'any clinician'
- you can define 'schedule views' to allows groups of schedules to be displayed at the same time
- schedules can belong to more than one view
- schedules can also represent resources, ie consulting rooms and surgeries
- each schedule can have its own minimum time slot size (eg 5 minutes, 15 minutes)
- schedules with different minimum time slot sizes can be combined on the same schedule view
- you can tailor the check-in process for each schedule by defining the available worklists, documents, and whether or not there will be a weigh-in step
- schedule views can be assigned to one or more practice locations and configured to be the default when the location is changed
- schedules can have multiple appointment types (with a default) and each appointment type can be assigned a default appointment duration
- appointment types can be colour coded
- scheduling dates can navigated by day, week, calendar selection and also by entering abbreviations eg 6w to jump 6 weeks ahead
- a clinician can be assigned to an appointment
- schedules can highlight appointments by appointment type, clinician or appointment status colour
- appointments can be easily moved between dates and schedules
- schedule views can be filtered to show specific times (Morning, Afternoon, Evening, AM, PM) as well as filtered by clinician
- when the appointment is created any relevant customer and patient alerts are displayed
- when an appointment is selected, the customer and patient details are shown in the left panel
- the appointment details include a 255 character notes area, and a set of user defined list of reasons
- the way the appointment is displayed in the schedule is customisable, and the presence of notes is indicated by a bubble icon display to save space
Work Lists
A work list is at its simplest, a queue or list of things to be done. However, it can also be used to manage hospital occupancy, boarding kennels and other resources. While schedules contain appointments, work lists contain 'tasks'. The following features are provided:
- as many work lists as you need - you will probably want one per reception area/waiting room, one per resource (eg hospital, boarding kennels), and perhaps a general 'to do' list
- you can define 'work list views' to allows groups of work lists to be displayed at the same time
- work lists can belong to more than one view
- for resource work lists, you can set the number of slots in the list to corresponds with the number of kennels etc that the resource has. For queues and lists, the number of slots is set high - normally 100.
- work lists can be combined on the same work list view
- work lists views can be assigned to one or more practice locations and configured to be the default when the location is changed
- work lists can have multiple task types (with a default) and each task type can be colour coded
- each worklist can be tailored to control the list of documents presented for use at check-in time and also whether or no a weigh-in screen is presented
- for a given date, only those tasks whose start & end dates span the selected date are shown - thus it is possible to 'book' a resource for some future period of time, and it is also possible to look at an earlier date to see what was happening on that date
- the dates can navigated by day, week, calendar selection and also by entering abbreviations eg 6w to jump 6 weeks ahead
- a clinician can be assigned to a task
- work lists can highlight tasks by type, clinician or task status colour
- tasks can be easily transferred between work lists
- work lists views can be filtered display tasks by status (incomplete or complete) and to highlight tasks for a selected clinician
- when a task is selected, the customer and patient details are shown in the left panel
- the task details include a 255 character notes area
- the way the task is displayed in the work list is customisable
Workflow
Buttons on the Scheduling and Work Lists screens enable you to proceed through the steps necessary to process a job from start to finish. These buttons are:
- New - create a new appointment or task
- Check-In - checks in the patient
- Consult - displays the Visit Editor (which enables you to enter all the visit details , ie medical records, invoice items, reminders & alerts, and documents from one screen)
- Check-Out - checks out the patient
The normal division of labour is that the Reception staff create the appointments and check the patient in. The vet(s) then use the Consult button to enter all the visit related data using the Visit Editor, and then press it's Completed button when they are done. Reception then takes over and does the Check-out.
Check-In
The Check-In button is available on Scheduling and Patient Information screens. Pressing it does the following things:
- presents a work list select screen to allow the appropriate work list to be selected (you can skip choosing one but it is sensible not to)
- optionally presents a weigh-in screen to record the patient's weight - you can skip entering the weight if you want
- optionally presents a tailored list of patient letters and forms to be selected for printing (for example admission forms). If any letters are selected and these have fill-ins, then these will be prompted for. Depending on the document template setup, the forms may be printed immediately or held until check-out time.
- a task is created in the selected work list. The task type is set to the default for the work list, the notes field is set to the appointment reason with any appointment notes concatenated to it so it comes out like 'Checkup - owner worried about weight gain'. The task status is set to Pending.
- creates a Visit entry in the patient's medical record with reason set to the appointment reason, and the status 'In Progress'. Note that in some cases an existing visit is re-used - see Concepts/Visits.
- if no open invoice exists, a new one is created
- presents the Visit Editor screen. The appropriate visit information could be entered immediately, but normally (since the Reception staff are probably doing the check-ins and not the clinicians) this is exited using the OK button without entering further information.
- updates visit status to In Progress, the appointment status to Checked-In, and the task status to In Progress
Consult
The consult activity is much simpler. Pressing the Consult button (on either the Scheduling or Work List screens) brings up the Visit Editor screen. This is used to:
- add to and edit the medical record
- add items to the invoice
- manage reminders and alerts
- add any required documents to the medical record
The Visit Editor can be exited using one of the following buttons:
- Cancel - discards any pending updates (ie those for which the Apply button has button not been used)
- OK - applies any pending updates but does not update any status
- In Progress - applies any pending updates, and if the invoice status was previously Completed, sets it back to In Progress
- Completed - applies any pending updates and sets the invoice status to Completed, and the activity and task status to Billed
Note that the In Progress and Completed buttons are only available on the Invoice tab of the Visit Editor.
Check-Out
Pressing the Check-Out button (on either the Scheduling or Work List screens) does the following:
- presents the Invoice Edit screen to allow any last minute changes to the invoice
- presents the Finalise Invoice? window so that you can finalise the invoice. If you say Yes, then its status will be set to Finalised.
- if the invoice is now finalised then the Pay Account? window is displayed. If you say Yes, then the New Payment window is displayed so that the payment can be made.
- if there are documents to be printed (eg the invoice and any patient documents), then the Print window will be displayed allowing you to print either all or selected documents
- the activity and task status are set to Completed
Appointment status
The appointment status can be as follows:
- Pending - the initial status when the appointment is created
- Checked-In - has been checked-in
- In-Progress - activity is in progress
- Billed - the associated invoice is complete
- Admitted - can be set manually
- Cancelled - appointment cancelled - set manually by editing the appointment
- Complete - has been checked-out
Task status
The task status can be as follows:
- Pending - the initial status when the appointment is created
- In-Progress - activity is in progress
- Billed - the associated invoice is complete
- Cancelled - task cancelled - set manually by editing the task
- Complete - has been checked-out
The following table shows the change in status of the appointment (in the schedule), the task (in the work list), and the invoice as things progress from a new appointment to all being completed. The actions are the buttons that are pressed on the various screens. Where the same action is shown for both the Schedule and the Work List, this simply means that the button is shown on both screens and you can use either one.
| Schedule | Work List | Invoice | Visit | |||
|---|---|---|---|---|---|---|
| Button | Status | Button | Status | Button | Status | Status |
| New | Pending | - | - | - | ||
| Check-In | Checked In | Pending | - | In Progress | ||
| Consult | In Progress | Consult | In Progress | In Progress | (unaltered) | |
| OK | (unaltered) | (unaltered) | ||||
| In Progress | In Progress | (unaltered) | ||||
| Billed | Billed | Complete | Completed | Completed | ||
| Check-Out | Completed | Check-Out | Completed | Finalise=Y Finalise=N |
Finalised Completed |
Completed |
You can of course manually alter the status, but in general you should not need to do, the workflow will take care of setting the appropriate status resulting from each action. The exceptions are: placing an invoice on hold, and cancelling an appointment or task - you need to do these manually - but you won't need to do this often.
Note also that because the appointment and task are linked, changing the status of one will generally change the status of the other. Thus if you have an appointment checked in (and thus the task has been created and has status Pending), then the customer walks out, then you can simply change the status of either the task or the appointment to Cancelled and this will also update the other one automatically.
Multi-day Resource Bookings
This section discusses how to handle multi-day resource bookings.
The scheduler can handle appointments that span the midnight boundary, so you can make an appointment for a 7-day stay in a boarding kennel. However, this does not give you the optimum resource control. The trick is to use work lists (rather than the appointment schedule) and do things is as follows:
- set up a work list that represents the kennels (or hospital), and set the number of slots to match the number of runs/kennels/cages
- when you get a booking for the boarding kennel, create a task in the kennels work list, with the start and completed date/times set for the expected stay - the status will be Pending
- when the patient arrives use the Consult button to move the status to In Progress and if necessary open an invoice and add notes etc to the visit record
- when the patient leaves, use the Check-Out button to do the discharge processing
Because we have limited the number of slots in the work list, the system will tell you if you are trying to book boarding between dates where the number of cages/runs available on any day between those dates exceeds the maximum.
Staff Availability
It is useful to be able to show on the schedule periods when staff are not available. This can be accomplished as follows:
- create a dummy customer with the Name "--Do Not Use--", First Name "Dummy 'No Customer' customer", and Company Name "-" - this provides us with a customer to be used where there is none [necessary since when creating an appointment, one must specify the customer]
- create an Appointment Type "Block Out", and Appointment Reasons such as "~Off Duty~", "~Meeting~", and "~Lunch~" - the use of the tilde ~ groups these reasons together at the bottom of the reasons list
You can now create 'appointments' which indicate staff unavailability for various reasons.
Tools
The tools to set up the above facilities are:
- Administration|Types|Appointment Type and Task Type to setup and maintain the required appointment and task types
- Administration|Lookups|Appointment Reason to setup and maintain the the required appointment reasons
- Administration|Organisation|Schedule and Schedule View to setup and maintain the required schedules and schedule views
- Administration|Organisation|Work List and Work List View to setup and maintain the required work lists and work list views
- Administration|Organisation|Practice Location to link the schedule views and work list views to the practice location
Stock Control
OpenVPMS has a very capable stock control system. Its facilities include:
- stock control can be enabled or disabled for each Practice Location
- stock can be held in multiple locations - these are called Stock Locations and represent storerooms, warehouses, etc
- a Stock Location can be shared between Practice Locations, but a Practice Location cannot use multiple Stock Locations
- when a customer invoice (or credit note) is processed, the associated stock updates are automatic
- each product can have stock levels (ideal and critical) set for each Stock Location together with always order and never order options
- each product can have one or more suppliers defined - one of which can be set as the preferred supplier, and for each supplier you can set the ordering information for that supplier
- orders can be generated either manually, or automatically
- the automatic order generation process allows the generation of orders for either a specific supplier and stock location, all suppliers and a specific stock location, or all suppliers and all stock locations. You can also specify whether to order only items at or below their critical stock level, or all those below their ideal stock level.
- to assist with the manual creation of orders, there is a Stock Reorder report
- the ESCI facility provides automation of the processing of orders, deliveries and invoices for suppliers who have implemented the required interface
- the manual handling of deliveries is well streamlined - you select what is being delivered from a list of outstanding orders and their line items, check these off, and after the deliveries are finalised, the supplier invoice can be automatically created. A given order can have multiple deliveries - ie if you place an order for 20, the system can handle this being delivered in say 5 and then another 15 some time later. Supplier invoices can be created for each delivery or you can manually create them.
- when receiving items stock levels are updated automatically, and it is also possible to have the product's cost price updated
- the stock adjustment transaction allows the update of the stock levels of one of more products
- the stock transfer transaction allows the transfer of products between stock locations
- one can have a stock location not attached to a practice location. This can be used as a mechanism to keep a record of written-off stock, ie create a stock location called Write-offs unlinked to any practice location, and transfer written-off stock to it. Similarly, to support conversion of one product into another, you could create a Conversion-out and a Conversion-in location, and transfer 10 cartons of pet food to Conversion-out and then transfer 10x12=120 cans of pet-food in from Conversion-in.
- reports available include Stock Take by stock location, Stock Value by stock location, Stock purchases, and Stock sales
To track the progress of orders and deliveries, both these have a status, and the order also has a delivery status.
The order status can be one of the following:
| Order Status | Meaning |
|---|---|
| In Progress | the initial status when the order is created |
| Finalised | has been finalised, no more changes can be made |
| Accepted | order has been accepted by the supplier |
| Rejected | order has been rejected by the supplier |
| Completed | order is complete - no more items to be delivered |
| Cancelled | Order has been cancelled |
The order's delivery status can be one of the following:
| Delivery Status | Meaning |
|---|---|
| Pending | no items have deen delivered yet |
| Part | some items have been delivered |
| Delivered | all items have been delivered |
The status of the actual delivery can be one of the following:
| Status | Meaning |
|---|---|
| In Progress | items are being delivered |
| Posted | delivery is finalised, either because all items have been delivered (in which case the Delivery Status or the order will be 'Delivered') or they have not (in which case the Delivery Status or the order will be 'Part') |
| Cancelled | the delivery is cancelled |
Suppliers
In OpenVPMS the term 'supplier' includes all the entities that supply things:
- Supplier Organisations - ie companies that you purchase from
- Supplier Personnel - ie the representatives & sales staff within the above companies
- Veterinary Practices - ie the other practices that you use to refer patients to or purchase services from
- Veterinarians - ie the vet staff within the above practices
Note that the use of this split into organisations and staff is not mandatory, and you could just use Supplier Personnel and Veterinarians. However, since staff change, it is probably best to set up the Supplier Organisations and Practices, and then add the appropriate staff entries.
On the accounting side, the supplier transaction set is not nearly as rich as the customer transaction set. Specifically there are no initial balance or adjustment transactions, nor a Check Balance facility. As indicated elsewhere, OpenVPMS does not attempt to provide a complete accounting system for the business. Hence on the supplier side, it provides just enough to handle orders and deliveries.
If you are setting up the system and do want to bring in the current balances for your existing supplier accounts, then the work around would be to create a product say zz-prior-supplies with Printed Name say 'Prior Supplies' and create supplier invoices or credits using this product. Then deactive the product so that it will not be available for normal use.
Taxes
OpenVPMS provides support for value added type tax systems, ie the GST used in Australia and the VAT system used in the UK.
More specifically, it is set up to display amounts as 'tax-included', rather than, as is the case in some countries, on a 'without tax' or 'ex-tax' basis. However, since the system keeps track of the tax amount at a line item level, it is quite possible to modify the standard invoice, receipt, and credit-note documents so that ex-tax amounts are shown at the line-item level with the summary displaying the total ex-tax, tax, and inc-tax amounts. Similarly, these documents can be modified to the UK standard of showing ex-VAT, VAT, and inc-VAT columns.
Tax Settings
Taxes can be set at the product, product type, and practice levels. One can also define multiple taxes.
In a simple 'same for everything' situation, it is only necessary to set the tax for the practice.
If different types of products are taxed differently, then the taxes can be set at the type level. Note also that the tax percentage can be set to zero. Thus in a situation where everything is taxed at 10% but one type of product is not taxed, then the simplest way to handle this is to set a 10% tax for the practice, and a 0% tax for the tax free product type. Similarly, if one type of product attracts an extra tax, the standard tax can be set for the practice, and the 'extra tax' product type set as having both the standard and the extra tax.
If there are only a few products with different tax rates, then it may be easier to set the taxes for the individual products.
Customers with special tax status can be accomodated since it is possible to set excluded taxes for any customer.
The system does not support location dependent taxes. That is, it is not possible to have different practice locations with different taxes.
Product Pricing
As discussed earlier, prices are displayed and entered as inc-tax amounts.
For each product, a cost price and a markup can be entered, and the system will calculate the tax-included price as follows:
price = (cost * (1 + markup/100) ) * (1 + tax/100)
The tax rate to use is selected as follows:
- if taxes are set for the product, use these
- if the product has a product type, and if that type has taxes set, use these
- else use the taxes set for the practice
Alternatively, if desired, the tax included price can be entered directly without any cost or markup.
Customer Transactions
When a product is entered on an invoice (or credit-note etc) the system first uses the logic above to decide the applicable taxes. It then checks if the customer has any tax exclusions, and if so removes these.
The tax included amount and the tax amount are calculated and stored for each line item. The invoice (or credit-note etc) record holds the total tax-included amount and the total tax amount.
Note that the line-item record also holds the cost and tax-inc amounts of the fixed component of the price, and the quantity and the cost and tax-inc amounts of the unit component. (See also Concepts|Pricing) Hence it possible to construct reports on the achieved sales margins by product, product type, customer, patient breed and so on.
Tills
The tills represent the actual tills that the practice uses to hold money. They track not only the cash payments that you receive, but all the other types of payment types (such as cheques, credit cards, EFT, etc) and also any refunds. There will normally be one till for each location but there can be more, and multiple locations can share a till.
At suitable intervals, normally at the end of the day, you will want to check what's in the till, and take out what should be deposited in the bank. This is done using the Reporting|Till Balancing screen. Using this you can print a report of what the system thinks is in the till; you can adjust the cash amount if there have been counting errors; and you can 'clear' the till to remove everything that should go to the bank. It is normal to leave a small cash 'float' in the till so that you have money on hand for change (and cash refunds) at the start of the next day.
Note that the system allows you to balance the till without stopping/pausing the business. Hence practices that operate around the clock are supported.
So the process is print, check and if necessary adjust, then clear.
After you have cleared the till, the money can only be deposited in the bank - it is not available for any refunds. The deposit operation is done using the Reporting|Deposit screen.
The tills are setup by your administrator using Administration|Organisation|Tills.
Users
Each user is assigned a category, a role, and a level - these determine what the user can do. Each user also has a login name and password and various other settings discussed below. Users are set up and maintained via Administration|Users.
User Groups can also be created via Administration|Groups. These are used only to allow messages to be sent to multiple users and cannot be used to set categories and rolls for groups of users.
Categories
The system comes with four, administrator, clinician, nurse and reception - but more can be added using Administration|Lookups|User Types. A user can belong to more that one category - ie it is quite logical for someone to be both a clinician and an administrator.
Administrators get an extra 'Administration' entry in the top menu line which allows access to the various administration functions. In addition, the following other functions are made available to Administrators (and are not available to non-administrators):
- Customers|Accounts Check
- Customers|Information Merge
- Patients|Information Merge
- Products|Information Edit, Delete, Copy, Export, Import
Only users set as clinicians are displayed in the 'Clinician' pull-down list shown on various screens. Note that as well as setting all vets as clinicians, it may be appropriate to set some some nursing staff as clinicians.
Roles
The role defines what the user can do. The system comes with only one, administrator, who can do everything - but more can be added using Administration|Roles. A user can have zero, one or more roles. If the user has no roles, then they will be able to see everything but will be unable to create, change or delete anything (and will receive an 'Access is denied' error message if they try).
Each role can have zero or more 'authorities'. A complete set comes with the system, but if necessary these can be maintained using Administration|Authorities. The authorities are split into areas with a create, save (ie modify), and delete for each area.
For example for Customer there are:
Customer All Acts Authorities (which includes all the following)
Customer Adjustment Authorities
Customer Alert Authorities
Customer Balance Authorities
Customer Charges Authorities
Customer Charges Items Authorities
Customer Document Authorities
Customer Estimation Authorities
Customer Note Authorities
Customer Party Authorities
Customer Payment Authorities
Customer Refund Authorities
Thus, potentially one can have very fine grain control.
It is also possible to create a role that can create and save everything, but delete nothing. You may want to use this to prevent anyone except the administrators from deleting things.
Levels
Each user has a 'level' from 0 to 9. Reports also have a level. A user cannot run a report with a level higher than their own.
Login
All users have a Login Name and a Password. Note that:
- A normal user (ie not an administrator) cannot change their own password - this must be done for them by an administrator.
- There is no block in the system against multiple people logging on to the system at the same time with the same Login Name - that is if you choose to operate with logins that reflect functions (such as reception, pharmacy, and nurse) rather than names, then there will be no problem with multiple people logging on as 'reception' at the same time. However, in this environment there will be less tracking of who did what since a number of different individuals will be using the same login name.
Names and Descriptions
All users have a name and a description. The name can be anything, eg GB, George Brown, or Dr George Brown. However, there is benefit in using short names (like GB), particularly for clinicians, because it makes it easier to quickly enter the clinician. This is particularly easy if each clinician's name starts with a different letter. If you are using short names, then the user's description should be set to the full name, eg Dr George Brown or even Dr George Brown BSc(Vetbiol), BVMS(Hons). This can then be displayed on forms and certificates.
Colours
All users have a 'colour' which determines how their names are highlighted on certain screens - notably the Scheduling and Work List screens. By default it is black on white. Different colours are really only necessary for clinicians since it is only clinician names that are highlighted.
Visits
A 'visit' is what it sounds like - a meeting between the vet and the patient. The visit entry in the medical records acts as a heading to group together all the items associated with the visit. Thus under a visit one can have notes, documents, medication and charged items.
The Medical Records Summary is displayed in visit order with the latest visit at the top. Within the visit itself, the items can be displayed in either ascending or descending date/time order.
There is no concept of 'finalising' a visit so that it cannot have entries added to it, or the existing entries deleted or edited. However, you cannot delete or add charges to a past visit.
The visit is normally created when you check-in the patient - but see also below. You then use the visit editor to add items to the visit. See also Schedules, Work Lists and Workflow.
The 'visit' will normally be a real vet-to-pet meeting, but could also be a phone call to the owner (and thus on the Medical Records screen there is an 'Add Visit & Note' button to allow this call to be easily recorded).
Visit Creation
Visits are created in the patient's medical record:
- as part of the appointment Check-In process
- if you create a task on the Work Flow|Work Lists screen, and then use the Consult button to open the Visit Editor
- if you use Customers|Payments to create or edit an invoice and the line item specifies the patient (and if the invoice involves multiple patients, then a visit will be generated for each one)
- if you use the 'Add Visit & Note' button on the medical records screen
- if you use the New button on the medical records screen to add a new visit
In the first three cases, and existing visit may be added to rather than creating a new one. This occurs in the following circumstances (note that 'event date' means the appointment or task date or the date of the invoice line item):
- if an IN_PROGRESS visit exists and it is less than a week old, it will be added to
- If a COMPLETED visit exists starting on the same date as the event, it will be added to
- If a COMPLETED visit exists with both the start and and end dates set, and the event date is between visit start and end dates, it will be added to
- If a COMPLETED visit exists starting on a prior day but has no end date set, then it won't be used and a new visit will be created
Notes:
- If the visit is being created as a result of checking-in an appointment, then the visit reason will be set to the appointment reason, otherwise the reason will not be set and the medical records will show 'No Reason'.
- When a visit is completed as a result of the check-out process, the end date of the visit is not set automatically. The end date will be set if you edit the visit record manually and either change the visit status from In-Progress to Completed or set the Completed Date.
Workspaces
As indicated in Introduction|Screen Layout, the system provides a number of different (Customers, Patients, Suppliers, ...) 'workspaces'.
These are so called because the system preserves their contents as you switch between them. Thus if you call up a customer in the Customer workspace, then go to say the Workflow workspace (by clicking on Workflow in the top menu line, or typing Alt-W), and then go back to Customers, your customer display will be unaltered.
Similar 'remember what was displayed' behaviour occurs within a workspace. For example, in the Workflow workspace there are four topics: Scheduling, Work Lists, Messaging, and Investigations. The displays for each of these is remembered separately so that you can switch between the screens without losing anything.
There is one problem with this 'remember what was displayed' behaviour - what happens if something has changed - ie another user entered a new appointment. When you return to the Workflow|Scheduling screen, it will be as you left it. In order to get an up-to-date view, you need to click the Find button or press the Alt-F key.
Customers
The Customer workspace is used to handle customers.
Information
This screen displays information about the current customer - or if there is no current customer, a Select button allowing you to select a customer, and a New button to create one. It is also the first screen displayed after you log in - if you are new to OpenVPMS you might want to check out Introduction and Concepts.
With a current customer, the screen is as follows:

The screen areas are as follows:
(1) the information panel - the fields here are as follows:
name - this provides a link back to this customer information screen, ie pressing it on the Account screen, brings you back here
phone - the phone number displayed here is the customer's preferred one
email - the customer's email address, clicking this brings up the Send Email window
Balance - the current account balance - ie what the customer owes us
Overdue - the part of the balance that is overdue, ie is overdue for payment
Current Amount - the part of the balance that is due to activity in the current accounting period
Credit Amount - the amount by which the account is in credit
Unbilled - the total of any transactions that have not yet been finalised
Alerts - shows any current alerts for the customer - you can click on the alert to display its details, or if there are more than 4 and 'More...' is displayed, press the View All button to display all the alerts
SMS Button - this will be displayed if the customer has an SMS enabled phone number - press it to send an SMS message
(2) the select area - this shows the customers name and address (which will be the billing address if there is one, else the preferred if is there is one, else the first found) and phone number (which will be the Home number if one has been recorded), and two buttons:
Select - pressing this brings up the Select screen to let you select another customer
Select Again - pressing this brings up the same screen but with you previous selection settings. This allows yoiu to quickly select another customer from the list when the one you chose previously was not the correct one, ie it was the wrong Jennifer Chan
(3) the header area - for the descriptions of these fields, click here
(4) the tabs area - for the descriptions of the fields in the Account Type and Appointments tabs, see below, for the others, click here
(5) the bottom buttons - these are as follows:
New - create a new customer
Edit - edit the current customer - note that you will be editing the compete customer record and all the tab items
Delete - delete the current customer - a confirmation window will appear
Merge - merge this customer with another - a select screen will appear to let you select the customer to be merged in. After you have selected the customer, a confirmation window will be displayed. Note that header information (name, title, etc) of the current customer is retained, but the tab items (patients, contacts, etc) are simply combined, ie there will be two addresses, two phone, numbers, etc etc, and you will need to edit the resulting customer record to delete the unwanted parts.
Note that the Merge button will not be displayed unless the user is a member of the Administrator category - see Concepts|Users.
Account Type tab
This shows the Account Type and its parameters as follows:

For an expanation of the fields see Administration|Lookups|Customer Account Type
Appointments tab
This tab is used to display the customers appointments as follows:

You can see that this operates as a select screen. By default the Status is set to 'Pending' which will thus show just the customer's current and future appointments. However, you can select either All or one of the other Appointment statuses to display historical data.
If you click on the patient name that will take you to the patient's Medical Records screen. If you click elsewhere on the line this will take you to the Workflow|Scheduling screen.
Create/Edit
This is the screen used to create and edit the customer record.
Note that if you are adding a new customer & patient, the easiest way is to use the New button on the Customers|Information screen, fill in the customer details, and before pressing OK to complete the customer add, click the Add button on the Patients tab, and then click the binoculars icon following the Patient name field - this will give you the Patient Select screen on which there is a New button so that you can add the new patient for this new customer.
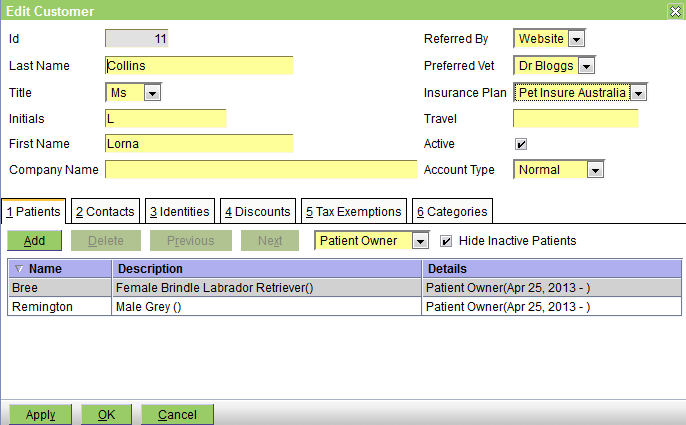
The fields in the header section are as follows:
Id - the customer's ID
Last Name - the customer's last name - note that you need to provide this even if the customer is a company
Title - the customer's title - select from those allowed - these are controlled by Administration|Lookups|Person Title
Initials - the customer's initials -these are best entered as 'J T' or 'J.T.' rather that 'JT' - the last will be propercased to 'Jt'.
First Name - the customer's given name(s)
Company Name - enter the company name if applicable
Referred By - if applicable, select the appropriate value from the list - these are controlled by Administration|Lookups|Customer Referral
Preferred Vet - if applicable, select the appropriate value from the list - these are controlled by Administration|Lookups|Customer Vet. Note that this is a documentation field - it does not set the default clinician for this customer.
Insurance Plan - if applicable, select the appropriate value from the list- these are controlled by Administration|Lookups|Customer Insurance
Travel - if applicable, enter appropriate information such as 'charge 100km for visit'
Active - untick this to deactivate the customer
Account Type - select the account type from the pull-down list. Initially the system has the following Account Types available: Normal (the default), Valued Customer, and Bad Debt. More can be added using the Administration|Lookups|Customer Account Type.
The Account Type can be used for reporting purposes (eg list all customer of type xxx), but more importantly it allows discounts to be applied (eg all valued customers get a 15% discount), and it allows customer alerts to be displayed (eg all Bad Debtor customers show with a red alert).
See also Local Procedures.
The 6 tabs Patients, Contacts, Identities, Discounts, Tax Exemptions, and Categories are documented below.
Note that in some cases, the tabs have a Hide Inactive xxxxx checkbox. This is present when the item being attached to the customer (ie the patient-owner, the patient-location, or the discount) can be deactivated (either by unsetting its Active flag, or if its To Date is in the past). In this case the item will remain attached to the customer, but the item will not be displayed and the customer will act as though the item was not attached. You can have these inactive items displayed by unchecking the Hide Inactive xxxxx box.
Patients tab
This tab is used to add/delete/edit a) 'Patient Owner' records and b) 'Patient Location' records.
Patient Owner - A patient can have multiple owners either at the same time (because the ownership is shared) or sequentially (because the patient passes from one owner to another).
The screen is as follows:
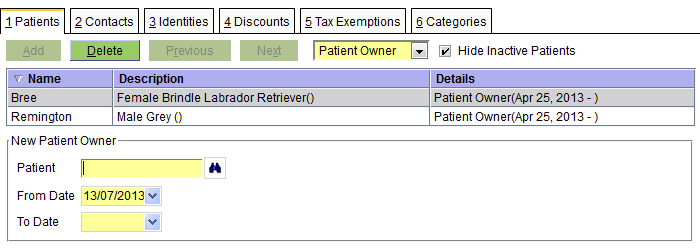
The fields are:
Patient - the name of the patient - if you use the binoculars to search you will be able (by ticking the All Patients option) to select a patient who has another owner and thus set up multiple ownership
From Date - the date from which the ownership started
To Date - the date on which it ended
Notes:
- If you do want to change the ownership of a patient, the easiest was to do it is to edit the patient record (rather than the customer record) since with the patient record, adding another owner automatically terminates the previous ownership.
- if you are simply adding patients to a customer, the easiest way to do this is to first call up the Customer|Information screen for the customer, and the click 'Patients' entry in the top menu line to switch to the Patients workspace and then simply press the New button to add the new patient to the current customer.
Patient Location - patient locations cope with the situation where the patient is owned by Dr Smith but lives at the Happy Horses stables. To cope with this, we have both Dr Smith and Happy Horses as customers. First we set up Dr Smith and his horse Ballantyne as normal. Then we set up Happy Horses as a customer, and add Ballantyne as a Patient Location record.
For the vast majority of cases, where the patients live with their owners, we don't need Patient Location Records.
The screen is as follows:
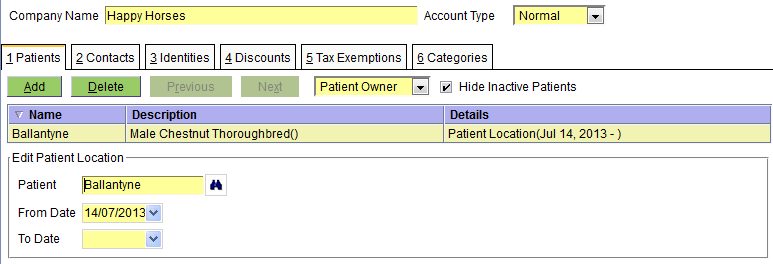
The fields are:
Patient - the name of the patient - note that the name search is done across all owners so that 'bal' will find Ballantyne
From Date - the date from which the location started
To Date - the date on which it ended
Note that given the above set up, if we go look at Ballantyne's information we see:

Note also that since a patient can only be in one place at a time, if you simply add a new Patient Location record to the patient, then the previous location will be automatically terminated.
Contacts tab
The Contacts tab (because contacts are used for customers, suppliers, etc) is documented in Concepts|Contacts.
Note that for good reminder control you should have one and only one contact (phone, email, or location) set with the purpose 'Reminder'. If you have multiple contacts with the purpose Reminder, then the first found will be used by the Reminder system. Similarly if you have no contacts set with the purpose Reminder, then the first contact found will be used for notifying reminders.
Identities tab
The Identities tab is used to set the customer's identities. Note that contrast with patients and products, customers only have one type of identity 'Code', however the customer can have multiple Code identities.

The fields are:
Code - the code - this can be anything appropriate
Description - an optional description of what the code represents (in the above case 54678 was the client number in the RxWorks system that this data was converted from)
Discounts tab
This tab is used to set the discounts that apply to the customer - see Concepts|Discounts for background.
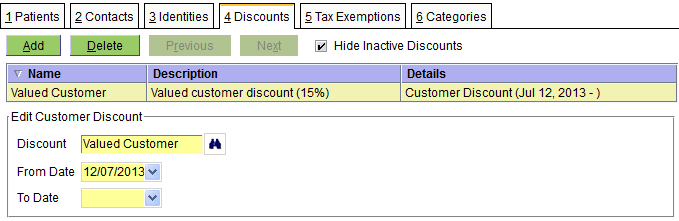
The fields are:
Discount - the discount - note that this can either be a discount, or a discount group
From Date - the date from which the discount applies
To Date - the date on which the discount ends
Taxes Exemptions tab
This is used to exempt the customer from taxes. See Concepts|Taxes for backround information.

Use the arrows to move the selected item from the Available list to the Selected list and vice versa.
Categories tab
This is used to set the categories (zero, one, or more) to which the customer belongs. See Concepts|Categories for background information.

Confirm Delete
When you press the Delete button on the Customers|Information screen, a confirmation window will appear.
If the customer is not in use and can be deleted, the window will simply ask you to confirm the delete. Press OK to confirm or Cancel to abort.
If it cannot be deleted because it is in use, the text will be "xxxx has relationships and cannot be deleted. Do you want to deactivate it instead?"(where xxx is the name of the customer you are trying to delete). Pressing OK will unset its Active flag, Cancel will abort.
Confirm Merge
After you have pressed the Merge button on the Customers|Information screen and selected the customer to merge, a confirmation window like the following will appear.

Press OK to merge the customers, or Cancel to abort.
Customer Alerts
This screen is displayed if you press the View All button on the customer information panel to display the customer's alerts.

The top part of the window shows the alerts. Selecting one displays its details below.
Click here if you need clarification of the meanings of the fields.
Documents
This screen displays the documents for the current customer - or if there is no current customer, a Select button allowing you to select a customer.
This screen shows the details of the customer's documents. As you can see below, there are three different types: Attachments, Letters and Forms. The first two support 'versions', ie previous revisions of the document. See Concepts|Documents for background.

The top half of this screen functions like a standard select screen. As well as by date, you can select by:
Type - this can be set to All (ie all document types), or Attachment, Form or Letter
Status - this can be set to All, In Progress, Completed, or Finalised
The table shows the documents that match the selection criteria. The column headings are self explanatory. Clicking on the entry in the Document column will cause the document to be downloaded and displayed. Note that for Letters the Document column shows two icons like ![]() . If you click on the right-hand one, the pdf file containing the letter will be downloaded and displayed. If you click on the left-hand one (or the name of the document) then the word processing document will be downloaded and you can open it in your word processor and save it and then edit it. (You need to save it as it is opened read-only.) After editing the file, you can then use the Edit button to edit the letter and upload the revised file.
. If you click on the right-hand one, the pdf file containing the letter will be downloaded and displayed. If you click on the left-hand one (or the name of the document) then the word processing document will be downloaded and you can open it in your word processor and save it and then edit it. (You need to save it as it is opened read-only.) After editing the file, you can then use the Edit button to edit the letter and upload the revised file.
The bottom part of the screen shows the details of the selected document.
The buttons are:
New - create a new documment - a window will open allowing you to select the type
Edit - edit the selected document record (not the document itself - though see above). If the document has status Finalised you will not be able to edit the record.
Delete - delete the selected document - a confirmation window will be displayed. If the document has status Finalised you will not be able to delete it.
Print - print the selected document (or preview it or email it)
Refresh - this button only appears when you have a non-finalised letter selected. Pressing it will (if the letter was generated from a template) refresh the letter by regenerating it from the template. This is useful if you have modified the template. A confirm window will be displayed.
Create/Edit Attachment
This is the screen used to create or edit an attachment document in the customer's Documents list. See Concepts|Documents for background.

The fields are as follows:
Start Time - the date on which the entry was created - defaults to today
Description - any pertinent description
Status - this can be In Progress, Completed, or Finalised. In Progress implies that you are still working on this; Completed implies that you have finished - but the entry can still be editied; and Finalised means that it is really complete and can no longer be edited.
Printed - this box will be checked when the form has been printed
Attachment - press the Select button to attach the file - after the file is attached its name (notes.txt in this case) is shown here.
The Versions tab shows the previous versions. Note that you can use the Add button to add another, but you can also use the Select button. If you use the Select button to attach another file, then the previous 'top' version will just be pushed onto the version list.
Create/Edit Form
This is the screen used to create or edit a form document in the customer's Documents list. See Concepts|Documents for background.
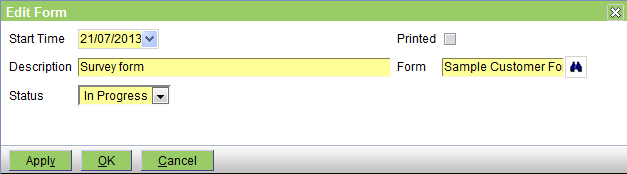
The fields are as follows:
Start Time - the date on which the entry was created - defaults to today
Description - any pertinent description
Status - this can be In Progress, Completed, or Finalised. In Progress implies that you are still working on this; Completed implies that you have finished - but the entry can still be editied; and Finalised means that it is really complete and can no longer be edited.
Printed - this box will be checked when the form has been printed
Form - select the form to print - these are the document templates that are of Type 'Customer Form'
Create/Edit Letter
This is the screen used to create or edit a letter document in the customer's Documents records. See Concepts|Documents for background. As discussed there, you can either generate a letter from a template, or upload any file.
First let's look at the screen shot for a new letter:

The fields are as follows:
Start Time - the date on which the entry was created - defaults to today
Description - any pertinent description
Status - this can be In Progress, Completed, or Finalised. In Progress implies that you are still working on this; Completed implies that you have finished - but the entry can still be editied; and Finalised means that it is really complete and can no longer be edited.
Printed - this box will be checked when the letter has been printed
Template - if you want to generate the letter from a template, enter the template here - these are the document templates that are of Type 'Customer Letter' - the generated document will be an editable word processing file
Document - if you want to simply upload a file as a letter, press the Select button. A document select window will open allowing you to select the required file. If you upload a word processing file (rather than say a pdf or scanned image of a letter) then you will be able to edit it if needed.
Now the edit screen. The senario is as follows: you created an editable letter as above. Then you decided that you needed to modify it, so on the Customers|Documents screen, you selected the letter and then clicked on the actual letter to download it and open it in your word processor. You then saved a copy (as say Survey Letter-2), edited in the required changes and then saved it.
On the Customers|Documents screen you now press the Edit button to get the Edit Letter screen. You then press the Document Select button - this will open a browse window to allow you to select your 'Survey Letter-2' and upload it. The screen will then appear as below. The initial version has been saved as the previous version, and your new one as the new current version.

As intimated above, the Versions tab shows the previous versions. Note that you can use the Add button to add another, but you can also use the Select button. If you use the Select button to attach another file, then the previous 'top' version will just be pushed onto the version list.
Parameters
If a template containing parameters is selected (i.e. Fill-In fields in Microsoft Word, or Input Fields in OpenOffice Writer), a window will be displayed prompting for the values of those parameters. On OK, these will be merged with the document.
Confirm Delete
When you press the Delete button on the Customers|Documents screen, a confirmation window will appear. Press OK to confirm or Cancel to abort.
Confirm New
This window allows you to select the type of customer document to be created. Select the required one and press OK, else Cancel to abort.

Confirm Refresh
If you press the Refresh button on the Customer|Documents screen, then the window below will be displayed. Clicking OK will regenerate the letter from the template. If you leave the 'Version current document' box checked, then the previous version of the letter will be saved as the previous version, otherwise it will not be.
Pressing the Cancel button will abort the operation.

Estimates
This screen displays the estimates for the current customer - or if there is no current customer, a Select button is allowing you to select a customer. See Concepts|Estimates for background.

The top half of this screen functions like a standard select screen. As well as by date, you can select by:
Status - this can be set to All, Cancelled, Completed, Finalised, In Progress or Invoiced
The item area displays the matching estimates. The column headers are self explanatory. Note that the Description column is always blank. You can click on any column header to sort by that column.
The bottom half of the screen displays the selected estimate, its line items, and the details of the selected line item.
Click here if you need information on the item fields.
The buttons are as follows:
New - create a new estimate
Edit - edit the selected estimate
Delete - delete the selected estimate - a confirmation window will appear
Finalise - change the status of the selected estimate to Finalised - a confirmation window will appear. Finalising the estimate locks it from any further changes. If you confirm the Finalise, then a print window will open allowing you to print or email the estimate.
Preview - download and display the selected estimate
Copy - copy this estimate to create another one
Invoice - generate an invoice from this estimate
Create/Edit Estimate
This is the window used to create and edit estimates.

The fields in the header are as follows:
Date - the date of the estimate - defaults to today
Title - enter a short useful description
Expiry Date - the date until which the estimate is valid
Notes - any pertinent notes - this will appear on the printed estimate
Low Total, High Total - the low and high total amounts for the estimate
Printed - this box will be checked after the estimate has been printed
Status - can be set to Cancelled, Completed, Finalised, In Progress or Invoiced. The initial setting is Completed. See the table below.
Clinician - set to the appropriate person
The fields in the Items tab are as follows:
Patient - this is a mandatory field
Product - this is also mandatory
Low & High Qty - the low and high quantities of the product
Fixed Price - the product's fixed price
Low & High Unit Price - the low and high unit prices
Discount - the discount amount
Low & High Total - these show the low and high totals
| Status | Meaning | Set by |
|---|---|---|
| Cancelled | has been cancelled | manually |
| Completed | no further changes expected | initial default |
| Finalised | no further changes allowed | press Finalise |
| In Progress | still being worked on | manually |
| Invoiced | an invoice has been created from this | press Invoice |
Confirm Delete
When you press the Delete button on the Customers|Estimates screen, a confirmation window will appear.
Press OK to confirm or Cancel to abort.
Confirm Finalise
When you press the Finalise button on the Customers|Estimates screen, a confirmation window will appear.
Press OK to confirm or Cancel to abort.
Confirm Invoice
When you press the Invoice button on the Customers|Estimates screen, a confirmation window will appear.
Press OK to confirm or Cancel to abort.
Charges
This screen displays the charges for the current customer - or if there is no current customer, a Select button allowing you to select a customer.
Note that 'charges' are the invoices (or credits or counter-sales) that are currently active, ie not yet Finalised. If you need to look at previously Finalised invoices etc, then you use the Customer|Account screen.
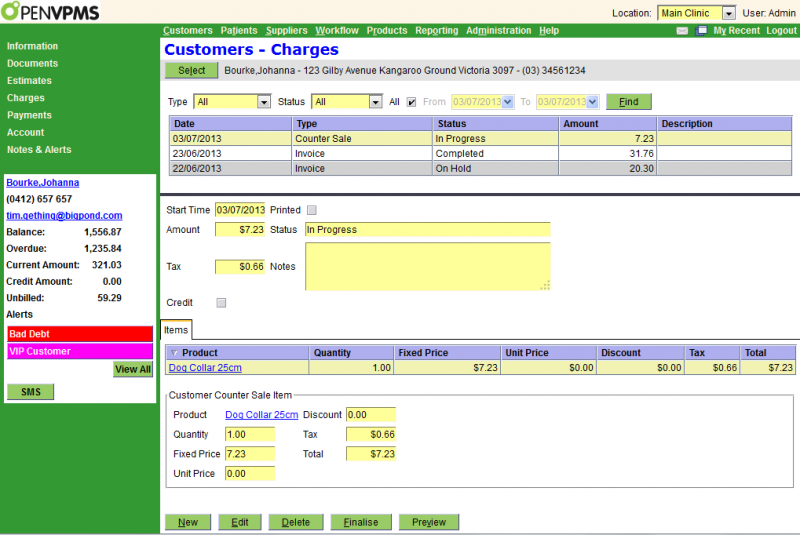
This screen functions like a standard select screen. As well as by date, you can select by:
Type - this can be set to All, Counter Sale, Credit, or Invoice
Status - this can be set to All, Completed, In Progress or On Hold
The item area displays the matching transactions. The column headers are self explanatory. Note that the Description column is always blank. You can click on any column header to sort by that column.
The Items tab displays the line items of the selected transaction, and the details for the selected line item. You can click on any of the column headers except Discount to sort the line items by that column. Click here if you need information on the item fields.
The buttons are as follows:
New - create a new Invoice, Credit or Counter Sale - a confirmation window will appear
Edit - edit the selected transaction
Delete - delete the selected transaction - a confirmation window will appear
Finalise - change the status of the selected transaction to Finalised - a confirmation window will appear. Finalising the transaction locks it from any further changes and moves it the the Customers|Account area
Preview - download and display the selected transaction
Counter Sale
The screen below is that for a new counter sale, but the same screen is used to edit counter sales.
The screen is a subset of the customer invoice screen and you should consult that for the field details.

Credit
This screen is used to create and edit customer credit notes. It works in exactly the same way as the invoice screen with the following exceptions:
- the Credit check box is always checked
- the Patient field is optional, not mandatory
- the item price cannot be negative
Invoice
This screen is used to create and edit customer invoices.
As well as the standard Apply, OK and Cancel buttons, there are two others:
Completed - pressing this is the same as pressing OK but it also changes the status to 'Completed'
In Progress - pressing this is the same as pressing OK but also setting the status to 'In Progress'
Note that you can still edit and add items to a 'Completed' invoice. In fact the only difference between the two states is that Completed invoices can be automatically finalised by the Reporting|Debtors|End Period processing.
The screen consists of a header section, an item area, and an investigations tab and a dispensing tab.

The header area contains the following fields:
Date - the date on which the invoice was created
Amount - the total (tax-included) amount of the invoice
Tax - the total tax amount
Status - this can be one of In Progress, On Hold, Completed, and Finalised. Note that the normal way to complete or finalise an invoice is by using the Complete and Finalise buttons - but you can can just change the status here.
Notes - any appropriate not text - this will appear on the invoice when it is printed
Reference - any appropriate reference code
Credit - this box will be checked if this is actually a credit - it is never checked for an invoice
Printed - this box indicates whether or not the invoice has been printed
Clinician - the approprtae clinician
Location - this displays the location under which the invoice was created
In the line item area, use the Add button to add a new line item, Delete to delete one.
The line item area table column headings are documented below. Note that all columns except Discount are sortable - for example clicking on the Total column will sort by the line item total amount. Click again to reverse the order.
Selcting a line item (normally by clicking it but also by using the Next and Previous buttons) displays the details of that line item. The are as follows:
Date - the date appropriate to the line item - normally this will be the current date but you could set a earlier date indicating the date of the sale or on which the service was performed
Patient - the name of the patient (this is a mandatory field)
Product - the product - you can use a barcode or the product ID here
Quantity - the quantity of the item - you can enter 1, 1.2, 1.23, 1.234 etc but it will be reformatted to show two digits after the decimal point
Fixed Price - this will be set from the fixed price for the product, but you can overide this. If the product has multiple fixed prices (for say Simple, Standard, Complicated) there will be a pull-down so you can select the appropriate one. See also Concepts|Pricing.
Unit Price - this will be set from the unit price for the product, but you can override this
Discount - this will be set from the applicable discounts but you can override this
Tax - the line item tax amount
Total - the line item amount (including tax)
Below is the Dispensing tab. This is present for any medication products that have a dispensing label.
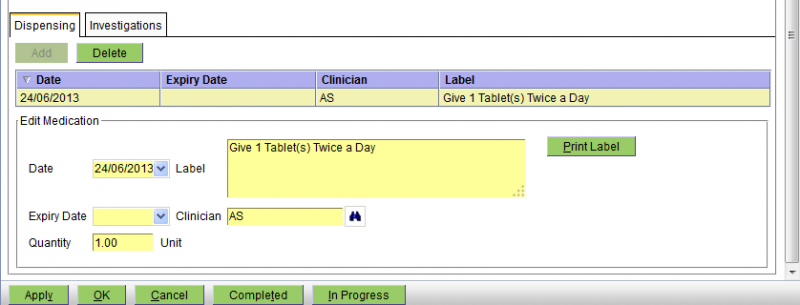
The fields are as follows:
Date - the date the invoice item was created
Expiry Date - here you can enter the expiry date of the medication. Note that you can enter a relative date (eg 2m for 2 months from today).
Quantity - the quantity
Label - the dispensing label - you can use the Print Label button to print this
Clinician - the clinician
Below is the Investigations tab. This is always shown so that you can manually initiate an investigation. Normally investigations are linked to a product, so that when you enter the invoice line item 'XYZ Test' the associated investigation is automatically started. Investigations are normally managed (and initiated) via the Patients|Medical Records screen. See Patients|Medical Records|Investigation for details on the working of this tab.

Confirm Delete
When you press the Delete button on the Customers|Charges screen, a confirmation window will appear. Press OK to confirm or Cancel to abort.
Confirm Finalise
When you press the Finalise button on the Customers|Charges screen, a confirmation window will appear. Press OK to confirm or Cancel to abort.
Confirm New
This window allows you to select the type of transaction to be created. Select the required one and press OK, else Cancel to abort. Note that since Invoice is the default selection, and OK the default button, you can simply press the Enter key to create a new invoice.

Confirm Payment
This screen is displayed after you finalise an invoice. If the account is to be paid now, click Yes, if not click No. Clicking Cancel aborts the operation - the invoice will stay as finalised, but if you were doing a Check-Out, the check-ot operation will be aborted.

Payments
This screen displays the payments for the current customer - or if there is no current customer, a Select button allowing you to select a customer.
Note that 'payments' are the payments (or refunds) that are currently currently active, ie not yet Finalised. If you need to look at previously Finalised payments etc, then you use the Customer|Account screen.
It is unusual for this screen to display any transactions because both Payments and Refunds are by default created with status Finalised and thus are moved immediately to the Account screen.

This screen functions like a standard select screen. As well as by date, you can select by:
Type - this can be set to All, Payment or Refund
The item area displays the matching transactions. The column headers are self explanatory. Note that the Description column is always blank. You can click on any column header to sort by that column.
The Items tab displays the line items of the selected transaction, and the details for the selected line item. You can click on any of the column headers except Discount to sort the line items by that column. If you need information on the item fields click here for payments and here for refunds.
The buttons are as follows:
New - create a new Payment or Refund - a confirmation window will appear
Edit - edit the selected transaction
Delete - delete the selected transaction - a confirmation window will appear
Finalise - change the status of the selected transaction to Finalised - a confirmation window will appear. Finalising the transaction locks it from any further changes and moves it the the Customers|Account area
Preview - download and display the selected transaction
Create/Edit Payment
This is the screen used to create and edit customer payments.
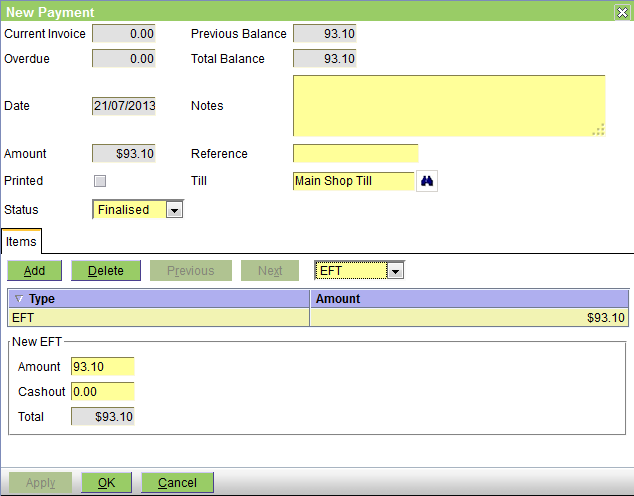
The header fields are as follows:
Current Invoice - the amount of the current invoice (in the above screen shot, there isn't one)
Overdue - the customer's current overdue balance
Date - the date on which the payment was created
Amount - the amount of the payment - this is the sum of the line item amounts
Printed - this checkbox will be checked when the payment is printed
Status - is initially set to Finalised, and can also be set to In Progress or On Hold
Previous Balance - the customers balance at the end of the last accounting cycle
Total Balance - the total balance owed by the customer
Notes - any relevant notes
Reference - any appropriate reference number/code
Till - the till into which the money is to be paid
The Items tab allows you to add, delete, view and edit the item items. The pull-down allows you to select the payment type to be one of Cash, Cheque, Credit Card, EFT, Other, or Discount. Note that the last is a 'negative' payment - you can use this payment type to include a discount for the customer.
The table shows the line items - normally there will be only one.
The item detail area changes depend on the payment type. The picture above shows EFT. Its fields are:
Amount - this will default to the amount owed
Cash Out - enter any cash out amount
For Cash it is as follows:
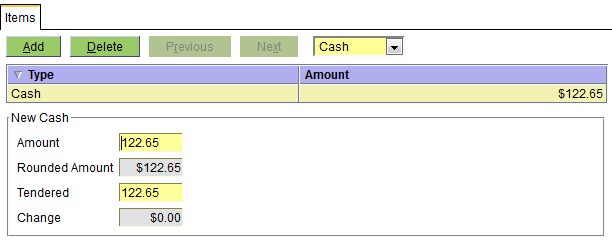
The fields are as follows:
Amount - this will default to the amount owed
Rounded Amount - this is the rounded equivalent of Amount using the minimum cash denomination and rounding mode set for the currency - see Administration|Lookups|Currency
Tendered - the amount tendered
Change - this will be Tendered less Rounded Amount
For Cheque it is as follows:

The fields are as follows:
Amount - this will default to the amount owed
Drawer - the name of the drawer of the cheque
Branch - something that identifies the branch of the bank. For Australian usage this is the BSB (Bank State Branch) number.
Bank - select the bank using the pull-down. The values allowed are set via Administration|Lookups|Bank.
For Credit Card it is as follows:

The fields are as follows:
Amount - this will default to the amount owed
Credit Card - select the credit card using the pull-down. The values allowed are set via Administration|Lookups|Credit Card.
For Other it is as follows:

The fields are as follows:
Amount - this will default to the amount owed
Payment Type - select the payment type using the pull-down. The values allowed are set via Administration|Lookups|Custom Payment Type.
For Discount it is as follows:
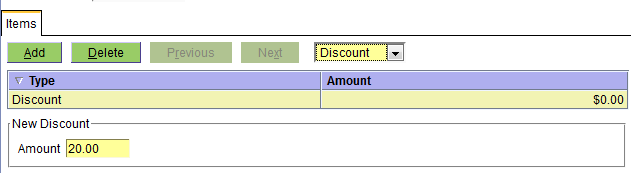
The fields are as follows:
Amount - the discount amount being given
Create/Edit Refund
This is the screen used to create and edit customer refunds.
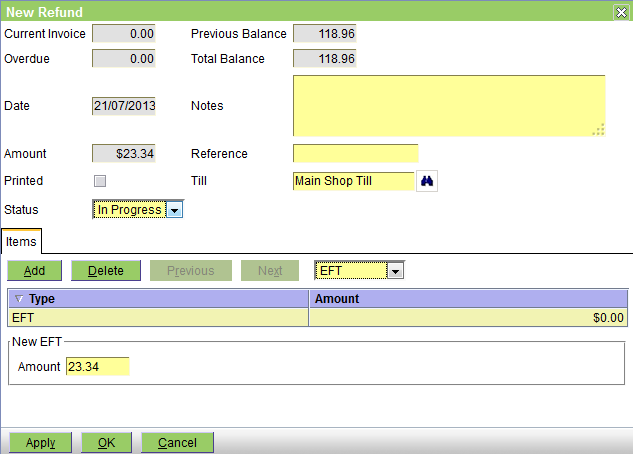
The header fields are as follows:
Current Invoice - the amount of the current invoice (in the above screen shot, there isn't one)
Overdue - the customer's current overdue balance
Date - the date on which the payment was created
Amount - the amount of the payment - this is the sum of the line item amounts
Printed - this checkbox will be checked when the payment is printed
Status - is initially set to Finalised, and can also be set to In Progress or On Hold
Previous Balance - the customers balance at the end of the last accounting cycle
Total Balance - the total balance owed by the customer
Notes - any relevant notes
Reference - any appropriate reference number/code
Till - the till into which the money is to be paid
The Items tab allows you to add, delete, view and edit the item items. The pull-down allows you to select the payment type to be one of Cash, Cheque, Credit Card, or EFT.
The table shows the line items - normally there will be only one.
The item detail area changes depend on the payment type. The picture above shows EFT. Its fields are:
Amount - this will default to the amount owed to the customer or 0.00 if nothing is owing
For Cash it is as follows:

The fields are as follows:
Amount - this will default to the amount owed to the customer or 0.00 if nothing is owing
Rounded Amount - this is the rounded equivalent of Amount using the minimum cash denomination and rounding mode set for the currency - see Administration|Lookups|Currency
For Cheque it is as follows:
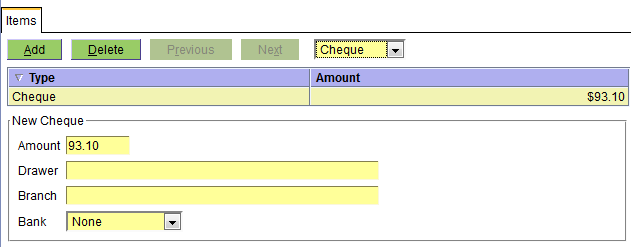
The fields are as follows:
Amount - this will default to the amount owed to the customer or 0.00 if nothing is owing
Drawer - the name of the drawer of the cheque
Branch - something that identifies the branch of the bank. For Australian usage this is the BSB (Bank State Branch) number.
Bank - select the bank using the pull-down. The values allowed are set via Administration|Lookups|Bank.
For Credit Card it is as follows:
The fields are as follows:
Amount - this will default to the amount owed to the customer or 0.00 if nothing is owing
Credit Card - select the credit card using the pull-down. The values allowed are set via Administration|Lookups|Credit Card.
For Other it is as follows:

The fields are as follows:
Amount - this will default to the amount owed to the customer or 0.00 if nothing is owing
Payment Type - select the payment type using the pull-down. The values allowed are set via Administration|Lookups|Custom Payment Type.
For Discount it is as follows:

The fields are as follows:
Amount - the discount amount being refunded
Confirm Delete
When you press the Delete button on the Customers|Payments screen, a confirmation window will appear. Press OK to confirm or Cancel to abort.
Confirm Finalise
When you press the Finalise button on the Customers|Payments screen, a confirmation window will appear. Press OK to confirm or Cancel to abort.
Confirm New
This window allows you to select the type of transaction to be created. Select the required one and press OK, else Cancel to abort. Note that since Payment is the default selection, and OK the default button, you can simply press the Enter key to create a new payment.

Account
This screen displays the account for the current customer - or if there is no current customer, a Select button allowing you to select a customer.
Note this screen displays the completed financial transactions (ie invoices, payments, etc etc). If you need to look at invoices and payments that are in progress, then you need to use the Customers|Charges or Customers|Payments screens. See also Concepts|Accounting for background information.
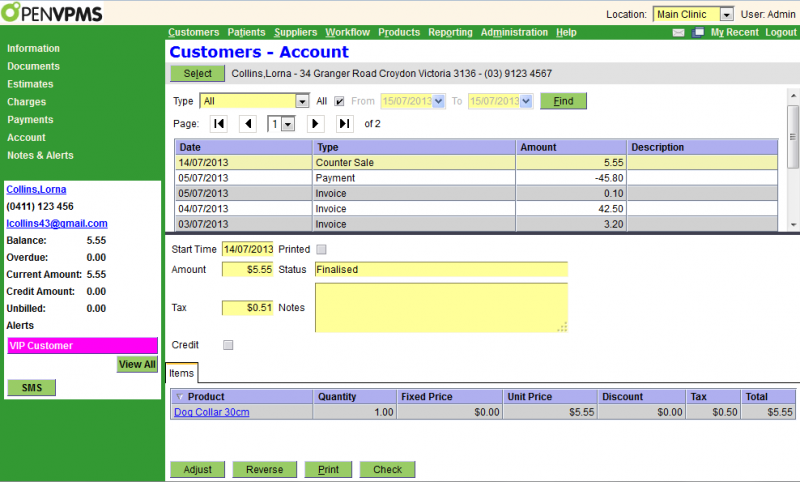
The top half of this screen functions like a standard select screen. As well as by date, you can select by:
Type - this can be set to All (ie all transaction types), or one of the various transaction types (just that type)
The bottom half of the screen shows the selected transaction (in the above example a Counter Sale), as well as any line items in the transaction.
The display data will change for each transaction type. If you need help with the meaning of the fields, consult the Charges, Payments and Adjustments documentation.
The Buttons are as follows:
Adjust - this allows you to create an adjustment transaction. A confirmatuion window will open to allow you to select the transaction type.
Reverse - this will generate a transction that will reverse the effects of the selected one. A confirmation window will appear, and if you OK this, the appropriate transaction will be created. This will have its Notes field set to identify the reversed transaction - eg "Reversal of Invoice 123456".
Print - prints the selected transaction
Check - checks the customer's balance.
Note that the Check button will not be displayed unless the user is a member of the Administrator category - see Concepts|Users.
Adjustments
This is the upper level page for the various adjustment transactions.
Bad Debt Adjustment
This screen is used to create a Bad Debt Adjustment.
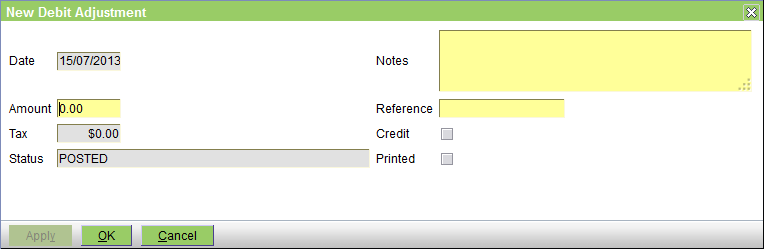
The fields are as follows:
Date - the date of the transaction - defaults to the current date
Amount - the tax-included amount of the bad debt adjustment
Tax - this shows the tax included in the above amount
Status - the is set to POSTED and cannot be changed
Notes - any applicable notes
Reference - any applicable reference number/code
Credit - this is always unchecked
Printed - this box will be ticked after the transaction is printed
Credit Adjustment
This screen is used to create a Credit Adjustment.

The fields are as follows:
Date - the date of the transaction - defaults to the current date
Amount - the tax-included amount of the credit adjustment
Tax - this shows the tax included in the above amount
Status - the is set to POSTED and cannot be changed
Notes - any applicable notes
Reference - any applicable reference number/code
Credit - this is always checked
Printed - this box will be ticked after the transaction is printed
Debit Adjustment
This screen is used to create a Debit Adjustment.

The fields are as follows:
Date - the date of the transaction - defaults to the current date
Amount - the tax-included amount of the debit adjustment
Tax - this shows the tax included in the above amount
Status - the is set to POSTED and cannot be changed
Notes - any applicable notes
Reference - any applicable reference number/code
Credit - this is always unchecked
Printed - this box will be ticked after the transaction is printed
Opening Balance
This screen is used to create an Opening Balance transaction. You only need this if, for some reason, you want to bring a new customer on board with a non-zero opening balance.
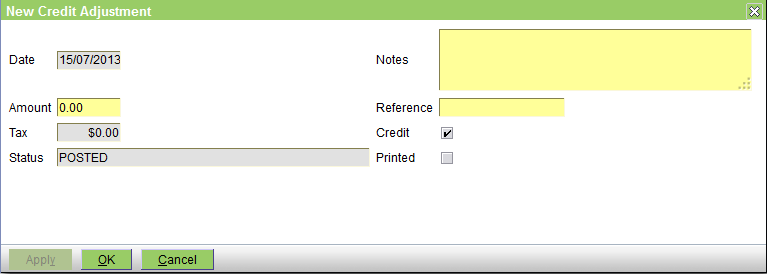
The fields are as follows:
Date - the date of the transaction - defaults to the current date
Amount - the tax-included amount of the opening balance
Tax - this shows the tax included in the above amount
Status - the is set to POSTED and cannot be changed
Notes - any applicable notes
Reference - any applicable reference number/code
Credit - this is always checked
Printed - this box will be ticked after the transaction is printed
Balance Check
When you press theCheck button on the Customers|Account screen, one of the following windows will be displayed:

Press OK to regenerate the balance, or Cancel to abort.
If there is no problem, then the window will be displayed as follows - press OK to close it.

Confirm Adjust
This window allows you to select the type of adjustment transaction to be created. Select the required one and press OK, else Cancel to abort.
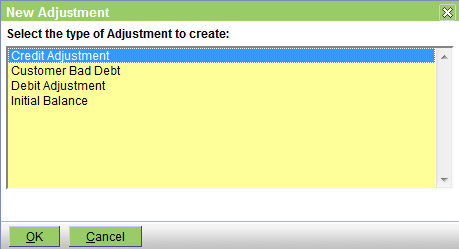
Confirm Reverse
When you press the Reverse button on the Customers|Account screen to reverse a transaction, a confirmation window will appear.
Press OK to confirm or Cancel to abort.
Notes & Alerts
This screen displays the Notes and Alerts for the current customer - or if there is no current customer, a Select button allowing you to select a customer.
A customer can have zero or more Notes, and zero or more Alerts. If there are Alerts then these are also shown in the Customer information panel.
The Notes screen is as follows:
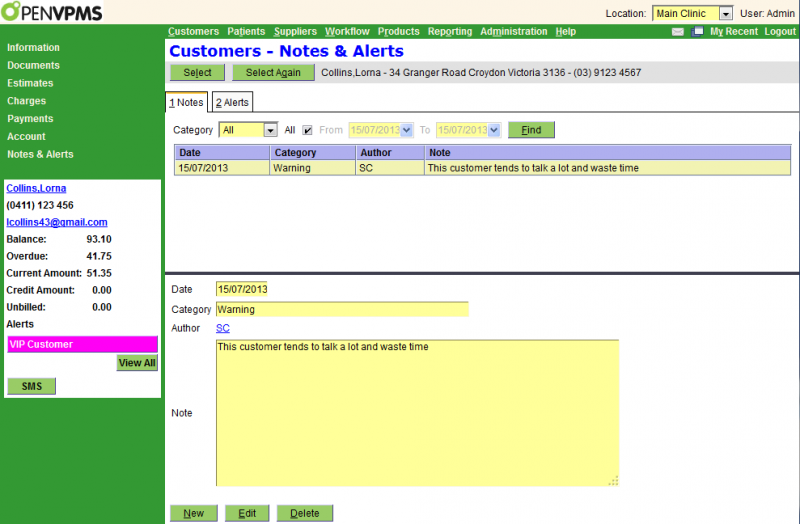
The top half of the screen is a select screen. As well as the date, you can select by:
Category - either All or one of the categories as defined via Administration|Lookups|Customer Note Category
The table shows the matching notes, and the bottom half of the screen, the details of the selected note. For details of the fields see Create/Edit Note.
The Alerts screen is as follows:
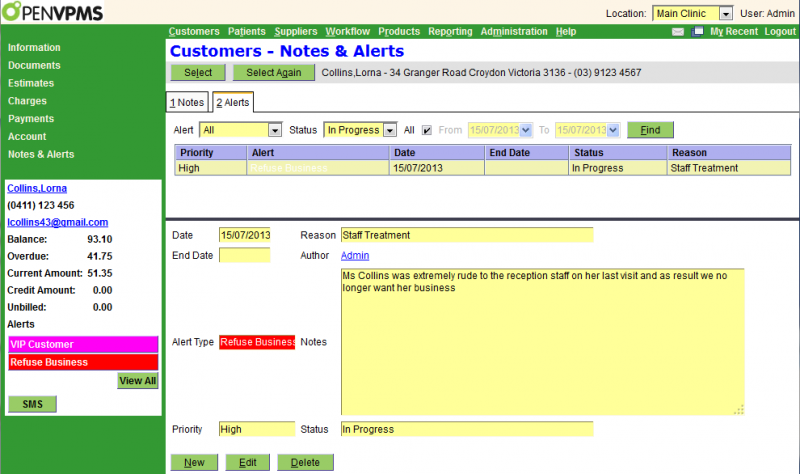
The top half of the screen is a select screen. As well as the date, you can select by:
Alert - either all or one of the alert types as defined via Administration|Lookups|Customer Alert Type
Status - the status of the alert, either All, Completed, or In Progress
The table shows the matching alerts, and the bottom half of the screen, the details of the selected alert. For details of the fields see Create/Edit Alert.
Note that this screen shows the customer alerts - it does not show those alerts set via the Customer Account Type. As you can see in the above, this customer is a VIP customer and thus shows the mauve VIP Customer alert in the left panel. However, you can see that this is not listed as one of the current customer alerts.
Confirm Delete
When you press the Delete button on the Customers|Notes & Alerts screen, a confirmation window will appear.
Press OK to confirm or Cancel to abort.
Create/Edit Alert
This screen is used to create and edit customer alerts.

The fields are as follows:
Date - the start date of the alert - defaults to the current date
End Date - the end date of the alert
Alert Type - select from those available - these are set via Administration|Lookups|Customer Alert Type
Priority - this displays the priority of the alert - see above link
Reason - a short version of the Notes text
Author - this defaults to your user name, but can be set to that of any user
Notes - the long version of the reason for the alert
Status - can be either In Progress or Completed
Create/Edit Note
This screen is used to create and edit customer notes.

The fields are as follows:
Date - the date of the note - defaults to the current date
Category - select from those available - these are set via Administration|Lookups|Customer Note Category
Author - this defaults to your user name, but can be set to that of any user
Note - the actual note text
SMS
This is the screen used to compose and send an SMS message to a customer. For background, see Concepts|SMS.

The fields are as follows:
Phone - the phone number to which the SMS will be sent. If the customer has multiple phone contact numbers that are SMS enabled, then there will be a pull-down list for you to select from.
Message - the text of the SMS message - a maximum of 160 characters. The counter on the top of the box (120 in the above sample) shows how many more characters you can enter before your text will be truncated. 'Muffet' has a red underline to indicate that the browser's spell checker is unhappy.
Press the OK button to send the SMS.
Note that you can use macros when composing the message. You may find the following expression to be useful when building the macro called say 'smsr' using Administration|Lookups|Macros
concat($patient.name,' is now due. Pls call ",party:getTelephone($location),' for an appointment. Thanks ',$practice.name)You could also create suitable macros for each vaccination, eg rg6 for 'Reminder: G6 Vaccination - "
Then you can simply type rg6 smsr into the SMS message text and press Enter to expand it to generate the text:
Reminder: G6 Vaccination - Muffet is now due. Pls call 9123 4567 for an appointment. Thanks Pets-R-Us
NOTE however, that the above macro will fail to expand if there is no current patient.
Select
This is the customer select screen. The picture below shows the 'empty' screen. If you had previously done a customer selection, and had pressed the 'Select Again' button, this will show the results of your previous selection.
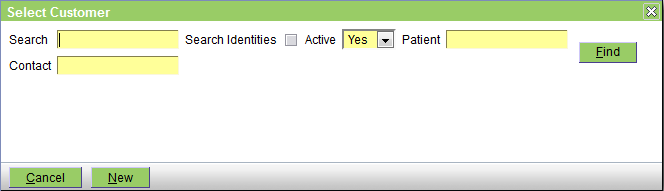
If the required customer is displayed, just click it to select it.
Enter the search criteria and click the Find button, or press the Enter key or Alt-F. The search is case insensitive (ie smith, SMITH, and Smith will all find Smith), and you can enter full or partial information (see using wildcards).
To search by customer name, enter the full or partial name in the Search field. You can include the first name of the customer using the format lastname,firstname eg 'smith,adam'. NOTE that there is no space, ie 'smith adam' will not work, nor will 'smith, adam' or 'smith , adam'.
To search by patient name, enter the full or partial name in the Patient field.
To search by customer contact (ie phone, address, email), enter the full or partial information in the Contact field.
You can use one or more of the Search, Patient, and Contact fields. ie entering smi, rov, and 123 respectively will find all customers with a name starting 'Smi', who have a pet with a name starting 'Rov', and a phone number or street address starting '123'.
To include deactivated customers, set the 'Active' pulldown to 'Both'.
To search by Identity or ID rather than name, click the 'Search Identities' checkbox.
The search results will be displayed as shown as follows:

For more information on how select screens work, click here.
Patients
The Patient workspace is used to handle patients.
Information
This screen displays information about the current patient - or if there is no current patient, a Select button allowing you to select a patient, and a New button to create one.
With a current patient, the screen is as follows:
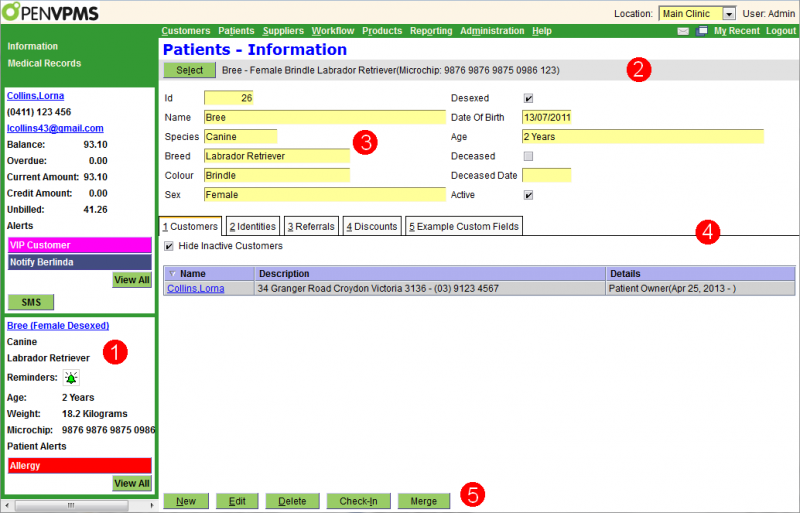
The screen areas are as follows:
(1) the patient information panel - the fields here are as follows:
name/sex - this provides a link back to the patient's medical records, ie pressing it on the Information screen, takes you to the Medical Records screen
species - the patient's species
breed - the patient's breed
Reminders - this is present if there are active reminders - see Administration|Types|Reminder for an explanation of how the colours are set
Age - the patient's age
Weight - the patient's last reported weight
Microchip - this is present if the patient has a microchip. Note that this example shows a 15 digit ISO number in 9999 9999 9999 9999 999 format - and this is to wide for the panel, and hence the scroll bar at the bottom. Note also that if the patient has multiple microchips, then only the last one added will be shown. (However, the description area - see (2) below, will show all the microchips.)
Patient Alerts - if there are any, these are shown - you can click on the alert to display its details, or if there are more than 4 and 'More...' is displayed, press the View All button to display all the alerts
(2) the select area - this shows the patient's name, sex, colour, breed, and if there are any, the microchip numbers, and one button:
Select - pressing this brings up the Select screen to let you select another patient
(3) the header area - for the descriptions of these fields, click here
(4) the tabs area - for the descriptions of the fields, click here
(5) the bottom buttons - these are as follows:
New - create a new patient
Edit - edit the current patient - note that you will be editing the compete patient record and all the tab items
Delete - delete the current patient - a confirmation window will appear
Check In - checks the patient in - this performs the same actions as pressing the Check In button on the Workflow|Scheduling screen - ie it allows you to check in a patient who does not have an appointment
Merge - merge another patient record into this one - a confirmation window will appear, and if you proceed, a select screen to let you select the patient to be merged in. Note that header information (name, title, etc) of the current patient is retained, but the tab items (customers, identities, etc) are simply combined, and you will need to edit the resulting patient record to delete the unwanted parts.
Note that the Merge button will not be displayed unless the user is a member of the Administrator category - see Concepts|Users.
Confirm Delete
When you press the Delete button on the Patients|Information screen, a confirmation window will appear.
If the pet cannot be deleted because it is in use (normally because it has an owner), the text will be "xxxx has relationships and cannot be deleted. Do you want to deactivate it instead?"(where xxx is the name of the pet you are trying to delete). Pressing OK will unset its Active flag, Cancel will abort.
If it is in use but can be deleted (because it has no owner), the text will be "xxxx has relationships. Are you sure want to delete? This operation cannot be undone." (where xxx is the name of the pet you are trying to delete). Pressing OK will delete the pet as well as all references to it, Cancel will abort.
If the pet is not in use and can be deleted, the window will simply ask you to confirm the delete. Press OK to confirm or Cancel to abort. (This will only occur if the pet has no breed, taxes, discounts, etc set.)
Confirm Merge
When you press the Merge button on the Patients|Information screen, this confirmation window will appear.
Press OK to merge the patients or Cancel to abort.
Create/Edit
This screen is used to create or edit the patient record.
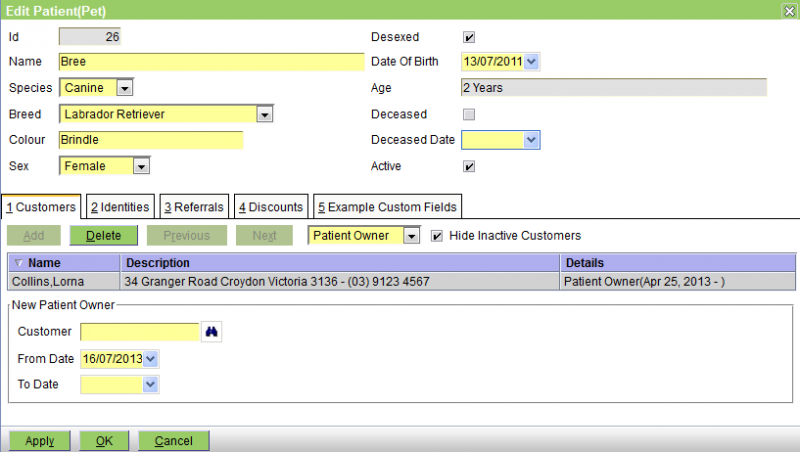
The fields in the header are as follows:
Id - the patient's ID
Name - the patient's name
Species - the species - choose from the ones available - this are set via Administration|Lookups|Species. This is a mandatory field.
Breed - the breed - choose from those available - these are set via Administration|Lookups|Breed. You can set this to None. Note that it is possible that a new patient is a breed that is not on the list. If you are not an administrator (and thus cannot add the new breed), it is suggested that you set the breed to None, and having entered the patient's details, call up Workflow|Messaging and send a message to the administrator saying 'need new breed Alsation X Chow'. Note that the customer and new patient name will be automatically included in the message.
Colour - enter the colour
Sex - choose one of None, Female, Male, or Unspecified
Desexed - check the box if the patient has been desexed
Date of Birth - the patient's DOB
Age - this will display the patient's age in Patient Age Format set for the practice - see Administration|Organisation|Practice
Deceased - check the box if the patient is deceased
Deceased Date - date of death
Active - untick this to deactivate the customer
See also Local Procedures.
The tabs are Customers, Identities, Referrals, Discounts, and perhaps Custom Fields - these are documented below.
Note that in some cases, the tabs have a Hide Inactive xxxxx checkbox. This is present when the item being attached to the patient (ie the patient-owner, the patient-location, the referral or the discount) can be deactivated (either by unsetting its Active flag, or if its To Date is in the past). In this case the item will remain attached to the patient, but the item will not be displayed and the patient will act as though the item was not attached. You can have these inactive items displayed by unchecking the Hide Inactive xxxxx box.
The Customers tab
This tab is used to add/delete/edit a) 'Patient Owner' records and b) 'Patient Location' records.
Patient Owner - A patient can have multiple owners either at the same time (because the ownership is shared) or sequentially (because the patient passes from one owner to another).
The screen is as follows:
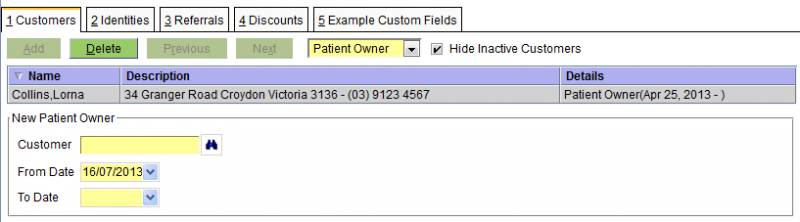
The fields are:
Customer - the name of the customer
From Date - the date from which the ownership started
To Date - the date on which it ended
Note: Although shared ownership of a patient is allowed, you need to set this up by editing the customer's patient-owner entries to add another customer. If you edit the patient's customer-owner entries you will change the ownership of the patient, ie terminate the old ownership and start a new one.
Patient Location - the screen snippet is below, but see the discussion in the customer edit page.
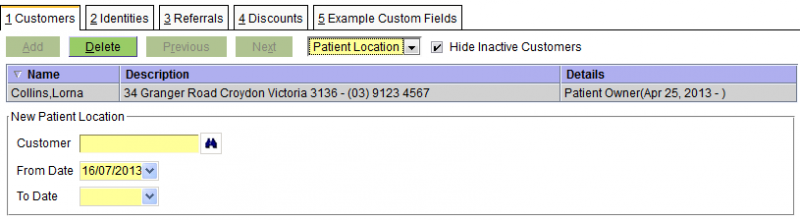
The Identities tab
The Identities tab is used to set the patient's identities. Patients have three types of identities, Microchip, Pet Tag, and Alias. These are discussed in this order below.
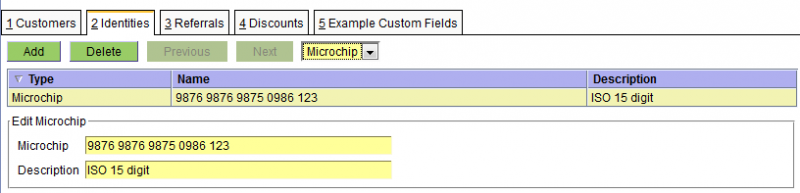
The Microchip fields are:
Microchip - the microchip number/code
Description - an optional description of what the code represents
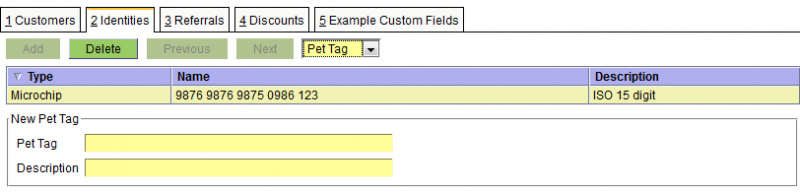
The Pet Tag fields are:
Pet Tag - the Pet Tag number/code
Description - an optional description of what the code represents
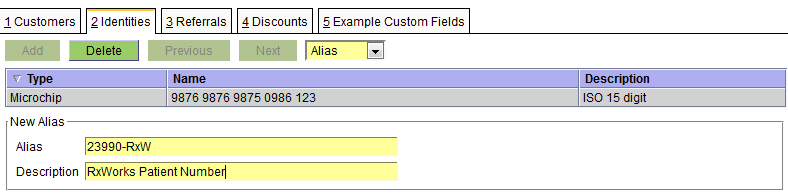
The Alias fields are:
Alias - the alias - this can be anything appropriate
Description - an optional description of what the alias represents (in the above case 23990 was the client number in the RxWorks system that this data was converted from)
You might also was to use the Alias Identify for a real alias such as the 'kennel name' BREEAMBERARGENTINA - no wonder they call him Bree for short ;-)
The Referrals tab
The Referrals tab is use to record both 'Referred To' and 'Referred From' referrals. As can be seen from the two snippets below, the fields for each are identical.
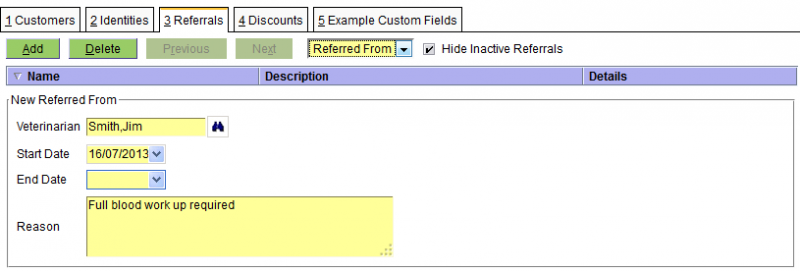
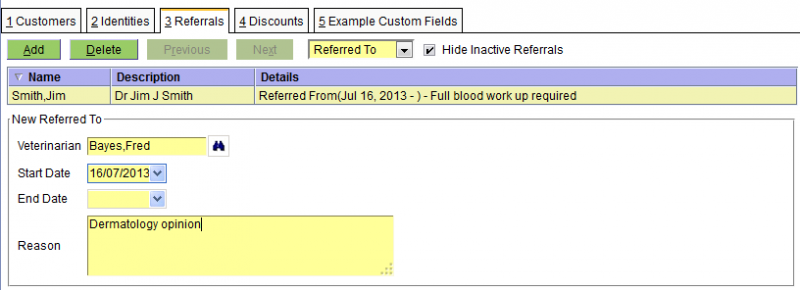
The fields are as follows:
Veterinarian - the vet - this is one of the Supplier/Vets - see Concepts|Suppliers for background. Note that if this is a new vet, then you can use the New button on the Supplier|Select screen (displayed when you press the binoculars) to quickly make a new Supplier/Vet record.
Start Date - the start date of the referral
End Date - the end date of the referral
Reason - the reason for the referral
The Discounts tab
This tab is used to set the discounts that apply to the customer - see Concepts|Discounts for background.
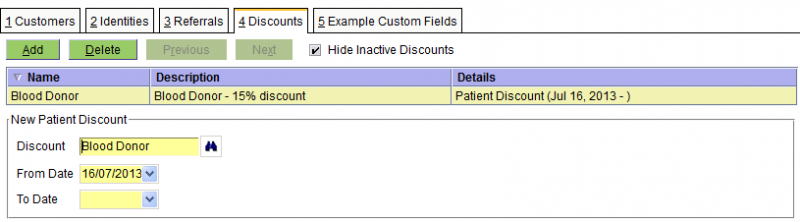
The fields are:
Discount - the discount - note that this can either be a discount, or a discount group
From Date - the date from which the discount applies
To Date - the date on which the discount ends
The Custom Fields tab(s)
See Administation|Lookups|Species for a discussion of the custom fields facility.

The fields here will depend on the specific customer fields archetype.
Medical Records
This screen displays the medical records for the current patient - or if there is no current patient, a Select button allowing you to select a patient.
Note that this screen is for viewing and editing the patient's medical records. However, if you are in the middle of a consult, you should not be using this - you should be using the Visit Editor which is accessed via the Consult button on the Workflow|Scheduling and Workflow|Work List screens.
There are six different screen shots below, one for each of the tabs: Summary, Problems, Reminders/Alerts, Documents, Charges, and Prescriptions.
All of these have a Select button at the top to allow you to select another patient.
All of them function as select screens. Date selection is always available, and in some you can select using the status or type.
All of them display the details of the item you have selected in the bottom part of the screen.
Summary
This shows the summary of the records. It should be obvious that the screen shot below is not taken from real practice data.

If you have set the 'Show Clinician in Medical Records' option for the Practice (see Administration|Organisation|Practice) then the display will be as follows. Note that here the practice is using 'short names' for their clinicians (see Concepts|Users) so the display shows 'CB' rather than 'Dr Chris Brown'.

Apart for the date, the selection fields are:
Type - this can be set to All or one of Note, Problem, Weight, Medication, Investigation, Attachment, Form, Image, or Letter
Include Charges - uncheck this box if you don't want to show the invoice line items. You would do this if you are setting up a medical record to send off as part of a referral and you don't want your charges to be shown.
 - this button changes the sort order of items within the visit - as shown it indicates that the visit items are shown in descending order, ie newest at the top. If you press the button it will change to an up arrow head indicating that the items are in ascending order with the newest at the bottom. Note that the visits themselves are always shown in descending order.
The items in the display are partially colour coded. As you can see above, the selected item (the checkup visit) is in blue, and the other items are coloured as shown below.

As you can see problems are pink/red, medication light green and weight a darker green.
The buttons are:
New - create a new entry - a window will open allowing you to select the type of entry to be created. If it is something other than a visit (ie a note, a form, etc), then the new entry will be created under the currently selected visit. Note that the 'current visit' is the visit containing the currently selected item (which may be the visit itself or a note, form, medication etc item that is part of that visit).
Edit - edit the selected item. If the Edit button is displayed, then you can edit the item - but for some things (eg a invoice item where the invoice has been finalised) the edit button will be suppressed because you cannot edit in this case.
Delete - delete the selected item - a confirmation window will be displayed. Again, if you can't delete the item, then the Delete button will not be displayed.
Print - print what is shown on on the screen (or preview it or email it)
Add Visit & Note - pressing this will generate a new visit entry (with Reason 'No Reason') and open the Create/Edit Note window so that you can add a note. This button should NOT be used to create a normal consult visit (for this you should use the Check-In button on the Workflow|Scheduling screen). It is intended for use when creating a note unrelated to another visit, say as a result of a phone call.
Problems
The Problems tab shows the details of the patient's problems.

The buttons are as follows:
New - create a new problem
Edit - edit the selected problem record
Delete - delete the selected problem - a confirmation window will be displayed
Print - print the selected problem (or preview it or email it)
Reminders/Alerts
The Reminders/Alerts tab shows the details of the patient's reminders and alerts.
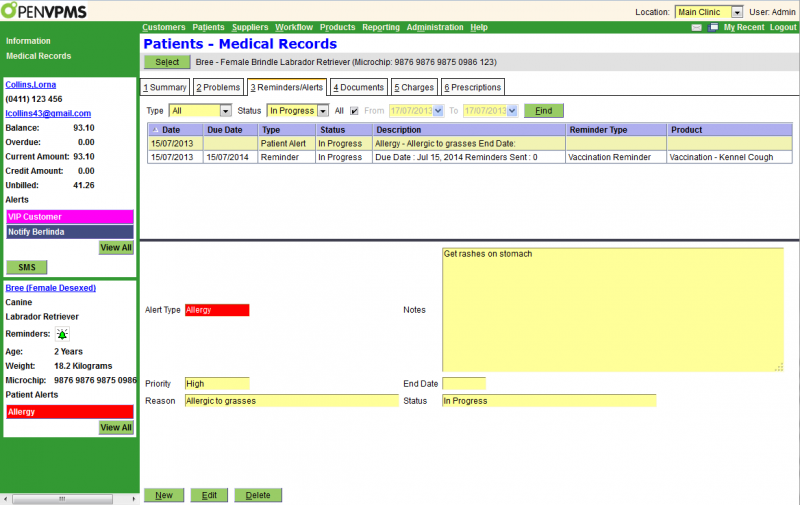
For details on the Alerts fields click here, for Reminders click here.
The buttons are as follows:
New - create a new alert or reminder
Edit - edit the selected item
Delete - delete the selected item - a confirmation window will be displayed
Documents
This shows the details of the patient's documents. As you can see below, there are 5 different types: Attachments, Images,Investigations, Letters and Forms. All of these except the latter support 'versions', ie previous revisions of the document.

The buttons are:
New - create a new document - a window will open allowing you to select the type
Edit - edit the selected document record (not the document itself - though see below). If the document has status Finalised you will not be able to edit the record.
Delete - delete the selected document - a confirmation window will be displayed. If the document has status Finalised you will not be able to delete it.
Print - if the selected item has an associated document template (which can be the case with an Investigation - see Administration|Types|Investigation) this will be presented for printing. Otherwise, if there is an attachment present, in .odt or .doc format, it will be presented for printing. If the document is other than an .odt or .doc file, it will be downloaded and can then be printed.
Refresh - (this button only appears when the selected document is a Letter) - refresh the document by regenerating it from its template - a confirmation window will be displayed.
Clicking on the entry in the Document column will cause the document to be downloaded and displayed. Note that for Letters the Document column shows two icons like ![]() . If you click on the right-hand one, the pdf file containing the letter will be downloaded and displayed. If you click on the left-hand one (or the name of the document) then the word processing document will be downloaded and you can open it in your word processor and save it and then edit it. (You need to save it as it is opened read-only.) After editing the file, you can then use the Edit button to edit the letter and upload the revised file.
. If you click on the right-hand one, the pdf file containing the letter will be downloaded and displayed. If you click on the left-hand one (or the name of the document) then the word processing document will be downloaded and you can open it in your word processor and save it and then edit it. (You need to save it as it is opened read-only.) After editing the file, you can then use the Edit button to edit the letter and upload the revised file.
Charges
This shows the details of the charges resulting from the patient's treatments. Note that this screen just displays information, there are no 'bottom buttons' to let you do things. It is provided so that you can check that everything you think should be charged for has been, and to check on past charges.
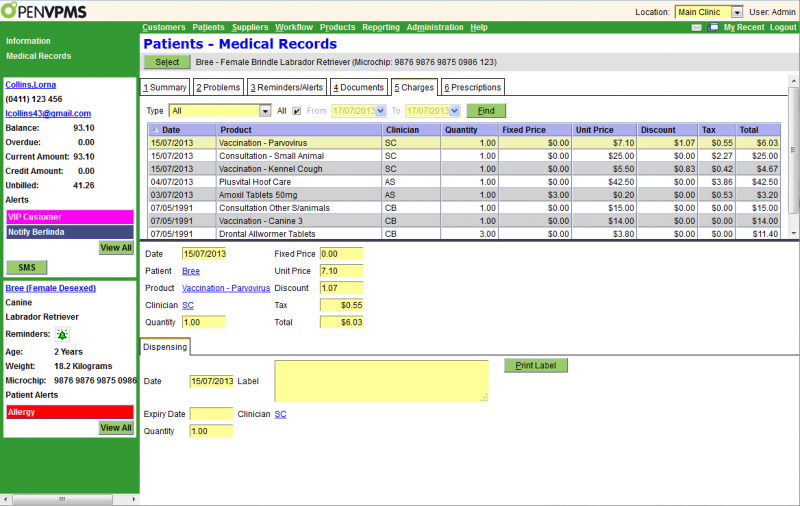
The Prescriptions tab is where patient prescriptions are created and dispensed.

The buttons are:
New - create a new prescription
Edit - edit the selected prescription. If the prescription has been fully dispensed or has expired, it cannot be edited.
Delete - delete the selected prescription. If the prescription has been dispensed or has expired, it cannot be deleted.
Print - prints the selected prescription.
Dispense - dispenses the selected prescription. This displays a medication window that allows the Date, Expiry Date and Clinician to be selected. The Label and Quantity are fixed
Cancel Prescription - cancels the selected prescription, if it hasn't been fully dispensed or expired.
Confirm Delete
This is the delete confirm screen. Press OK to proceed, else Cancel.
Confirm New
Depending on which tab of the Medical Records or Visit Editor screen that you have open, this window allows you to select the type of medical record entry, alert/reminder, or document to be created. Select the required one and press OK, else Cancel to abort.
For the Summary tab, the window is: (the partially visible last item is 'Weight')

For the Reminders and Alerts tab, the window is:

For the Documents tab, the window is:

Confirm Refresh
This window is displayed when you press the Refresh button to refresh a letter from its template. Press OK to confirm, Cancel to abort.

If Version current document is checked, then when the letter is regenerated, the current copy will be saved as a version, otherwise it will be replaced.
Create/Edit Alert
This is the screen used to create or edit a patient Alert. See Concepts|Alerts for background.
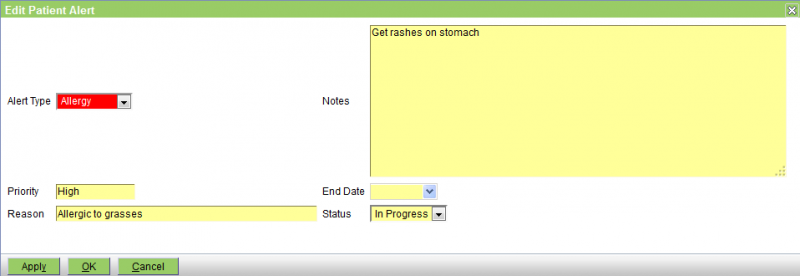
The fields are as follows:
Alert Type - select from those available - these are set via Administration|Lookups|Patient Alert Type
Priority - this displays the priority of the alert - see above link
Reason - a short version of the Notes text
Notes - the long version of the reason for the alert
End Date - the date on which the alert was ended (ie set to Completed status)
Status - can be either In Progress or Completed
Create/Edit Attachment
This is the screen used to create or edit an attachment document in the patient's medical records. See Concepts|Documents for background. Note that although you can use this facility to attach an image file, it is probably better to use the Image facility for this.
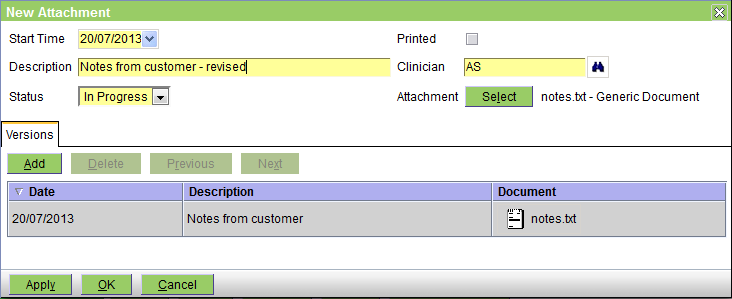
The fields are as follows:
Start Time - the date on which the entry was created - defaults to today
Description - any pertinent description
Status - this can be In Progress, Completed, or Finalised. In Progress implies that you are still working on this; Completed implies that you have finished - but the entry can still be editied; and Finalised means that it is really complete and can no longer be edited.
Printed - this box will be checked when the form has been printed
Clinician - the appropriate clinician
Attachment - press the Select button to attach the file - after the file is attached its name (notes.txt in this case) is shown here.
The Versions tab shows the previous versions. Note that you can use the Add button to add another, but you can also use the Select button. If you use the Select button to attach another file, then the previous 'top' version will just be pushed onto the version list.
As you can guess from the above, there is no problem in adding the same file name twice. In fact although two notes.txt files have been attached, each in fact contains different text.
Create/Edit Form
This is the screen used to create or edit a form document in the patient's medical records. See Concepts|Documents for background.
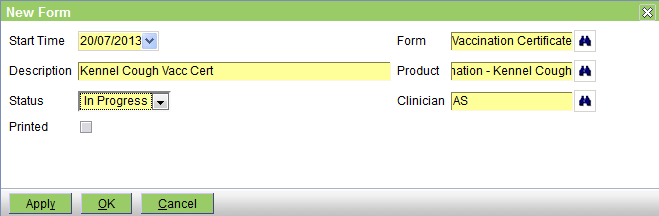
The fields are as follows:
Start Time - the date on which the entry was created - defaults to today
Description - any pertinent description
Status - this can be In Progress, Completed, or Finalised. In Progress implies that you are still working on this; Completed implies that you have finished - but the entry can still be editied; and Finalised means that it is really complete and can no longer be edited.
Printed - this box will be checked when the form has been printed
Form - select the form to print - these are the document templates that are of Type 'Patient Form'
Product - select a product if appropriate. This is here so that if the form selected is sensitive to the current product, the form can include product information. Thus, for example, we do not have to have a vaccination certificate for each type of vaccination - we can just have a general certificate that prints the name of the current product.
Clinician - the appropriate clinician - normally the form will display the clinician's name
Create/Edit Image
This is the screen used to create or edit an image document in the patient's medical records. See Concepts|Documents for background.

The fields are as follows:
Start Time - the date on which the entry was created - defaults to today
Description - any pertinent description
Status - this can be In Progress, Completed, or Finalised. In Progress implies that you are still working on this; Completed implies that you have finished - but the entry can still be editied; and Finalised means that it is really complete and can no longer be edited.
Printed - this box will be checked when the form has been printed
Clinician - the appropriate clinician
Image - press the Select button to attach the file - after the file is attached its name (Bree.jpg in this case) is shown here.
The Versions tab shows the previous versions. Note that you can use the Add button to add another, but you can also use the Select button. If you use the Select button to attach another file, then the previous 'top' version will just be pushed onto the version list.
Note that there is no problem in adding the same file name twice. Thus if your images arrive in files called img001.jpg, there is no problem if there is already an image imported from a file named img001.jpg.
Create/Edit Investigation
This is the screen used to create/view/edit investigations. For background see Concepts|Investigations.

The fields are as follows:
Start Time - the date on which the investigation was initiated
Investigation Type - the type of investigation - these are set up via the Administration|Types|Investigation screen
Notes - you can enter any appropriate notes
Status - this will initially be 'In Progress' - for other settings see Concepts|Investigations
Reviewed - this box gets checked after the results have been reviewed
Clinician - the associated clinician
Report - use the Select button to add the results report to the investigation. Note that if there is an existing report and you add another, the first will be pushed down into the Versions tab. You can upload any sort of file at all. If you are using the automatic facility (see Concepts|Investigations) to attach investigation results, then you should not have to use the Select button to attach results.
The Print Form button is used to reprint the Investigation form.
The Versions tab is used to display and manage the versions of the reports. Normally the Add button is not needed - as discussed above you just use the Report|Select button to add a new version of the report. The display area shows the previous versions in a column format. Selecting a version causes its fields to be displayed (and these are the same as above). The column headings are:
Date - the date of the version
Description - this showns the Notes field
Document - this shown the results file - you can click on it to download and display it.
Create/Edit Letter
This is the screen used to create or edit a letter document in the patient's medical records. See Concepts|Documents for background.
First lets look at the screen shot for a new letter:

The fields are as follows:
Start Time - the date on which the entry was created - defaults to today
Description - any pertinent description
Status - this can be In Progress, Completed, or Finalised. In Progress implies that you are still working on this; Completed implies that you have finished - but the entry can still be editied; and Finalised means that it is really complete and can no longer be edited.
Printed - this box will be checked when the letter has been printed
Clinician - the appropriate clinician
Template - select the template to be used - these are the document templates that are of Type 'Patient Letter'
Document - you DO NOT need to press the Select button when you are creating a new letter. Simply selecting the Template will generate the letter from the template and insert the appropriate information.
Now the edit screen. The senario is as follows: you created the letter as above. Then you decided that you needed to edit it, so on the Documents tab of the Medical Records screen, you selected the letter and then clicked on the actual letter to download it and open it in your word processor. You then saved a copy (as say Referral Letter-2), edited in the required changes and then saved it.
On the Medical Record screen you now press the Edit button to get the Edit Letter screen. You then press the Document Select button - this will open a browse window to allow you to select your 'Referral Letter-2' and upload it. The screen will then appear as below. The initial version has been saved as the previous version, and your new one as the new current version.
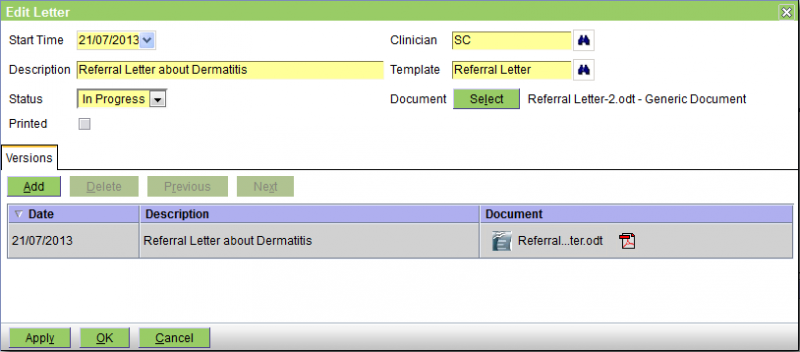
As intimated above, the Versions tab shows the previous versions. Note that you can use the Add button to add another, but you can also use the Select button. If you use the Select button to attach another file, then the previous 'top' version will just be pushed onto the version list.
There is no problem in adding the same file name twice. In the above example the file names were different but they could have been the same.
Parameters
If a template containing parameters is selected (i.e. Fill-In fields in Microsoft Word, or Input Fields in OpenOffice Writer), a window like that below will be displayed prompting for the values of those parameters. On OK, these will be merged with the document. Note that the order of the prompts cannot be specified, ie if the template has prompte P1, P2 and P3, these may be displayed on the screen in the order P2, P1, P3.
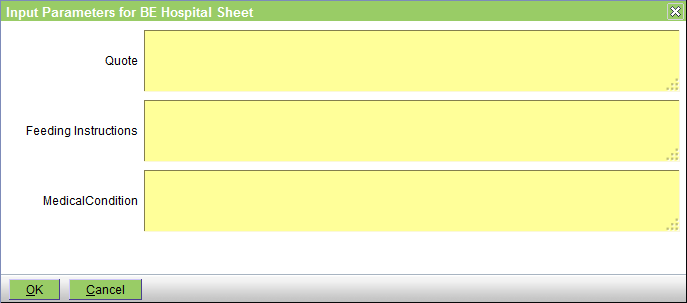
The parameters are normally text fields and hence you can use macros to enter the information.
Create/Edit Medication
This is the screen used to create or edit a medication entry in the patient's medical records.
If the medication entry is being created as a result of invoicing the item, then this screen will only be displayed if the medication product entry has it's Dispensing Label option ticked. It is always displayed to edit the medication entry, or if the entry is being created via the New|Medication button on the Patients|Medical Records screeen.

The fields are as follows:
Date - the date the medication record was created - defaults to today
Expiry Date - the expiry date of the medication. Note that since the field is blank when the record is created, it is very easy to use a 'relative date' to set the expiry date - in the above case '4w' was used to create the date.
Quantity - the quantity
Label - the label text- this will be initially set from the medication product record
Print Label - pressing this button prints the label using the template, 'Drug Label'
Medication - the medication product
Clinician - the clinician
Dispensing Notes - these will be displayed if there are any
Note that if it is important to you that the Dispensing Notes be displayed when the item is added to the invoice but you would not normally print a label (and hence the product's Dispensing Label option is not ticked), you should edit the product to have the Dispensing Label option ticked, but either leave it's Label Text blank, or set to say 'No label required'.
Create/Edit Note
This is the screen used to create or edit a note in the patient's medical records.

The fields are as follows:
Date - the date of the note - defaults to today
Note - the note text goes here. If needed you can change the size of the note window using the handle at the bottom left of the text window.
Clinician - the clinician
Create/Edit Prescription
This is the screen used to create or edit a prescription. See Concepts|Prescriptions for background. In the picture below, the prescription has already been dispensed once so the 'Dispensing' tab is shown. If the prescription was being created the Dispensing tab would be absent.

The fields are as follows:
Date - the date on which the prescription was created - defaults to today
Expiry Date - the date on which the prescription expires. After this date, the prescription cannot be dispensed nor deleted. Note that this is totally separate from the Expiry Date set when you dispense the item - which is of course the expiry date of the dispensed medication. This date defaults to today plus the Prescription Expiry interval set for the practive - see Administration|Organisation|Practice. If you have not set this, then it defaults to zero and the Expiry Date will default to today.
Quantity - the quantity to be dispensed each time
Repeats - the number of repeats
Medication - the product
Label - the dispensing label text - this defaults to that set for the product. This will be the label when you actually dispense from this prescription.
Clinician - the clinician
Times Dispensed - the number of times that this prescription has been dispensed.
The Dispensing Tab shows the information for previous dispenses of this prescription.
Note that when you set up the prescription, you are functionally authorising the dispensing a total of (qty x (repeats+1)). Hence if you set the Quantity to 2 and the Repeats to 5, the total quantity being authorised is 12.
Note also that when the prescription is dispensed neither the Quantity nor the Label text can be altered. If these do need to be altered, this must be done by editing the prescription itself.
Create/Edit Problem
This is the screen used to create or edit a problem in the patient's medical record. See Concepts|Problems for background. The following screen shows a problem being edited.
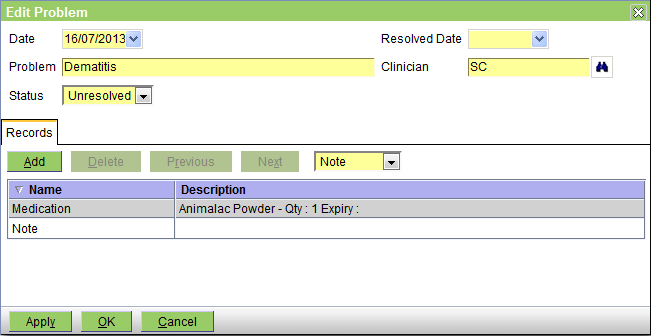
The fields are as follows:
Date - the date the problem was created - defaults to today
Problem - enter a description/title for the problem
Status - this can be Unresolved or Resolved
Resolved Date - the date on which the problem was resolved
Clinician - the associated clinician
The Records tab displays the current records and allows them to me added or deleted. There are two sorts of records, Medication and Notes.
The screen below shows a medication record being edited. Note that when a medication record is added a warning message will be displayed saying that the medication will not be charged for.
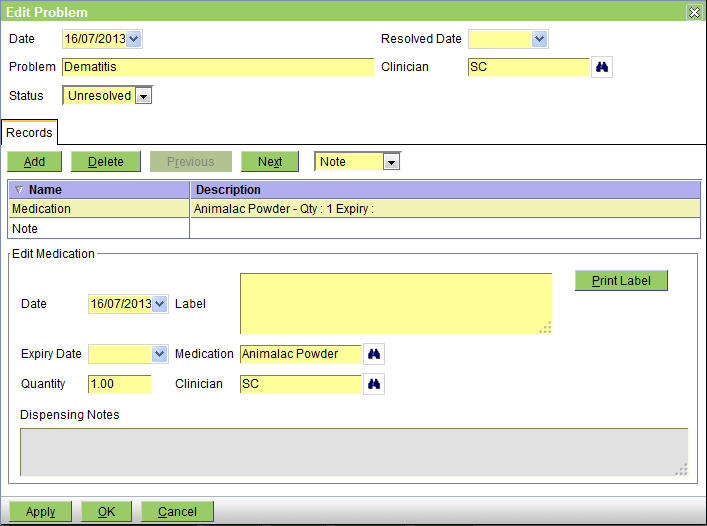
The screen below shows a Note being edited. The horizontal slashed areas just indicate that this picture has been editied to make it smaller.

Create/Edit Reminder
This screen is used to create and edit reminders. Normally reminders are created automatically by the system (ie as a result of invoicing an annual vaccination, the system will create the reminder for the next one), but they can also be created manually using this screen. Similarly, they are normally processed automatically by the Reporting|Reminders processing. However, in some circumstances you may want to cancel them or change their due date manually. Note that you cannot delete a reminder - to do this you change its status to Cancelled.

The fields are as follows:
Date - the date on which the reminder was created
Reminder Type - the Type of the reminder
Due Date - the due date (ie when the vaccination is due)
Status - this can be In Progress (ie active), Completed (ie the associated event, eg the vaccination, has occurred), or Cancelled. Normally the system will adjust the state to Completed (when the event occurs) or Cancelled (when the reminder becomes too old), but you can also change the state using this screen.
Reminders Sent - displays the number of reminder notifications generated
Last Sent - the date on which the last one was generated
Completed - the date on which the reminder was completed. Note that if the reminder is cancelled by the system, the date on which this happened is not shown here, is this is a Completed date, not a Cancelled or Completed date.
Error - if an error occurred the last time that the reminder was processed by Reporting|Reminders|Send All, this will be shown here
Product - the associated product
Clinician - the associated clinician
Create/Edit Visit
This window is used to create or edit the patient's visit record. Note that if you are using the workflow facilities, and in particular the Consult button on the Workflow|Work List screen, then the visit record will be created for you.

The fields are as follows:
Start Date - the date on which the visit started - defaults to today
Complete Date - the date on which the visit was completed
Reason - the reason for the visit
Clinician - the clinician
Status - you can set this to In Progress or Completed
The Print button will print the complete visit information (ie including notes, medication, weight, etc) - not just the above information.
Create/Edit Weight
This window is used to create or edit the patient's weight record.
The fields are as follows:
Date - the date on which the weight was measured - defaults to today
Weight - the weight
Units - the units - you can select Grams, Kilograms, or Pounds
Clinician - the clinician
New Medication Record prompt
The New Medication Record prompt is displayed when creating Medication records from:
- Patients|Medical Records|Summary
- Patients|Medical Records|Problems

When Medication records are created this way:
- the customer is not invoiced
- the medication quantity selected does not change the stock level
If there is no need to invoice the customer, or change stock levels, click OK.
If the customer should be invoiced, then click Cancel, and add the medication via:
- Customer|Charges
- the Visit Editor
Select
This is the patient select screen. As shown below, if there is a current customer, the screen will show all the patients for that customer. If there is no current customer, no patients will be displayed, and the 'All Patients' box will be ticked.

If the required patient is displayed, just click it to select it.
To search by patient name, enter the full or partial name (see using wildcards) and click the Find button, or press the Enter key or Alt-F.
To search the patients belonging to all customers (and not just the current one), click the 'All Patients' checkbox.
To include deactivated patients, set the 'Active' pulldown to 'Both'.
To search by Identity rather than name, click the 'Search Identities' checkbox.
For more information on how select screens work, click here.
Suppliers
The Supplier workspace is used to handle suppliers.
Information
This screen displays information about the current supplier - or if there is no current supplier, a Select button allowing you to select one and a New button to create one.
Depending on the type of supplier, the details are shown in slightly different ways as follows:
For Supplier Organisations: (for the meanings of the fields, click here)
For Supplier Persons: (for the meanings of the fields, click here)

For Vet Practices: (for the meanings of the fields, click here)

For Veterinarians: (for the meanings of the fields, click here)

Edit Supplier (Organisation)
This is the screen used to create and edit supplier organisations. For background see Concepts|Suppliers.

The fields in the header are as follows:
Id - the ID
Company Name - the name of the supplier organisation
Notes - any notes you want to add
Active - uncheck this box to deactivate the supplier
See Tabs for a description of the fields in the common tabs, Contacts, Account Type, Categories, and Suppliers.
The Representatives tab is used to set the Supplier-Persons that this organisation employs. Note that an organisation can have zero, one or more representatives defined. As can be seen above the fields are:
Contact - the representative
From Date - the date on which the relationship started
To Date - the date on which the relationship ended
Edit Supplier (Person)
This is the screen used to create and edit supplier persons. For background see Concepts|Suppliers.

The fields in the header are as follows:
Id - the ID
Title - the name of the supplier organisation
First Name - the first name
Initials - the initials
Last Name - the last name
Notes - any pertinant notes
Active - uncheck this box to deactivate the supplier
See Tabs for a description of the fields in the common tabs, Contacts, Account Types and Categories.
The Organisations tab is used to set the Supplier-Organisations that this person belongs to. Note that they can belong to zero, one or more organisations. As can be seen above the fields are:
Supplier - the organisation
From Date - the date on which the relationship started
To Date - the date on which the relationship ended
Edit Practice
This is the screen used to create and edit supplier practices. For background see Concepts|Suppliers.

The fields in the header are as follows:
Id - the ID
Practice Name - the name of the supplier organisation
Notes - any notes you want to add
Active - uncheck this box to deactivate the supplier
See Tabs for a description of the fields in the common tabs, Contacts and Categories.
The Vetinarians tab is used to set the Supplier-Veterinarians that this practice employs. Note that a practice can have zero, one or more vets defined. As can be seen above the fields are:
Veterinarian - the vet
From Date - the date on which the relationship started
To Date - the date on which the relationship ended
Edit Veterinarian
This is the screen used to create and edit supplier veterinarians. For background see Concepts|Suppliers.

The fields in the header are as follows:
Id - the ID
Title - the name of the supplier organisation
First Name - the first name
Initials - the initials
Last Name - the last name
Notes - any pertinant notes
Active - uncheck this box to deactivate the supplier
See Tabs for a description of the fields in the common tabs, Contacts and Categories.
The Practices tab is used to set the Supplier-Practices that this vet belongs to. Note that they can belong to zero, one or more practices. As can be seen above the fields are:
Practice - the Supplier Practice
From Date - the date on which the relationship started
To Date - the date on which the relationship ended
Tabs
This page documents the various common tabs on the on the supplier edit screens.
The common tabs are: Account Type, Categories, Stock Locations, and also Contacts. (Note that since the latter is also used for customers, practice and practice locations, it is documented in Concepts|Contacts.)
Account Type tab
This is used to set the Supplier Account Type. Note that this is an information setting - it does not affect the way in which the system treats suppliers.

Choose the account type from the list. Those available are set via Administration|Lookups|Supplier Account Type.
Categories tab
This is used to set the categories (zero, one, or more) to which the supplier belongs.

Use the arrows to move the selected item from the Available list to the Selected list and vice versa.
Note that those available are drawn from differents list depending on the type of supplier you are editing - see Concepts|Categories.
Stock Locations tab
This is needed only if you use the ESCI facility - if you don't use this, don't bother with this tab.

The fields are:
Stock Location - the stock location
Account ID - the account number }
Service URL - the URL }that the ESCI facility uses to access this supplier
Username - the user name }
Password - the password }
Pressing the Test button checks that these settings work.
Confirm Delete
When you press the Delete button on the Suppliers|Information screen, a confirmation window will appear. Press OK to confirm or Cancel to abort.
If the selected supplier is not in use and can be deleted, the window will simply ask you to confirm the delete. Press OK to confirm or Cancel to abort.
If it cannot be deleted because it is in use, the text will be "xxxx has relationships and cannot be deleted. Do you want to deactivate it instead?" (where xxx is the name of the supplier you are trying to delete). Pressing OK will unset its Active flag, Cancel will abort.
Confirm New
This window allows you to select the type of supplier to be created. Select the required one and press OK, else Cancel to abort. Note that since Organisation the default type and OK is the default button, you can just press Enter to create a new supplier organisation.

SMS
This is the screen used to compose and send an SMS message. For background, see Concepts|SMS.

The fields are as follows:
Phone - the phone number to which the SMS will be sent. If the supplier has multiple phone contact numbers that are SMS enabled, then there will be a pull-down list for you to select from.
Message - the text of the SMS message - a maximum of 160 characters. The counter on the top of the box (96 in the above sample) shows how many more characters you can enter before your text will be truncated.
Press the OK button to send the SMS.
Documents
This screen displays the documents for the current supplier - or if there is no current supplier, a Select button allowing you to select a supplier.
This screen shows the details of the supplier's Documents. As you can see below, there are three different types: Attachments, Letters and Forms. The first two support 'versions', ie previous revisions of the document. See Concepts|Documents for background.

The top half of this screen functions like a standard select screen. As well as by date, you can select by:
Type - this can be set to All (ie all document types), or Attachment, Form or Letter
Status - this can be set to All, In Progress, Completed, or Finalised
The table shows the documents that match the selection criteria. The column headings are self explanatory. Clicking on the entry in the Document column will cause the document to be downloaded and displayed. Note that for Letters the Document column shows two icons like  . If you click on the right-hand one, the pdf file containing the letter will be downloaded and displayed. If you click on the left-hand one (or the name of the document) then the word processing document will be downloaded and you can open it in your word processor and save it and then edit it. (You need to save it as it is opened read-only.) After editing the file, you can then use the Edit button to edit the letter and upload the revised file.
The bottom part of the screen shows the details of the selected document.
The buttons are:
New - create a new documment - a window will open allowing you to select the type
Edit - edit the selected document record (not the document itself - though see above). If the document has status Finalised you will not be able to edit the record.
Delete - delete the selected document - a confirmation window will be displayed. If the document has status Finalised you will not be able to delete it.
Print - print the selected document (or preview it or email it)
Refresh - this button only appears when you have a non-finalised letter selected. Pressing it will (if the letter was generated from a template) refresh the letter by regenerating it from the template. This is useful if you have modified the template. A confirm window will be displayed.
Create/Edit Attachment
This is the screen used to create or edit an attachment document in the supplier's Documents list. See Concepts|Documents for background.
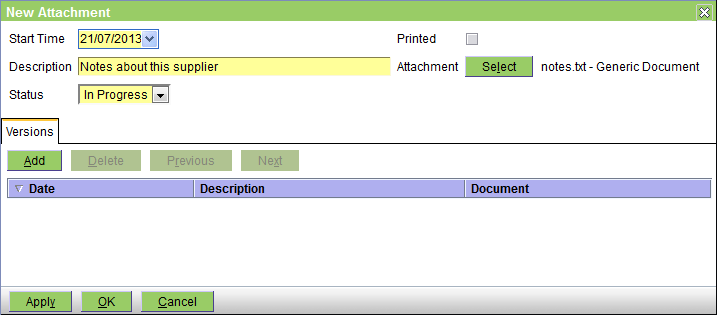
The fields are as follows:
Start Time - the date on which the entry was created - defaults to today
Description - any pertinent description
Status - this can be In Progress, Completed, or Finalised. In Progress implies that you are still working on this; Completed implies that you have finished - but the entry can still be editied; and Finalised means that it is really complete and can no longer be edited.
Printed - this box will be checked when the form has been printed
Attachment - press the Select button to attach the file - after the file is attached its name (notes.txt in this case) is shown here.
The Versions tab shows the previous versions. Note that you can use the Add button to add another, but you can also use the Select button. If you use the Select button to attach another file, then the previous 'top' version will just be pushed onto the version list.
Create/Edit Form
This is the screen used to create or edit a form document in the supplier's Documents list. See Concepts|Documents for background.

The fields are as follows:
Start Time - the date on which the entry was created - defaults to today
Description - any pertinent description
Status - this can be In Progress, Completed, or Finalised. In Progress implies that you are still working on this; Completed implies that you have finished - but the entry can still be editied; and Finalised means that it is really complete and can no longer be edited.
Printed - this box will be checked when the form has been printed
Form - select the form to print - these are the document templates that are of Type 'Supplier Form'
Create/Edit Letter
This is the screen used to create or edit a letter document in the supplier's Documents records. See Concepts|Documents for background. As discussed there, you can either generate a letter from a template, or upload any file.
First let's look at the screen shot for a new letter:

The fields are as follows:
Start Time - the date on which the entry was created - defaults to today
Description - any pertinent description
Status - this can be In Progress, Completed, or Finalised. In Progress implies that you are still working on this; Completed implies that you have finished - but the entry can still be editied; and Finalised means that it is really complete and can no longer be edited.
Printed - this box will be checked when the letter has been printed
Template - if you want to generate the letter from a template, enter the template here - these are the document templates that are of Type 'Supplier Letter' - the generated document will be an editable word processing file
Document - if you want to simply upload a file as a letter, press the Select button. A document select window will open allowing you to select the required file. If you upload a word processing file (rather than say a pdf or scanned image of a letter) then you will be able to edit it if needed.
Now the edit screen. The senario is as follows: you created an editable letter as above. Then you decided that you needed to modify it, so on the Suppliers|Documents screen, you selected the letter and then clicked on the actual letter to download it and open it in your word processor. You then saved a copy (as say Survey Letter-2), edited in the required changes and then saved it.
On the Suppliers|Documents screen you now press the Edit button to get the Edit Letter screen. You then press the Document Select button - this will open a browse window to allow you to select your 'Survey Letter-2' and upload it. The screen will then appear as below. The initial version has been saved as the previous version, and your new one as the new current version.

As intimated above, the Versions tab shows the previous versions. Note that you can use the Add button to add another, but you can also use the Select button. If you use the Select button to attach another file, then the previous 'top' version will just be pushed onto the version list.
Parameters
If a template containing parameters is selected (i.e. Fill-In fields in Microsoft Word, or Input Fields in OpenOffice Writer), a window will be displayed prompting for the values of those parameters. On OK, these will be merged with the document.
Confirm Delete
When you press the Delete button on the Suppliers|Documents screen, a confirmation window will appear. Press OK to confirm or Cancel to abort.
Confirm New
This window allows you to select the type of supplier document to be created. Select the required one and press OK, else Cancel to abort.

Confirm Refresh
If you press the Refresh button on the Supplier|Documents screen, then the window below will be displayed. Clicking OK will regenerate the letter from the template. If you leave the 'Version current document' box checked, then the previous version of the letter will be saved as the previous version, otherwise it will not be.
Pressing the Cancel button will abort the operation.
Orders
This screen displays the current orders. Note that when you first open this screen after logging on, no orders will be displayed, even though there are some - press the Find button to display all orders that are in progress with delivery pending for all suppliers and all stock locations.
The top part of the screen is a standard select screen. The bottom part displays the selected order and line item details.
Apart from the date, the selection fields are:
Supplier - the supplier - leave blank to select all suppliers
Stock Location - the stock location - leave blank to select all stock locations
Status - can be All or one of the allowed statuses
Delivery Status - can be All or one of the allowed delivery statuses
The fields in the order header are as follows:
Id - the ID of the order
Supplier - the supplier to whom the order is being made
Stock Location - the stock location for which the product is being ordered
Date - the date on which the order was created
Notes - any pertinant notes to the supplier - these will be displayed on the order
Amount - the amount payable to the supplier (ie the sum of the line item total amounts)
Tax - the total tax amount included in Amount
Printed - the checkbox will be ticked if the order has been printed
Status - the order status
Delivery Status - the delivery status
Supplier Response -the response (if any) from the supplier (eg 'widgets on backorder' or 'widgets no longer available')
The Items tab shows the line items in the order. If you select one, its details will be displayed as follows:
Product - the product being ordered - note that this is our product name, as opposed to the supplier's (given by Reorder Code and Description). This is a link and you can click on it to get to the Product|Information screen for this product.
Reorder Code & Description, Package Size & Units - see see the Suppliers tab of the Products|Information screen
Quantity - the quantity ordered
Received & Cancelled Quantity - the quantity received and cancelled
Tax - the total tax payable for this line item
Total - the total line item amount - this will equal the Quantity times the Nett Price plus the Tax.
Buttons: For an 'In Progress' order the available buttons are shown above. If there are no orders displayed, then only New, Generate Orders, and Check In-Box are displayed. For a 'Finalised' order, the Delete and Finalise buttons will not be displayed. Apart from the standard ones, the buttons are as follows:
Finalise - initiatiate the process of placing the order. A confirm window will be displayed to let you confirm the Finalise. If you press OK, the order status will be set to 'Finalised'. A print window will be displayed to let you print, preview or email the order.
Preview - displays the order that will be sent to the supplier
Copy - copy this order to generate another - you would probably use this to make a copy of a previously completed order so that the items on it can be re-ordered. The new order will be presented in the Order Edit screen so that you can make any adjustments necessary.
Generate Orders - run the Generate Order process to generate the orders - this will bring up a confirmation window to allow you to specify the supplier and stock location. See here for help if you are not generating the orders you expect.
Check Inbox - pressing this checks to see if there are any messages from the ESCI interface, and if so sets the red 'have messages' alert in the messages icon at the top left of the screen. If the alert comes on, then you can use Workflow|Messaging to examine the messages.
Generate Orders
This window is displayed when you press the Generate Orders button on the Suppliers|Orders screen.

The fields are as follows:
Stock Location - use the pull-down to select the required stock location or choose All to process all stock locations
Supplier - use the pull-down to select the supplier, or choose All to select all suppliers
Generate orders for stock:
- below ideal levels - this is the default,only items whose stock is below their idea level are processed
- at or below critical levels - choose this to only process items whose stock is at or below their critical level
The buttons are:
OK - generate the orders - after the orders are generated a window will appear saying home many orders were generated
Cancel - abort
Note that the ordering algorithm is fairly simple:
- only the default supplier set for the product is considered - thus if product X is out of stock, and the supplier selected on the Generate Orders screen is NOT the default supplier for the product (but is one the other suppliers listed for the product) then the item will NOT be ordered.
- there is no fancy calculation involving usage rates and lead times
- if the current stock quantity is negative, then it is assumed that there is zero stock (and not say -6 of them)
- existing orders are scanned for any that are for the product for the selected stock location from any supplier and that have order status other than Cancelled, and delivery status other than Full, and the number on-order is calculated as ordered less received less cancelled since this gives the number still to come
- the quantity ordered is (ideal-level - current-stock - on-order)
- the supplier's package size is taken into account - ie if 14 are required, and the package size is a box of 12, then 2 boxes (ie 24 units) will be ordered
Multiple products are included on the one order, and there will be separate orders for each supplier/stock location.
Note that the orders are simply generated. You can edit them before finalising the order.
Edit Order
This is the screen used to edit orders.

The fields in the order header are as follows:
Id - the ID of the order
Supplier - the supplier to who the order is being made
Stock Location - the stock location for which the product is being ordered
Date - the date on which the order was created
Notes - any pertinant notes to the supplier - these will be displayed on the order
Amount - the amount payable to the supplier (ie the sum of the line item total amounts)
Tax - the total tax amount included in Amount
Printed - the checkbox will be ticked if the order has been printed
Status - the order status
Delivery Status - the delivery status - note that you cannot change this here
Supplier Response - the response from the supplier - note that you cannot enter this here (because if you are editing the order it has not been finalised and thus cannot have been sent to the supplier)
The Items tab shows the line items in the order. Use the Add and Delete buttons to add and delete items from the order.
The line item fields are as follows:
Product - the product being ordered - note that this is our product name, as opposed to the supplier's (given by Reorder Code and Description). This is a link and you can click on it to get to the Product|Information screen for this product.
Reorder Code & Description, Package Size & Units - see see the Suppliers tab of the Products|Information screen - note that you edit the values for this order here, but for permanent changes you need to edit the product|supplier information
Quantity - the quantity ordered
Received & Cancelled Quantity - the quantity received and cancelled - which you cannot set here
Nett Price & List Price - again these are taken from the Product|Supplier settings and you edit the values for this order here, but for permanent changes you need to edit the product|supplier information
Tax - the total tax payable for this line item
Total - the total line item amount - this will equal the Quantity times the Nett Price plus the Tax.
Confirm Delete
When you press the Delete button on the Suppliers|Orders screen, a confirmation window will appear. Press OK to confirm or Cancel to abort.
Confirm Finalise
When you press the Finalise button on the Suppliers|Orders screen, a confirmation window will appear. Press OK to confirm or Cancel to abort.
If you press OK the order status will be set to Finalised and you will be able to print the order.
Deliveries
This screen displays the deliveries and returns for the selected supplier and stock location. Initially the screen looks as follows:

The top part of the screen is a standard select screen. Enter the required Supplier and Stock Location. You can select one of the following statuses: All, Cancelled, In Progress or Posted.
After finding orders, and selecting an order and a line item the screen looks as follows:

For details on the fields in the header and the Items tab, see Edit Delivery.
For details on the fields in the Order tab, see Edit Order.
For a Posted delivery the buttons are as follows:
New - create a new delivery or return
Invoice - create the invoice for this delivery. The delivery status will be set to Posted. Note that you will not be able to do any more changes to this delivery, and the system will not object if you have only had a part delivery (eg 3 items delivered out of 6 ordered) - because what you are doing is creating the invoice for the part delivery. Note that the invoice is normally created as the second step of the Finalise process - see below.
Reverse - create a return note to reverse the selected delivery - a confirm window will be displayed
Check Inbox - pressing this checks to see if there are any messages from the ESCI interface, and if so sets the red 'have messages' alert in the messages icon at the top left of the screen. If the alert comes on, then you can use Workflow|Messaging to examine the messages.
For an 'In Progress' delivery, the buttons are New and Check Inbox and also:
Edit - edit the delivery
Delete - delete the delivery/return - a confirm window will be displayed
Finalise - finalise the delivery/return indicating that it is ready for invoicing/crediting. A confirm window will be displayed - if you OK the finalisation, the status will be change to 'Posted'. You will also be asked if you want to create a supplier invoice/credit note for the delivered/returned items.
Select
This is the screen used to select the order line items for which you want to create a delivery. The picture below shows the screen after a supplier and stock location (for which there are outstanding orders) have been entered and the Find button pressed.

The screen will show the line items for all the current finalised orders for which there have been no deliveries yet.
You can see that there are two types of rows in the table, the first shows just the order date, and the second the line item(s). In the above picture there are two orders, each with one line item.
Check the appropriate boxes. If all the line items in an order are being delivered, check the order date row - this will automatically select all items in that order. If only some line items are being delivered, check those and not the order date row.
If you got a part delivery of an item (ie you ordered 20 and got 15), then tick the line - so that this line item gets included in the delivery record, which then you can edit to correct the delivered quantity from 20 to 15.
Press OK to continue, or Cancel to abort.
Edit Delivery
This screen is used to create and edit deliveries.

The fields in the header are as follows:
Supplier Invoice Id - the identifier for the invoice, assigned by the supplier
Supplier - the supplier
Stock Location - the stock location
Date - the date of the delivery
Amount - the sum of the line item amounts
Tax - the total tax included in the Amount
Printed - this box will be checked when the delivery note has been printed
Notes - any pertinant notes
Status - this initially set to In Progress, but can also be set to Cancelled or Posted
The Items tab shows the items being delivered, and the details for the selected line. These are as follows:
Supplier Invoice Line item Id -the identifier for the invoice line item, assigned by the supplier
Product - the product - this is our name for the product
Reorder Code & Description - the supplier's identification of the item
Package Size & Units - the package details
Quantity - the quantity being delivered - this defaults to the quantity ordered, but you can see in the above that we have said that only 3 of the 6 ordered have been delivered
Nett Price - the tax-excluded price from the supplier
List Price - the supplier's list price
Tax - the title tax for the line item
Total - the total tax-included amount for the line item
If you modify any of the supplier information fields (eg Reorder Code & Description, Package Size & Units, Nett & List prices), then when the delivery is finalised, this information will be updated in the product's supplier information.
If the Auto Price Update flag is set (see here), then the product's Cost and Sell prices will also be updated if you modified the Package Size and/or List price.
Note that if this delivery item is linked to an order item, then you will not be able to modify the Product (even though it is an editable field). That is, if you ordered a X but they delivered a Y, then you cannot change X to Y in the delivery line item - you have to delete the X delivery item and add a new delivery item for Y. [You will also have to edit the order to cancel the X's otherwise they will be oustanding on the order.
If you do add a delivery item, make sure that you press Enter after entering the Product name - this will call in all the supplier information so that you can check it and update if required.
Edit Return
This screen is used to edit a supplier return. It has the same fields as the Edit Delivery screen.
Confirm Finalise
When you press the Finalise button on the Suppliers|Deliveries screen, a confirmation window will appear. Press OK to confirm or Cancel to abort.
If you press OK the delivery note status will be set to Finalised and you will be able to print the delivery or return note.
Confirm Invoice
When you finalise a delivery on the Suppliers|Deliveries screen, you will be asked if you want to invoice the supplier. If you OK that, then this confirmation window will appear. Press OK to confirm or Cancel to abort.
Confirm New
This window allows you to select the type of delivery to be created. Select the required one and press OK, else Cancel to abort. Note that since Delivery is the default type and OK is the default button, you can just press Enter to create the delivery transaction.
Confirm Reverse
When you press the Reverse button on the Suppliers|Deliveries screen, a confirmation window will appear. Press OK to confirm or Cancel to abort.
?? need more ???
?? correct URL ???
Charges
This screen displays the charges for the current supplier - or if there is no current supplier, a Select button allowing you to select a supplier.
Note that 'charges' are the invoices (or credits) that are currently in progress. If you need to look at previously completed invoices etc, then you use the Supplier|Account screen.

The top part of the screen is a standard select screen. If you need to change the supplier, press the Select button. The bottom part displays the selected invoice and line item details.
Apart from the date, the selection fields are:
Type - you can select All, Credit, or Invoice
Status - can be All, Completed, In Progress, or On Hold
The fields in the invoice/credit note header are as follows:
Start Time - the date on which the invoice/credit note was created
Amount - the total tax-included amount of the invoice/credit note
Credit - this checkbox will be checked if this is a credit note, otherwise (for an invoice) it won't be
Printed - the checkbox will be ticked if the invoice/credit note has been printed
Status - the invoice/credit note status
The Items tab shows the line items in the invoice/credit note. If you select one, its details will be displayed as follows:
Date - the date on which the line item was created
Product - the product being ordered - note that this is our product name, as opposed to the supplier's (given by Reorder Code and Description)
Quantity - the quantity ordered
Unit Price - the unit nett tax-excluded price of the item
Tax - the total tax payable for this line item
Total - the total line item amount - this will equal the Quantity times the Unit Price plus the Tax.
Buttons: For an 'In Progress' transaction the available buttons are shown above. If there are no transactions displayed, then only New is displayed. Apart from the standard ones, the buttons are as follows:
Finalise - initiatiate the process of finalising the transaction. A confirm window will be displayed to let you confirm the Finalise. If you press OK, the status will be set to 'Finalised'. A print window will be displayed to let you print, preview or email the invoice.
Preview - displays the invoice/credit note
Edit Credit
This is the screen used to create and edit supplier credit notes.

The header fields are as follows:
Start Time - the date on which the credit note was created
Amount - the amount of the credit note - this is the sum of the line item amounts
Printed - this checkbox will be checked when the credit note is printed
Status - is initially set to In Progress, and can also be set to On Hold or Finalised
The Items tab allows you to add, delete, view and edit the line items. The fields are as follows:
Date - the date on which the line item was created
Product - the product - note that this is our product name, as opposed to the supplier's (given by Reorder Code and Description). Note also that there is no check that the product selected is in fact provided by the currently selected supplier.
Quantity - the quantity
Unit Price - the unit nett tax-excluded price of the item
Tax - the total tax payable for this line item
Total - the total line item amount - this will equal the Quantity times the Unit Price plus the Tax.
Edit Invoice
This is the screen used to create and edit supplier invoices.

The header fields are as follows:
Start Time - the date on which the invoice was created
Amount - the amount of the invoice - this is the sum of the line item amounts
Printed - this checkbox will be checked when the invoice is printed
Status - is initially set to In Progress, and can also be set to On Hold or Finalised
The Items tab allows you to add, delete, view and edit the line items. The fields are as follows:
Date - the date on which the line item was created
Product - the product - note that this is our product name, as opposed to the supplier's (given by Reorder Code and Description). Note also that there is no check that the product selected is in fact provided by the currently selected supplier.
Quantity - the quantity
Unit Price - the unit nett tax-excluded price of the item
Tax - the total tax payable for this line item
Total - the total line item amount - this will equal the Quantity times the Unit Price plus the Tax.
Confirm Delete
When you press the Delete button on the Suppliers|Charges screen, a confirmation window will appear. Press OK to confirm or Cancel to abort.
Confirm Finalise
When you press the Finalise button on the Suppliers|Charges screen, a confirmation window will appear. Press OK to confirm or Cancel to abort.
If you press OK the invoice/credit note status will be set to Finalised and you will be able to print the invoice/credit note.
Confirm New
This window allows you to select the type of charge to be created. Select the required one and press OK, else Cancel to abort.

Payments
This screen displays the payments for the current supplier - or if there is no current supplier, a Select button allowing you to select a supplier.
Note that 'payments' are the payments (or refunds) that are currently in progress. If you need to look at previously completed payments etc, then you use the Supplier|Account screen.

The top part of the screen is a standard select screen. If you need to change the supplier, press the Select button. The bottom part displays the selected transaction and line item details.
Apart from the date, you can select by:
Type - you can select All, Payment or Refund
The fields in the payment/refund header are as follows:
Date - the date on which the payment/refund was created
Amount - the total tax-included amount of the payment/refund
Printed - the checkbox will be ticked if the payment/refund has been printed
Status - the payment/refund status
The Items tab shows the line items in the payment/refund. If you select one, its details will be displayed. These vary depending on the payment/refund type. See Edit Payment and Edit Refund for details.
Buttons: For an 'In Progress' transaction the available buttons are shown above. If there are no transactions displayed, then only New is displayed. Apart from the standard ones, the buttons are as follows:
Finalise - initiatiate the process of finalising the transaction. A confirm window will be displayed to let you confirm the Finalise. If you press OK, the status will be set to 'Finalised'. A print window will be displayed to let you print, preview or email the payment/refund.
Preview - displays the payment/refund
Create/Edit Payment
This is the screen used to create and edit supplier payments.
The header fields are as follows:
Date - the date on which the payment was created
Amount - the amount of the payment - this is the sum of the line item amounts
Printed - this checkbox will be checked when the payment is printed
Status - is initially set to In Progress, and can also be set to On Hold or Finalised
The Items tab allows you to add, delete, view and edit the item items. The pull-down allows you to select the payment type to be one of Cash, Cheque, Credit Card, or EFT.
The table shows the line items - normally there will be only one.
The item detail area changes depend on the payment type. The picture above shows EFT.
For Cash it is as follows:

The fields are as follows:
Amount - this will default to the amount owed
Rounded Amount - this is the rounded equivalent of Amount using the minimum cash denomination and rounding mode set for the currency - see Administration|Lookups|Currency
Tendered - the amount tendered
Change - this will be Tendered less Rounded Amount
For Cheque it is as follows:
The fields are as follows:
Amount - this will default to the amount owed
Drawer - the name of the drawer of the cheque
Branch - something that identifies the branch of the bank. For Australian usage this is the BSB (Bank State Branch) number.
Bank - select the bank using the pull-down. The values allowed are set via Administration|Lookups|Bank.
For Credit Card it is as follows:

The fields are as follows:
Amount - this will default to the amount owed
Credit Card - select the credit card using the pull-down. The values allowed are set via Administration|Lookups|Credit Card.
Edit Refund
This is the screen used to create and edit supplier refunds.
The header fields are as follows:
Date - the date on which the refund was created
Amount - the amount of the refund- this is the sum of the line item amounts
Printed - this checkbox will be checked when the refund is printed
Status - is initially set to In Progress, and can also be set to On Hold or Finalised
The Items tab allows you to add, delete, view and edit the item items. The pull-down allows you to select the refund type to be one of Cash, Cheque, Credit Card, or EFT.
The table shows the line items - normally there will be only one.
The item detail area changes depend on the payment type. The picture above shows EFT.
For Cash it is as follows:

The onlly field is:
Amount - the amount to be refunded
For Cheque it is as follows:

The fields are as follows:
Amount - the amount to be refunded
Drawer - the name of the drawer of the cheque
Bsb - something that identifies the branch of the bank. For Australian usage this is the BSB (Bank State Branch) number.
Bank - select the bank using the pull-down. The values allowed are set via Administration|Lookups|Bank.
For Credit Card it is as follows:
The fields are as follows:
Amount - the amount to be refunded
Credit Card - select the credit card using the pull-down. The values allowed are set via Administration|Lookups|Credit Card.
Confirm Delete
When you press the Delete button on the Suppliers|Payments screen, a confirmation window will appear. Press OK to confirm or Cancel to abort.
Confirm Finalise
When you press the Finalise button on the Suppliers|Payments screen, a confirmation window will appear. Press OK to confirm or Cancel to abort.
If you press OK the payment/refund status will be set to Finalised and you will be able to print the payment/refund.
Confirm New
This window allows you to select the type of payment to be created. Select the required one and press OK, else Cancel to abort. Note that since Payment is the default selection, and OK the default button, you can simply press the Enter key to create a new payment.
Account
This screen displays the account for the current supplier - or if there is no current supplier, a Select button allowing you to select a supplier.
Note this screen displays the completed financial transactions (ie invoices, payments, etc etc). If you need to look at invoices and payments that are in progress, then you need to use the Supplier|Charges or Supplier|Payments screens.
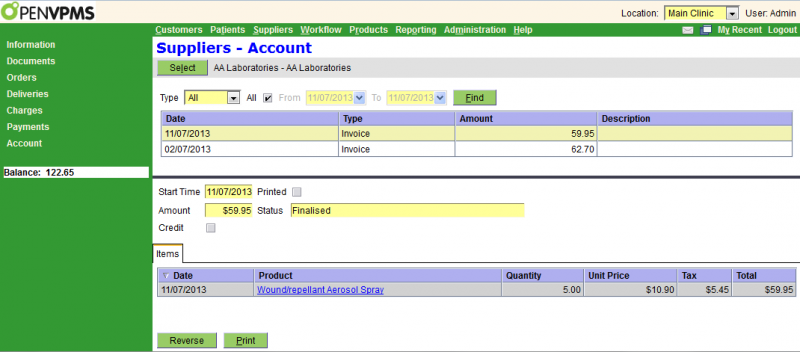
The top part of the screen is a standard select screen. If you need to change the supplier, press the Select button. The bottom part displays the selected transaction and its line item details.
Apart from the date, you can select by:
Type - you can select All, Credit, Invoice, Payment or Refund
The fields in the item header are as follows:
Start Time - the date on which the transaction was created
Amount - the total tax-included amount of the transaction
Credit - this checkbox will be checked if this is a credit note or refund, otherwise (for an invoice or payment) it won't be
Printed - the checkbox will be ticked if the transaction has been printed
Status - the transaction status
The Items tab shows the line items in the transaction . If you select one, its details will be displayed as follows:
Date - the date on which the line item was created
Product - the product - note that this is our product name, as opposed to the supplier's (given by Reorder Code and Description)
Quantity - the quantity
Unit Price - the unit nett tax-excluded price of the item
Tax - the total tax payable for this line item
Total - the total line item amount - this will equal the Quantity times the Unit Price plus the Tax.
Buttons: The buttons are as follows:
Reverse - create a transaction to reverse the selected one. A confirm window will be displayed to let you confirm the reversal. See Confirm Reverse.
Print - prints the transaction - a Print Confirm window will open allowing you to print, preview or email the transaction.
Confirm Reverse
When you press the Reverse button on the Suppliers|Account screen, a confirmation window will appear. Press OK to confirm or Cancel to abort.
If you press OK the reversing transaction will be generated as follows:
| Transaction | Reversing Transaction | Find in |
|---|---|---|
| Invoice | Credit | Charges |
| Credit | Invoice | Charges |
| Payment | Refund | Payments |
| Refund | Payment | Payments |
You will then need to edit if necessary, and then finalise the created transaction.
Select
The Supplier select screen is displayed whenever you are looking for a supplier. It works like a standard select screen.

This is a standard select screen. The Type can be set to All or one of the different types of supplier - see Concepts|Supplier.
The column headings need no explanation.
Workflow
The Workflow workspace is use to handle workflow related items. See also Concepts|Schedules, Work Lists and Workflow.
Scheduling
NOTE - this screen does not automatically refresh - to check the current schedule, click the Find button.
This screen is used to display the Schedules - ie the diary of appointments and their status. The buttons allow you to move the appointment through its various stages from new to completed. For background see Concepts|Schedules, Work Lists and Workflow.
The screen displays data in two modes, multi-schedule and single schedule. Note that the left hand panel displays the current customer and patient. This will change as the different appointments are selected. Below the Craddock/Sadie appointment is selected (note the italic font).
[As you will guess these screens show artificial data - a practice with this few appointments wouldn't survive, and there is something wrong with a 25 year old spaniel, and a 2 month old, 23 kilo chihuahua.]
First the multi-list display.
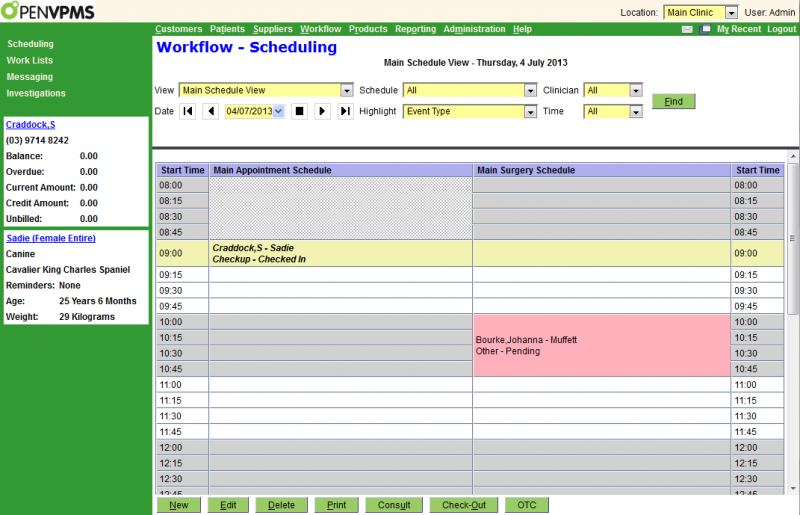
This is essentially a select screen. The selection fields area as follows:
View - this is used to select the Schedule View to be used
Schedule - this can be set to All or any one of the Schedules that are part of the current Schedule View. If you select other that All, then the schedule will be displayed in single schedule mode - see below.
Clinician - this can be set to All or any one of the clinicians. If you select a clinician, then all the appointments for clinicians other that the one selected will be 'greyed out'.
Date - the date selector  allows you to enter a date, go back or forth one day, or one week (the outer arrows), or, with the black square, select today.
Highlight - this can be set to Clinician, Event Type or Status and changes the colours used to display each appointment
Time - this can be set to All, Morning, Afternoon, Evening, AM or PM. This sets the part of the day for which the schedule is displayed. Note also that if there is part of the day for which the schedule is not available then there will be no slots in that part. In the picture, the Surgery starts at 8am but the main clinic not until 9am.
The display area consists of one column per schedule, each showing the appointments that match the selection conditions. What is displayed for each appointment is set via the Administration|Organisation|Schedule View screen. Here you can see that this view is set to display the customer, patient and status (but not the clinician).
The buttons are as follows: (see below for when the various buttons are displayed)
New - create a new appointment in the currently selected time slot. To select a time slot, click it and it will display  in the slot, then press the New button (or click the slot again) and the New Appointment screen will open. The new appointment will have status Pending.
Edit - edit the selected appointment
Delete - delete the selected appointment, a confirm window will appear
Print - print the selected appointment
Check-In - initiates the check-in process }
Consult - opens the Visit Editor window } click here for details
Check-Out - initiates the check-out process }
OTC - Over The Counter sale - opens the New Counter Sale window to allow you to make an OTC sale
Moving an appointment
If you want to move an appointment to another date/time, you can just edit the appointment and change the start and end times.
You can also 'cut and paste' it as follows (which also allows you to move it to another schedule):
- select the appointment by clicking on it
- cut it using Ctrl-X
- navigate to the day and schedule that you want
-
click on the new time slot so that appears
- paste it using Ctrl-V
Copying an appointment
If you want to copy an appointment to another date/time, you can use 'copy and paste' as follows:
- select the appointment by clicking on it
- copy it using Ctrl-C
- navigate to the day and schedule that you want
-
click on the new time slot so that appears
- paste it using Ctrl-V
The single-schedule display is as follows:

The selection fields and buttons are the same as for the multi-schedule display.
The display area columns are as follows:
Start Time - the slot start time
Status - the appointment status - which will be (in logical order) one of Pending, Waiting, Admitted, In-Progress, Billed, Completed, or Cancelled. Note that the status 'Checked-In' is translated here to 'Waiting' with the time since checked-in - see the 11.45 slot in the picture above.
Appointment Type - the type of appointment - those available are set via Administration|Types|Appointment Type
Customer - the customer - note that the name is a link - clicking on it will take you to the Customers|Information screen
Patient - the patient - note that the name is a link - clicking on it will take you to the Patients|Medical Records screen
Notes - the notes for the appointment
Available Buttons
The following table shows when each button is displayed.
| Button | Displayed When |
|---|---|
| OTC | always |
| New | time slot selected |
| Edit | appointment selected |
| Delete | appointment selected |
| appointment selected | |
| Check-In | status = Pending |
| Consult |
status = In-Progress, Billed, Completed Note that if you press Consult on a Completed or Billed appointment, then the Visit Editor opens so that you can add to the visit record |
| Check-Out |
status = In-Progress, Billed, Completed Note that if you press Check-out on a Completed appointment, a new invoice will be opened so that you can add items to it. |
Appointment
This window is used to create and edit an Appointment.
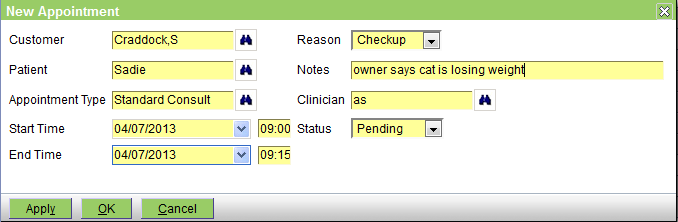
The fields are:
Customer - the customer - this is a mandatory field
Patient - the patient - this is an optional field
Appointment Type - the appointment type. The available types and their default duration are set via Administration|Organisation|Schedule and hence selecting an appointment type will automatically set the End Time.
Start Time - the date and time that the appointment will start
End Time -the date and time that the appointment will end. If the practice operates on a 24 hour basis, you can create the appointment to run across the midnight boundary - ie start 23:00 on 3/7/13 and end at 00:30 on 4/7/13.
Reason - the reason for the appointment - the available reasons are set using Administration|Lookups|Appointment Reason. Note that this will be placed into the Visit Reason field when the appointment is checked-in.
Notes - any pertinent notes
Clinician - the clinician - this is an optional field
Status - the status can be one of (in logical order) Pending, In Progress, Checked-In, Admitted, Billed, Completed or Cancelled
Note that normally both the status and the completed date/time are updated by the system's workflow processing when you use the Consult (sets status In Progress) and Check-Out (sets status Completed and the Completed date/time) buttons on the Work List screen, and Complete/Finalise (sets status Billed) button on the Invoice screen.
The two status settings not set automatically by the workflow processing are Cancelled and Admitted. You set Cancelled to show that an appointment has been cancelled. Admitted can be used to indicate that the patient has been admitted to hospital.
Confirm Delete
This screen is displayed when you initiate the deletion of an appointment on the Workflow|Scheduling screen.
Press OK to confirm else Cancel.
Work Lists
NOTE - this screen does not automatically refresh - to see the current status, click the Find button.
This screen is used to display the Work Lists - ie the list of tasks and their status. The buttons allow you to move the task through its various stages from pending to completed. For background see Concepts|Schedules, Work Lists and Workflow.
The screen displays data in two modes, multi-list and single list. Note that the left hand panel displays the current customer and patient. This will change as the different tasks are selected. Below the Casbolt/Bree task is selected (note the italic font).
First the multi-list display.
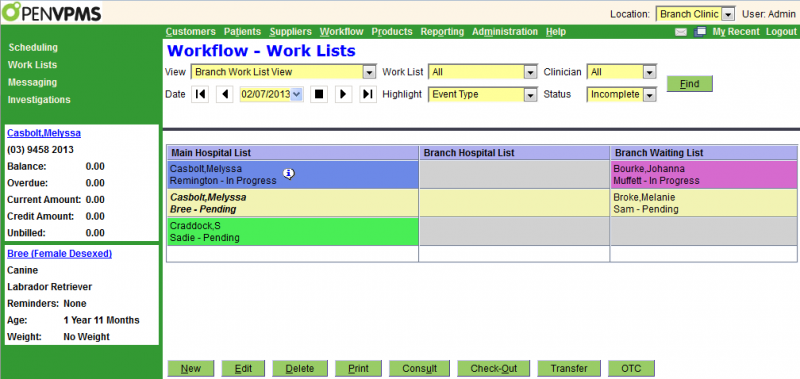
This is essentially a select screen. The selection fields area as follows:
View - this is used to select the Work List View to be used
Work List - this can be set to All or any one of the Work Lists that are part of the current Work List View. If you select other that All, then the work list will be displayed in single list mode - see below.
Clinician - this can be set to All or any one of the clinicians. If you select a clinician, then all the tasks for clinicians other that the one selected will be 'greyed out'.
Date - the date selector allows you to enter a date, go back or forth one day, or one week (the outer arrows), or, with the black square, select today.
Highlight - this can be set to Clinician, Event Type or Status and changes the colours used to display each task
Status - this can be set to All, Incomplete, or Complete
The display area consists of one column per work list, each showing the tasks that match the selection conditions. What is displayed for each task is set via the Administration|Organisation|Work List View screen. Here you can see that this view is set to display, the customer, patient and status (but not the clinician). The i balloon  indicates that there is a note for the task - clicking the balloon will display the note. (If the task has been created as a result of checking-in a patient, then the task note will generated from the appointment reason and any appointment note.)
The buttons are as follows: (see below for when the various buttons are displayed)
New - create a new task in the currently selected work list. You may find it more obvious to click in the half slot at the bottom of the tasks in the desired work list column - this will display in the slot, then click it again (or press the New button) and the New Task screen will open.
Edit - edit the selected task
Delete - delete the selected task
Print - print the selected task
Consult - opens the Visit Editor window } click here for details
Check-Out - initiates the check-out process }
Transfer - transfers the task to another work list
OTC - Over The Counter sale - opens the New Counter Sale window to allow you to make an OTC sale
The single-list display is as follows:

The selection fields and buttons are the same as for the multi-list display.
The display area columns are as follows:
Started - the time at which the task was created - not that only hours and minutes are shown even if the task was started say 3 days ago
Status - the task status - which will be (in logical order) one of Pending, In Progress, Billed, Completed, or Cancelled
Task Type - the type of task - those available are set via Administration|Types|Task Type
Customer - the customer - note that the name is a link - clicking on it will take you to the Customers|Information screen
Patient - the patient - note that the name is a link - clicking on it will take you to the Patients|Medical Records screen
Notes - the notes for the task
Time - the time (in hours and minutes) since the task was started
Available Buttons
The following table shows when each button is displayed.
| Button | Displayed When |
|---|---|
| OTC | always |
| New | work list selected |
| Edit | task selected |
| Delete | task selected |
| task selected | |
| Consult | status = In-Progress, Billed |
| Check-Out | status = In-Progress, Billed |
| Transfer | status = Pending, In-Progress, Billed |
Task
This window is used to create and edit a Work List Task.

The fields are:
Customer - the customer - this is a mandatory field
Patient - the patient - this is an optional field
Task Type - the task type - see Administration|Types|Task Type
Started - the date and time that the task was started
Completed -the date and time that the task was completed
Notes - any pertinent notes
Clinician - the clinician - this is an optional field
Status - the status can be one of (in logical order) Pending, In Progress, Billed, Completed or Cancelled
Note that normally both the status and the completed date/time are updated by the system when you use the Consult (sets status In Progress) and Check-Out (sets status Completed and the Completed date/time) buttons on the Work List screen, and Complete/Finalise (sets status Billed) button on the Invoice screen.
Confirm Delete
This screen is displayed when you initiate the deletion of a task on the Workflow|Work Lists screen.
Press OK to confirm else Cancel.
Messaging
This is the screen used to manage messages. For background, see also Concepts|Messages.

The screen is in two halves, the top is a standard select screen, the bottom displays the selected message, and then there are buttons to create, process and print the messages.
In the top half:
Type - selects the type of message (All, System, or User)
Status - selects the message status (Completed, Pending or Read). Newly received messages will be Pending until read by the To addressee, then Read, and then (when the Completed button is pressed), Completed.
Dates - normally you can leave the All box checked, otherwise uncheck it and enter the required from and to dates
User - by default this will be set to your user name, but you can enter any name in order to see the messages to that user. Note that you cannot enter a user-group name.
The column headings are as follows:
Date - shows the date and time, or if it's today then just the time
Description - the message subject
From - the user who sent the message
Reason - the message reason
Status - its status. This will be Pending, Read (ie read by the To addressee), or Completed.
Item - this field will be blank for User messages, but may contain information for System messages
In the bottom half the fields are self-explanatory, except for the following:
From & To - note that these user names are links, and clicking on them will redisplay the screen with the User set to the name you clicked. Hence you can quickly switch to see the messages for the from or to person.
Customer & Patient - similarly, these are links to take you to the customer or patient workspace
Buttons - these are as follows: (only New will be visible if no message is selected)
New - create a new message
Reply - reply to the message
Forward - forward the message
Delete - delete the message
Complete - change the message status to Completed
Print - print the message
Note that you can forward and reply to completed messages - the resulting message will be 'Pending'.
Confirm Delete
This is the Message Delete Confirmation window. Press OK to delete the message, else Cancel.
New/Reply/Forward
This is the screen used to create, forward or reply to a message.

The fields are as follows:
From - this will always show your name, you cannot pretend to be someone else
To - enter the names of the User(s) or User Group(s) to whom you wish to send the message. Multiple names must be separated by semi-colons. This is in fact a search field (even though it does not have the binoculars icon) and you can enter just 'r' to select Receptionists.
If you are replying to a message, then this will be prefilled with the sender's name.
Subject - you must enter a subject. If you are replying, then original subject will be shown prefixed by "Re: "; if forwarding then by "Fwd: ".
Customer & Patient - use these to enter the customer and patient, if applicable. If you are creating a message and do have a current customer and patient in the Customer and Patient workspaces (which will be the case most of the time), then they will be shown here. Hence if you want to send a message unrelated to the customer and patient, you will need to clear these two fields.
If you are forwarding or replying to a message, these will be set from the original message.
Reason - select the reason from the pull down list. The system comes with two, Phone and Other, but your admisistrator can add more using Administration|Lookups|Messsage Reason.
Message - enter the message text. As with any text field, you can use macros if you want. If you are replying to a message then the original text will be shown prefixed by a line giving the date/time and sender of the original message. Similarly, if you are forwarding a message, the complete header (To/From/date,time/Subject) and text will be shown.
Note that the message text is optional - ie you can send a 'subject only' message like "Staff meeting 8am Wednesday - Be There".
Press Send to send the message, Cancel to abort.
Investigations
This Investigations screen is used to display the status of investigations. For background see Concepts|Investigations. (The screen shot below is taken from a live system with adjustments to the screen display.)

This is a standard select screen. As well as the date range you can select by:
Status - can be set to All, Cancelled, Completed, Final, In Progress, Preliminary or Received - see below
The column headings are as follows:
Date - the date on which the investigation was initiated
Investigation Type - the type of investigation - clicking on the link takes you to the Administration|Types|Investigation View screen to view the details
Patient - the patient - this is a link and you can click on it to go to the patient's medical records screen
Request Id - the unique number that identifies the investigation
Status - the status - see below
Product - the product that invoked the investigation, or, if the investigation was manually initiated, the product (if any) specified
Clinician - the name of the clinician (note that in this example the practice is using the convention of using 'short names' for their clinicians) - clicking on the link takes you to the Workflow|Messaging screen to display messages to this clinician
Supplier - the organisation doing the test or procedure - clicking on the link takes you to the Suppliers|Information screen to display the supplier's details
Report - if results have been received, they will be shown here - clicking on the link will display or download the result image/document. Note that in the above screen shot you can see that the majority of the results files have the investigation number as the first part of the file name - this allows the automatic loading of the results file by the document loader program.
The status will be one of the following:
- In Progress - the initial status
- Received - results back
- Preliminary - results returned but preliminary
- Final - results returned and final
- Completed - vet reviewed and owners contacted and whatever other steps were needed
- Cancelled - investigation has been cancelled
All of these can be set manually. The document loader program sets the status to Received when it imports the results file.
Visit Editor
The Visit Editor allows you to do all the work of recording the activities in the visit.
It has a tabs for Summary, Invoice, Reminders/Alerts, Documents, Prescriptions and Estimates.
Although the Summary tab looks almost the same as the Patients|Medical Records screen Summary tab, it has two extra buttons at the bottom, OK and Cancel. OK means 'save any changes I have made and exit the visit editor'; Cancel means 'discard any changes I have made and exit the visit editor'.
These OK and Cancel buttons are present on all the tabs. Thus if you press OK on the Invoice tab, you will exit the Visit Editor. If you press OK but didn't intend to exit the Visit Editor, don't worry - just press the Consult button and that will return you to the Visit Editor.
Summary
This is the Summary tab of the Visit Editor. The screen shot below is taken from an active practice and hence some data has been intentionally blurred.
[Careful observers will also note that this is a screen shot from a system using a modified label for the Find button.]

The buttons are as follows:
OK - save any changes and close the Visit Editor
Cancel - cancel any changes and close the Visit Editor
New - add a new item to the medical record - a window will open allowing you to select the type
Edit - edit the selected item
Delete - delete the selected document - a confirmation window will be displayed
Print - print what is shown on on the screen (or preview it or email it)
Add Visit & Note - pressing this will generate a new visit entry (with Reason 'No Reason') and open the Create/Edit Note window so that you can add a note. This button should NOT be used to create a normal consult visit (for this you should use the Check-In button on the Workflow|Scheduling screen). It is intended for use when creating a note unrelated to another visit, say as a result of a phone call.
This screen is very similar to the Patients|Medical Records Summary tab - see this for further information.
Confirm Delete
When you press the Delete button on the Visit Editor|Summary screen, a confirmation window will appear.
Press OK to confirm or Cancel to abort.
Confirm New
This window is displayed when you press the New button on the Visit Editor's Summary screen. It allows you to select the type of medical record entry, alert/reminder, or document to be created. Select the required one and press OK, else Cancel to abort.
Invoice
This is the Invoice tab of the Visit Editor.
[Careful observers will note that this is a screen shot from a system using a modified label for the Find button and right justified field labels.]
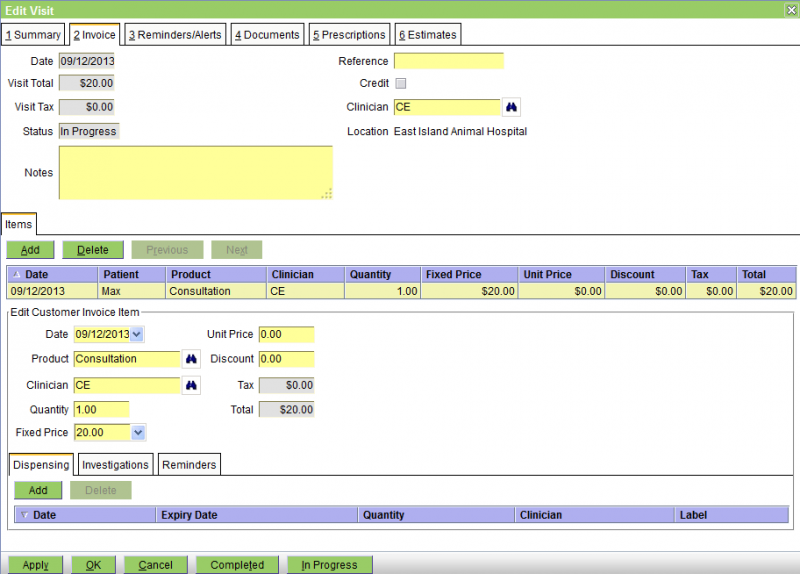
The buttons at the bottom are:
Apply - save any changes but do not close the Visit Editor
OK - save any changes and close the Visit Editor
Cancel - cancel any changes and close the Visit Editor
Completed - save any changes, set the Invoice Status to Completed, and close the Visit Editor
In Progress - save any changes, set the Invoice Status to In Progress, and close the Visit Editor
This screen works in a very similar manner to the Customer|Charges|Invoice edit screen - see this for more information.
Reminders & Alerts
This is the Reminders & Alerts tab of the Visit Editor. See Concepts|Reminders for background.
[Careful observers will note that this is a screen shot from a system using a modified label for the Find button and right justified field labels.]
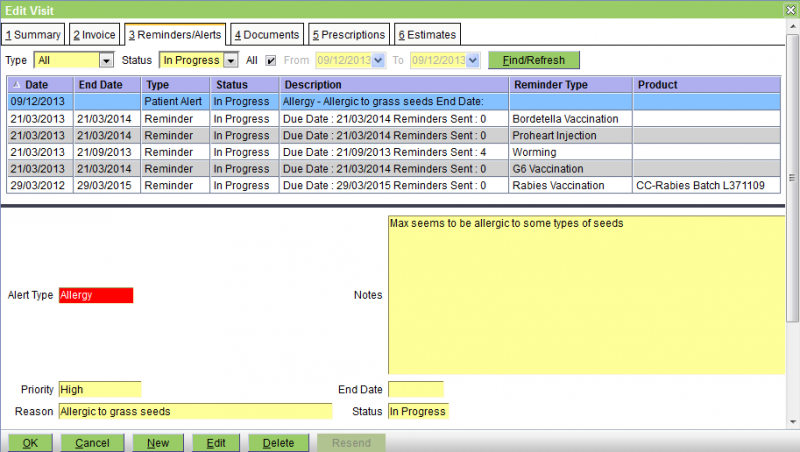
The non-standard buttons are as follows:
OK - save any changes and close the Visit Editor
Cancel - cancel any changes and close the Visit Editor
New - create a new alert or reminder
Edit - edit the selected item
Delete - delete the selected item - a confirmation window will be displayed
This screen is very similar to the Patients|Medical Records Reminders/Alerts tab - see this for further information.
Confirm Delete
When you press the Delete button on the Visit Editor's Reminders & Alerts tab screen, a confirmation window will appear.
Press OK to confirm or Cancel to abort.
Confirm New
When you press the New button on the Visit Editor's Reminders & Alerts tab screen, the window below will be displayed. Select the type of reminder that you require and and then press the OK button.
Confirm Resend
When you press the Resend button on the Visit Editor's or Patients|Medical Records' Reminders & Alerts tab screen, the following window will appear.
From the Contacts pulldown select the contact to be used. Note that all possible contacts will be listed, and those with a purpose 'Reminder' will be shown as per the above.
The Reminder Count pulldown lists the Reminder Counts of reminders that have already been generated. This enables you to resend, for example, the second reminder. The restrictions are that the reminder count must have an associated document template and cannot have its List field checked. Select the one you wish to use.
Press the OK button to proceed, Cancel to abort.
Depending on the type of the selected contact, either an email will be generated or a reminder printed.
Documents
This is the Documents tab of the Visit Editor. See Concepts|Documents for background.
[Careful observers will note that this is a screen shot from a system using a modified label for the Find button and right justified field labels.]
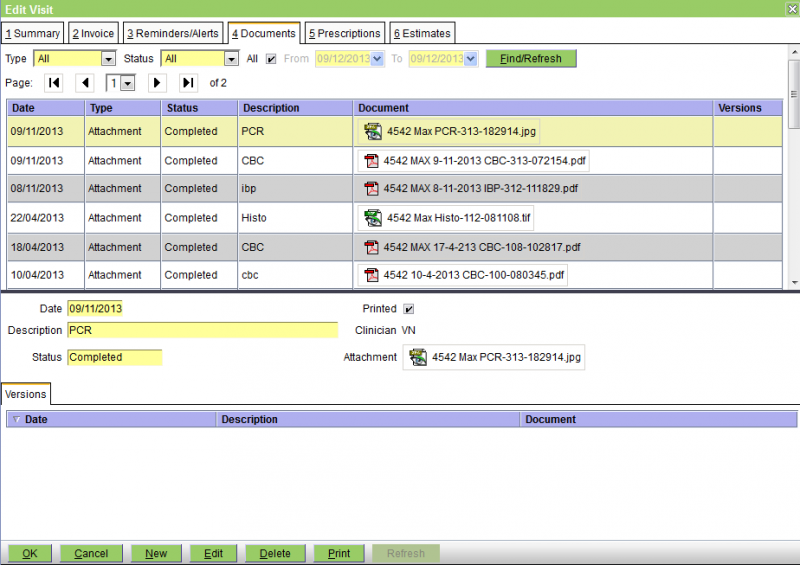
The buttons are as follows:
OK - save any changes and close the Visit Editor
Cancel - cancel any changes and close the Visit Editor
New - create a new document - a window will open allowing you to select the type
Edit - edit the selected document record. If the document has status Finalised you will not be able to edit the record.
Delete - delete the selected document - a confirmation window will be displayed. If the document has status Finalised you will not be able to delete it.
Print - print the selected document (or preview it or email it)
Refresh - (this button only appears when the selected document is a Letter) - refresh the document by regenerating it from its template - a confirmation window will be displayed.
This screen is very similar to the Patients|Medical Records Documents tab - see this for further information.
Confirm Delete
When you press the Delete button on the Visit Editor's Documents tab screen, a confirmation window will appear.
Press OK to confirm or Cancel to abort.
Confirm New
When you press the New button on the Visit Editor's Documents tab screen, the window below will be displayed. Select the type of document that you require and and then press the OK button.
Prescriptions
This is the Prescriptions tab of the Visit Vditor. See Concepts|Prescriptions for background.

The buttons are:
OK - save any changes and close the Visit Editor.
Cancel - cancel any changes and close the Visit Editor.
New - create a new prescription
Edit - edit the selected prescription. If the prescription has been fully dispensed or has expired, it cannot be edited.
Delete - delete the selected prescription. If the prescription has been dispensed or has expired, it cannot be deleted.
Print - prints the selected prescription.
Dispense - dispenses the selected prescription. This displays a medication window that allows the Date, Expiry Date and Clinician to be selected. The Label and Quantity are fixed
Cancel Prescription - cancels the selected prescription, if it hasn't been fully dispensed or expired.
For further information, see the Prescriptions Tab on the Patients|Medical Records screen.
Confirm Delete
When you press the Delete button on the Visit Editor's Prescriptions tab screen, a confirmation window will appear.
Press OK to confirm or Cancel to abort.
Estimates
This is the Estimates tab of the Visit Editor. See Concepts|Estimates for background.
It is very similar to the Customer|Estimates screen, except that entry is restricted to the current patient only. If an estimate exists for another patient, or an estimate contains multiple patients, then it will be excluded. [Careful observers will note that this is a screen shot from a system using a modified label for the Find button and right justified field labels.]
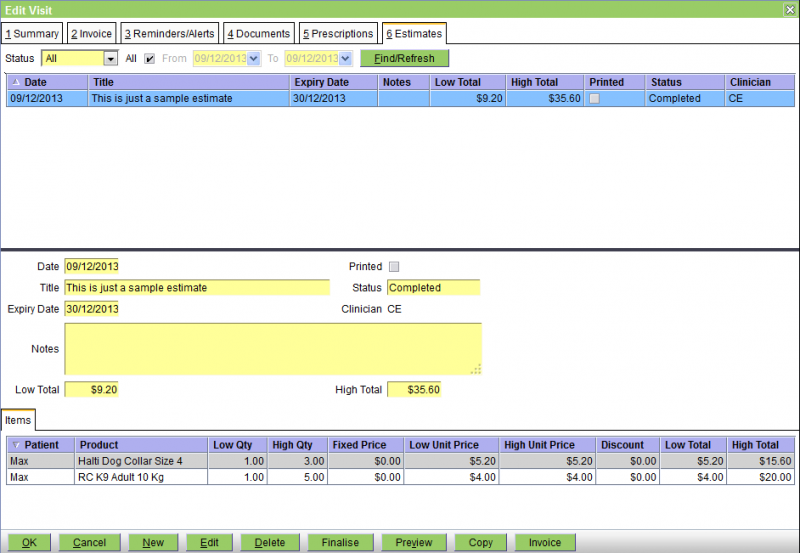
The buttons are as follows:
OK - save any changes and close the Visit Editor
Cancel - cancel any changes and close the Visit Editor
New - create a new estimate
Edit - edit the selected estimate
Delete - delete the selected estimate - a confirmation window will appear
Finalise - change the status of the selected estimate to Finalised - a confirmation window will appear. Finalising the estimate locks it from any further changes. If you confirm the Finalise, then a print window will open allowing you to print or email the estimate.
Preview - download and display the selected estimate
Copy - copy this estimate to create another one
Invoice - generate an invoice from this estimate
Confirm Delete
When you press the Delete button on the Visit Editor's Estimates tab screen, a confirmation window will appear.
Press OK to confirm or Cancel to abort.
Confirm Finalise
When you press the Finalise button on the Visit Editor's Estimates tab screen, a confirmation window will appear.
Press OK to confirm or Cancel to abort.
Confirm Invoice
When you press the Invoice button on the Visit Editor's Estimates tab screen, a confirmation window will appear.
Press OK to confirm or Cancel to abort.
Check-Out Print
The window below is displayed at the end of the check-out process when there are documents to be printed. Thes may be invoices, certificates and forms, etc.

Ensure the ones you want printed are checked, and uncheck all the rest. The buttons are as follows:
OK - initiate the printing of the selected documents
Skip - skip the printing
Cancel - abort the check-out
Mail - bring up an email write screen so that the selected documents can be emailed
Products
The Products workspace is used to handle products.
Information
The Product Information screen is shown below. Note that this is a product selection screen - it displays limited information about the product(s) found by the selection - detailed information is displayed when you view or edit the product. When first used, it will be empty. The picture below shows it after a selection has been done.
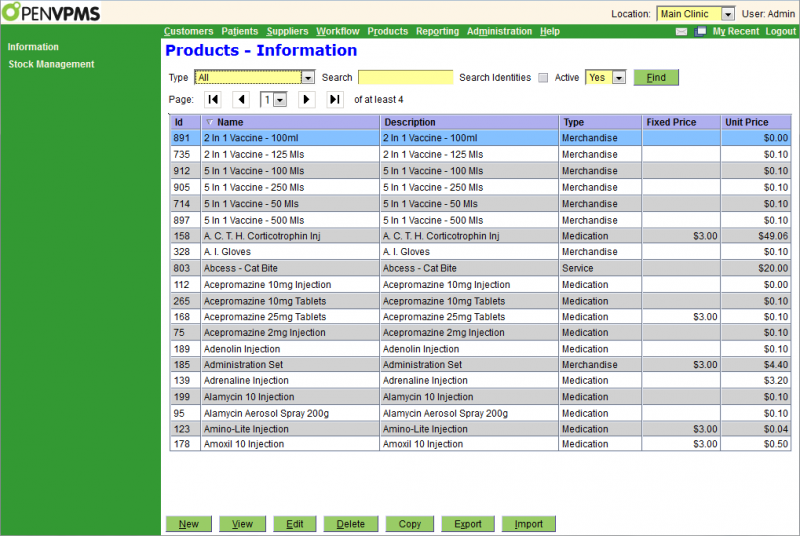
This works as a standard select screen. The Type field allows you to select the type of product.
The column headings require no explanation except to note that:
Description - will be the same as Name except for Template products (where it will be blank)
Prices - are shown as 'tax included' - see Concepts|Pricing
The standard buttons have their standard meanings. In addition,
Copy lets you create a new product by cloning it from the selected one. Note that EVERYTHING is copied - including any current stock holdings. Hence after the copied product is created, you will need to edit it to zero the stock quanties and make any other required adjustments.
Export initiates the Price Export process by displaying the Export Prices window. See also Concepts|Pricing Updates.
Import initiates the Price Import process by displaying an upload window to let you select the file to be imported.
Note that the Edit, Delete, Copy, Export & Import buttons will not be present unless the user's categories include 'Administrator'. See also Concepts|Users.
Confirm Copy
When you press the Copy button on the Products|Information screen, a window like the following will be displayed. Pres OK to proceed, Cancel to Abort.

Confirm New
This is the New Product confirmation window. Select the type of Product to be created and then use OK to continue or Cancel to abort. Note that if you have selected a type on the Product screen, then this will already be selected in this window - thus you can normally simply click OK to proceed.
Create/Edit/View Medication
This is the create/edit/view screen for Medication products, ie items which are sold (like merchandise) but which being medication, also need drug labels, dispensing notes, a drug schedule and list of active ingredients.

The fields are as follows:
Id - the ID of the product
Name - its name
Printed Name - the name that will be displayed when the invoice etc is printed. If omitted, then the Name will be used.
Drug Schedule - the applicable drug schedule (None, or S1 through S8)
Active Ingredients - you can list the active ingredients here. The standard prescription print template will display this text with the label 'Strength'.
Selling Units - the units by which this is sold (eg Unit, Ampoule, Bottle, Box, etc). The available choices are set by the Administrator|Lookups|Units of Measure screen.
Dispensing Units - the units by which this is dispensed - the same choices as Selling Units
Dispensing Verb - the applicable dispending verb (None, Administer, Apply, Give, Inject). This and the Dispensing Units are commonly used in macros to generate dispensing labels.
Dispensing Label - check this box if a dispensing label should be printed for this product
Label Instructions - the preset text for the label - this can be added to prior to printing
Dispensing Notes - here you can add notes (eg Dose - Dogs: 2.5mls bid, Cats: 1ml bid). These will be displayed on the Create/Edit Medication screen
Active - uncheck this box to deactivate the product
See Tabs for a description of the fields in the various tabs.
Create/Edit/View Merchandise
This is the create/edit/view screen for Merchandise products. See Concepts|Products for background information.
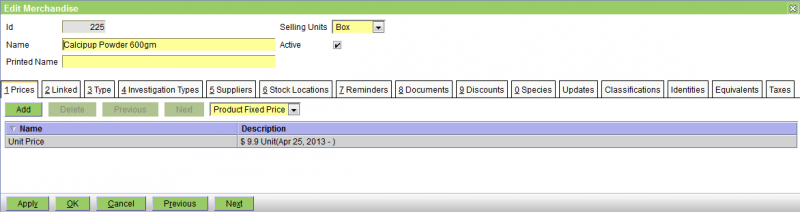
The fields are as follows:
Id - the ID of the product
Name - its name
Printed Name - the name that will be displayed when the invoice etc is printed. If omitted, then the Name will be used.
Selling Units - the units by which this is sold (eg Unit, Ampoule, Bottle, Box, etc). The available choices are set by the Administrator|Lookups|Units of Measure screen.
Active - uncheck this box to deactivate the product
See Tabs for a description of the fields in the various tabs.
Create/Edit/View Price Template
This is the create/edit/view screen for Product Price Templates. These are used to set standard prices that can be used by actual products.

The fields are as follows:
Id - the ID of the template
Name - its name
Active - uncheck this box to deactivate the product
See Tabs for a description of the fields in the Price tab. Note that for Product Price Templates you can only set a Fixed price, and not the Unit price. That is, you can only use standard pricing for the fixed component of a product's price.
Create/Edit/View Product Template
This is the create/edit/view screen for product Templates. These are used to group a number of products together so that time is saved when generating invoices.

The fields are as follows:
Id - the ID of the template
Name - its name
Description - used to clarify the name if necessary
Active - uncheck this box to deactivate the product
Invoice Note - if present, this is added to the invoice note of the invoice. Note that it is added to any pre-existing text and does not replace it.
Visit Note - if present, this is added to the medical record as a note. You must using the visit-charge editor (i.e. the integrated editor that is displayed during Check-In and Consult), for this to work. If you simply use the Customer|Charges screen to create an invoice, then no visit note will be added to the patient's medical records.
See Tabs for a description of the fields in the various tabs.
Create/Edit/View Service
This is the create/edit/view screen for products that are Services.
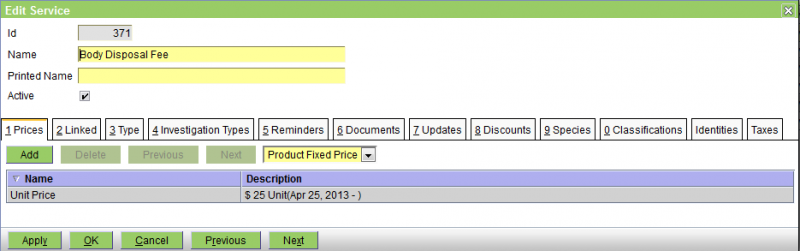
The fields are as follows:
Id - the ID of the product
Name - its name
Printed Name - the name that will be displayed when the invoice etc is printed. If omitted, then the Name will be used.
Active - uncheck this box to deactivate the product
[1.7.1] Selling Units - the units by which this is sold (eg Unit, Hour, Day, etc). The available choices are set by the Administrator|Lookups|Units of Measure screen. Note that for most services, this can be left at the default (normally Unit), and it only needs to be set for services like Boarding and Theatre Time that will be sold in quantities other than one. [Note that this facility was added in the 1.7.1 release and is not shown on the above screen shot.]
See Tabs for a description of the fields in the various tabs.
Export Prices
The Export Prices window is used to export OpenVPMS product prices to a CSV (comma separated values) file.
The exported prices can be manipulated in a spreadsheet program such as Microsoft Excel or OpenOffice Calc, and imported using Price Import.

Prices can be selected for export using the following criteria:
- Type - one of Medication, Merchandise, Product Price Template, Service, or All
- Search - enables the products to be queried by name or identity
- Search Identities - if selected, products are queried by identity
- Include Deactivated - if selected, inactive products are included in the search
- Product Type - the type of the product. E.g "Desexing", "Euthanasia".
- Species - queries products by species
- Income Type - queries products by income type. E.g. "Medication", "Professional"
- Product Group - queries products by product group. E.g "Fees", "Grooming"
- Prices - one of:
- Current - exports the fixed and unit prices for a product that are active at the current time
- All - exports all fixed and unit prices for a product. This may be used to export the price history
- Range - exports all prices for a product active within the range specified by the From and To fields
- From - used to set the price From Date, when querying prices in a range
- To - used to set the price To Date, when querying prices in a range
- Include Linked Prices - if selected, prices linked from Product Price Templates will be included in the exported data
Export File Format
The exported data is a comma-separated-values file, containing the following columns:
| Column | Required | Type | Description |
|---|---|---|---|
| Product Id | Yes | Integer | The product identifier. |
| Product Name | Yes | String | The product name. |
| Product Printed Name | No | String | The product printed name. If different to that stored, updates the product's Printed Name. |
| Fixed Price Id | No | Integer | The fixed price identifier, used when updating an existing fixed price. |
| Fixed Price | No | Decimal | The tax-inclusive fixed price. If unspecified, no fixed price will be created/updated. |
| Fixed Cost | No | Decimal | The fixed cost. Only used if a fixed price is specified. Defaults to 0.0 if unset. |
| Fixed Price Max Discount | No | Decimal |
[1.7.1] The fixed price maximum discount, expressed as a percentage. Required if a fixed price is specified, optional otherwise. |
| Fixed Price Start Date | No | Date | The date the fixed price starts on. Required if a fixed price is specified, optional otherwise. |
| Fixed Price End Date | No | Date | The date the fixed price ends on. If unspecified, the fixed price will have no end date. |
| Default Fixed Price | No | Boolean (true/false) | Indicates if a Fixed Price is the default price for the date range. Only applicable if there are multiple fixed prices. |
| Unit Price Id | No | Integer | The unit price identifier, used when updating an existing unit price. |
| Unit Price | No | Decimal | The tax-inclusive unit price. If unspecified, no unit price will be created/updated. |
| Unit Cost | No | Decimal | The unit cost. Only used if a unit price is specified. Defaults to 0.0 if unset. |
| Unit Price Max Discount | No | Decimal |
[1.7.1] The unit price maximum discount, expressed as a percentage. Required if a unit price is specified, optional otherwise. |
| Unit Price Start Date | No | Date | The date the unit price starts on. Required if a unit price is specified, optional otherwise. |
| Unit Price End Date | No | Date | The date the unit price ends on. If unspecified, the unit price will have no end date. |
| Tax Rate | No | Decimal | The sum of tax rates for the product, expressed as a percentage. This must be valid on import, but is otherwise ignored. |
| Notes | No | String | Price notes. At present, this is used to report if a price is linked from another product. |
Note that the Markup is not exported as it can be derived using the cost and price columns. To calculate the markup from the exported columns use:
Unit Price Markup = ((Unit Price / (Unit Cost * ( 1 + Tax Rate/100))) - 1) * 100
Fixed Price Markup = ((Fixed Price / (Fixed Cost * ( 1 + Tax Rate/100))) - 1) * 100
See Pricing Updates for instructions on manipulating the exported data.
Import Prices
The Import Prices window is used to import product prices from a CSV (comma separated values) file in the format produced by Export Prices.
Only those prices that have changed will be displayed. Where a value has changed, both the old (as strike-through text) and new value will be displayed. In the example below, the fixed prices have been increased by 20% and their start dates set.

Click OK to save the price changes.
Click Cancel to cancel importing the prices.
Price Import Date Formats
When importing prices, a Price Import Date Format window may be displayed:

This is displayed if the dates in the import document can be interpreted in different ways.
Select the appropriate date format and click:
- OK to import the document
- Cancel to cancel the import
Price Import Errors
Imported prices are validated for correctness prior to being saved. If errors are detected, these are displayed. E.g.:

The possible errors and their causes are outlined below:
| Error | Cause |
|---|---|
| A Value for <column name> is required | A mandatory value is missing. Values for Product Id and Product Name must always be provided. The Fixed Price Start Date and Unit Price Start Date need only be provided if a corresponding price is specified. |
| '<some value>' is not a valid value for <column name> | An invalid value has been specified for an Id, Price, Cost or Date column |
| Expected name: <product name> | The specified Product Name differs from that stored. Both the Product Id and Product Name must match that of an existing Product. |
| Product not found | The product with the specified identifier cannot be found |
| Unit price dates overlap an existing unit price |
A unit price has been specified that has a date range that intersects another unit price. |
| Price with identifier <price Id> not found | A price with the specified Fixed Price Id or Unit Price Id cannot be found. |
| Cannot update linked price |
An attempt has been made to update a fixed price linked from a Price Template. These prices can be updated via the Price Template. |
| Cannot determine which end date to use to close existing price. |
Multiple Fixed and/or Unit Prices have been specified for a product, and an existing price needs to have its To Date set to avoid price overlaps. This can be corrected by specifying a To Date for the existing price. |
| Cannot close existing price. Its start date would be greater than its end date. |
A new price has been provided that has a From Date that overlaps an existing price that has no To Date. and the calculated To Date for the existing price would be greater than its From Date. This can be corrected by specifying a later From Date for the new price. |
| Duplicate fixed price | Duplicate Fixed Price Id values have been specified, with different details for the other columns. |
| Duplicate unit price | Duplicate Unit Price Id values have been specified, with different details for the other columns. |
Tabs
This page documents all the possible tabs on the create/edit/view windows for the various type of product.
Use the following links to jump to the required tab:
Prices Linked Type Investigation Types Suppliers Stock Locations Reminders Documents Discounts Species Updates Classifications Identities Equivalents Taxes
Note that in many cases, the tabs have a Hide Inactive xxxxx checkbox. This is present when the item being attached to the product (ie the linked-to product, the reminder, the supplier, etc) can be deactivated. In this case the item will remain attached to the product, but the item will not be displayed and the product will act as though the item was not attached. You can have these inactive items displayed by unchecking the Hide Inactive xxxxx box.
Prices tab
This tab is used to set the product's price. See also Concepts|Pricing.
The price type selector is used to select Fixed (as shown below) or Unit when adding a new price. A product can have multiple current fixed prices, but only one unit price. As shown below, the fixed prices can be named. When entering an invoice, if the product has multiple prices, there will be a pull-down to let the appropriate one be selected. This facility is normally used for service products so that you can have one product, say Surgery, with three prices, Simple, Standard, and Complicated. The item will be shown on the invoice as 'Surgery' and with the selected price. Alternatively, if you want the invoice to show 'Surgery - Simple', 'Surgery - Standard', or 'Surgery - Complicated', then you need to have three separate products.

The Fixed Price fields are as follows:
Name - the name of the price that will be displayed in the pull-down on the invoice entry screen
Cost - the ex-tax cost of the product. It defaults to 0.
Markup - the markup (as a percentage). It defaults to 100.
Price - the 'tax-included' price. You can either enter the price, or set the cost and markup and the system will calculate the price.
Max Discount - the maximum discount allowed - see Concepts|Discounts - Calculation
Default - check the box to make this the default price. If multiple prices are set, the default is the one initially selected.
From & To Date - these set the applicable dates. An unspecified To Date means 'forever'. If/when you adjust a price, it is sensible, not to just simply edit the price, but to do as follows. Edit the entry to set its To Date, then add a new price using the same date as the From Date. In the above, you can the that the 'Small' price was increased from $14.30 to $14.96 on 24 June 2012. Note that if you add a new price without 'closing off' the old one, then for Fixed prices, both will be available; for Unit prices, the oldest one will be used. Hence you should always 'close off' the old price.
As you can see below, for Unit Prices the fields are the same except that there is no Name field and a Selling Units and a Quantity are added. You can choose from Ampoule, Bottle, Box, etc as set by Administration|Lookups|Units of Measure. Note however that these two are reserved for future use if and when a quantity discount facility is implemented.
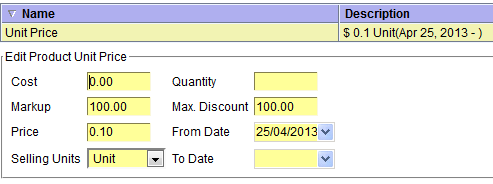
Linked tab
This allows standard pricing to be used for the Fixed component of the price. One very common use is for dispensing fees.
First you need to set up the standard prices using Product Price Templates, then you can link 'real' products to the templates. Just as you can set multiple fixed prices for a product, you can link to multiple price templates.
Note that the linked prices do not override any fixed prices set for the product, they just add to them. Thus when invoicing, the Fixed price pull-down will show both the linked and product prices.

The fields are:
Price Template - used to select the required Product Price Template
From & To Date - these are the same as used in the Prices tab
Type tab
This is used to set the Product Type - see Concepts|Products. A product can have no more than one Product Type. If you are using product types, then you really need to set the type for every product.
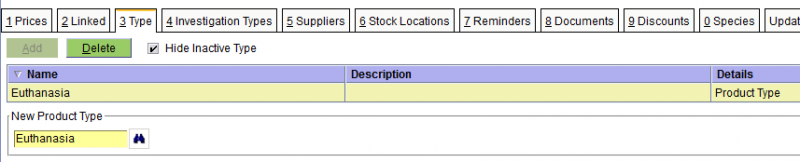
Product types can be arbitrarily created by your administrator. These product types are distinct from product classes (Merchandise, Service, Medication). Instead, these can be used to group products according to discounts and tax types for instance. See Administration|Types|Product Type.
Investigation Type
This is used to set Investigation Types for the product - see Concepts|Investigations. A product can have zero, one, or multiple investigation types linked to it.
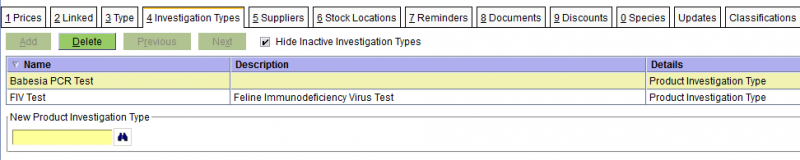
Suppliers tab
This is used to define the Supplier(s) for the product, and is only needed if you use the Stock Control facility.
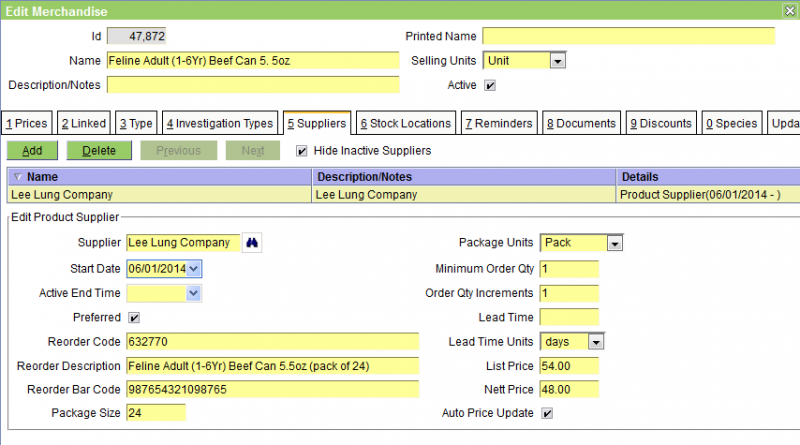
The fields are as follows:
Supplier - the supplier - this can be either a supplier organisation or a supplier person. See Concepts|Suppliers.
Start Date - the date from which this supplier can be used
Active End Time - the date after which the supplier should not be used to create orders
Preferred - check this box if this is the preferred supplier for this product.
Reorder Code - the part number/product code by which the supplier knows this item - if this is omitted no part number/product code will be shown on the order
Reorder Description - the description by which the supplier knows this item - if this is omitted then the Product Name will be shown on the order. Note that in the above screen snippet, the Reorder Description is indeed different from the Product Name - in this case we sell individual cans of pet food but buy them from the supplier in packs of 24.
Reorder Bar Code - the supplier's bar code for the item - remember that if two suppliers both sell widgets then their bar codes will be different
Package Size - this field is not shown on the order. The system uses the Package Size field to do things like "need to order 37 cans, but the package size is 24 so I will order 2".
Package Units - this field is shown on the order to describe the quantity being ordered.
Minimum Order Qty - the minimum order quantity that the supplier will accept. Note that this field is not currently used by the system, it is for documentation only.
Order Qty increments - the increment in order quantity. Again, this field is not currently used by the system, it is for documentation only.
Lead Time & Units - the lead time, ie the time from order until delivery. These fields are not currently used by the system, they are for documentation only.
List Price - this is your 'tax excluded' price for the item from the supplier - it is not displayed on the order. Note that both this and the Nett price are the prices for the item being ordered - in the above example the pack of 24 cans (and not the individual can price).
Nett Price - this is the 'tax excluded' price from the supplier, and will be displayed on the order. Note that the Nett Price is the price that the practice pays for the product. It will either be the same as the List Price, or will be lower because the practice receives a discount from the supplier.
Auto Price Update - check this box to automatically update product Cost and Sell prices when:
- editing a product to change the supplier's List Price or Package Size
- a delivery containing the product is Finalised which has a modified List Price or Package Size
In order for prices to update, the product must have:
- a Product Supplier relationship linked to an active supplier
- Auto Price Update set true
- a non-zero List Price
- a non-zero Package Size
The product's prices are updated as follows:
- Cost Price = List Price / Package Size
- Unit Price = (Cost Price * (1 + Markup/100) ) * (1 + Tax/100)
Notes:
- This updates the existing Unit Price rather than creating a new Unit Price.
- When a delivery is finalised, any line items with updated Package Size or Units, or List or Nett Prices, will update the Product Supplier information, irrespective of the Auto Price Update setting.
Generating Orders
Note that the system's 'Generate Orders' function will only generate orders for a product that has low stock if:
- the product has a supplier specified and the supplier's Preferred box is checked
- the Package Size set for the preferred supplier is greater than zero
- the Ideal and Critical quantities must be greater than zero
Stock Location tab
This tab lets you examine the stock at a stock location and to set ordering parameters.

The fields are:
Stock Location - the applicable stock location
Quantity - the current quantity in stock at this location. Note that you not normally edit this value. If you do need to adjust the stock holding, then you should use the Products|Stock Management|Adjust transaction.
Ideal Qty - the ideal stock level - the ordering system can reorder stock to get back to this level
Critical Qty - the critical stock level - the ordering system can reorder if the in-stock quantity drops below this level
Always Order - check this box if stock is to be reordered if the in-stock quantity is below the ideal level
Never Order - check this box if stock is never to be ordered
The algorithm used by the system to to calculate the order quantities (when the Generate button on the Suppliers|Orders screen is pressed) is as follows:
 Calculate predicted stock P = current stock + qty on order and not yet delivered or cancelled
Let I = ideal quantity, C = critical quantity
If P <= C, then order (I - P)
Note that the above algorithm does not use the Always & Never order check boxes (but this is planned for a future enhancement). Also the algorithm is more complex than the above because it also takes into account the supplier's package size.
Reminders tab
This tab is used to set the reminder(s) to be created when the product is invoiced. See also Concepts|Reminders.

The fields are as follows:
Reminder - the required reminder type
Interactive - check this box if, when the product is added to the invoice, a window is to be displayed to allow the reminder to be skipped (ie not created) or to enable the editing of the reminder parameters. If the box is not ticked then the reminder will be created without further intervention. Note that when a reminder is added to the product, the initial setting of this flag is taken from the Reminder Type definition - see Administration|Types|Reminder Types.
Period & Period Units - these set the period of the reminder, ie the time from when it was created until it becomes due. Note that these settings override the interval set for the reminder type. Also, if Interactive is set, then these can changed when the reminder is created.
Documents tab
This tab defines what documents, if any, are to be printed when the product is used (ie invoiced). The documents are defined by their Document Templates - see Administration|Templates. (Note that the Type set for the templates need to be 'Patient Form' otherwise things won't work.) A product can have multiple documents associated with it.

Discounts tab
This tab sets the discounts that apply to this product. See Concepts|Discounts. Note that although discounts have been set for the product in the picture below, it is far more usual to set the discounts via the Product Type, rather than against the product itself.

The fields are:
Discount - select the required discount
From & To Date - set the dates for which the discount applies - a blank To Dtae means forever
Species tab
This tab is used to set the species to which the product applies. If none are set then it applies to all, else if one are more are set, then it applies to just those. This facility ensures that we don't sell fish food to a dog. The available species are set via Administration|Lookups|Species.

Updates tab
This tab is used to set what updates will occur if the product is used (ie invoiced). For example if a cat is spayed, then we want to automatically set its desexed status. Similarly if there is a burial charge, then the animal can be automatically deactivated and its Date Deceased set. The available updates are set via Administration|Lookups|Demographic Updates.

Classifications tab
The classification tab is used to indicate the product group(s) and/or product income type(s) to which this product belongs. See Concepts|Classifications.

Identities tab
This tab is used to set the identities for a product. See Concepts|Identities and Concepts|Barcodes.
The pull-down is used to select the type of identity, Code or Bar Code.
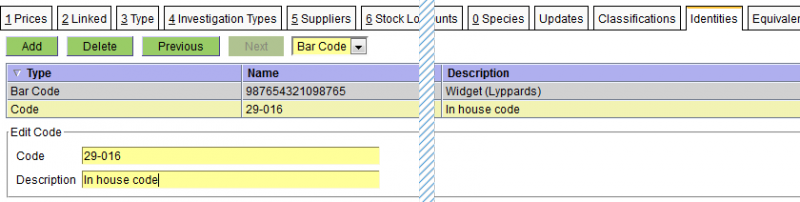
The Description field is used simply to document the code or barcode if desired.
Note that if you purchase the same widget from two suppliers, then each will have its own bar code, and both bar codes should be entered here so that the system can recognise both brand A and brand B widgets.
One further possible used of identities is as follows: say you want to have a product name in a second language (to support sales of this product on a web site). Then you could set the Code to 'Cantonese' and the description to ADVANTIX小狗小型犬(0-4KG) for the product whose (English) name is 'Advantix Pup & Small Dog (0-4Kg)'.
Equivalents tab
This tab allows you specify any products that are functionally equivalent to this one. Note that this simply a way of documenting any equivalent products. ie when you enter the product on an invoice, the system does not inform you that there is an equivalent.

Taxes tab
This tab allows you to set the applicable taxes for the product if this is necessary. Normally it is not because taxes are normally set at the Product Group or Practice level. See Concepts|Taxes.

Stock Management
The Stock Management screen enables you to search for and display stock management transations, ie stock adjustments (where you are increasing or decreasing the stock of one or more items in a given stock location) and stock transfers (where you are transferring quantities of one or more items from one stock location to another).
A typical screen is as follows:
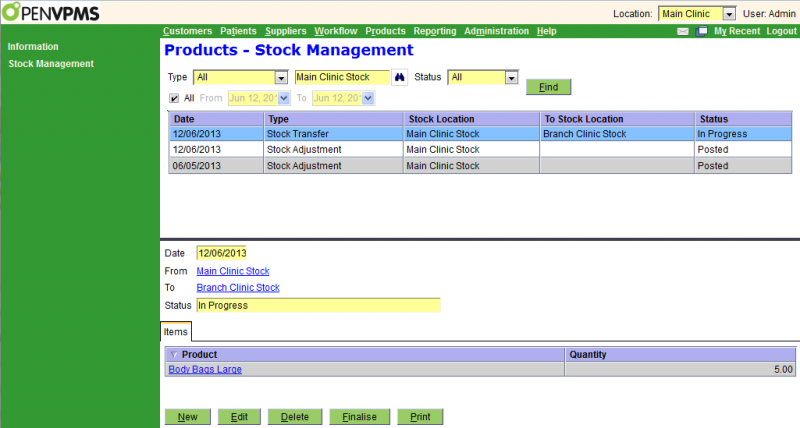
The top half of the screen is a standard select screen. The bottom half shows the details of the selected transaction. If you need clarification of the field contents, see Stock Adjustment and Stock Transfer
Buttons: For an 'In Progress' transaction the available buttons are shown above. For a 'Posted' transaction, only the New and Print buttons are shown (because one cannot Edit, Delete or Finalise a posted tranaction).
The Finalise button applies the stock changes and sets the status to 'Posted'.
Note that there are no reversal transactions to correct incorrect transfers and adjustments. To reverse a transfer you just use another transfer with the To and From locations swapped. To reverse an adjustment, you just use another adjustment with negative quantities.
Stock Adjustment Create/Edit
This is the screen used to create or edit a Stock Adjustment transaction.
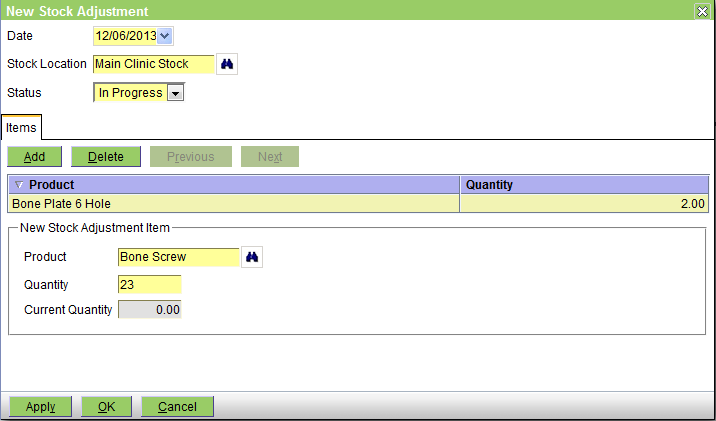
The fields are:
Date - the date of the adjustment
Stock Location - the stock location at which the adjustment is to be done
[1.7.1] Reason - the reason for the adjustment. [This was added in 1.7.1 and hence is not shown in the above screen shot.]
Status - this can be 'In Progress' or 'Posted'. It will be 'In Progress' initially, and will change to 'Posted' when the adjustment is Finalised.
Items tab - this shows the line items in the adjustment, and the details of the selected item. The details fields are:
Product - the name of the product
Quantity - the amount by which the quantity is to be adjusted. This number can be negative to reduce the stock or positive to increase it. It is NOT the new stock in-hand (which will be the Current Quantity + Quantity entered when the transaction is finalised).
[1.7.1] This has been renamed to Adjust Quantity By, to better reflect what it does.
Current Quantity - this shows the current quantity
Stock Transfer Create/Edit
This is the screen used to create or edit a Stock Transfer transaction.
![]()
The fields are:
Date - the date of the transfer
From - the stock location from which stock is to be transferred
To - the stock location to which stock is to be transferred
[1.7.1] Reason - the reason for the transfer. [This was added in 1.7.1 and hence is not shown in the above screen shot.]
Status - this can be 'In Progress' or 'Posted'. It will be 'In Progress' initially, and will change to 'Posted' when the adjustment is Finalised.
Items tab - this shows the line items in the adjustment, and the details of the selected item. The details fields are:
Product - the name of the product
Quantity - the quantity to be transferred. It must be greater than or equal to 1.
Current From Quantity - this shows the current quantity in the From location
Current To Quantity - this shows the current quantity in the To location
Confirm Delete
When you press the Delete button on the Products|Stock Management screen, a confirmation window will appear. Press OK to confirm or Cancel to abort.
Confirm Finalise
When you press the Finalise button on the Products|Stock Management screen, a confirmation window will appear. Press OK to confirm or Cancel to abort.
Confirm New
This is the New Stock Management Act confirmation window. Select the type of act to be created and then use OK to continue or Cancel to abort. Note that if you have selected an act on the Stock Management screen, then this will already be selected in this window - thus you can normally simply click OK to proceed.
Product Select
The Product Select screen is displayed whenever you are looking for a product. Sometimes, you will not be able to look for all types of products because it does not make sense to do so (eg when doing a stock transfer, you can only transfer types where stock is held, ie medication and merchandise).
It works like a standard select screen (and in fact you will find that the example used to explain how select screens work is in fact the Product Select screen).
Reporting
The Reporting workspace is used to handle various processing and reporting functions.
Till Balancing
This screen is used display, print, adjust and clear balances. For background information see Concepts|Tills.
Summary: How to clear the till
- if necessary press Select to select the required till
- if business needs to continue, press Start Clear to freeze this till balance and let a new one start so that business can continue
- press Print to get the Till Balance Report
- count the till and compare with the report
- if necessary press Adjust to make adjustments and go back to step 3
- when it all matches, press Clear
Initially the screen shows the current uncleared balance of the default till for the current location. The following shows a till with very little activity - normally there will be far more transactions.

The top half of the screen works as a standard select screen to select and display the Till Balance records for the selected till. The bottom half shows the payments making up the selected Till Balance.
If the till displayed is not the one you want, press the Select button to select the required till.
The columns in the top half of the screen are as follows:
Date - this shows the date of the first payment made after the till was previously cleared, ie it will have the same date as the earliest payment in the set shown at the bottom of the screen.
Type - this always shows as 'Till Balance'
Status - will be either Cleared or Uncleared. These should be only one line with status Uncleared, but this will not appear until the first payment is made following the till being cleared.
Amount - this shows the total of the payments received since the till was last cleared. It will always be negative because OpenVPMS treats amounts that the customer owes us as positive, and the amounts they pay as negative. NOTE that this amount does not represent the total of the cash money in the physical till. When you need to see the cash total, use the Print button to print the Till Balance Report.
Description - always blank
The fields in the bottom half of the screen are as follows:
Start Time - the date of the first payment in this till balance
End Time - blank if this till balance has not been cleared, else shows the date on which the till was cleared
Amount - the sum of all the payments shown in the columns below
Cash Float - the amount of cash left in the till each time it is cleared so as to give some money for change.
Printed - set when the till balance is printed
Status - shows Cleared or Uncleared
The columns in the bottom half are as follows:
Date - the date of the transaction
Type - the transaction type, normally Payment but also can be Refund or Cash Float Adjustment
Customer - the customer's name, or if this was a payment for an OTC sale, the name of the OTC account. Note that this is a link so you can click it to jump to the customer.
Amount - the amount of the payment
Description - almost always blank
Buttons - the buttons are as follows:
Start Clear - starts clearing the till. This changes the status of the current till balance to Clear In Progress, so that new payments and refunds don't impact it while it is in the process of being cleared. This can be used in practices that want to perform intra-day till clearing without suspending payments and refunds.
Clear - clears the till. Don't use this until you have checked the amount of cash in the till against the Till Balance Report.
Print - initiates the printing of the Till Balance Report for the selected Till Balance. You will need to print the report so that you can check that the amount in the till matches what the system thinks it is.
Adjust - generate an adjustment transaction to correct the amount in the till. You use this when your count of the cash in the till does not match the total shown on the printed Till Balance Report.
Transfer - (this button is not shown in the above screen shot, it only appears when one of the payments is selected) - transfer the payment to another Till. When you press the button, a confirmation window will appear allowing you to choose the till.
Confirm Adjust
This is the window that is displayed when you press the Adjust button on the Till Balancing screen.
 s
s
The fields are as follows:
Date - the date of the adjustment
Description - the reason for the adjustment (the default is shown above)
Amount - the amount
Credit - tick this box if this is a credit. If the amount of actual cash in the tin is more than is shown on the Till Balance Report, then leave the box unticked. If the amount of actual cash is less, then tick the box.
The buttons have their normal meanings.
Confirm Clear
This window is displayed when you press the Clear button in the Till Balancing screen.

The fields are as follows:
Cash Float - this is the amount to be left in the till
Deposit Account - choose the account into which the cleared amount is to be deposited
Press the OK button to proceed, else Cancel.
Confirm Start Clear Till
This window is displayed when you press the Start Clear button in the Till Balancing screen.

The Cash Float indicates the amount be left in the till.
Press the OK button to proceed, else Cancel.
Confirm Till
This window appears when you press the Transfer button on the Reporting|Till Balancing screen. Click the till you wish to transfer the payment to and then press OK, or use Cancel to abort.
![]()
Deposits
This screen is used to manage deposits from tills into deposit accounts.
How To Summary:
- if necessary, press Select to select the account
- press Find to find the undeposited amounts
- press Print to print the deposit slip
- press Deposit to do the deposit
Having done steps 1 & 2 the screen will look like the one below. Note however that here we have set the Status to 'All' to show the Deposited amounts as well - the default is 'Undeposited' and this will show only one item (or none if there have been no till clearances since the last deposit).

The top half of the screen works as a standard select screen to select and display the Bank Deposit records for the selected account. The bottom half shows the payments making up the selected Till Balance.
If the Deposit Account displayed is not the one you want, press the Select button to select the required account.
The Status can be set to All, Deposited or Undeposited.
Note that the account details shown on the right of the Select button are not updated immediately you make the deposit. They will be updated if you select a different account and then switch back again. (This is a known bug.)
The columns in the top half of the screen are as follows:
Date - this shows the date of the first till balance made after the last deposit was made, ie it will have the same date as the earliest till balance in the set shown at the bottom of the screen.
Type - this always shows as 'Bank Deposit'
Status - will be either Deposited or Undeposited. These should be only one line with status Undeposited, but this will not appear until the first till balances is done following the last deposit.
Amount - this shows the total of the till balances that are part of this deposit. It will always be negative because OpenVPMS treats amounts that the customer owes us a positive, and the amounts they pay as negative.
Description - always blank
The fields in the top of bottom half of the screen are as follows:
Start Time - the date of the first till balance in this deposit
End Time - blank if this deposit is still undeposited, else shows the date on which the deposit was done. (Note that because of a current bug, this field is always blank.)
Amount - the sum of all the amounts in the till balances shown in the columns below
Printed - this is set if the deposit has been printed
Status - shows Deposited or Undeposited
The columns in the bottom half for the Till Balance records are as follows:
Date - the date of the till balance
Type - the transaction type, always Till Balance
Amount - the amount of the till balance
Description - almost blank
If you select a Till Balance record, its details are shown (as they are in the above screen shot). For further information see Reporting|Till Balancing.
Buttons - the buttons are as follows:
Deposit - initiates the deposit (there will be a confirmation window). This button will not be present if there is no Undeposited item.
Print - initiates the printing of the Deposit Report for the selected Deposit Account. This will be useful when you go to the bank.
Confirm Deposit
This is the Deposit confirmation window. Press OK to action the deposit, else Cancel.
Debtors
The Debtors screen is used to manage debtors. You can:
- display customer balance information with various selection options and print the results
- print a statement for a selected customer
- do the end-of-period processing at the end of the accounting period
- generate the statements at the end of the accounting period
- re-print previously generated statements
For background information, see Concepts|Accounting. See also the note on statement detail at the bottom of this page.
How to summary:
- for month (or accounting period) end processing
- set the Statement Date to the end of the period (eg end of previous month)
- press the End Period button to do the period end processing for all customers
- press the Send All button to generate the statements for the selected customers
- if you did select customers (say those with 60 days overdue balances so that you can include a payment request note in the envelope with their statement), then clear the selection conditions and press Send All again to process the other customers. The 60 day overdue customers' statements will not be reprinted (unless you use the reprint option).
- Note that you do not have to generate statements for all customers. If say you have two customer account types, Normal and Staff, you could choose to only print statements each month for Normal customers and never for Staff.
- for debtor management
- set the Statement Date to the required date
- enter the other selection criteria
- press the Find button
- optionally press the Report button
for debtor management
- for account enquiries (if a customer wants a current statement)
- set the Statement Date to today
- set the Customer From and To to minimise the number of customers selected (ie 'sm' to 'smz' if the customer is named Smith)
- press the Find button
- click the line containing the customer and press the Print button
- Note that the resulting statement will only include finalised transactions prior to the statement date - ie it will not show today's finalised invoice.

This is a standard select screen. The selection fields are:
Customer Account Type - this allows you to select customers by their account type
Overdue From & To - use these to select overdue accounts. They are entered as the number of days after the statement date, ie 30 and 60 will select accounts that are between 30 and 60 days overdue. They are both optional. If you enter bad data, it is ignored. Hence:
| From | To | Meaning |
|---|---|---|
| all | ||
| 30 | more that 30 days overdue | |
| 30 | xxx | same as above (bad To value ignored) |
| 60 | up to 60 days overdue | |
| xxx | 60 | same as above (bad From value ignored) |
Customer From & To - this allows you to select customers by name. For this to work as expected you need to set both the From and To entries and the To value must be greater than the From. If you get this wrong, eg search from 't' to 't', no error will be reported, you will just get 'No results to display'.
Statement Date - the date of the end of the accounting period. Normally this will be the last day in the previous month if you are doing end-of-period and statement printing. However, if you are doing debtors management, then this should be set to the current date so that you can see the current situation.
Balances - you can select All, Current or Overdue. 'Current' selects those customers who do not have an overdue balance, 'Overdue' just those who do have an overdue balance.
Exclude Credit - uncheck the box if you also want to include customers with credit balances. Note that irrespective of any of the selection settings, customers with zero balances are never displayed.
The column headings are:
Customer Name - these have been intentionally blurred in the above picture. Each is a link to the customer.
Balance - the balance of the account as at the Statement Date. (If you think that the amounts shown above are high, it's because they are in Hong Kong dollars.)
Overdue Balance - the overdue balance, see below
Credit Balance - if the account is in credit the amount will be shown here (as well as in the Balance column)
Unbilled - the amount that is unbilled, ie the total of any in-progress, on-hold, or completed transactions
Last Payment Date & Amount - the date and amount of the last payment
Last Invoice Date - the date of the last invoice
The Buttons are:
Send All - generates the statements for the selected customers. This will display a confirmation window - which will also allow you to request the reprint of statements of previously printed statements (which would otherwise not be reprinted).
Note that you normally use Send All only after you have used End Period, and you should keep the same Statement Date for both.
The statements generated will be emailed to the customer (rather than printed) if the customer has an email address with the purpose 'Billing'.
The document template used for the statements will be that with the type 'Customer Statement' - and this MUST have something present in the Email Body text (eg 'See attached statement') - see Administration|Templates.
Print - prints a statement for the currently selected customer
Report - prints a Debtors report for the accounts of the customers shown on the screen - ie only those customers who match the current selection criteria. Note that this report does not show the selection critera. The document template used for the Debtors report will be that with the type 'Customer Account Balance'.
End Period - initiates the end-of-period processing for all customers (not just those selected). A confirmation window will be displayed. It has a 'Finalise Completed Invoices' checkbox - you should normally leave this ticked. However, if your practice has a policy that all invoices should be manually finalised by the accounts department, then you should untick this. In this case the completed/not finalised ones will be held over and not included in the closing balance.
Note that you use End Period before you have used Send All, and you should keep the same Statement Date for both.
Overdue calculation
The overdue date, ie the date at which an account becomes overdue is calculated as:
overdue date = statement date - customer's account type payment terms
If the customer doesn't have an account type, then the overdue date is the statement date.
A balance is overdue if it's unpaid or part paid, and has been so since prior to the overdue date.
Statement Detail
The standard statements generated by the system use a document template that is written so that whether or not the statement contains line item detail depends on whether or not the invoice (or credit note, etc) has been printed. If it has, no line item detail is displayed; if it has not been printed, then line item detail is show.
Confirm End Period
This confirmation window is displayed when you press End Period to to do the end-of-period processing.
There is a 'Finalise completed invoices' check box. You should normally leave this ticked. However, if your practice has a policy that all invoices should be manually finalised by the accounts department, then you should untick this. In this case the completed/not finalised ones will be held over and not included in the closing balance.
Click OK to proceed, else Cancel.
Confirm Report
This screen is used to confirm that the Account Balance Report should be run. Press OK to proceed, Cancel to Cancel.
Confirm Statements
This confirmation window is displayed when you press Send All to generate the statements.
There is a 'Reprint statements' check box. If you are reprinting, you MUST check this so that Accounting Fees are not levied again on any overdue accounts.
Click OK to proceed, else Cancel.
Work In Progress
This Work In Progress screen is used to display the current open invoices, credit notes and counter sales, ie those that are in progress, on hold, or completed.
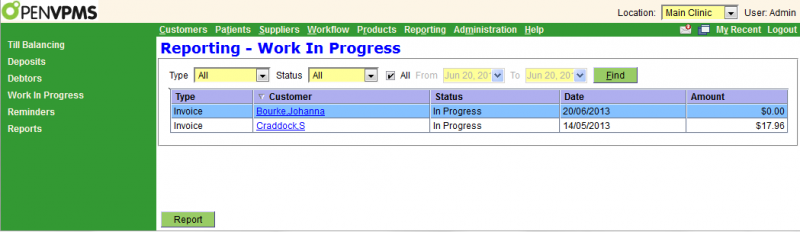
This is a standard select screen. As well as the date range you can select by:
Type - can be set to All, Counter Sales, Credit Notes or Invoices
Status - can be set to All, Completed, In Progress or On Hold
The column headings need no explanation.
Press the Report button to print the Work In Progress report.
Reminders
This screen is to used to select and process reminders. For a general discussion of reminders, see Concepts|Reminders.

This is a standard select screen. In the first field, you can select what types of reminders to process, either All (as shown above) or a specific type chosen from the pull-down list.
The From and To dates are used to enter the date range for which the reminders are due. By default (ie when you open the screen for the first time in a session), these will be set to the first and last days in the next calendar month. Assuming you use a monthly reminder cycle, in the first week of each month you would use this screen to check and process all the reminders due in the next month.
Having set the reminder type (or All) and the dates, you press the Find button, and it will display all the reminders that have status 'In Progress' and:
- are new (ie have not yet been sent out) and have a due date between the specified from and to dates, ie from <= due <= to
- are too old and should be cancelled (ie their due date+ cancel interval < today)
- are overdue (ie have been sent out previously) and have a next due date between the specified from and to dates
The columns are as follows:
Due Date - the date the associated event (eg vaccination) is/was due
Next Due - the date that the reminder is due. For initial reminder (ie those with 'Reminders Sent'=0), this will be the same as the Due Date, for others it is the Due Date plus the Overdue interval specified for this sent count (ie Reminders Sent) in the Reminder Type definition.
Reminder Type - the name of the reminder type
Customer - the name of the customer. (In the above screen shot, these have been intentionally blurred.)
Patient - the name of the patient.
Reminders Sent - the number of reminders sent out previously. (Note that 'sent' does not just mean posted or emailed, it also includes those listed to be called.)
Last Sent - the date on which this reminder was previously sent out.
Error - will be blank unless there was an error processing this reminder, in which case the error message is displayed.
Action - will be one of the following:
- Post - the reminder will be printed and will have to be posted to the customer
- Email - the reminder will be emailed to the customer
- List - the details will be listed on the Patient Reminders Report (the standard version of this displays the customer and patient's names, but it is possible to modify the report to generate address labels)
- Export - the reminder will be included in the exported CSV file (see below)
- Cancel - the reminder will be cancelled because it is too old and has reached its cancellation date
- Skip - no processing will be done either because there is no template at all specified for the reminder type, or because there is no template with the current reminder count
The buttons are as follows:
Print - prints the selected reminder irrespective of the Action show. Note that an error will occur is there is no template specified - see also below.
Send All - initiates the processing of all the reminders found - ie 'Send All' means 'process all the reminders of the selected type that match date range' and NOT 'process all reminders of all types that match the date range'
Report - prints all the reminders found irrespective of the actions shown, ie print the reminders shown on the screen. This uses the document template with Type 'Reminder Report'.
Post, Email, List or Export?
The program decides whether to Post, Email, List or Export using the following logic:
- if the reminder type's template the current reminder count has its List box ticked, then list
- else if the customer has a contact with purpose 'Reminder', then
- if this is a phone number, then list
- if it is an email address, then email
- if it is a location, then
- if the reminder type's template has its Export box ticked, then export; else
- post
- else if there is no contact with purpose 'Reminder', use the first contact found and treat as above
If there are multiple contacts with purpose 'Reminder' then the first one found will be used. Hence it is best to only have one contact with purpose 'Reminder'.
Notes:
- If you do process individual reminder types (ie do not select All), then you should also do a run with All specified to ensure that you pick up all the reminders for the period, and don't forget some types.
- The emails sent have a 'from' address taken from the Practice, not the Practice Location. If there is an email address defined with purpose 'Reminder' then this will be used, otherwise the first found.
- The Reminder Report document template is used both for the Send All processing (to show the reminders with Action 'List', and also if you click the Report button. However, you can make the system switch templates by changing the selected Practice Location to a one that has a document template of type Reminder Report specified. Hence if you create a dummy Program Location called say "Reminders Labels" and you have two document templates of type Reminder Report ,one of which generates a standard list (like the standard Patient Reminder Report), and the other which generates labels called say "Reminder Labels", and you set this as a template used by the location "Reminder Labels", then if you switch to this location and then use Send All, all the reminders with Action 'List' will appear as a set of labels.
- Errors. If you get an error saying "... no document template for .. with a reminder count of N..", it can mean what it says (ie the Reminder Type does not have a template specified for that reminder count), or that a template is specified but that it does not have Document Template specified, or that it does but the specified Document Template does not have its Content specified.
See also Administration|Types|Reminder Types for further information on Reminder Types.
Export File
If one or more reminders are to be exported then the CSV file will be generated and then downloaded to the browser for the user to save on the completion of reminder generation. See also Reminder Export Format.
Reports
This window is used to run reports. For background information, see Introduction|Reports.

This works like a standard select screen.
The column headings are:
Id - the Id number of the report
Name - the name of the template - see Administration|Templates
Description - its description
Report Type - its report type
Run Level - its run level. Note that you will not be shown any reports with a run level higher than your own. Your run level is set using Administration|Users
Press the Run button to run the report.
Report Criteria
This window is displayed when you press the Run button on the Reporting|Reports screen. It is allows the input of the report parameters (which will vary from report to report) and also provides the standard print request facilities.

The non standard buttons are as follows:
Export - click this to to export the report to a CSV file so that it can be processed by another program. Note that for best effect, the report itself may need to be adjusted. That is, if the report has page headers, footers and titles (as is normally the case) then these will also be in the CSV output. Hence making a 'no fancy bits' version will produce a cleaner CSV file.
Export & Email - will generate the CSV file and then bring up an Email window to allow you to send it somewhere
Report Parameters
This area will vary from report to report because the parameters vary from report to report.
If the parameter is a date, then you can use any of the date shortcuts - eg '-2y' for two years ago.
If the parameter is a string (indicated by the data field having resize dots in the bottom right corner like the Location name and other selection boxes above) then you can use a macro to enter the information. This can be useful for entering data which a macro can easily generate but which you have to think about.
For example if you define a macro @cid whose expression is $customer.id, then provided the report has defined the Customer Id parameter as a string, you can enter @cid and press Enter and (if there is a current customer) then the @cid will be replaced by 123456 (or whatever the current cusomer's id is).
If fact a better macro expression to use is expr:var("customer.id", "There is no current customer") because this will warn if there is no current customer.
Administration
The Administration entry in the top menu line is used to access various administration functions. It is displayed only for users who have been set as administrators.
Note that when documenting the screens in this section, it has been assumed that since you must be an andministrator to use them, you only need the fields explained and not the various buttons and how the screen works. If you do need help with the functionality, you should read the Introduction section.
Organisation
The Administration|Organisation screen is a select screen that allows you to select the specific Organisation Type to be viewed or maintained. Below is the screen as initially displayed but with the Organisation Type pull-down list showing.
Note that if you do edit Administration|Organisation items (say to change an email address), then the new values will not become available until the next time you log on (because these organisation settings are fetched once at logon time to improve performance).
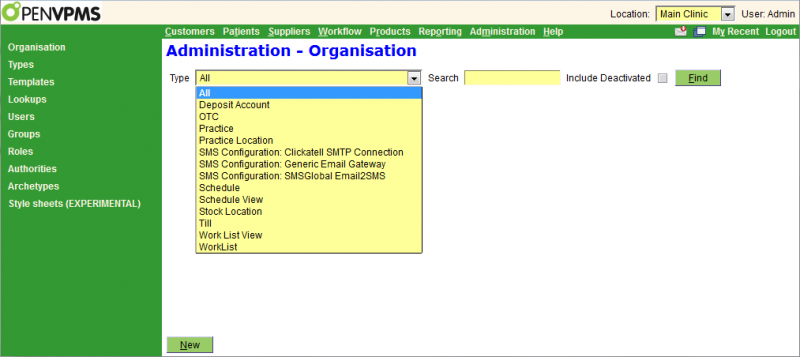
Each Type has its own view/edit screen.
Deposit Accounts
This screen is used to create/edit/view the details of the bank accounts in which takings are deposited via the Reporting|Till Balancing|Deposit processing. Most of the fields are used to provide the information to print on the Bank Deposit document obtained using Reporting|Till Balancing|Print.

The fields are as follows:
Name - the name of the Deposit Account
Account Name - the name in which the account is held
Bank - select the bank from those available in the pull-down - see Lookups|Bank
Branch - the name of the branch
Account Number - the account number
Last Deposit - the date on which the last deposit was made (this is updated by the system when the Till Balancing|Deposit processing is done)
Active - uncheck this box to deactivate the account
Locations Tab - used to set the Practice Locations for which this Deposit Account is available. Note that multiple locations can be set, but not repeated - ie an error will occur if you attempt to add one location twice
Select
This is the screen used to select a Deposit Account. It works like a standard select screen.
OTC
This screen is used to create/edit/view the OTC accounts. See also Concepts|OTC - Over The Counter.

The fields are as follows:
Name - the name of the OTC account
Description - serves to clarify the name
Active - uncheck this box to deactivate the account
Locations Tab - used to set the Practice Locations for which this OTC account is available. Note that multiple locations can be set, but not repeated - ie an error will occur if you attempt to add one location twice
Select
This is the screen used to select an OTC account. It works like a standard select screen.
Practice
This screen is used to create/edit/view the Practice. Note that you can only have one active Practice at any one time.

The fields are as follows:
Practice Name - the name of the practice. This will appear on various reports and documents so it should be set as you want it to appear.
Active - uncheck this box to deactivate the practice
Currency - select the currency to be used - see Lookups|Currency
Patient Age Format - select the required format - see Lookups|Duration Formats. If you leave this set at None, then the following will apply:
| Age | Shown as |
|---|---|
| < 1 week | N day(s) |
| < 3 months | N week(s) |
| < 23 months | N month(s) |
| >= 2 years | N year(s) |
Prescription Expiry - the default interval for how long prescriptions are valid - see Concepts|Prescriptions
Medical Records Sort Order - this sets the initial display order of items within the visit on the Patients|Medical Records screen
Reminder Export Format - this determines the file format when exporting reminders on the Reporting|Reminders screen - it can be set to None, Comma or Tab separated values.
Auto Logout - this determines how long a user's session may remain inactive before the user is automatically logged out.
Show Clinician in History Items - if selected, a clinician column is added in Patients|Medical Records, to display the clinician associated with each patient history item. By default, it is unselected.
The Contacts tab is used to view and maintain the various contacts. The types are as follows:
Location - you should set this so that it can appear on reports and documents
Phone - again you should set this so that it can appear on reports and documents
Fax - this as well
Email - you need to set this, not only so that it can appear on reports and documents, but also because it is used by the system when generating the From address on emails being sent out. In particular, the code that sends out Reminders and Statements via email uses the Practice's email addresses. If you set one with the purpose 'Billing' it will be used for the Statements. If you set one with the purpose 'Reminder' it will be used for Reminders. Note however that emails initated by users are sent out using the current location's email address(es).
See Concepts|Contacts for details.
Below is the Locations tab. You can use this to set the Practice Locations, but it's more normal to attach the locations to the practice when setting up the locations.
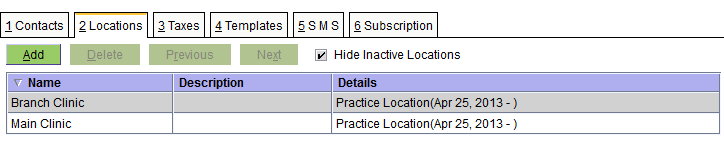
Below is the Taxes tab. Use this to set the applicable taxes.
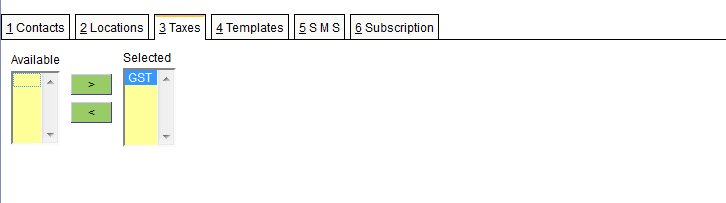
Below is the Templates tab. You should set the 'default' template here for each type of template for which you have multiple templates of that type. For example if you are using different Invoice templates for some Practice Locations, then you should set the default invoice template here.

Below is the SMS tab - use this to add the SMS gateway. There can only be one.

Below is the Subscription tab with no current subscription. First you need to click the link to purchase the subscription. You will be send a key file. Upload this by clicking the Upload button.
Below is the Subscription tab showing the current subscription (with the details intentionally blurred).

Select
This is the screen used to select a Practice. It works like a standard select screen.
Practice Location
This screen is used to create/edit/view the Practice Locations, ie the branches of the practice. See Concepts|Practice and Locations for background.

The fields are as follows:
Location Name - the name of the location. This will appear on various reports and documents so it should be set as you want it to appear.
Active - uncheck this box to deactivate the location
Stock Control - check this box to enable stock control for this location
Mail Host - the host name of your ISP's SMTP server
Mail Port - its port
Mail Username - the username of your ISP account
Mail Password - its password
Mail Connection Security - set to None, SSL/TLS, or STARTTLS as required by your ISP. The standard setup is:
| Mail Port | Security |
|---|---|
| 25 | None |
| 465 | SSL/TLS |
| 587 | STARTTLS |
Default Printer - use the pull-down to select the default printer for this location
The Contacts tab is used to view and maintain the various contacts. The types are as follows:
Location - you should set this so that it can appear on reports and documents
Phone - again you should set this so that it can appear on reports and documents
Fax - this as well
Email - you need to set this, not only so that it can appear on reports and documents, but also because it is used by the system when generating the From address on emails being sent out. Although the code that sends out Reminders and Statements via email uses the Practice's email addresses, emails initiated by users are sent out using the current location's email address. If there are multiple email addresses set, then the user can choose the required one from a pull-down list.
See Concepts|Contacts for details.
Below is the Practice tab. Use this to set the Practice to which this location belongs. Note that you can have a location not attached to a practice, but it can't be used because it can't be selected using the Location pull-down at the top right of the screen.

Below is the Tills tab. Use this to set theTill(s) for the location. You must have at least one, otherwise there is nowhere to put the money. It is possible for multiple locations to share tills. See also Organisation|Tills.

Below is the Deposit Accounts tab. Use this to set the Deposit Account(s) for the location. You must have at least one, otherwise there is nowhere to deposit the money. It is possible for multiple locations to share accounts. See also Organisation|Deposit Accounts.

Below is the Schedule Views tab. Use this to set the Schedule Views for the location. You must have one, but can have more. Multiple locations can share Schedule Views. See also Organisation|Schedule Views.

Below is the Work List Views tab. Use this to set the Work List Views for the location. You must have one, but can have more. Multiple locations can share Work List Views. See also Organisation|Work List Views.

Below is the Stock Locations tab. Use this to set the Stock Locations for the location. If you have Stock Control enabled for this location then you must have one (and only one). Multiple locations can share the one stock location. See also Organisation|Stock Location.

Below is the OTC tab. Use this to set the OTC account for the location. You can only have one but multiple locations can share the one OTC account. See also Organisation|OTC.

Below is the Templates tab. Use this to set any location specific Document Templates. These are commonly used where it is necesssary for each location to have different logos on invoices, receipts etc. It is quite possible for a document to be generated with the current location's name and address, but its far more difficult to get it to use different images. See also Templates.

Select
This is the screen used to select a Practice Location. It works like a standard select screen.
SMS Configuration: Clickatell SMTP Connection
This screen is used to configure the SMS gateway for Clickatell. See also Concepts|SMS and Reference|Setup|SMS. The screen is in two parts - the top contains the parameters, the bottom allows you to test the setup.

The fields in the top half are as follows:
Name - the name of the connection
Description - a description which serves to clarify the name
Website - Clickatell's website
Active - uncheck this box to deactivate this configuration
Country Prefix - the country code, eg 61 for Australia, 44 for the UK, etc
Area Prefix - the digit used to prefix the area code, ie 0 for Australia - see also below
User - the user name for the Clickatell account
Password - the password for the Clickatell account
API ID - the API ID provided by Clickatell
From - a valid email address
Reply To - an optional email address - responses from the gateway will be sent here
[1.7.1] Sender ID - the SMS sender ID. If specified, it must correspond to one configured with the Clickatell account. [This field was added in 1.7.1 and is not shown on the above screen shot.]
[1.7.1] Note: If your Clickatell SMS Configuration was created prior to OpenVPMS 1.7.1, you will need to recreate it to access the Sender ID field.
The bottom half of the screen contains:
Number - the phone number to which the test message is to be sent
Message - the text for the SMS message
SMS Button - press to send the email
Email - this panel shows the email that will be sent
Status - this shows 'OK' if all is OK else an error message indicating what is wrong
To get the Email and Status to update you must press the Enter key when the cursor is positioned in either of the Number or Message fields.
Note: The Country and Area Prefixes are used to format phone numbers so that they have the required format. That is, the customer's number will be something like 0413 123 456, but the gateway needs the full international number, ie 61413123456. However, if the customer lives in another country then their number will be something like (for Hong Kong) 852 1234 5678. In this case we can use the full number (without the spaces) 85212345678.
So the logic is:
Does the customer's number start with the Area Prefix? If yes, then strip the prefix and add the Country Prefix else assume that this is an international number and leave as is.
However, there are currently bugs in this code - see https://openvpms.atlassian.net/browse/OVPMS-1316.
[1.7.1] This bug has been fixed. The logic is now: if a phone number is prefixed with +, it will be removed, and no other processing will be performed. So +8512345678 -> 8512345678.
All other numbers (ie those without a leading +) will be processed as before.
SMS Configuration: Generic Email Gateway
This screen is used to configure the generic SMS gateway. See also Concepts|SMS and Reference|Setup|SMS. The screen is in two parts - the top contains the parameters, the bottom allows you to test the setup. Note that this is a generic gateway configuration screen - the screen shot below shows parameters suitable for Exetel.
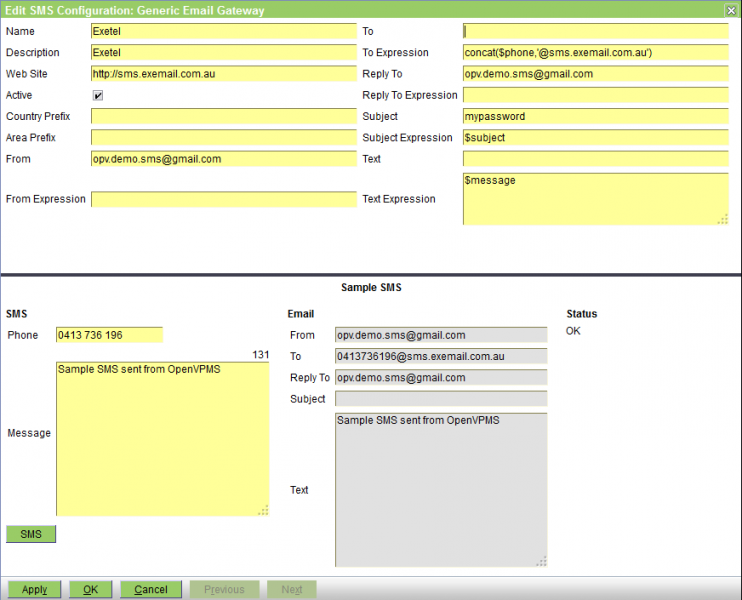
The fields in the top half are as follows:
Name - the name of the connection
Description - a description which serves to clarify the name
Website - the provider's website
Active - uncheck this box to deactivate this configuration
Country Prefix - the country code, eg 61 for Australia, 44 for the UK, etc
Area Prefix - the digit used to prefix the area code, ie 0 for Australia - see also below
From & From Expression - these define the email's From address. If only From is entered, this is used. If the From Expression is provided, it is evaluated and the result used. The expression may refer to the From value as "$from".
To & To Expression -these define the email's To address. If only To is entered, this is used. If the To Expression is provided, it is evaluated and the result used. The expression may refer to the To value as "$to".
Reply To & Reply To Expression - these define the email's Reply To address. If only Reply To is entered, this is used. If the Reply To Expression is provided, it is evaluated and the result used. The expression may refer to the Reply To value as "$replyTo".
Subject & Subject Expression - these define the email's Subject. If only Subject is entered, this is used. If the Subject Expression is provided, it is evaluated and the result used. The expression may refer to the Subject value as "$subject".
Text & Text Expression - these define the email's Text. If only Text is entered, this is used. If the Text Expression is provided, it is evaluated and the result used. The expression may refer to the Text value as "$text".
The bottom half of the screen contains:
Number - the phone number to which the test message is to be sent
Message - the text for the SMS message
SMS Button - press to send the email
Email - this panel shows the email that will be sent
Status - this shows 'OK' if all is OK else an error message indicating what is wrong
To get the Email and Status to update you must press the Enter key when the cursor is positioned in either of the Number or Message fields.
Note: The Country and Area Prefixes are used to format phone numbers so that they have the required format. That is, the customer's number will be something like 0413 123 456, but the gateway needs the full international number, ie 61413123456. However, if the customer lives in another country then their number will be something like (for Hong Kong) 852 1234 5678. In this case we can use the full number (without the spaces) 85212345678.
So the logic is:
Does the customer's number start with the Area Prefix? If yes, then strip the prefix and add the Country Prefix else assume that this is an international number and leave as is.
However, there are currently bugs in this code - see https://openvpms.atlassian.net/browse/OVPMS-1316.
[1.7.1] This bug has been fixed. The logic is now: if a phone number is prefixed with +, it will be removed, and no other processing will be performed. So +8512345678 -> 8512345678.
All other numbers (ie those without a leading +) will be processed as before.
Select
This is the screen used to select an SMS configuration. It works like a standard select screen.
SMS Configuration: SMSGlobal Email2SMS
This screen is used to configure the SMS gateway for SMSGlobal. See also Concepts|SMS and Reference|Setup|SMS. The screen is in two parts - the top contains the parameters, the bottom allows you to test the setup.
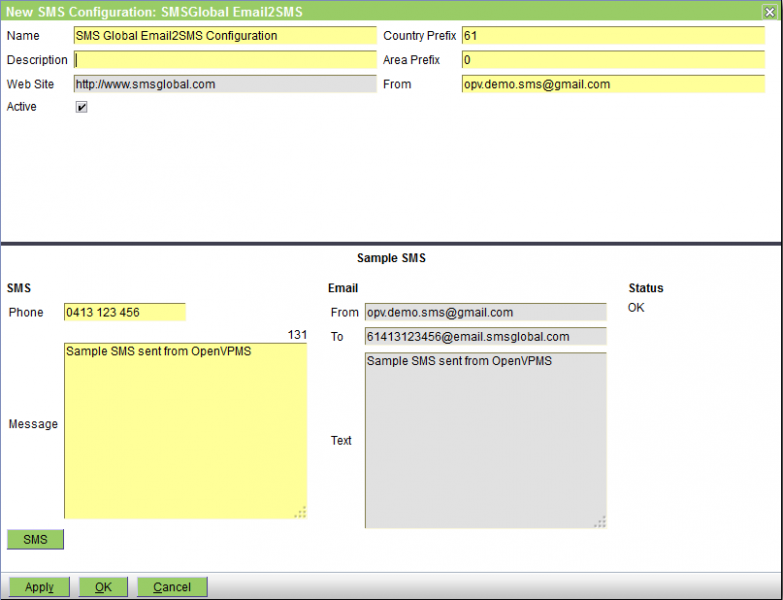
The fields in the top half are as follows:
Name - the name of the connection
Description - a description which serves to clarify the name
Website - SMSGlobal's website
Active - uncheck this box to deactivate this configuration
Country Prefix - the country code, eg 61 for Australia, 44 for the UK, etc
Area Prefix - the digit used to prefix the area code, ie 0 for Australia - see also below
From - a valid email address - this must be the same as that entered in the Email to SMS settings in the Preferences page at https://www.smsglobal.com/mobileworks/preferences.php
The bottom half of the screen contains:
Number - the phone number to which the test message is to be sent
Message - the text for the SMS message
SMS Button - press to send the email
Email - this panel shows the email that will be sent
Status - this shows 'OK' if all is OK else an error message indicating what is wrong
To get the Email and Status to update you must press the Enter key when the cursor is positioned in either of the Number or Message fields.
Note: The Country and Area Prefixes are used to format phone numbers so that they have the required format. That is, the customer's number will be something like 0413 123 456, but the gateway needs the full international number, ie 61413123456. However, if the customer lives in another country then their number will be something like (for Hong Kong) 852 1234 5678. In this case we can use the full number (without the spaces) 85212345678.
So the logic is:
Does the customer's number start with the Area Prefix? If yes, then strip the prefix and add the Country Prefix else assume that this is an international number and leave as is.
However, there are currently bugs in this code - see https://openvpms.atlassian.net/browse/OVPMS-1316.
[1.7.1] This bug has been fixed. The logic is now: if a phone number is prefixed with +, it will be removed, and no other processing will be performed. So +8512345678 -> 8512345678.
All other numbers (ie those without a leading +) will be processed as before.
Schedule
This screen is used to create/edit/view the Schedules. These together with the views (see Organisation|Schedule View) determine how the Workflow|Scheduling screen works. It also sets options to control the check-in behaviour. See also the note at the bottom about * as the default appointment type.

The fields are as follows:
Name - the name of the schedule
Description - serves to clarify the name
Slot Size - this and Slot Units defines the size of each slot in the schedule
Slot Units - can be set to minutes or hours
Allow Double Booking - check this box to allow multiple appointments to be scheduled at the same time. Note that due to a current bug overlapping bookings do not display correctly when a single schedule is shown on the Workflow|Scheduling screen.
Active - uncheck this box to deactivate the schedule. Note that if you do deactivate a schedule because it is no longer needed, then you should also remove this schedule from any schedule views in which it is used, otherwise the Workflow|Scheduling screen will happily display and let you use a schedule that has been deactivated.
Start & End Time - these define the work day - ie the times between which appointments can be booked. If left unset, they default to 08:00 to 18:00 respectively. Enter either in hh:mm or hhmm format. If you enter just the hour the minute portion will be set to the current time (ie 9 yields 9:13 if the current time is 11:13).
If you set say 18:00 as the end time, then the last slot shown on the schedule will start at the slot size before this, ie 17:45 if you have a 15 minute slot size.
For a practice that operates on a 24hour basis, you can set the start time to 00:00 and the end to 24:00.
Use All Work Lists - if this box is checked, then when an appointment if checked-in from this schedule, you will be able to choose any work list, otherwise only the worklists defined in the Work Lists tab will be available
Input Weight - if this box is checked, then as part of the check-in, the New Weight screen will be displayed so that the patient's weight can be entered
Use All Templates - if this box is checked, then as part of the check-in, all patient form and letter document templates will be displayed for you to select from, otherwise only those defined in the Templates tab will be available
Views tab - used to set the Schedule Views which this Schedule is included in
Appointments Types tab - as shown below, this is used to view, add and delete the Appointment Types that are valid for this Schedule.

The fields are as follows:
Appointment Type - the appointment type (the available types are determined by the Administration|Types|Appointment screen)
No of Slots - the lenght of this appointment type in this schedule
Default - check this box if this is the default appointment type.
Work Lists tab - as shown below, this is used to view, add and delete the Work Lists you can choose from when checking-in an appointment on this schedule.
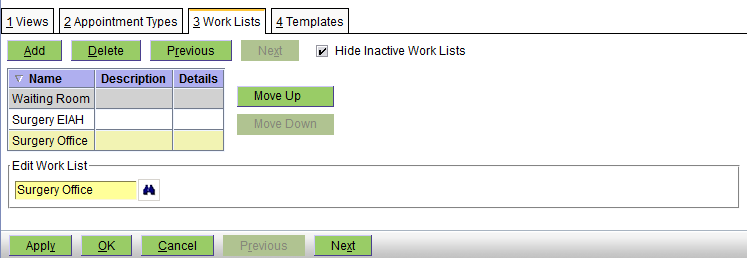
As you can see you can add, delete and modify the set of work lists, and also change the order in which they are listed (so that the most common one can be put at the top).
Templates tab - as shown below, this is used to view, add and delete the patient form and letter document templates that will be presented to choose from when checking-in an appointment on this schedule

As you can see you can add, delete and modify the list of templates, and also change the order in which they are listed (so that the most common one can be put at the top of the list).
Note that in order to enable the quickest possible selection of the Appointment Type on the Workflow/Scheduling screen, you should define an appointment type "*" (description 'unspecified') and make this the default. With this as the default, then when you create an Appointment when you press the binoculars for the Appointment Type field, you will see the complete list of available Appointment Types. Alternatively, when you tab to the Appointment Type field, (which selects the *), you can then type the first letter of your required Appointment Type (eg c for Consult, h for Health-check, etc - assuming you have set the other appointment types so that each start with different letters).
Select
This is the screen used to select a Schedule. It works like a standard select screen.
Schedule View
This screen is used to create/edit/view the Schedule Views. These together with the schedules themselves (see Organisation|Schedules) determine how the Workflow|Scheduling screen works.

The fields are as follows:
Name - the name of the schedule view
Description - serves to clarify the name
Active - uncheck this box to deactivate the schedule view
Display Expression - this the expression used to construct what is displayed when the schedule view contains multiple schedules. (It's not used if there is only a single schedule in the view.) See also Expressions below.
Display Notes - uncheck this if you do not want the notes icon shown on the multi-schedule version of the Workflow|Scheduling screen. On the single-schedule version, the notes text is shown in the Notes column.
Highlight - you can select None, Clinician, Event Type (ie appointment type), or Status. This determines the initial setting of the Highlight setting on the Scheduling screen. Remember that if you are going to make proper use of this highlighting facility, then you need to set different colours for each clinician (in Administration|Users), appointment type (in Administration|Types|Appointment). However if you want to change the status colours, it's more difficult - see Reference|Colours.
Schedules tab - used to set the Schedules which this Schedule View includes. If there are more than one, then the Workflow|Scheduling screen initially shows each schedule in its own column. If there is only one, then a different screen format is used with columns for each of Status, Appointment Type, Customer, Patient, Reason and Notes. Even with a multiple-schedule view, you can switch the Scheduling screen to show only a single schedule.
Test Button
Pressing the Test button opens a window that allows you to test and compose expressions. It includes documentation and examples as well as its own Test button that actually tests your expression and displays the resulting text.
Expressions
The expression shown in the screenshot above is duplicated here so you can copy it:
concat(openvpms:get(.,'clinician.name'),': ',openvpms:get(.,'customer.name'),' - ',openvpms:get(.,'patient.name'),'\n',openvpms:get(.,'act.reasonName'),' - ',openvpms:get(.,'act.statusName'))Note that what we are doing is concatenating together bits of information from the openvpms:get calls with various separators, eg ': '. The '\n' injects a newline character to start a second line.
The following table shows the parameters that the expressions have access to, that is, each of the node names which can be used in the openvpms:get(.,'nodeName') function.
| Node Name | Explanation |
|---|---|
| act.description | Appointment Notes |
| act.status | Status code (eg PENDING) |
| act.statusName | Status (eg Pending) |
| act.reason | Reason code (eg HIT_BY_CAR) |
| act.reasonName | Reason (eg Hit by Car) |
| customer.name | Name of Customer (eg Smith,Fred) |
| patient.name | Name of Patient |
| clinician.name | Name of Clinician |
| schedule.name | Name of the schedule |
| scheduleType.name | Appointment Type |
| arrivalTime | Time arrived, ie check-in time (eg Sat Jul 27 10:15:47 EST 2013) empty string if not checked-in yet use date:format functions to format, eg date:formatDateTime(openvpms:get(.,'arrivalTime'),'short') yields 27/7/13 10:16 AM |
| waiting | Time as '(h:mm)' since check-in, empty string if not checked-in yet |
There are also a number of others which may be used, but not particularly efficiently as they require database queries.
- patient.objectReference - reference to the patient
- act.objectReference - reference to the appointment/task
- schedule.objectReference - reference to the schedule
- customer.objectReference - reference to the customer
- clinician.objectReference - reference to the clinician
To get the breed, do:
openvpms:lookup(openvpms:get(., "patient.objectReference"), "breed")
To get the customer's last name, do:
openvpms:get(.,"customer.objectReference.lastName")
Notes:
- the various objectReference properties above aren't supported by the Display Expression editor and hence if you use its Test function, you will get 'Expression Error'
- if there is no patient, an empty string will be returned
However, if you need a customer's full name and address to show on a schedule view so that a house call vet can look at the schedule with his iPhone to see where to go next, then the following will do the trick:
normalize-space(openvpms:get(., "customer.objectReference.description"))
The 'normalize-space' function (one of the xpath functions) removes the newline characters to convert the multiline address into a single line.
Finally, an example where the information is displayed over three lines but is limited to 30 characters wide:
concat(substring(concat(openvpms:get(., 'clinician.name'),': ', openvpms:get(., 'patient.name'),' ',openvpms:get(.,'customer.objectReference.lastName')),1,30),'\n', substring(concat('[',openvpms:lookup(openvpms:get(., 'patient.objectReference'),'breed'),']'),1,30),'\n', substring(concat(openvpms:get(.,'scheduleType.name'), ':', openvpms:get(.,'act.reasonName'),' ', openvpms:get(.,'waiting')),1,30)) Select
This is the screen used to select a Discount Type. It works like a standard select screen.
Stock Location
This screen is used to create/edit/view the Stock Locations, ie the store rooms where stock is held. See Concepts|Stock Control for background.
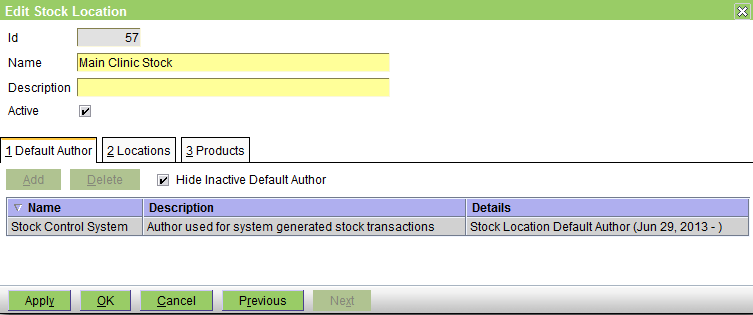
The fields are as follows:
Name - the name of the stock location. This will appear on various reports and documents so it should be set as you want it to appear.
Description - used to clarify the name if necessary
Active - uncheck this box to deactivate the stock location
The Default Author tab is used to view and maintain the user set as the author of stock management transactions generated by the system. It is possible to set an normal user for this, but it is better to create a special user - as is shown in the screen shot above.
Below is the Locations tab. Use this to set the Practice Locations to which this stock location belongs. One stock location can be used by multiple practice locations, but a practice location cannot have more than one stock location. Note that you can have a stock location not attached to a practice location, but it is of little use since all you can do is use the Products|Stock Management|Stock Transfer transaction to transfer items to it. However, you could use this as a mechanism to keep a record of written-off stock, ie create a stock location called Write-offs unlinked to any practice location, and transfer written-off stock to it.
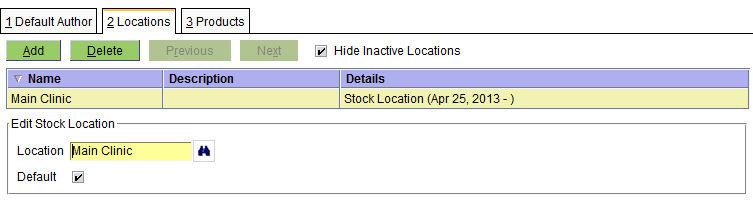
Below is the Products tab. It is normally used just to view the products at the stock location and their stock details. You can used it to add products to this location and set their stock details - but this is normally done via the Products|Information screen. Note that in order to show the product details, you must click on the product line in order to get the details to show.

For the field meanings, see here.
Select
This is the screen used to select a Stock Location. It works like a standard select screen.
Till
This screen is used to create/edit/view the details of the Tills. See Concepts|Tills for background information.

The fields are as follows:
Name - the name of the till
Till Float - the float - ie the amount of cash money to be left in the till when it is cleared as part of the Reporting|Till Balancing|Clear operation
Last Cleared - the date on which the till was last cleared. Although you can modify this field, you should not normally need to as it is set by the system.
Active - uncheck this box to deactivate the till
Locations tab - used to set the Practice Locations which this till is used by
Work List
This screen is used to create/edit/view the Work Lists. These together with the views (see Organisation|Worklist View) determine how the Workflow|Scheduling screen works and also to control what screens are presented as part of the check-in process. See also the note at the bottom about * as the default task type.
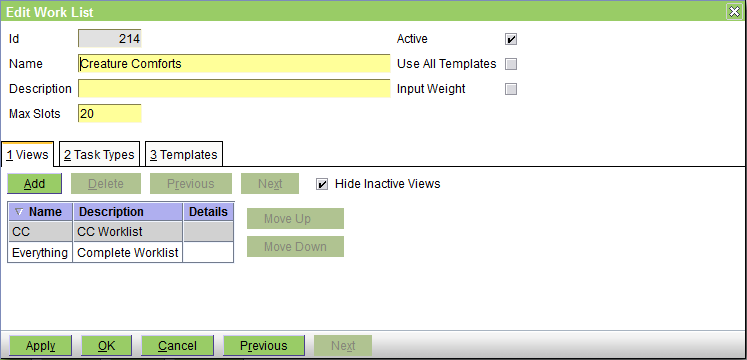
The fields are as follows:
Name - the name of the work list
Description - serves to clarify the name
Max Slots - the maximum number of slots in the work list, ie how many entries it can contain. For normal 'list of jobs' work lists this can be left at the default of 100. However, if your work list represents some limited commodity such as the number of boarding kennels, then you should set the Max Slots to this.
Active - uncheck this box to deactivate the work list. Note that if you do deactivate a work list because it is no longer needed, then you should also remove this work list from any work list views in which it is used, otherwise the Workflow|Work Lists screen will happily display and let you use a work list that has been deactivated.
Use All Templates - uncheck this box if you want to limit the list of document templates presented for selection at check-in time. You will then need to use the Templates tab to define which templates are to be displayed for selection, and if none are defined then the document selection step will be skipped. If the box is checked, then all suitable templates will be displayed for selection. Note that even if you do want to be able to select from all available templates, you may want to uncheck this box and list all the templates in the Templates tab because you can then control the order so that the most commonly used one are listed first.
Input Weight - uncheck this box if you do not want the Weight recording window to be displayed as part of the checkin process.
Views tab - used to set the Work List Views which this Work List is included in
Task Types tab - as shown below, this is used to view, add and delete the Task Types that are valid for this work list.

The fields are as follows:
Task Type - the task type
No of Slots - this field is not currently used by the system (every task type uses one slot in the work list irrespective of anything you set here)
Default - check this box if this is the default task type
Templates tab - as shown below, this is used to view, add and delete the Templates that are valid for this work list - ie those that will be suggested for use when the check-in is done.
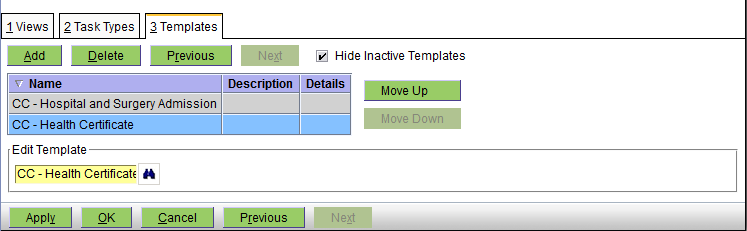
As you can see you can add, delete and modify the list of templates, and also change the order in which they are listed (so that the most common one can be put at the top of the list).
Note that in order to enable the quickest possible selection of the Task Type on the Workflow/Work Lists screen, you should define an task type "*" (description 'unspecified') and make this the default. When you do the check-in, this will get set as the task type, and can generally be left as is BECAUSE the Notes field of the worklist entry gets automatically set to the Appointment Reason + the Appointment Notes. However, if you do want to set a specific Task Type, you can just edit the Worklist entry and press the Task Type binoculars to show the available types (and all available types will be displayed because * acts as a wildcard mean 'show all').
If you don't like this approach, then be sure to set the default task type for the worklist to the most common task, so that most of the time you don't need to change it.
Select
This is the screen used to select a Work List.
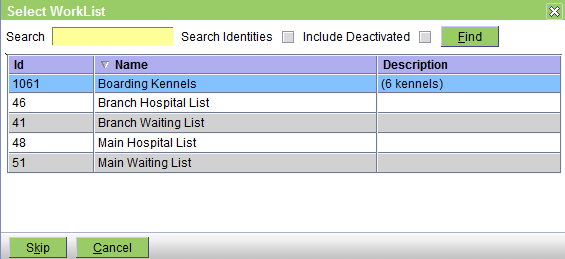
It works like a standard select screen.
Click on the required work list to choose it. The patient weight screen will then open as the next part of the check in process.
Pressing Skip will skip the selection of the work list so this activity will not be listed on any work list. This is not normally a sensible thing to do. However, if you do have a current consult running, then you can get to the visit edit screen for that consult by pressing the Check-in button and skipping everything (Alt-K is the easiest) until you get to the visit editor.
Pressing Cancel will abort the check-in.
Work List View
This screen is used to create/edit/view the Work List Views. These together with the work lists themselves (see Organisation|Work Lists) determine how the Workflow|Work Lists screen works.

The fields are as follows:
Work List View - the name of the work list view
Description - serves to clarify the name
Active - uncheck this box to deactivate the schedule view
Display Expression - this the expression used to construct what is displayed when the work list view contains multiple work lists. (It's not used if there is only a single work list in the view.) See also Expressions below.
Display Notes - uncheck this if you do not want the notes icon shown on the multi-work list version of the Workflow|Work List screen. On the single-work list version, the notes text is shown in the Notes column.
Highlight - you can select None, Clinician, Event Type (ie task type), or Status. This determines the initial setting of the Highlight setting on the Work Lists screen. Remember that if you are going to make proper use of this highlighting facility, then you need to set different colours for each clinician (in Administration|Users), task type (in Administration|Types|Task Type). However if you want to change the status colours, it's more difficult - see Reference|Colours.
Work Lists tab - used to set the Work Lists which this Work List View includes. If there are more than one, then the Workflow|Work Lists screen shows each work list in its own column. If there is only one, then a different screen format is used with columns for each of Status, Appointment Type, Customer, Patient, Reason and Notes. Even with a multiple-work list view, you can switch the Work List screen to show only a single work list.
Test Button
Pressing the Test button opens a window that allows you to test and compose expressions. It includes documentation and examples as well as its own Test button that actually tests your expression and displays the resulting text. Note that it is possible to write a valid complex expression that the Test facility says is invalid - see the note at the bottom of this page.
Expressions
The expression shown in the screenshot above is duplicated here so you can copy it:
concat(openvpms:get(.,'clinician.name'),': ',openvpms:get(.,'customer.name'),' - ',openvpms:get(.,'patient.name'),'\n',openvpms:get(.,'act.reasonName'),' - ',openvpms:get(.,'act.statusName')) Note that what we are doing is concatenating together bits of information from the openvpms:get calls with various separators, eg ': '. The '\n' injects a newline character to start a second line.
The following table shows the parameters that the expressions have access to, that is, each of the node names which can be used in the openvpms:get(.,'nodeName') function.
| act.description | Task Notes |
| act.status | Status code (eg PENDING) |
| act.statusName | Status (eg Pending) |
| act.reason | [can be used but always empty] |
| act.reasonName | [can be used but always empty] |
| customer.name | Name of Customer (eg Smith,Fred) |
| patient.name | Name of Patient |
| clinician.name | Name of Clinician |
| schedule.name | Name of the work list |
| scheduleType.name | Task Type |
| waiting | [can be used but always empty] |
There are also a number of others which may be used, but not particularly efficiently as they require database queries.
- patient.objectReference - reference to the patient
- act.objectReference - reference to the appointment/task
- schedule.objectReference - reference to the schedule
- customer.objectReference - reference to the customer
- clinician.objectReference - reference to the clinician
To get the breed, do:
openvpms:lookup(openvpms:get(., "patient.objectReference"), "breed")
To get the customer's last name, do:
openvpms:get(.,"customer.objectReference.lastName")
Notes:
- the various objectReference properties above aren't supported by the Display Expression editor and hence if you use its Test function, you will get 'Expression Error'
- if there is no patient, and empty string will be returned
However, if you need a customer's full name and address to show on a schedule view so that a house call vet can look at the schedule with his iPhone to see where to go next, then the following will do the trick:
normalize-space(openvpms:get(., "customer.objectReference.description"))
The 'normalize-space' function (one of the xpath functions) removes the newline characters to convert the multiline address into a single line.
Select
This is the screen used to select a Work List View. It works like a standard select screen.
Confirm Delete
When you press the Delete button on the Administration|Organisation screen, a confirmation window will appear.
If the selected Organisation is not in use and can be deleted, the window will simply ask you to confirm the delete. Press OK to confirm or Cancel to abort.
If it cannot be deleted because it is in use, the text will be "xxxx has relationships and cannot be deleted. Do you want to deactivate it instead?"(where xxx is the name of the item you are trying to delete). Pressing OK will unset its Active flag, Cancel will abort.
If it is in use but can be deleted, the text will be "xxxx has relationships. Are you sure want to delete? This operation cannot be undone." (where xxx is the name of the item you are trying to delete). Pressing OK will delete the item as well as all references to it, Cancel will abort.
Confirm New
This is the New Organisation confirmation window. Select the type of Organisation to be created and then use OK to continue or Cancel to abort. Note that if you have selected a type on the Organisation screen, then this will already be selected in this window (even if it is not showing in the list of types) - thus you can normally simply click OK to proceed.
Job Configuration: ESCI Inbox Reader
Job Configuration: ESCI Inbox Reader configures a scheduled job to periodically check ESCI Inboxes for messages from suppliers:

The Active field:
- schedules the job to run if checked; or
- prevents it from being run if unchecked
The Minutes, Hours, Day Of Month, Month, and Day Of Week fields determine when the job is run.
These are a defined using a simplified version of a Cron expression:
| Field | Allowed Values | Allowed Special Characters |
|---|---|---|
| Minutes | 0-59 | , - * / |
| Hours | 0-23 | , - * / |
| Day Of Month | 1-31 | , - * ? / |
| Month | 1-12 or JAN-DEC | , - * / |
| Day Of Week | 1-7 or SUN-SAT | , - * ? / |
Note that only one of Day Of Month and Day Of Week may be specified. If one is specified, the other must be set to ?.
Examples
| Description | Minutes | Hours | Day Of Month | Month | Day Of Week |
|---|---|---|---|---|---|
| Run at 8am every weekday | 0 | 8 | ? | * | mon-fri |
| Run every 30 minutes | */30 | * | * | * | ? |
| Run every 2 hours | 0 | */2 | * | * | ? |
| Run every 15 mins between 8am and 6pm on weekdays | */15 | 8-16 | ? | * | mon-fri |
The Run As field specifies the user to run the job as. The selected user must have permissions to:
- update Orders
- create Supplier Deliveries
- create System Messages
Types
The Administration|Types screen is a select screen that allows you to select the specific Type to be viewed or maintained. Below is the screen as initially displayed but with the Types pull-down list showing.
Note that if you do edit Administration|Types items (say to change an an appointment type colour), then the new values will not become available until the next time you log on (because these type settings are fetched once at logon time to improve performance).
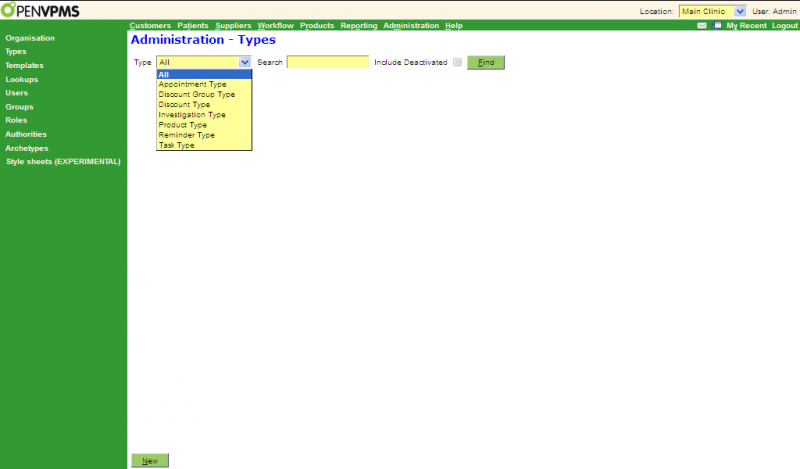
Each Type has its own view/edit screen.
Appointment
This screen allows you to create/view/edit the details for each Appointment Type. This and Organisation|Schedule determine what appointment types can be made.

The fields are as follows:
Appointment Type - it's name
Description - you can use this to clarify the type of appointment
Colour - used to set the colour used to identify appointment types in the schedule screen. You use the mouse to select the colour via the colour and luminosity/hue boxes. If you want to check the colours of the different appointment types, the easiest way to do this is to view the appointment type and then to use the Next and Previous buttons to run back and forth through the different types.
Note that you should avoid the 'light cream' colour f2f3b3 which displays as follows: 
because this is used to highlight the selected item on the Workflow|Scheduling screen.
Active - uncheck the box to deactivate the Appointment Type
Discount
This screen allows you to create/view/edit the Discount Types. See also Concepts|Discounts.

The fields are as follows:
Name - the name of the discount
Description - a description that serves to clarify the name
Discount Type - either Percentage (ie a percentage of the amount) or Fixed (ie a fixed amount)
Rate - either the percentage rate or the fixed amount depending on the Discount Type
Include Fixed Amount - check this box if the discount is to apply to the fixed component of the product price as well as its unit component
Active - uncheck this box to deactivate the discount
Select
This is the screen used to select a Discount Type or a Discount Type Group. It works like a standard select screen.
Discount Group
This screen allows you to create/view/edit the Discount Groups. These are used to group together Discounts so that multiple discounts can be more easily set for a customer or patient. See also Concepts|Discounts.

The fields are as follows:
Name - the name of the discount group
Description - a description that serves to clarify the name
Active - uncheck this box to deactivate the discount group
Discounts Tab - used to add and delete the discount types in the group. Its fields are:
Discount - enter the name of the Discount or use the binoculars to display a list to select from
From and To Dates - these define the inclusive dates between which the discount applies. The From date is mandatory, the To date can be left unspecified and in this case means 'forever'.
Note that you cannot add the same discount type more than once, ie the group can only contain one of each discount type.
Select
This is the screen used to select a Discount Type to be included in a Discount Type Group. It works like a standard select screen.
Investigation
This screen allows you to create/view/edit the details for each Investigation Type. These define the Investigations that can be:
- linked to a product via its Investigations tab
- added to the medical record

The fields are as follows:
Name - the name of investigation type
Description - you can use this to clarify the type of investigation
Active - uncheck the box to deactivate the Investigation Type
Template tab - this is used to display, add, modify and delete the Document Template. If one is specified then it defines the document that will be printed when the investigation is initiated. It is normally some sort of form that can be used to request the required test(s). A maximum of one template can be specified.
Supplier tab - this is used to display, add, modify and delete the associated Supplier. If one is specified then will be displayed on the Workflow|Investigations screen. A maximum of one supplier can be specified.
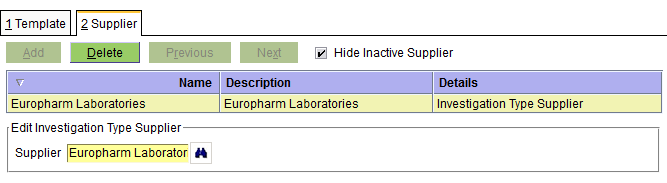
Product
This screen allows you to create/edit/view the details for each Product Type. Each Merchandise, Medication, and Service Product can be given a Product Type. These allow you to:
a) determine how the product appears on the invoice
b) set different taxes by product type
c) set different discounts by product type

The fields are as follows:
Product Type - it's name
Description - you can use this to clarify the type of product
Invoice Sort Order - the lower the number set here, the earlier the item appears on the invoice. If you are using the standard invoice documents, then items having the same number (or no number at all) will be sorted by the date/time that they were added to the invoice - earliest at the top, newest at the bottom. However, if you are using invoices tailored to group items by Product Type, then you will probably need to ensure that the Invoice Sort Order is set to a different value for each product type.
Detail on Invoice - untick this box if you want all the invoice items of the same type combined as one line item on the invoice. Note that this facility is not supported by the invoice documents in the standard distribution. To make use of it requires tailoring of the jrxml file used to print the invoice items.
Active - uncheck the box to deactivate the Product Type
Taxes tab
This is used to display/set the taxes applicable to the Product Type. To adjust, click the tax in the Available or Selected box and then click the > or < button respectively.
Discounts tab
This is used to display/set the discounts applicable to the Product Type. The fields are as follows:
Discount - enter the Discount Type or click the binoculars to select one. Note that you cannot attach Discount Type Groups to a Product Type, only a Discount Type. You can add one or more.
From Date - the date from which the discount will apply
To Date - the date to which the discount will apply - left unspecified this means 'forever'
Reminder
This screen allows you to view/edit the details for each Reminder Type. For general information on the Reminder system, see Concepts|Reminders. See also Stopper Reminders below.

The fields are as follows:
Reminder Type - it's name
Description - you can use this to clarify the type of reminder
Active - uncheck the box to deactivate the Reminder Type
Group - check this box if you want multiple reminders to the one customer to only generate one reminder letter. See also the Grouped Reminders discussion below.
Interactive - check this box if you want confirmation when this type of reminder is generated as a result of using a product to which the reminder is attached (such as a vaccination). Note that this sets the default setting of the Interactive flag for this reminder. However, each product that uses this reminder can have its own setting of the Interactive flag. Specifically, this means that if you have existing products using this reminder, then altering the Interactive setting here will have no effect - you will have to go and set the Interactive flag as required for each product that uses this reminder.
Reminder Interval - the number of 'Interval Units' from the time that the reminder is created until it is due
Interval Units - you can set this to years, months, weeks or days
Cancel Interval - the number of 'Cancel Units' after a reminder is due that it is automatically cancelled. This should be set to be a little more than the Overdue Interval set for the "last" template that you have - ie the one with the highest Sent Count. If you set it less than the last Overdue Interval, then the reminder will be cancelled before all the reminders that you planned have been sent.
Cancel Units - you can set this to none, years, months, weeks or days
Sensitivity Interval - the number of 'Sensitivity Units' that determines the colour of the reminder when displayed on the Patient Information & Medical records screens when you click the Reminders bell icon in the left panel. It shows as follows:

If a given reminder has a sensitivity period of two weeks, then up until two weeks before the reminder is due, it will be shown in green; in the two weeks prior to and after the due date, it will be shown in orange; and after two weeks after the reminder date, it will be shown in red.
Sensitivity Units - you can set this to none, years, months, weeks or days
Templates tab - this is used to display and edit the Document Template to be used when printing reminders of this type. You should have at least one template defined. You can set up multiple templates so that different reminder notices are generated for the initial reminder and first, second, etc overdue notices. (If you don't have any templates, then when the reminders are processed using Reporting|Reminders, any reminders of this type will be skipped and nothing can be sent to the customer. However, the reminder is displayed in the Patients|Medical Records screen, and thus does function as an aide-memoire to clinicians and staff.) The fields are as follows:
Document Template - enter the name of template or use the binoculars to search for one. Note that the template that you specify must have its Type (see Templates|Edit) set to Patient Letter, unless you have checked Group (see above) in which case it must be set to Grouped Reminders. If you tick the List box (see below), then the document template will not be used, but you still must specify a template.
Reminder Count - this is the reminder number, 0 for the initial one, 1 for the second etc.
Overdue Interval and Overdue Units - these set the times between the initial and following reminders. The Interval should be set to zero for the initial (Reminder Count 0) template, and increasing intervals for the second, third etc.
List - if this box is ticked then no individual reminder notice is generated, but instead the customer and patient details are printed on a list
Export - this can be used if reminder mailouts are handled via a third party. When ticked, customers that want reminders mailed will have their details exported to a file during reminder processing using Reporting|Reminders. See here for details of the export format.
A typical template setup might have these entries:
- Reminder Count: 0 Overdue: 0 days Document: Vaccination reminder - First List: unchecked
- Reminder Count: 1 Overdue: 30 days Document: Vaccination reminder - Second List: unchecked
- Reminder Count: 2 Overdue: 60 days Document: Vaccination reminder - Second List: checked
This will send a first reminder letter on the due date of the initial reminder, a second reminder 30 days after the due date of the initial reminder and then print the reminder details on a report 60 days after the due date of the initial reminder. The latter will show up with Action 'List' in the Reporting|Reminders screen. The two former ones will show up as Post or Email dependent on the customers preferred mode of communication. Note that for the above (with Reminder Count 2 overdue at 60 days), a Cancel Interval of say 90 days would be appropriate.
Species tab - this is used to display and edit the species to which this reminder can apply. You don't have to use this facility. It is only needed if you want to ensure that species specific reminders are applied only to the relevant species. To adjust, click the species in the Available or Selected box and then click the > or < button respectively.
Groups tab - this is used to display and edit the group(s) to which this reminder belongs. To adjust, click the group in the Available or Selected box and then click the > or < button respectively.
You don't have to use this facility. It is only needed if you want to group reminders so that generating reminder B will complete an existing reminder A. Use Administration|Lookups|Reminder Groups to create a group names say G, and the use the Groups Tab to make both reminders A and B members of group G.
"Stopper" Reminders
You may want to create a special reminder whose purpose is simply to complete other reminders. Consider the following:
Senario - have a new puppy and so manually create Desex reminder for 4 months forward. When we do the actual Desex operation we want this reminder to disappear, but with no creation of any future reminder.
Solution:
- create a reminder group called say Desex-G
- create the Desex reminder as normal, but with group Desex-G
- create Desex-Complete reminder with zero interval, zero cancel interval and a sensitivity interval of say 60 days, and also set the group Desex-G
- for all desex products, set the reminder type as 'Desex-Complete'
Now when we invoice the Desex operation, the original Desex reminder will be completed, and a new Desex-Complete reminder will be created.
However, on the next Reminders run this will be cancelled because it's cancel interval has expired.
Note that until the next Reminders run, the patient will have an orange reminder bell showing on the patient information panel. However, clicking on this will show that the orange reminder is the 'Desex-Complete' one and staff will understand that this is not a real reminder and that it will disappear when the next Reminders run is done.
If a customer has multiple reminders of types that have the Group box ticked, then these, irrespective of the Document Template specified for the applicable reminder count, will use the Document Template that has Type 'Grouped Reminders' - PROVIDED that the action is Post or Email. Consider the following, and assume that the action is Post in all 4 cases:

If both the G6 and Proheart reminder types have their Group box ticked, then one document will generated for Sir Humphry; it will be generated using the Grouped Reminders Document Template, and it will list the 4 reminders shown.
If only the G6 reminder type has the Group box ticked, then 3 documents will be printed: one Grouped Reminder for the G6 vaccinations showing both Dotty and Twiglet, and two Proheart reminders, one for Dotty and one for Twiglet, generated using the Document template specified for the reminder count. If Twiglet did not have a G6 vaccination due, then there would still be 3 documents, with the Grouped Reminder being replaced by a G6 vaccination reminder letter for Dotty.
That is, if the Group boxes are ticked, then the Grouped Reminder Document Template will be used - but ONLY IF there are multiple reminders. If the customer only has one reminder (and thus there is no need to group them) then the Document Template used is that specified in the Reminder Type's Templates tab for the applicable reminder count.
Note that there should only be a single Document Template of Type 'Grouped Reminders' available - either because there is only one in the system, or a single one is specified in the Practice Location or Practice Templates tab.
A sample Grouped Reminders document template is included in the standard system. It will need tailoring for your practice.
Task
This screen allows you to view/edit the details for each Task Type. This and Organisation|Work List determine what appointment types can be made.

The fields are as follows:
Task Type - it's name
Description - you can use this to clarify the type of task
Colour - used to set the colour used to identify task types in the worklist screen. You use the mouse to select the colour via the colour and luminosity/hue boxes. If you want to check the colours of the different task types, the easiest way to do this is to view the task type and then to use the Next and Previous buttons to run back and forth through the different types.
Note that you should avoid the 'light cream' colour f2f3b3 which displays as follows:
because this is used to highlight the selected item on the Workflow|Work Lists screen.
Active - uncheck the box to deactivate the Task Type
Confirm Delete
When you press the Delete button on the Administration|Types screen, a confirmation window will appear.
If the selected Type is not in use and can be deleted, the window will simply ask you to confirm the delete. Press OK to confirm or Cancel to abort.
If it cannot be deleted because it is in use, the text will be "xxxx has relationships and cannot be deleted. Do you want to deactivate it instead?" (where xxx is the name of the item you are trying to delete). Pressing OK will unset its Active flag, Cancel will abort.
If it is in use but can be deleted, the text will be "xxxx has relationships. Are you sure want to delete? This operation cannot be undone." (where xxx is the name of the item you are trying to delete). Pressing OK will delete the item as well as all references to it, Cancel will abort.
Confirm New
This is the New Type confirmation window. Select the Type to be created and then use OK to continue or Cancel to abort. Note that if you have selected one on the Type screen, then this will already be selected in this window (even if it is not showing in the list of types) - thus you can normally simply click OK to proceed.
Templates
This screen allows you manage the Document Templates. Every form and report has a document template. The template specifies things like usage, paper format, associated printers, its content, and when it is printed. See also Concepts|Printing for background information, and Template Create/View/Edit for the template details.
As shown below, the system comes with a number of standard templates. You can use these but you will probably want to modify some of them. For example, the system comes with the invoice, statement etc tempates set to use A5 paper. If you want to use a A4, then you will need to modify the invoice and other templates to use the appropriate A4 content files (eg "invoice a4.jrxml" in place of "invoice a5.jrxml"). You may also want to use a report from the Community Contributions set. See below for a quick summary of how to do this.
Template Usage: One can divide the templates into three groups:
Reports - you use the Reporting|Reports screen to select the report to run
Selectable forms - (eg Patient Forms) you will be presented with a list to select from
Automatic forms - (eg Invoices) where the system chooses the template.
For the first two you can obviously set up as many as you need - you just choose the one you want. In the last case (eg Invoices) you need to be careful because if you create three different invoice templates, the system will just use the first it finds. This is not normally a problem - after all you only need one type of invoice form. However, if you do want to use different templates for each Practice Location, then you can do this by defining the templates to be used by the location. See Administration|Organisation|Practice Location.
If you do need to create or modify reports and forms, see Reference|Reports and Forms. Note that if you want to modify an existing report or form, then if you View the template, you can then click on the Content field to download the report/form ready for editing.

Installing a new report
To install a new report from the Community set, do as follows:
- download the jrxml (or odt) file by right-clicking on the attachment link and using 'Save Link As' (or 'Save Target As' etc depending on your browser) - remember where you saved it
- click the New button
- on the resulting New Document Template screen set the Type to Report, then click the Upload button. If it's not a report, then you need to set the appropriate Type.
- on the resulting window, click Browse and navigate to where you downloaded the file and select it. Click the Send button.
- back at the Edit Document Template screen, click the OK button
Changing a report from A5 to A4
The system comes with some things (eg invoices, credit notes etc) set to use A5 paper. To switch to the A4 versions do as follows:
- select the required report (see table below) and then click the Edit button
- on the resulting Edit Document Template screen, click the Upload button
- on the resulting window, click Browse and navigate to the <OPENVPMS HOME>\reports folder, eg C:\OpenVPMS\openvpms-release-1.7\reports and select the appropriate file (see table below). Click the Send button.
- back at the Edit Document Template screen, click the OK button
Note that many reports consist of a main and sub-report. For these repeat the above for the sub-report.
The following table showns the files used for each report that has A4 and A5 versions. The name of the Document template for the sub-reports is always that in first column with " Items" appended, eg Invoice Items.
| Document | Size | Report | Sub-report |
|---|---|---|---|
| Counter Sale | A4 | countersale a4.jrxml | countersaleItems.jrxml |
| A5 | countersale a5.jrxml | countersaleItemsA5.jrxml | |
| Credit | A4 | credit a4.jrxml | creditItems.jrxml |
| A5 | credit a5.jrxml | creditItemsA5.jrxml | |
| Desexing Certificate | A4 | desexing certificate a4.odt | |
| A5 | desexing certificate a5.odt | ||
| Estimation | A4 | estimation a4.jrxml | estimationitems.jrxml |
| A5 | estimation a5.jrxml | estimationitemsa5.jrxml | |
| Grouped Reminders Report | A4 | grouped reminders a4.jrxml | |
| A5 | grouped reminders postcard.jrxml | ||
| Invoice | A4 | invoice a4.jrxml | invoiceitems.jrxml |
| A5 | invoice a5.jrxml | invoiceitemsa5.jrxml | |
| Invoice Reminders | A4 | invoiceRemindersA4.jrxml | |
| A5 | invoiceRemindersA5.jrxml | ||
| Patient Clinical Event | A4 | patientClinicalEvent a4.jrxml | |
| A5 | patientClinicalEvent a5.jrxml | ||
| Receipt | A4 | receipt a4.jrxml | receiptItems.jrxml |
| A5 | receipt a5.jrxml | receiptItemsA5.jrxml | |
| Statement | A4 | statement A4.jrxml | statementItems.jrxml |
| A5 | statement A5.jrxml | statementItems A5.jrxml | |
| Vaccination Certificate | A4 | vaccination certificate a4.odt | |
| A5 | vaccination certificate a5.odt |
Create/Edit/View
This is the create/edit/view screen for document templates. See also Concepts|Printing and Administration|Templates for background information.
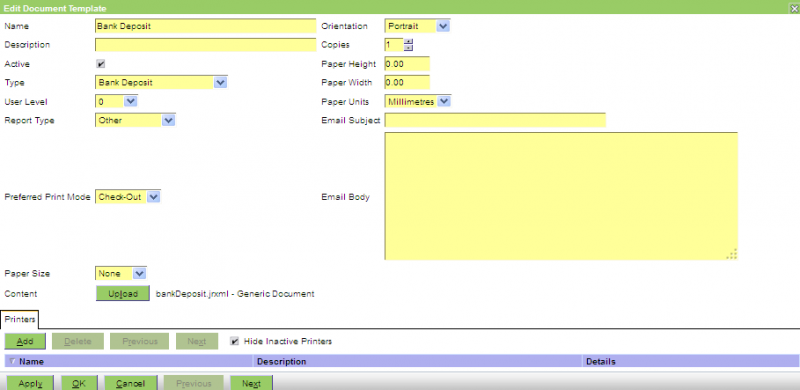
The fields are as follows:
Name - the name of the template. The name can be anything (ie in the example above, we could change the name to 'ABCDE' and the system would still work) but it is sensible to use meaningful names. You can have multiple templates with the same name, but again, it is sensible not to.
Description - a description of the template. This should be used if necessary to clarify the purpose of the template.
Active - uncheck this to deactivate the template.
Type - this is used to define the usage of the template - for example when printing an invoice for a customer, the system looks for templates of type 'Customer Invoice'. The Type also defines what information fields are made available to the Content generator (see below). Most of the Types are self explanatory. Use 'Report' for a report (eg a list of customers or sales, etc), and 'Sub Report' for the report's repeated components (ie the line items). See also this summary.
User Level - this allows you to define who can run which reports. Each user has a level (0-9). A user with level N can only run reports of level N and below.
Report Type - this field is not currently used
Preferred Print Mode - this determines when documents are printed or offered for printing. The option is used when the document is generated as a result of invoicing an item which has an attached document. It can be set to:
None - the print mode is not specified
Immediate - print immediately using the printer/interactive option
Check Out - (the default) delay print until at Check Out time
Manual - documents must be manually selected for printing
At Check Out time, the system checks if any documents have been accumulated. If there are any that have not been printed, then a window is displayed showing the accumulated documents each with a print checkbox - those that have already been printed, and those with Mode=Manual will have the box unchecked - those whose mode is 'Check Out' will have their box checked.
Paper Size - used to indicate to the printer what size paper is required. It can be set to None, A4, A5, Custom, and Letter. Normally can be left at 'None' unless the printer(s) that you are using allow the selection of different sized paper.
Content - the 'content' is the name of the file containing the JRXML report or Open Office or Microsoft Word template used to generate the document. See also Introduction|Reporting and JXPath Extension Functions.
If you are editing the template, click the Upload button to upload the required file. If you are viewing the template, then you can click the content file name to download the template content.
Orientation - set to Portrait or Landscape as required
Copies - set to the required number of copies
Paper Height, Width and Units - these can normally be left at their defaults unless you have specified 'Paper Size' as Custom.
Note that for OpenOffice and Microsoft Word templates, the Paper Size, Orientation, Paper Height, Paper Width, and Paper Units settings of the Document Template are ignored. These settings must be specified within the OpenOffice or Word template. That is, they are only used for templates that use Jasper Reports (jrxml) content.
Email Subject, Body - these are used only when the system is generating emails to send out reminders and statements. Hence they can be left empty for all templates other than those used for reminders and statements. For these templates, it is mandatory to provide email body text. The email subject can be left blank, and if so will be set to the Name of the template. Note also that although you can use macros to generate the body text as you create/edit the template, you cannot use macros to generate the email text at run time. That is, although the reminder attached to the email can say 'Fido's next vaccination is due', you cannot get the email text to say 'Attached see reminder for Fido'.
Note also that the reminder and statement emails will have a From address that reflects the Practice (and not the Practice Location), and the email address used will be that with the purpose 'Reminder' or 'Billing' respectively, or if there is not one with this purpose, then the first email address found.
Printers tab
The Printers Tab is used to display and maintain the printers that can be used with this template. You don't have to use this facility, but if you don't then your users will have to choose the required printer each time they print something.
Before using this you need to set up the printers available to the Practice Locations(s) - see Administration|Organisation|Practice Location.
The fields are as follows:
Practice Location - the Practice Location. Note that you can also insert the Practice here. This useful for the case where you want to set a global default printer, and override it for one (or more) locations. For example if the standard label printer is LABEL-R, but for the upstairs office you wish to use LABEL-U, then it may be more convenient to set LABEL-R for the practice, and LABEL-U for the Main-Upstairs location, than to set the label printer for each practice location. Of course, if you only have two practice locations, then it makes no difference which way you do it, but if you have a more complex setup then it may be better to use the 'set for practice, and override for one location' approach.
Printer Name - choose one from the pull-down list
Paper Tray - if applicable, select the required tray - you will want to use this if you are running plain paper in one tray and letterhead in the other
Interactive - check this box if you want the print dialog box to be displayed (so you can use preview or email rather than print, or change the printer if necessary or load the required paper or ...) before the printing occurs. If the box is not checked, then printing proceeds immediately.
Delete Template
When you press the Delete button on the Administration|Templates screen, a confirmation window will appear.
If the selected Template is not in use and can be deleted, the window will simply ask you to confirm the delete. Press OK to confirm or Cancel to abort.
If it cannot be deleted because it is in use, the text will be "xxxx has relationships and cannot be deleted. Do you want to deactivate it instead?"(where xxx is the name of the item you are trying to delete). Pressing OK will unset its Active flag, Cancel will abort.
Select
This is the screen used to select a Document Template. It works like a standard select screen.
It will be presented whenever you need to choose a template, for example when assigning templates to a Practice or Practice Location, or (more commonly) when selecting a document at check-in time. In the latter case only the relevant templates will be displayed.
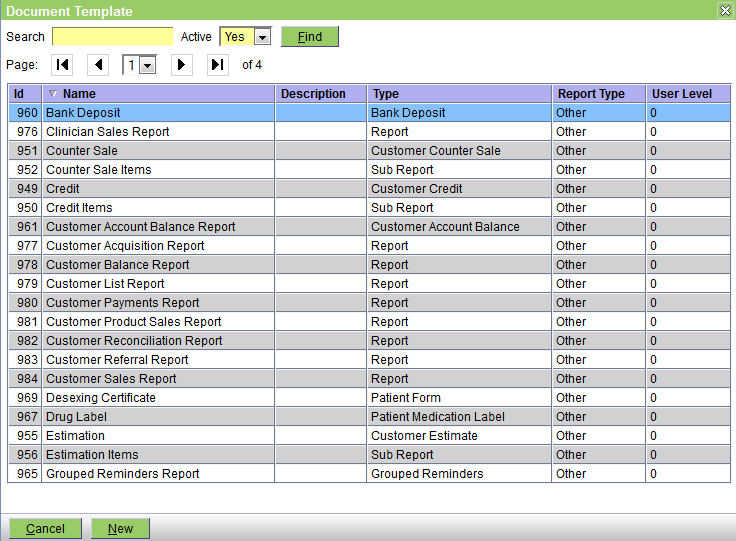
Summary
The following table summarises the standard Document Templates and their Types and usage.
| Document Template Name | Template Type | Used by/for |
|---|---|---|
| Bank Deposit | Bank Deposit | Reporting|Deposits|Print |
| Customer Account Balance Report | Customer Account Balance | Reporting|Debtors|Report |
| Counter Sale | Customer Counter Sale | Customers|Charges|Counter Sale|Print |
| Credit | Customer Credit | Customers|Charges|Credit |
| Estimation | Customer Estimate | Customers|Estimates|Preview|Print |
| Invoice | Customer Invoice | Customers|Charges|Invoice|Print |
| Receipt | Customer Payment | Customers|Payments|Payment|Print |
| Statement | Customer Statement | Reporting|Debtors|Print & Send All |
| Grouped Reminders Report | Grouped Reminders | Reporting|Reminders|Send All |
| Message | Message | Workflow|Messaging|Print |
| Desexing Certificate | Patient Form | check-in processing |
| Vaccination Certificate | Patient Form | check-in processing |
| Patient Image | Patient Image | Patients|Medical Records|Documents|Print where the item is an Image |
| Referral Letter | Patient Letter | report macro |
| Reminder Cartrophen First | Patient Letter | Reporting|Reminders|Print & Send All |
| Reminder Desexing First | Patient Letter | Reporting|Reminders|Print & Send All |
| Reminder Vaccination First | Patient Letter | Reporting|Reminders|Print & Send All |
| Reminder Vaccination Puppy and Kitten First | Patient Letter | Reporting|Reminders|Print & Send All |
| Reminder Vaccination Second | Patient Letter | Reporting|Reminders|Print & Send All |
| Drug Label | Patient Medication Label |
Customers|Charges|Invoice & Patients|Medical Records|New|Medication where item has a dispensing label |
| Patient Clinical Event | Patient Visit | Patients|Medical Records|Print |
| Patient Reminders Report | Reminder Report | Reporting|Reminders|Report |
| Clinician Sales Report | Report | Reporting|Reports |
| Customer Acquisition Report | Report | Reporting|Reports |
| Customer Balance Report | Report | Reporting|Reports |
| Customer List Report | Report | Reporting|Reports |
| Customer Payments Report | Report | Reporting|Reports |
| Customer Product Sales Report | Report | Reporting|Reports |
| Customer Reconciliation Report | Report | Reporting|Reports |
| Customer Referral Report | Report | Reporting|Reports |
| Customer Sales Report | Report | Reporting|Reports |
| Patient Acquisition Report | Report | Reporting|Reports |
| Patient Deceased Report | Report | Reporting|Reports |
| Patient List Report | Report | Reporting|Reports |
| Patient Sterilisation Report | Report | Reporting|Reports |
| Practice Clinician Sales Report | Report | Reporting|Reports |
| Product List Report | Report | Reporting|Reports |
| Product Price List Report | Report | Reporting|Reports |
| Stock Reorder Report | Report | Reporting|Reports |
| Stock Take List Report | Report | Reporting|Reports |
| Stock Valuation Report | Report | Reporting|Reports |
| StockTake Sheet Report | Report | Reporting|Reports |
| Counter Sale Items | Sub Report | line items component of Report |
| Credit Items | Sub Report | line items component of Report |
| Estimation Items | Sub Report | line items component of Report |
| Invoice Items | Sub Report | line items component of Report |
| Invoice Reminders | Sub Report | line items component of Report |
| Order Items | Sub Report | line items component of Report |
| Receipt Items | Sub Report | line items component of Report |
| Statement Items | Sub Report | line items component of Report |
| Order | Supplier Order | Suppliers|Orders|Preview & Generate |
| Till Balance | Till Balance | Reporting|Till Balances|Print |
| Work In Progress Report | Work in Progress Charges | Reporting|Work In Progress|Report |
Lookups
The Administration|Lookups screen is a select screen that allows you to select the specific Lookup to be viewed or maintained. These Lookups are used mostly to define the values that can be entered in various fields - for example the Species can only be set to one of the define Species Lookup Types. Below is the screen as initially displayed but with the Types pull-down list showing.
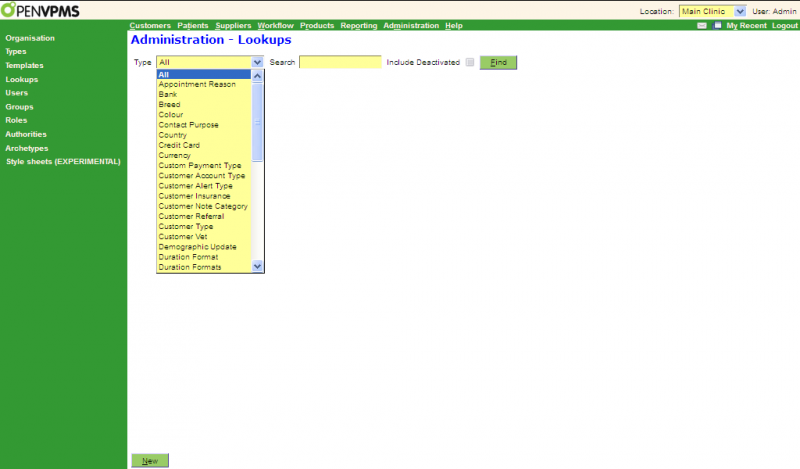
Each Type has its own view/edit screen. Note that those shown are only a subset of the full set of Lookup Types which is as follows:
|
Appointment Reason Bank Breed Colour Contact Purpose Country Credit Card Currency Custom Payment Type Customer Account Type Customer Alert Type Customer Insurance Customer Note Category |
Customer Referral Customer Type Customer Vet Demographic Update Duration Formats Macro Message Reason Message Status Patient Alert Type Person Title Practice Type Product Group Product Income Type |
Reminder Group Report Macro Report Type Species State Suburb Supplier Account Type Supplier Type Tax Type Units of Measure Units of Measure Group User Type Veterinary Speciality |
Once you have pressed the Find button and items are displayed, more buttons are displayed as shown below.
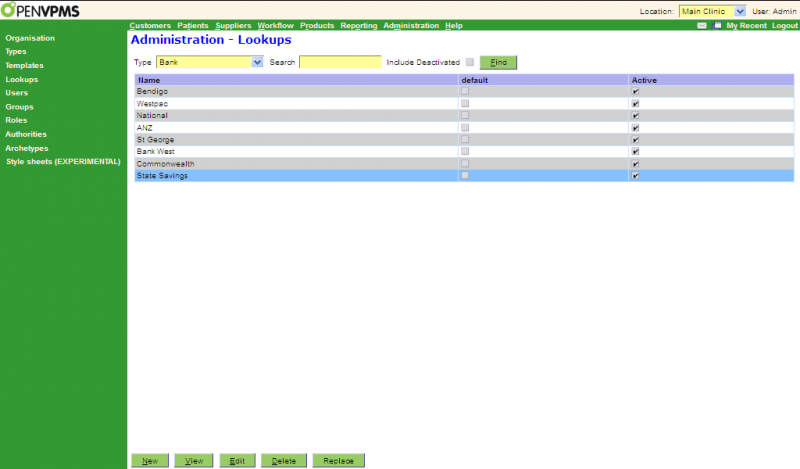
The Delete button will initiate the deletion of the selected item. You will not be able to delete it if it is in use.
The Replace button is used to to either to remove all usages of the selected item or to replace all usages of the selected item with another. To illustrate when you would want to do the second, assume that you have been using two Product Groups, Washing and Cutting which you now want to combine into one. You would do this by first editing Washing to change its name to Grooming, then Replacing Cutting by Grooming and checking the 'Delete lookup?' box - see Confirm Replace. Note that if the lookup has a target relationship (eg Suburbs which have an associated State) then you will not be able to replace SuburbA by SuburbB if these two are not in the same State. Similarly you cannot replace BreedA by BreedB unless both have the same Species.
When items are displayed and they are all of the same type, then the columns change to suit the type - contrast the screen below which displays as below with that for Banks above.

The meanings of the column headings are documented in each of the Lookup Type create/edit screens in this section.
Appointment Reason
This screen is used to create/view/edit the details of each Appointment Reason.

The fields are as follows:
Name - the Appointment Reason
default - check the box to make this the default reason for the appointment
Bank
This screen is used to create/view/edit the Bank lookups. Note that these hold just the Bank names, details of the account such as Branch and Account Number are held elsewhere.

The fields are as follows:
Name - the name of the bank
default - check the box to make this the default bank
Active - uncheck the box to deactivate the bank
Breed
This screen is used to create/view/edit the details of the Breed lookups.

The fields are as follows:
Name - the name of the breed
default - check the box to make this the default breed
Active - uncheck the box to deactivate the breed
Target tab - this is used to set/display the Species
Note that you can only have one Species for each Breed. In cases where the same breed name occurs in two or more species, then you create multiple entries with the same name but each with a different species.
Colour
This screen is used to create/view/edit the details of the Colour lookups. Note that currently these are not used by the system. That is, when you enter the patient details, you can set the patient's colour to anything - unlike Species and Breed, it's value does not have to be chosen from a list. If you really have a need to limit the colours that can be set, then your integrator can adjust the relevant archetype so that the Colour lookup is used to limit the colours that can be set.

Contact Purpose
This screen is used to create/view/edit the details of the Contact Purpose lookups.

The fields are as follows:
Name - the Contact Purpose
Active - uncheck the box to deactivate the Contact Purpose
The system comes with a basic set (Billing, Correspondence, Home, Mobile, Postal, Reminder and Work) which will normally suffice. However, you might want to add 'Spouse' or 'Partner' or 'Maid'.
These contact purposes are independent of the Contact Type (ie Location, Phone, Email and Fax).
The system does make use of the Contact Purpose in some situations.
- When generating Reminders it uses the Reminder contacts
- When generating Statements it uses the Billing contacts
- The various JXPath extension functions like party:getCorrespondenceAddress and party:getBillingAddress use the relevant contact purpose. [But note that ther is no getPostalAddress function.]
- In all cases the selection logic is to look for the preferred contact of the relevant purpose, if none, then use the first found for the purpose, if none then use the first preferred contact of any purpose.
- Note however, that the system does NOT look at the Contact Purpose when providing lists of email addresses. For example, if you are emailing a customer invoice, the system will not look for a Billing Contact Purpose. Rather the list of available email addresses is determined by the current workspace as follows:
In the customer and patient workspaces, the To dropdown will include:
- the customer's email addresses
- the referral email addresses
- any practice email addresses associated with the referrals
In the supplier workspaces, the To dropdown will include:
- the supplier's email addresses
In all other workspaces, the To dropdown will be empty.
Country
This screen is used to create/view/edit the details of the Country lookups. Note that you need at least one of these - for the country that you operate in. You may need others if you have customers or suppliers located in other countries.
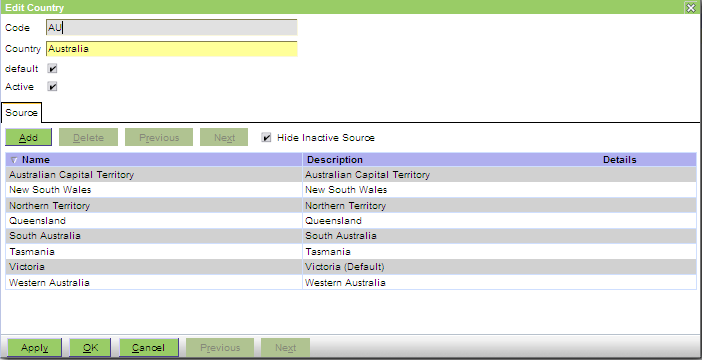
The fields are as follows:
Code - the code for the country. It is conventional to use the standard country codes (eg see http://en.wikipedia.org/wiki/ISO_3166-1), but you can in fact use any upper case letter string (eg AUST, or AUSTRALIA in place of the standard AU). Note that once you have created the Country Lookup, you cannot change the Code - you have to create a new one, and then use the Replace mechanism.
Country - the name of the country
default - check the box to make this the default country
Active - uncheck the box to deactivate the country
Source tab - this is used to display and set the States that are part of the country - use Lookup|State to create these
Credit Card
This screen is used to create/view/edit the details of each type of Credit Card. Not all of the fields are currently used by the system.

The fields are as follows:
Name - the name of the Credit Card
Floor Limit - not currently used by the system. Reserved for future use to set the minimum payment amount for which this credit card can be used.
Authorisation - not currently used by the system. Reserved for future use to so you can enter a note about the authorisation procedure required for this card.
Separate Deposit List - not currently used by the system. Reserved for future use to control whether, when processing the Bank Deposits, the system is to generate a separate report for amounts paid by this card.
default - check the box to make this the default credit card
Active - uncheck the box to deactivate the credit card
Currency
This screen is used to create/view/edit the details of the Currency lookups. Note that this is used in only one place, to set the currency used by the practice. The system runs in single currency mode and there is no support for foreign currency transactions.

The fields are as follows:
ISO code - the code for the currency. When creating the Currency, the pull-down list allows you to select from the standard set (eg see http://en.wikipedia.org/wiki/ISO_4217). Note that once you have created the Currency Lookup, you cannot change the Code - you have to create a new one, and then use the Replace mechanism.
Currency - the name of the currency
default - check the box to make this the default currency
Rounding Mode - this determines how amounts are rounded. It can be set to Half Down, Half Up or Half Even. See below for more.
Minimum Cash Denomination - the value of the smallest coin in this currency
Active - uncheck the box to deactivate the country
OpenVPMS assumes that all currencies are decimal and displays amounts to two decimal places, ie it assumes a dollars and cents structure. When doing calculations (say for a 20% discount on an amount of $23.57) then commonly the calculation will not yield an exact number of cents (in this case the discount amount is 23.57/5=4.714). The Rounding Mode determines how the fractional cents are rounded as follows:
| Half Up |
Round to nearest cent, for half a cent, round up away from zero. Note that this is the rounding mode that most of us were taught at school. |
4.714->4.71 4.715->4.72 4.716->4.72 -4.714->-4.71 -4.715->-4.72 -4.416->-4.72 |
| Half Down | Round to nearest cent, for half a cent, round down towards zero. |
4.715->4.72 -4.715->-4.71 |
| Half Even |
Round to nearest cent, for half a cent, round towards the even cent. Note that this is the rounding mode that minimizes cumulative error when applied repeatedly over a sequence of calculations. |
4.715->4.72 4.725->4.72 -4.715->-4.72 -4.725->-4.72 |
Custom Payment Type
This screen is used to create/view/edit the details of the Custom Payment Type lookups. When you make a payment, there is a pull-down list of payment types (Credit Card, EFT, Cash, Cheque, Other, and Discount). If you select Other, then the available Payment Types are the Custom Payment Types.

The fields are as follows:
Name - the Custom Payment Type
default - check the box to make this the default custom payment type
Active - uncheck the box to deactivate the custom payment type
Customer Account Type
This screen is used to create/view/edit the details of the Customer Account Type lookups. You don't have to use Customer Account types, but doing so enables better financial management of debtors and provides a method of quickly identifying important groups of customers by using an alert.

The fields are as follows:
Name - the name of the Account Type
Credit Limit - not currently used by the system
Payment Terms and Payment Terms Units - define the period within which payment is expected and define how the Overdue Balance is calculated - see below. The units can be days, weeks or months.
Account Fee Type - can be set to None, Fixed, or Percentage. If not None, then when the End Period processing is done using Reporting|Debtors and statements are being generated, a check will be made to see if an overdue fee is applicable.
Fee Amount - this is either the fee amount (if the Fee Type is set to Fixed) or the percentage of the overdue balance (if the Fee Type is set to Percentage)
Minimum Fee - no fee is charged if the fee amount is less than this amount
Minimum Balance - no fee is charged if the overdue balance is less than this amount
Overdue Days - this defines how long a payment can be outstanding before it is considered to be overdue and thus liable for an Account Fee
Fee Message - if an Account Fee is charged, the Notes text of the generated Debit Adjustment transaction is set to this text, or if none has been entered, to "Account Fee". Note that because of a current bug, the text entered is ignored and the Notes text is always "Account Fee".
General Message - not currently used by the system
Overdue Message - not currently used by the system
Show Alert - not currently used by the system
Active - uncheck the box to deactivate the the Account Type
Default Lookup - check the box to make this the default Customer Account Type - ie that set when a new customer is created.
Alert tab - not currently used by the system
Calculation Logic
To determine the current overdue balance:
- the payment terms (e.g 30 days) are subtracted from the current date
- any unpaid amounts dated prior to this new date are summed to get the overdue balance
The account fee is determined during statement generation.
A non-zero account fee will be returned if:
- the customer has an account type;
- there is a non-zero overdue balance for the account fee date (derived from the statement date - Overdue Days);
- the overdue balance is >=Minimum Balance; and
- the account fee is greater than Minimum Fee
The account fee is calculated as:
- overdue balance * Fee Amount/100 if the Account Fee Type is PERCENTAGE; or
- Fee Amount if the Account Fee Type is FIXED
Customer Alert Type
This screen allows you to create/view/edit the Customer Alert Type lookups.
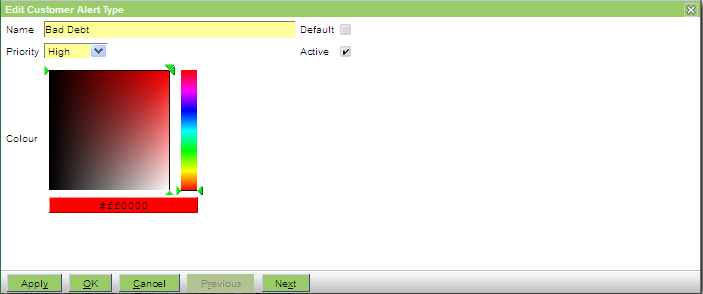
The fields are as follows:
Name - the Alert's name
Priority - can be set to High, Medium or Low. If there are too many alerts for the display space, higher priority ones get preference.
Colour - used to set the colour used for the alert. You use the mouse to select the colour via the colour and luminosity/hue boxes.
Default - check this box to make this alert the default type
Active - uncheck the box to deactivate the alert type
Customer Insurance
This screen is used to create/view/edit the Customer Insurance lookups (used in the Insurance Plan field on the customer information screen).

The fields are as follows:
Name - the name of the Insurance Plan
default - check the box to make this the default Insurance Plan
Active - uncheck the box to deactivate the Insurance Plan
Customer Note Category
This screen is used to create/view/edit the Customer Note Category lookups.

The fields are as follows:
Name - the name of the note category
default - check the box to make this the default category
Customer Referral
This screen is used to create/view/edit the Customer Referral lookups. These are used to set the 'Referred By' values on the customer information screen.
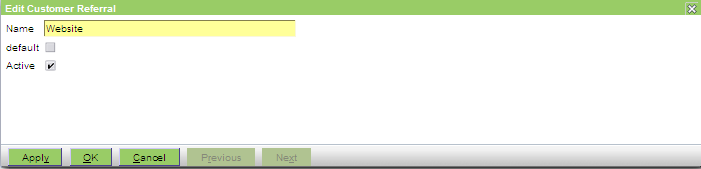
The fields are as follows:
Name - the 'referred by' value
default - check the box to make this the default
Active - uncheck the box to deactivate the referral
Customer Type
This screen is used to create/view/edit the Customer Type lookups. These are used to set the Categories available on the customer information screen.

The fields are as follows:
Name - the customer type
Active - uncheck the box to deactivate the type
Customer Vet
This screen is used to create/view/edit the Customer Vet lookups. These are used to set the 'Preferred Vet' values on the customer information screen. Note that there is no relationship between the names set here and the actual names of the vets in the practice - ie in the example below, no check is made to see that there is a Dr Bloggs on staff. This implies that you could have 'Not Dr Bloggs' as an entry.

The fields are as follows:
Name - the 'preferred vet' value
default - check the box to make this the default
Active - uncheck the box to deactivate this entry
Demographic Update
This screen is used to create/view/edit the Demographic Update lookups. These are used to set what is available under the Update tab on the product information screen. An update is used to change something in the patient record as a result of the use of the product - eg to set the desexed status after a spaying operation.

The fields are as follows:
Name - the name of the update
Expression - the jxpath expression that does the update
Node Name - the name of the node to be used
Active - uncheck the box to deactivate this entry
The following table gives examples including the above:
| Name | Expression | Node |
|---|---|---|
| Desex | party:setPatientDesexed(.) | patient.entity |
| Deceased | party:setPatientInactive(.) | patient.entity |
| DDate | openvpms:set(.,"deceasedDate",java.util.Date.new()) | patient.entity |
Duration Formats
This screen is used to create/view/edit the Duration Formats lookups. These are used to set how a patient's age is presented and allows the format to vary as a function of age. Normally only one is needed and it is used to set the values in the 'Patient Age Format' field on the Administration|Organisations|Practice screen.

The fields are as follows:
Name - the name of the format
Active - uncheck the box to deactivate the format
Formats tab - it's fields are as follows:
Interval - sets the (inclusive) age (in units of Units) below which this format is to be used (ie less than or equal to 3 years in the above example)
Units - can be years, months, days or weeks
Show Years/Months/Weeks/Days - check the boxes to display the years/months/weeks/days
Note that when adding formats, these can be added in any order. The last entry (999 years) provides the setting for the more than 3 years case. If no 'Patient Age Format' is set for the Practice, then the formats used are as follows:
| Age | Shown as |
|---|---|
| < 1 week | N day(s) |
| < 3 months | N week(s) |
| < 1 year | N month(s) |
| >= 1 year | N year(s) |
If the age is greater than that set for the largest defined interval, then the above table is used to define the format.
Macro
This screen is used to create/view/edit the Macro lookups. These are used to enable the accelerated entry of text in any text field.

The fields are as follows:
Code - the text that will be replaced. The code must start with a letter or @, and the other characters can be letters or numbers or _. Hence abc, A4b, a_B, a_4, @aBc, and @abc are all valid. Note however that although the case is preserved (ie you can define a macro aBBa), you then cannot have another macro abba. Also if you do create a macro with a mixed case name, eg @aBc then you must invoke it as @aBc - @abc will not find it. It is thus probably best to always use lower case letters. Also take care not to use an actual word as it will expand into text inappropriately, for example bid can transform into twice daily when you may just mean bid. Perhaps end the code in "x" to avoid this mishap. Alternatively you can use @ as a prefix.
Name - the name of the macro. Normally this reflects the text that will be generated.
Description - an optional description. It is sensible to use this to provide a hint to the user as to how the macro is invoked - because the description will be displayed as part of the Macro Select window when the user types Alt-M. A useful convention is as follows:
| Case | Name | Description |
|---|---|---|
| simple text expansion | same as generated text | none unless needed to clarify when used |
| expression | something suitable, eg Twice a Day |
usage instructions such as the following: eg: 4@bid -> Take 4 Tablet(s) Twice a Day |
| data retrieval | something suitable, eg Customer Name |
none unless needed to clarify when used |
Active - uncheck the box to deactivate the macro
Expression - the replacement text or an expression (see below). For replacement text you have a 4,999 character limit and can format with leading spaces and paragraphs. The text should be enclosed in double quotes. You can also enclose with single quotes, but then if you use the single quote character as an apostrophe in the text, the macro will fail. For example, if you want to have text such as today's temperature, the single quote in today's will cause the macro to fail if the whole of the text is not enclosed in double-quotes.
The Expression can contain more that just text - it can incorporate the preceding number, it can invoke another macro, and it can perform a lookup. You can also use the concat function to concatenate things, and other XPath functions.
If you do use concat, then if you need the generated text to be on separate lines, you just split the line in the middle of a string like the following:
	 concat('This is the first part',' and this is the end of line one
This is the second line')
and this will expand to two lines:
	 This is the first part and this is the end of line one
This is the second line
$number: If you define a macro, say @hrs to have the expression concat('every ',$number,' hours') then when you enter 6@hrs, it will be replaced by "every 6 hours". That is, the number preceding the macro code ('@hrs' in this case) can be accessed using the special variable $number. As well as simple integers (like 6 or 10), you can use decimals (like 2.5) or fractions (like 1/4).
You cannot pass more than one number into the macro, but you can use the following trick. You can use a decimal and then cut it up using an expression like the following:
concat('Part1=',substring-before(string($number),'.'),' Part2=',substring-after(string($number),'.'))If a macro say @parts is defined with the above expression, then 12.34@parts will expand to 'Part1=12 Part2=34'.
You can even use three parts using the expression:
concat('Part1=',substring-before(string($number),'.'),' Part2=',substring-before(substring-after(string($number),'.'),'.'),' Part3=',substring-after(substring-after(string($number),'.'),'.'))Now 123.567.789@parts will expand into 'Part1=123 Part2=456 Part3=789'. That is, although we are passing in a number with an illegal format, we can cut it into parts.
The above trick is useful if you a building a macro to generate something like 'Take x mls y times a day for z days'.
If you prefer, you can use / as the separator rather than the decimal point by changing '.' in the above expressions to '/'. You then invoke the macro as 123/456/789@parts.
Lookups: If you define a macro, say dispensingUnits, to have the expression openvpms:lookup(openvpms:get(.,'product.entity'), 'dispensingUnits')
this will be used to look up the dispensing units for the current product. Other useful examples are:
openvpms:lookup(openvpms:get(.,'product.entity'), 'dispensingVerb') and
openvpms:lookup(openvpms:get(.,'product.entity'), 'sellingUnits')Obviously, you need a understanding of the archetypes to make extensive use of this facility.
Macros in Macros: We can make use of the above two facilities by defining a macro, say @oid with the expression:
concat($dispensingVerb, ' ', $number, ' ', $dispensingUnits, '(s) Once Daily')
Here we are invoking two other macros, dispensingVerb and dispensingUnits, and also making use of the $number. Thus 4@oid will expand to something like "Give 4 Tablet(s) Once Daily"
Note that invoked macro (eg 'dispensingVerb') MUST have a name that starts with a letter, otherwise the expansion will not work. (What will happen is that the invoked macro will be immediately expanded instead of delaying its expansion until you invoke the outer macro.)
If you do really need to invoke a macro starting with @, then you need to 'hide' the macro by splitting it as in the following example:
macro:eval(concat('@', 'lea'))Here we have hidden the macro code from expansion using concat, and then evaluated it with the macro:eval() function. If in the earlier example, the dispensing macros were in fact @dispensingVerb and @dispensingUnits, then we could write the macro as follows:
concat(macro:eval(concat('@','dispensingVerb')),' ',$number, ' ',macro:eval(concat('@','dispensingUnits')),'(s) Once Daily')
JXPath Extension Functions
Macro expressions are JXPath expressions and may therefore use the JXPath Extension Functions.
Macro Variables
Within the OpenVPMS web application, there a number of pre-defined variables that can be used in macros.
For example, the $patient variable refers to the current selected patient. If no patient is selected, then the variable is undefined.
The standard JXPath functions can be used to access the variable fields. e.g:
- openvpms:get($patient, "name") - gets the current patient name
- openvpms:lookup($customer, "title") - gets the current customer's title (as opposed to the title code)
For convenience, the variables support the archetype dot notation, so the above can be simplified to:
- $patient.name
- $customer.title
Note: these variables are not available in reports.
The following variables are available:
| Variable | Archetype(s) | Description | Example |
|---|---|---|---|
| $patient | party.patientpet | The current patient | $patient.name |
| $customer | party.customer* | The current customer | party:getBillingAddress($customer) |
| $practice | party.organisationPractice | The current practice | party:getCorrespondenceAddress($practice) |
| $location | party.organisationLocation | The current practice location | party:getTelephone($location) |
| $stockLocation | party.organisationStockLocation | The current stock location | $stockLocation.description |
| $supplier | party.supplier* | The current supplier | $supplier.notes |
| $product | product.* | The current product | $product.label |
| $deposit | party.organisationDeposit | The current deposit account | $deposit.accountNumber |
| $till | party.organisationTill | The current till | date:formatDate($till.lastCleared) |
| $clinician | security.user | The current clinician | $clinician.name |
| $user | security.user | The current user | $user.id |
| $invoice | act.customerAccountChargesInvoice |
The current invoice. Only valid:
|
openvpms:get($invoice, "amount") |
| $visit | act.patientClinicalEvent |
The visit for the current patient. Only valid:
|
$visit.reason |
Message Reason
This screen is used to create/view/edit the Message Reason lookups. These are used to set the Reasons available on the message create/edit screen.

The fields are as follows:
Name - the message reason
default - check the box to to make this the default reason
Message Status
This screen is used to create/view/edit the Message Status lookups. These are used to set the Statuses available on the message create/edit screen.

The fields are as follows:
Name - the message status
default - check the box to to make this the default status
Patient Alert Type
This screen allows you to create/view/edit the details for the Patient Alerts.

The fields are as follows:
Name - the Alert's name
Priority - can be set to High, Medium or Low. If there are too many alerts for the display space, higher priority ones get preference.
Colour - used to set the colour used for the alert. You use the mouse to select the colour via the colour and luminosity/hue boxes.
Default - check this box to make this alert the default type
Active - uncheck the box to deactivate the alert type
Person Title
This screen is used to create/view/edit the Title lookups. These are used to set the Titles available on the customer create/edit screen.

The fields are as follows:
Name - the title
default - check the box to to make this the default title
Active - uncheck the box to deactivate the title
Practice Type
This screen is used to create/view/edit the Practice Type lookups. These are used to set the Categories available on the Supplier-Veterinary Practice create/edit screen.

The fields are as follows:
Name - the practice type
Active - uncheck the box to deactivate the type
Product Group
This screen is used to create/view/edit the Product Group lookups. These are used to set the Classifications available on the Product (merchandise, medication and service) create/edit screens.
Note that the Classifications available include both the Product Groups and the Product Income Types.

The fields are as follows:
Name - the group
Active - uncheck the box to deactivate the group
Product Income Type
This screen is used to create/view/edit the Product Income Type lookups. These are used to set the Classifications available on the Product (merchandise, medication and service) create/edit screens.
Note that the Classifications available include both the Product Income Types and the Product Groups.

The fields are as follows:
Name - the income type
Active - uncheck the box to deactivate the income type
Reminder Group
This screen is used to create/view/edit the Reminder Group lookups. These are used to set the Groups available on the Administration|Types|Reminders create/edit screen.

The fields are as follows:
Name - the group name
Description - an optional description used to clarify the purpose of the group
Active - uncheck the box to deactivate the reminder group
Report Macros
This screen is used to create/view/edit the Report Macro lookups. These are used to enable the accelerated entry of text in any text field by running a report. The primary use of these is to generate email text.
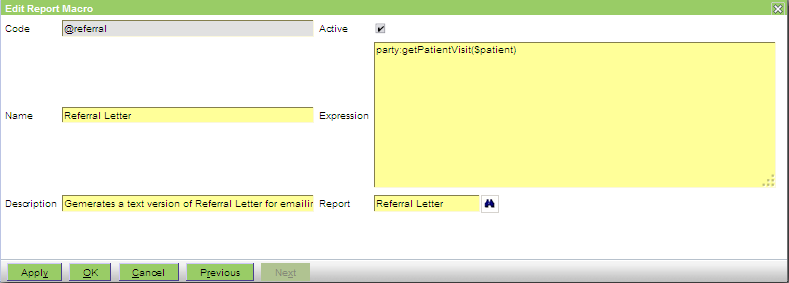
The fields are the same as for normal Macros (see Lookups|Macros) but with a different usage for the Expression field and an additional Report field.
Description - it is sensible to use a description like the above to emphasise that the macro will generate a text version of the report (and not the actual fully formatted report)
Expression - this is used to pass the data source to the report and we need to access the thing that we are going to report on. This is done using of the JXPath Extension Functions - specifically one of the party:get*() series. As you can see in the above example the expression is getting the last visit for the current patient.
Note: You need to be careful with the syntax used in the Expression. Specifically, you can only use the $xxxx argument format ($patient in the above screen shot) if the ReportMacro is to be invoked directly by the user. If the ReportMacro is to be invoked from say an Open Office document by using the macro:eval function, then you cannot use the $xxxx argument format. Instead, simply use a period - ie party:getPatientVisit(.) and in the Open Office document the user field should be like: [macro:eval('@referral',openvpms:get(.,'patient.entity'))] - here the second argument is passing the patient entity needed by the macro expression.
Report - the Report to run
The above macro runs the Referral Letter report, using the current patient's most recent Visit. Note that if there is no current patient, then the macro simply will not expand - ie the user will be left with the '@referral' that they typed.
Report macros can use:
- OpenOffice documents
- Microsoft Word documents
- JasperReports templates
If you are using OpenOffice or Word documents, you may want to do some conditional text handling (ie if sex=male use 'he', if female use 'she', else use 'it'. This is possible - see here for OpenOffice, here for MS Word.
When using JasperReports templates, there are a number of issues to be aware of:
- a fixed size font should be used
- special properties need to be defined to indicate to JasperReports how to divide the report into a grid
- fields should start on grid boundaries to avoid text being excluded
The easiest approach is to:
- define all dimensions in pixels
- set the character width and height to a round number
- ensure the page height and width is divisible by the character size
To set the character size to 10x10 pixels in iReport:
- right click on the report in Report Inspector
- select Properties
- scroll down to Properties in the displayed table
- click on the elipsis; this will display a dialog containing the defined properties.
- add property net.sf.jasperreports.export.text.character.width with value 10
- add property net.sf.jasperreports.export.text.character.height with value 10
Set the page width and height to a multiple of the character width and height. E.g. 500x500
See also JasperReports - Text Export Sample
Species
This screen is used to create/view/edit the details of the Species lookups. These determine what patient species are available.

The fields are as follows:
Name - the name of the species
default - check the box to make this the default species
Active - uncheck the box to deactivate the species
Custom Fields - normally this is left at 'None'. The system supports the use of custom fields. To make use of this feature, you need to copy/modify the entity.customPatientExample archetype that is shipped with the system to make archetypes having names matching entity.customPatient* (eg entity.customPatientLastVaccination). Note that if you do make use of this facility, then:
a) for existing patients, the new custom field tab will not appear until you edit the patient, but from then on it will appear for that patient
b) when you are creating a new patient, the custom tab will not appear until you set the species (because the custom field is species specific)
Source tab - this is used to set/display the Breeds belonging to the species
State
This screen is used to create/view/edit the details of the State lookups.
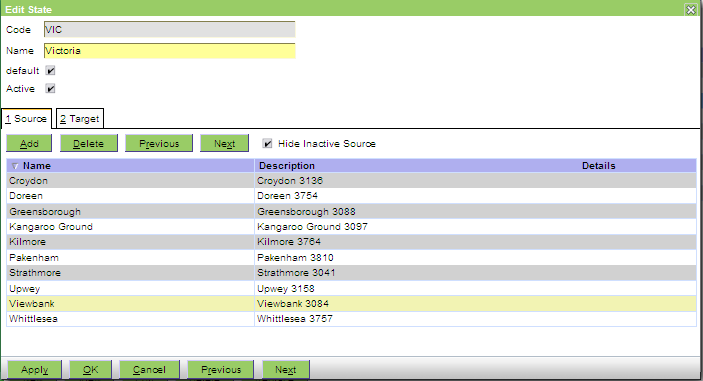
The fields are as follows:
Code - the code for the state. It is conventional to use the standard state codes, but you can in fact use any upper case letter string (eg VICTORIA in place of the standard VIC). Note that once you have created the State Lookup, you cannot change the Code - you have to create a new one, and then use the Replace mechanism.
Name - the name of the state
default - check the box to make this the default state
Active - uncheck the box to deactivate the state
Source tab - this is used to display and set the suburbs that are part of the state - use Lookup|Suburb to create these
Target tab - this is used to display and set the country - use Lookup|Country to create this
Suburb
This screen is used to create/view/edit the details of the Suburb lookups.
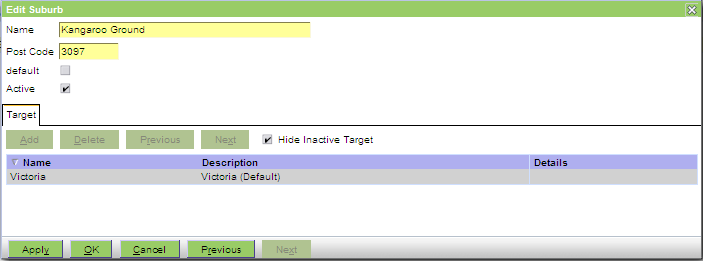
The fields are as follows:
Name - the name of the suburb
Post Code - the post or zip code
default - check the box to make this the default suburb
Active - uncheck the box to deactivate the suburb
Target tab - this is used to display and set the state - use Lookup|State to create this
Supplier Account Type
This screen is used to create/view/edit the Supplier Account Type lookups. These are used to set the Account Types available on the Supplier (Organisation and Person) create/edit screens.

The fields are as follows:
Name - the account type
Payment Terms and Payment Terms Units - the supplier's payment terms
Active - uncheck the box to deactive the account type
Note that the system contains no automatic payment processing system which would make use of the Payment Terms fields to pay only invoices that are due (and this functionality is usually handled by the accounting system). However, it is quite possible to build a supplier payments due report that would use these fields.
Supplier Type
This screen is used to create/view/edit the Supplier Type lookups. These are used to set the Categories available on the Supplier (Organisation and Representative) create/edit screen.

The fields are as follows:
Name - the supplier type
Active - uncheck the box to deactive the supplier type
Tax Type
This screen is used to create/view/edit the Tax Type lookups. These set the available taxes on the Taxes tabs for Practices, Practice Locations, Product Types, Products, and Customers.

The fields are as follows:
Name - the tax name (normally its short name such as GST or VAT)
Description - the full name of the tax
Percentage - the tax rate as a percentage
Active - uncheck the box to deactive the tax type
Tax Scheme - can be set to None, Goods and services tax, or Value added tax.
Tax Category - can be set to None, Standard rated, or Zero rated.
The latter two fields (Tax Scheme and Category) are used only are used to map ESCI (e-Supply Chain Interface) taxes to their OpenVPMS equivalents. See the ESCI documentation for more details: http://www.openvpms.org/documentation/esci If you are not using ESCI, then these two can be left at their defaults, ie None.
Units of Measure
This screen is used to create/view/edit the Units of Measure lookups. These are used to set the units available for the Selling, Dispensing and Packaging Units on the Product Information screens.

The fields are as follows:
Name - the name of the Unit of Measure (eg Unit, Grams, Pounds, Box, Syringe, Pack of 10)
Unit Code - this is used by the ESCI facility (see below). If you are not using ESCI, then you can happily leave this set at its default of 'each'.
default - check this box to make this the default Unit of Measure
Active - uncheck the box to deactive the Unit of Measure
The Unit Code is used by the ESCI facility to map UN/CEFACT Unit Codes* to the practice equivalents. The list contents are defined within the archetype lookup.uom and can only be added to by modifying the archetype. Note that OpenVPMS only provides a subset of the available codes, so if a required code is missing, it can be added but must be present in the list provided by http://docs.oasis-open.org/ubl/cs-UBL-2.0/cl/gc/cefact/UnitOfMeasureCode...
* UN/CEFACT Recommendation N°. 20 - Codes for Units of Measure Used in International Trade - http://www.unece.org/fileadmin/DAM/cefact/recommendations/rec20/rec20.zip
Units of Measure Group
This facility is not used in the current system. It is reserved for future use to categorise units of measure in order to set a practice wide default for weight units.

User Type
This screen is used to create/view/edit the User Type lookups. These are used to set the Categories available on the Administrator|Users create/edit screen.
The system comes with four user Types, Administrator, Clinician, Nurse and Receptionist. The first two are important for the functioning of the system. Users with Type Administrator, get will have the Administration workspace available. Only users with Type Clinician can be selected as the Clinician in places where the system allows or requires the clinician to be entered.

The fields are as follows:
Name - the user type
Active - uncheck the box to deactive the user type
Veterinary Speciality
This screen is used to create/view/edit the Veterinary Speciality lookups. These are used to set the Categories available on the Supplier-Veterinarian create/edit screen.

The fields are as follows:
Name - the speciality
Active - uncheck the box to deactivate the speciality
Confirm Delete
When you press the Delete button on the Administration|Lookups screen, a confirmation window will appear.
If you press OK to confirm the delete, then, if the Lookup is not in use, it will be deleted. Otherwise an error window will appear with the text:
Cannot delete lookup. It is being used.
To delete the lookup, select 'Replace' to replace it with another lookup.
Click OK to dismiss the error window and use the Replace button to replace the Lookup.
Confirm New
This is the New Lookup confirmation window. Select the type of Lookup to be created and then use OK to continue or Cancel to abort. Note that if you have selected a type on the Lookup screen, then this will already be selected in this window (even if it is not showing in the list of types) - thus you can normally simply click OK to proceed.
Confirm Replace
This is the Replace Lookup confirmation window. As shown below it allows you to confirm the Lookup you are about to replace and choose what to replace it with.

Notes:
- You must choose a replacement, ie you cannot leave it set as 'None' as shown above.
- If you check the Delete Lookup? box, then the Lookup you are replacing will be deleted when the replacement is complete. ie in the above case, the Product Group Lookup 'Procedures' would be deleted.
Users
This screen allows you manage the Users. See also Concepts|Users.
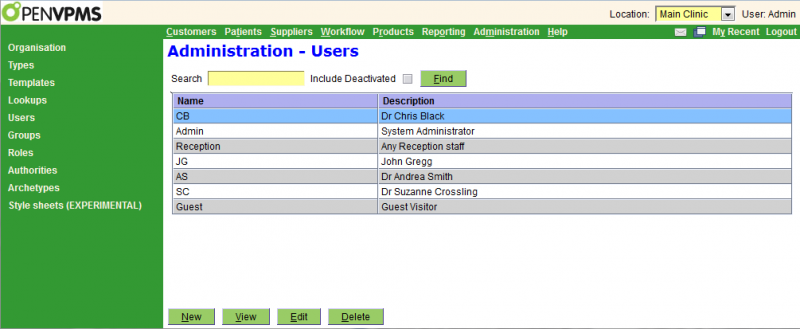
Confirm Delete
When you press the Delete button on the Administration|Users screen, a confirmation window will appear.
If the selected User is not in use and can be deleted, the window will simply ask you to confirm the delete. Press OK to confirm or Cancel to abort.
If it cannot be deleted because it is in use, the text will be "xxxx has relationships and cannot be deleted. Do you want to deactivate it instead?"(where xxx is the name of the item you are trying to delete). Pressing OK will unset its Active flag, Cancel will abort.
Create/Edit/View
This screen allows you to create, edit and view Users. See also Concepts|Users for background information.
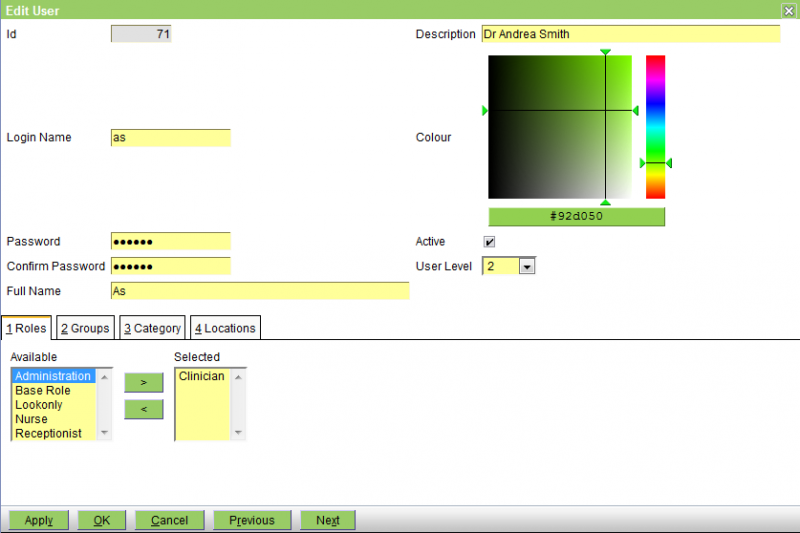
The fields are as follows:
Login Name - the name with which the user logs in. Note that you can set this to have upper and lower case letters (eg Doris). The user will be able to login with doris, Doris, DORIS, or even doRis. The upper case version of the login name must be unique, ie you cannot have one user named Doris and another named DORIS.
Password and Confirm Password - the user's password
Full Name - the name that will be used within the system - ie that shown in the Clinician pull-downs, and the name used to send messages. As shown in the above, this need not be a full name, and it is faster to select the clinician if the name is short or has a unique first letter.
Description - if you use short names then this should be the person's full name, else if can be any useful text. Note that if you do use short names (with the full name in the description) then you will need to modify reports and documents that display the 'Full Name' field to instead display the Description field.
Colour - used to set the colour used for the user when highlighting them on the Scheduling and Work Lists windows. It is not necessary to set the colour for anyone who is not a clinician. You use the mouse to select the colour via the colour and luminosity/hue boxes. If you want to check the colours of the different users, the easiest way to do this is to view the user and then to use the Next and Previous buttons to run back and forth through the different user.
Note that you should avoid the 'light cream' colour f2f3b3 which displays as follows: 
because this is used to highlight the selected item on the Workflow|Scheduling and Work Lists screens.
Active - uncheck this box to deactivate the user
Roles tab - this is used to display, add, delete and edit the Roles for the user
Groups tab - this is used to display, add, delete and edit the User Groups the user belongs to

Category tab - this is used to display, add, delete and edit the User Types for the user. Set Administrator for all users who need to access the Administration menu and other administrative functions (Customer Accounts Check and Merge, Patient Merge, and Product maintenance [Edit, Delete, Copy, Export & Import]). Set Clinician for any user who needs to be selectable in the Clinician pull-downs. You can set multiple categories, ie both Clinician and Administrator.

Location tab - this is used to display, add, delete and edit the Practice Locations for the user. You specify Practice Locations in order to limit the Locations that the user can select at the top right of the screen. If you do not specify any, then the user can select any Location. You should set the default flag on the user's default Location- this will then be the selected Location when the user logs in.

Groups
This screen allows you manage the User Groups. These are only used to allow groups of users to be addressed when sending a message.

Confirm Delete
When you press the Delete button on the Administration|User Groups screen, a confirmation window will appear.
If the selected Group has no members and can be deleted, the window will simply ask you to confirm the delete. Press OK to confirm or Cancel to abort.
If it has members, the text will be:
xxx has relationships. Are you sure want to delete?
This operation cannot be undone.
(where xxx is the name of the Group you are trying to delete). Pressing OK will delete the Group, Cancel will abort.
Create/Edit/View
This screen allows you to create, edit and view User Groups.

The fields are as follows:
Name - the name of the group
Description - use this to clarify the purpose of the group
Active - uncheck this box to deactivate the group
Users tab - this is used to display, add and delete users from the group
Roles
This screen allows you manage the Roles. These are used to define the roles that are assigned to Users. See also Concepts|Users for background information.
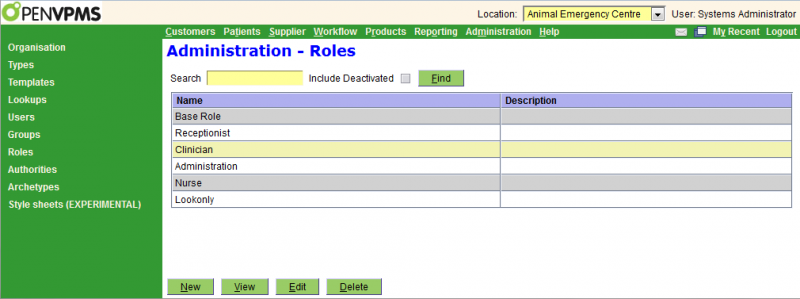
Confirm Delete
When you press the Delete button on the Administration|Roles screen, a confirmation window will appear.
If you press OK to confirm the delete, then, if the Role is not in use, it will be deleted. Otherwise an error window will appear with the text like:
Failed to delete object with reference security.role.1.0:.......
Click OK to dismiss the error window.
Create/Edit/View
This screen allows you to create, edit and view Roles.

The fields are as follows:
Name - the name of the role
Description - use this to clarify the purpose of the role
Active - uncheck this box to deactivate the group
Authorities tab - this is used to display, add and delete authorities from the role
Note that in the above you will see that the Clinician role can create or save (ie modify) everything, but remove (ie delete) only messages. If you don't include message remove, then the user will not be able to delete their own messages. However, a normal (ie non-administrator) user can happily operate with no other remove authorities - recall that in general nothing should be deleted, only deactivated.
Authorities
This screen allows you manage the Authorities. These are used to define the authorities that are assigned to roles. See also Concepts|Users for background information.

Confirm Delete
When you press the Delete button on the Administration|Authorities screen, a confirmation window will appear.
If you press OK to confirm the delete, then, if the Authority is not in use, it will be deleted. Otherwise an error window will appear with the text like:
Failed to delete object with security.archetypeAuthority.1.0:.......
Click OK to dismiss the error window.
Create/Edit/View
This screen allows you to create, edit and view Authorities. Normally you should never need to change these.

The fields are as follows:
Authority Name - the name of the authority
Description - use this to clarify the purpose of the authority
Service Name - must be set to Archetype Service
Method Name - can be one of save, new or remove
Archetype Name - the name of the archetype
Archetypes
This screen is used to select an archetype to view and maintain archetypes. (See further down for what an archetype is.)
Note that if you are a normal administrator, you almost certainly do not need to use this screen. If you are developing reports, then you will find this facility useful for seeing how things are put together so that you can write the necessary SQL code. (See also Reference|Report Fields.)
If you do really need to modify an archetype, then the best way is probably to modify the archetype's adl file (after saving a copy), then shutdown the system by stopping Tomcat, then use the archload script to load the archetype(s), and finally restart Tomcat.
Note also that if you use this screen to make changes to a derived node or you import an archetype that makes changes to a derived node, then you will be presented with the option to update derived nodes. If you do not accept this offer, then the derived node(s) will not be updated until the object itself is edited and saved. If you use archload to import the modified archetype, then because archload does not have this 'update derived nodes' facility, these will not get updated until you edit the affected object.

This is a standard select screen with two extra buttons:
Import - click this to upload an archetype from an adl file. Note that a) you should not do this unless you know exactly what you are doing; and b) it is probably better to shut down the system and use the archload script to load the archetype(s) and then restart the system. Note that if you do import as archetype using this button, then if the imported archetype has changes that affect the data (eg a change in a derived field) then you will get the following message

If you press the OK button, then the affected data will be updated. If you have large data sets then this can take a long time. If you press the Cancel button then then existing data will not be updated, but any new or modified records will include the update.
Note that the above message will also be displayed if you edit a node and your changes affect the data.
This option to apply updates to the affected data is not available if you use the archload script.
Export - click this to export the archetype to an adl file. Note that if you want to study the archetypes don't use this - it generates a very complete but overly complex adl file. If you do want to look at a file, take a copy of the adl file from the <OPV-HOME>\update\archetypes\org\openvpms\archetype folders. Alternatively, use the View or Edit buttons. Note however, that if you use View, you will not be able to see the full archetype. Specifically, if the archetype has a node that links to multiple archetypes (eg participation.product's entity node), then if you use View, you will only be shown one. To see all four you need to Edit the archetype.
What exactly is an archetype?
OpenVPMS is built using some modern system design concepts – specifically it uses an entity-relationship model. (See http://en.wikipedia.org/wiki/Entity%E2%80%93relationship_model for some light bed-time reading.)
Each entity (eg customer, patient, supplier, product etc), each 'act' (ie the actions associated with each entity- eg invoice for customer, order to supplier, visit to a patient) and each relationship between these has a set of 'attributes' (eg customer last-name/title/first-names etc, patient species/breed/age/colour etc) that define the entity, act and relationship.
These are described using a variant of XML (eXtended Markup Language), and the 'description' is called an archetype. These are held in files with the extension .adl (for Archetype Description Language).
Because of the way the OpenVPMS code is built (it's completely driven by the archetypes), and because the archetypes can be changed by a knowledgeable person, certain adjustments to the system are very simple and require no change to the underlying code.
Two examples:
- Say you wanted to use an otherwise unused field (eg the Travel field on the Customer Information screen) for some other purpose (eg to hold the customer's Citizen ID Number). To modify the system so that Travel becomes 'Citizen ID' on the customer screen, all you have to do is to edit the party.customerPerson archetype to change the Display Name of the field called 'travel' from 'Travel' to 'Citizen ID'.
- Say you wanted to to ensure that the microchip numbers entered into the system have one of three formats, 9999 9999 9999 999 or 999*999*999 or 10 characters alpha numeric, then you edit the entityIdentity.microchip archetype to set both the necessary validation and the appropriate error message.
To make the equivalent changes in most other systems is impossible – because they are completely compiled applications and thus have 'no user serviceable parts inside'.
Note that if you are modifying archetypes, then although you can do it directly by editing it on the screen, it is best to edit the adl file, and then importing it. This has two advantages. Firstly you have a copy of the modified archetype that can be re-used if/when the system is upgraded. Secondly, if you are adding a new field (more correctly referred to as a node), then you can control where it is displayed because, in general, the screen layout is determined by the order of the nodes in the archetype.
Database Structure It is appropriate here to also mention something about the database structure used by OpenVPMS. If you have ever played with conventional databases, you will be used to having tables which hold like data, ie there will be a customer file, a patient file, a product file, etc etc. This is not the case with OpenVPMS where the database tables hold entities, acts and relationships. Thus the entities table contains entries for all the entities, ie customers, patients, products, etc with each tagged with an archetype to say what sort of entity it is. Further information about each entity is held in the entity-classifications and entity-details and other tables.
This setup makes it a bit more difficult to extract data from the system, for example when building the SQL code required for a report. However, it has huge benefits in the ease of extending the system when it is necessary to add extra fields.
Confirm Delete
When you press the Delete button on the Administration|Archetypes screen, a confirmation window will appear.
If you press OK to confirm the delete, then, if the Archetype is not in use, it will be deleted. Otherwise an error window will appear with the text like:
Failed to delete object with descriptor.archetype.1.0:.......
Click OK to dismiss the error window.
Create/Edit/View
This is the create/edit/view screen for archetypes. Feel free to use this screen to examine archetypes, but unless you know exactly what you are doing, do not use it to modify things.
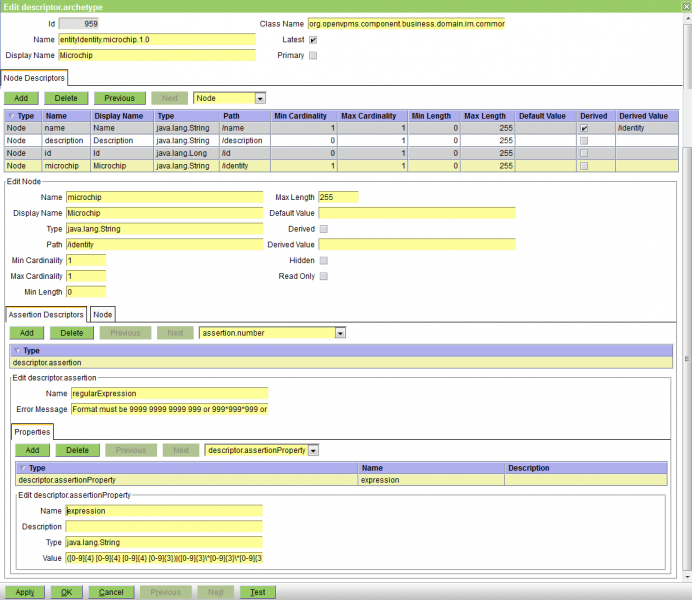
The fields are:
ID - the id number of the archetype
Name - the name of the archetype
Display Name - its display name
Class Name - the name of the java class that defines the archetype
Latest - check this box if this is the latest version
Primary - check this box if this is a primary archetype. The primary field is used to filter similarly named archetypes from lists when wildcards are used. E.g listing archetypes for act.customerAccount* with primary=true will exclude all of the item acts (act.customerAccountPaymentCash etc). Most cases where workspaces list archetypes by archetypes (e.g. Admin|Organisation), they list primary archetypes.
That said, there aren't too many non-primary archetypes, and these wouldn't be matched on the wildcards used anyway.
Node table - this shows each 'node' or component of the archetype. In the above example there are only 4. If there are more than 10, then the display is paged.
Node tab - this shows the attributes of the selected node (microchip in the above example). Its fields are:
Name - the name of the node
Display Name - this is used as the name of the field when it appears on the screen
Type - the java class that defines the node's type
Path - defines where this node is held in the database
Min, Max Cardinality - define how many of these nodes there can be. (1,1) means there must be one only (ie the field is mandatory), (0,1) means that the node is optional but there can be no more than one, (0,-1) means that the node is optional, but there in no limit to the number.
Min, Max Length - define the allowed number of characters if this is a string
Default Value - the default value for this node
Derived - check this box if the value of this node is to be derived from others
Derived Value - an expression that provides the derived value. For example, the Description node of the till archetype is "concat('Last Cleared : ',/details/lastCleared, ' Cash Float : ',/details/tillFloat)".
Hidden - check this box is the node is not to be displayed
Read Only - check this box if the node cannot be updated
Assertion Descriptors tab - this shows the attributes of the selected assertion. Assertions are used to validate the data for the node. There are a dozen different types (such as number, stringcase, expression, regular expression, lookup, etc). In the above example there is a single regular expression assertion. The fields are in general different for each assertion type, and are not documented here.
Style Sheets
This is an experimental facility and not completely implemented. It allows you to control and experiment with the stylesheet parameters that define the layout of the OpenVPMS screens.
OpenVPMS has a set of stylesheets for different screen resolutions. This facility allows you to modify the parameters for each resolution, define a new resolution, and to open a new window with a specified resolution to see how things look.
Note that any changes made will be lost when you log out. That is, this facility is for experimenting with the effects of stylesheet changes, not permanently making them.
The screen is as follows:

The fields are:
Resolution - a pull-down list of the available resolutions. Initially this will show 'Default' and the screen width and height will be that of your screen.
Screen Width and Height - the screen width and height corresponding to the resolution
Property - this column showns the name of the property. These are fixed and cannot be modified, deleted or added to.
Expression - this column shows the expression used to determine the value of the property. As you can see the majority consist of a number multiplied by a parameter such as the font size, screen height or width.
The buttons are as follows:
Add - opens a window to allow you to add a new screen resolution - you can also edit the various settings. When you press the OK button, the current display will be updated to reflect your settings.
Edit - opens a window to allow you to modify the expressions for the currently selected resolution. To get these to be applied to the current screen, press the OK button on the edit screen, and then press the Add button and immediately OK it.
Change Resolution - displays a window to allow you to set a screen width and height and then opens a new OpenVPMS window with that width and height. This allows you to see what the screens will look like on a screen of that size.
Revert Changes - enables you to discard all changes you made in this session
Export - displays a note window displaying the settings. Note that the properties are held as a default set with overrides for each resolution. Hence, if you press Export when the Resolution is shown as Default, there will be a full set of properties shown in the note window. However, if you call up say 800x600 resolution and then press Export, you will see only a very small number of properties - and these are the ones in the full set that are overridden for 800x600 resolution.
For permanent changes you need to edit the properties files in the <TOMCAT HOME>\webapps\openvpms\WEB-INF\classes\style directory.
If you are changing an existing resolution, say 800x600, then you only need to edit the file default-800x600.properties
If you are creating a new resolution, say 600x1024, then you need to create the file default-600x1024.properties and fill it with the information copied from the note window displayed by the Export button. Then you need to add the new resolution to the list in the default-resolutions.properties file.
Finally you need to restart Tomcat to make the changes take effect.
Help
Clicking Help on the top menu item, or using Alt-H displays a screen like the one below.
On most other screens, you can press Alt Function Key 1 to directly access help for that screen.

Notes:
- The current version is displayed at the top right - useful if you are reporting problems.
- Your practice's licence details are displayed at the bottom. If there is no current subscription, the nag message shown above will be displayed.
- It is possible to tailor this screen - see here.
Reference
This section contains reference information which will be useful to administrators, integrators, and others who need to know "what's under the hood".
Audit
OpenVPMS has a simple but incomplete audit facility that needs to be explicitly enabled - see below.
Some records (eg invoices) record the 'author' - ie the name of the user who created them. However, this is not universal - for example no author is recorded on the customer record.
Audit Service
The audit service is very limited. It has never been developed beyond prototype phase. As such, it doesn't audit all of the operations performed on the database nor does it log the user that performed the operation. It works by intercepting calls to the archetype service but it does not intercept the method where multiple objects are saved at once.
This method is used in many places, including:
* editing
* lookup merging
* customer merging
* invoice/credit reversals
* document generation
* customer balance updates
* till clearing
If you want to try it out, you need to edit applicationContext.xml located in <TOMCAT_HOME>/webapps/openvpms/WEB-INF/ and uncomment auditDao, auditService, autoProxyCreator, and auditServiceAdvisor so that things look as follows:
     <bean id="auditDao"
          class="org.openvpms.component.business.dao.hibernate.im.audit.AuditDAOHibernate">
        <property name="sessionFactory" ref="sessionFactory"/>
    </bean>

    <bean id="auditService"
          class="org.openvpms.component.business.service.audit.AuditService">
        <constructor-arg ref="auditDao"/>
    </bean>

    <bean id="autoProxyCreator"
          class="org.springframework.aop.framework.autoproxy.BeanNameAutoProxyCreator">
        <property name="beanNames">
            <list>
                <value>archetypeService</value>
            </list>
        </property>
        <property name="interceptorNames">
            <list>
                <value>auditServiceAdvisor</value>
            </list>
        </property>
    </bean>

    <bean id="auditServiceAdvisor"
          class="org.springframework.aop.support.RegexpMethodPointcutAdvisor">
        <property name="advice" ref="auditService"/>
        <property name="patterns">
            <list>
                <value>.*ArchetypeService\.save</value>
                <value>.*ArchetypeService\.remove</value>
            </list>
        </property>
    </bean>
Help Topics
When you click Help in the top menu line or press Alt-H, a help topics window is displayed.
In the standard system this provides four links, Help Topics (which links to this), An Introduction to OpenVPMS (which links to the Introduction section), OpenVPMS Concepts and Glossary (which links to the Concepts section) and User's Forum (which links to http://www.openvpms.org/category/forums/users/general).
You can modify these and add more topics by editing the file help.properties in <TOMCAT_HOME>\webapps\openvpms\WEB-INF\classes\localisation.
If you are going to provide Local Procedures, then this is how to provide links to them.
Note that you can provide a simple local procedures document by writing what you need with your favourite word processor and then creating a pdf (called say localProcs.pdf). You can place this in TOMCAT_HOME>\webapps\ROOT and the help.properties entry will be like:
help.topic.5.title = Local procedures
help.topic.5.url = http://localhost:8080/localProcs.pdf
JXPath Extension Functions
OpenVPMS uses JXPath to perform expression evaluation within archetypes, macros, and reports.
The following extension functions can be used within expressions. They are grouped as General, Expression, Date, Party, Math, Macro and History functions.
In the examples below you will see arguments like $patient, $customer, $visit, etc. This is a convenient shorthand for openvpms:get(.,'xxxx.entity') where xxxx is patient, customer, etc.
Note that the $ shorthand is only available in the GUI environment. Specifically, it can be used in macros invoked the by user, but not in macros invoked by macro:eval() when generating forms and letters.
General Functions
| Function | Description |
|---|---|
|
openvpms:get(object, node)
Note that in the case where the node is an object reference (such as the node patient in the act.customerAppointment) then the node 'patient.objectReference' will return the patient object and one can then use this to access the patient details. In this case (see examples) using the / syntax to access the child node provides a shorthand. |
Returns the named node. If the object is null, then the default value is returned, or a null string if no default value is provided. The node name may be a single or composite name. The former returns the immediate node. A composite name is multiple node names separated by ".". Two special node names are defined:
Examples
Object Reference Examples (the first two are equivalent)
|
|
openvpms:set(object, node, value)
|
Sets the named node to the supplied value.
The node name may be a single or composite name. The former sets the immediate node. A composite name is multiple node names separated by ".". Examples
Note that this is a powerful low level function which should be avoided if there is a dedicated function for the task (as there is indeed for the above two examples). |
|
openvpms:lookup(object, node)
|
Returns the name of a lookup node. If object is null, then the default value is returned, or a null string if no default value is provided. The node name may be a single or composite name. The former returns the immediate node. A composite name is multiple node names separated by ".". Examples
|
Date Functions
| Function | Description | ||||||||||
|---|---|---|---|---|---|---|---|---|---|---|---|
| Note that in the following, the current date and time can be accessed by using java.util.Date.new() as the dateTime argument, eg date:formatDate(java.util.Date.new()) | |||||||||||
|
date:format(dateTime, pattern)
|
Formats a date/time according to a SimpleDateFormat pattern. Examples Given: dateTime = 3:30:05pm 20/8/2012
|
||||||||||
|
date:formatDate(date)
|
Formats a date using the current locale's MEDIUM format. Examples Given: dateTime = 10:38 am 15/7/2013
|
||||||||||
|
date:formatDate(date, style)
|
Formats a date using the specified format for the current locale. Examples Given: dateTime = 11:00am 15/7/2013
|
||||||||||
|
date:formatTime(time)
|
Formats a time using the current locale's MEDIUM format. Examples Given: dateTime = 3:30:05pm 20/8/2012
|
||||||||||
|
date:formatTime(time, style)
|
Formats a time using the specified format for the current locale. Examples Given: dateTime = 3:30:05pm 20/8/2012
|
||||||||||
|
date:formatDateTime(datetime)
|
Formats a date-time using the MEDIUM format for the current locale. Examples Given: dateTime = 3:30:05pm 20/8/2012
|
||||||||||
|
date:formatDateTime(datetime, style)
|
Formats a date-time using the specified format for the current locale. Examples Given: dateTime = 3:30:05pm 20/8/2012
|
||||||||||
|
date:formatDateTime(datetime, dateStyle, timeStyle)
|
Formats a date-time using the specified date and time styles for the current locale Examples Given: dateTime = 9:58:12am 28/7/2013
|
Expression Functions
| Function | Description |
|---|---|
|
expr:if(condition, value)
|
Evaluates the result of condition. If true, returns value, otherwise returns null.
|
|
expr:if(condition, trueValue, falseValue)
|
Evaluates the result of condition. If true, returns trueValue, otherwise returns falseValue. Examples
|
|
expr:var(name)
|
Returns the value of the named variable if it exists, otherwise returns null. Examples
|
|
expr:var(name, value)
|
Returns the value of the named variable if it exists, otherwise returns value. Examples
|
Party Functions
The following functions operate on party archetypes, such as customers, patients, suppliers, and organisations.
| Function | Description |
|---|---|
|
party:getPartyFullName(party)
|
Returns the full name of the specified party Examples
|
|
party:getPartyFullName(act)
|
If the act has a customer node, then the full name of the customer will be returned. If there is no customer node, but there is a patient node, the full name of the owner of the patient will be returned. Examples
|
|
party:getPatientOwner(patient)
|
Returns the owner of a patient. Examples
|
|
party:getPatientOwner(act)
|
Returns the owner of a patient associated with an act. Examples
|
|
party:getPatientCurrentOwner(act)
|
Returns the current owner of a patient associated with an act. Examples
|
|
party:setPatientInactive(patient)
|
Flags a patient as being inactive. Examples
|
|
party:setPatientDeceased(patient)
|
Flags a patient as being deceased. This also:
Examples
|
|
party:setPatientDesexed(patient)
|
Flags a patient as being desexed. Examples
|
|
party:getPreferredContacts(party)
|
Returns a formatted string of preferred contacts for a party. Examples
|
|
party:getBillingAddress(party)
|
Returns a formatted billing address for a party. This looks for:
Returns an empty string if there is no location contact. Examples
|
|
party:getBillingAddress(act)
|
Returns a formatted billing address for a customer associated with act. If the act has a customer node, then this customer will be passed to party:getBillingAddress(party) If there is no customer node, but there is a patient node, the owner of the patient will be passed to party:getBillingAddress(party) Returns an empty string if there is no location contact. Examples
|
|
party:getCorrespondenceAddress(party)
|
Returns a formatted correspondence address for a party. This looks for:
Returns an empty string if there is no location contact. Examples
|
|
party:getCorrespondenceAddress(act)
|
Returns a formatted correspondence address for a customer associated with act. If the act has a customer node, then this customer will be passed to party:getCorrespondenceAddress(party) If there is no customer node, but there is a patient node, the owner of the patient will be passed to party:getCorrespondenceAddress(party) Returns an empty string if there is no location contact. Examples
|
|
party:getTelephone(party)
|
Returns a formatted telephone number for a party. This looks for:
Returns an empty string if there is no phone contact. Examples
|
|
party:getTelephone(act)
|
Returns a formatted telephone number for a customer associated with act. If the act has a customer node, then this customer will be passed to party:getTelephone(party) If there is no customer node, but there is a patient node, the owner of the patient will be passed to party:getTelephone(party) Returns an empty string if there is no phone contact. Examples
|
|
party:getHomeTelephone(party)
|
Returns a formatted home telephone number for a party. This looks for:
Returns an empty string if there is no phone contact. Examples
|
|
party:getHomeTelephone(act)
|
Returns a formatted home telephone number for a customer associated with act. If the act has a customer node, then this customer will be passed to party:getHomeTelephone(party) If there is no customer node, but there is a patient node, the owner of the patient will be passed to party:getHomeTelephone(party) Returns an empty string if there is no phone contact. Examples
|
|
party:getWorkTelephone(party)
|
Returns a formatted work telephone number for a party. This looks for:
Returns an empty string if there is no phone contact. Examples
|
|
party:getWorkTelephone(act)
|
Returns a formatted work telephone number for a customer associated with act.
If the act has a customer node, then this customer will be passed to party:getWorkTelephone(party) If there is no customer node, but there is a patient node, the owner of the patient will be passed to party:getWorkTelephone(party) Returns an empty string if there is no phone contact. Examples
|
|
party:getMobileTelephone(party)
|
Returns a formatted mobile telephone number for a party. This looks for:
Returns an empty string if there is no phone contact. Examples
|
|
party:getMobileTelephone(act)
|
Returns a formatted mobile telephone number for a customer associated with act.
If the act has a customer node, then this customer will be passed to party:getMobileTelephone(party) If there is no customer node, but there is a patient node, the owner of the patient will be passed to party:getMobileTelephone(party) Returns an empty string if there is no phone contact. Examples
|
|
party:getFaxNumber(party)
|
Returns a formatted fax number for a party. Returns an empty string if there is no fax contact. Examples
|
|
party:getFaxNumber(act)
|
Returns a formatted fax number for a customer associated with act.
If the act has a customer node, then this customer will be passed to party:getFaxNumber(party) If there is no customer node, but there is a patient node, the owner of the patient will be passed to party:getFaxNumber(party) Returns an empty string if there is no fax contact. Examples
|
|
party:getEmailAddress(party)
|
Returns a formatted email address for a party. Returns an empty string if there is no email contact. Examples
|
|
party:getEmailAddress(act)
|
Returns a formatted email address for a customer associated with act.
If the act has a customer node, then this customer will be passed to party:getEmailAddress(party) If there is no customer node, but there is a patient node, the owner of the patient will be passed to party:getEmailAddress(party) Returns an empty string if there is no email contact. Examples
|
|
party:getContactPurposes(contact)
|
Returns a formatted string of contact purposes for a contact. |
|
party:identities(party)
|
Returns a formatted string of a party's identities. |
|
party:getAccountBalance(customer)
|
Returns the account balance for a customer. Examples
|
|
party:getAccountBalance(act)
|
Returns the account balance for a customer associated with act. If the act has a customer node, then this customer will be passed to party:getAccountBalance(customer) If there is no customer node, but there is a patient node, the owner of the patient will be passed to party:getAccountBalance(customer) Examples
|
|
party:getPatientReferralVet(patient)
|
Returns the referral vet for a patient. This is the patient's associated veterinarian from the first matching Referral (either a Referred From or Referred To relationship) active at the current time. Examples
|
|
party:getPatientReferralVet(act)
|
Returns the referral vet for a patient linked to act. This is the patient's associated veterinarian from the first matching Referral (either a Referred From or Referred To relationship) active at the act's start time. Examples
|
|
party:getPatientReferralVetPractice(patient)
|
Returns the referral vet practice for a vet associated with the supplied patient, active at the current time. Examples
|
|
party:getPatientReferralVetPractice(act)
|
Returns the referral vet practice for a vet associated with the supplied act's patient, active at the act's start time. Examples
|
|
party:getReferralVetPractice(vet, date)
|
Returns the referral vet practice for a vet, for the specified date. |
|
party:getPatientAge(patient)
|
Returns the age of the patient. Examples
|
|
party:getPatientMicrochip(patient)
|
Returns a patient's microchip, or an empty string if none exists. Examples
|
|
party:getPatientMicrochip(act)
|
Returns the microchip for a patient linked to act. Examples
|
|
party:getPatientMicrochips(patient)
|
Returns a patient's microchips, or an empty string if none exists. If there are more than one, then the values are separated by commas, eg Examples
|
|
party:getPatientMicrochips(act)
|
Returns the microchips for a patient linked to act. Examples
|
|
party:getPatientPetTag(patient)
|
Returns the pet tag for a patient,or an empty string if none exists. Examples
|
|
party:getPatientPetTag(act)
|
Returns the pet tag for a patient linked to act. Examples
|
|
party:getPatientWeight(patient)
|
Returns the formatted weight for a patient, or an empty string if the patient has not been weighed. This uses the most recent recorded weight for the patient.
|
|
party:getPatientWeight(act)
|
Returns the formatted weight for a patient linked to act, or an empty string if the patient has not been weighed. This uses the most recent recorded weight for the patient. Examples
|
|
party:getWeight(patient)
|
Returns the patient weight in kg. If the patient has no recorded weight, returns 0. This uses the most recent recorded weight for the patient. Examples
|
|
party:getWeight(patient, units)
|
Returns the patient weight in the specified units. If the patient has no recorded weight, returns 0. This uses the most recent recorded weight for the patient. Examples
|
|
party:getWeight(act)
|
Returns the weight (in kilograms) for a patient linked to act, or 0 if there is no patient, or the patient has no weight recorded. This uses the most recent recorded weight for the patient. Examples
|
|
party:getWeight(act, units)
|
Returns the weight in units for a patient linked to act, or 0 if there is no patient, or the patient has no weight recorded. This uses the most recent recorded weight for the patient. Examples
|
|
party:getPatientDesexStatus(patient)
|
Returns the desex status of a patient. Examples
|
|
party:getPatientDesexStatus(act)
|
Returns the desex status of a patient linked to act. Examples
|
|
party:getPatientVisit(patient)
|
Returns the most recent Visit (i.e. act.patientClinicalEvent) for a patient. Examples
|
| party:getPractice() |
Returns the practice. |
| party:getPracticeAddress() | Returns the practice address, or an empty string if the practice has no location contact. |
| party:getPracticeTelephone() | Returns the practice telephone, or an empty string if the practice has no phone contact |
| party:getPracticeFaxNumber() | Returns the practice fax number, or an empty string if the practice has no fax contact |
|
Returns the BPay Customer Reference Number for a party. This is the id of the party plus a check digit generated using the Luhn 10 algorithm. Examples
|
|
party:getBpayID(act)
|
Returns a the BPay CRN (see above) for a customer associated with act.
If the act has a customer node, then this customer will be passed to party:getBpayID(party) If there is no customer node, but there is a patient node, the owner of the patient will be passed to party:getBpayID(party) Examples
|
Math Functions
| Function | Description |
|---|---|
| math:round(value, n) |
Rounds value to n decimal places. Examples
|
| math:pow(value, n) |
Returns valuen Examples
|
Macro Functions
The following function can be used in document template content files. Its primary use is to provide standardised text strings for multiple documents.
| Function | Description | ||||||
|---|---|---|---|---|---|---|---|
|
macro:eval(macro) macro:eval(macro, .) macro:eval(macro, expr) The first two forms are equivalent.
|
Expands the specified macro Examples Given: the macro fn_bloggs contains the expression
|
History Functions
The patient history functions are restricted for use within Jasper Reports. They are designed to be used in sub-report expressions. E.g.:
$P{dataSource}.getExpressionDataSource("history:medication(openvpms:get(.,'patient.entity'))")
| Function | Description |
|---|---|
|
history:medication(patient)
|
Returns all medication acts for a patient, ordered on descending start time.
|
|
history:medication(patient, productTypeName)
|
Returns all medication acts for a patient, that have the specified product type name, ordered on descending start time.
|
|
history:medication(patient, from, to)
|
Returns all medication acts for a patient between the specified dates, inclusive, ordered on descending start time. If a date is null, indicates it is unbounded.
|
|
history:medication(patient, productTypeName, from, to)
|
Returns all medication acts for a patient that have the specified product type name, between the specified dates, inclusive, ordered on descending start time. If a date is null, indicates it is unbounded.
|
Reminder Functions
Reminders functions returning lists of act.patientReminder acts are restricted for use within Jasper Reports. They are designed to be used in sub-report expressions. E.g.:
$P{dataSource}.getExpressionDataSource("reminder:getReminders(., 1, 'YEARS')")
| Function | Description |
|---|---|
|
getReminders(act, dueInterval, dueUnits)
|
Returns a list of reminders for a customer's patients for the customer associated with the supplied act.
|
|
getReminders(act, dueInterval, dueUnits, includeOverdue)
|
Returns a list of reminders for a customer's patients for the customer associated with the supplied act, optionally including overdue reminders.
|
|
getReminders(customer, dueInterval, dueUnits)
|
Returns a list of reminders for a customer's patients.
|
|
getReminders(customer, dueInterval, dueUnits, includeOverdue)
|
Returns a list of reminders for a customer's patients.
|
|
getDocumentFormReminder(act)
|
Returns a reminder associated with a Form act, if any. For forms linked to an invoice item, this If there are multiple reminders with the same due date, the reminder with the lesser Id will be used. For forms not linked to an invoice item that have a product with reminders, a reminder with the nearest due date to that of the form's start time will be returned. For forms that don't meet the above, null is returned.
|
Links to other reference material
You may find the following useful.
Reminder Export format
Reminders may be configured to be exported during reminder processing instead of mailed.
This file can be either comma or tab-delimited, depending on the Practice configuration.
The file contains the following fields:
| Field | Description |
|---|---|
| Customer Identifier | Corresponds to the id node of party.customerperson |
| Customer Title | Corresponds to the title node of party.customerperson |
| Customer First Name | Corresponds to the firstName node of party.customerperson |
| Customer Initials | Corresponds to the initials node of party.customerperson |
| Customer Surname | Corresponds to the lastName node of party.customerperson |
| Company Name | Corresponds to the companyName node of party.customerperson |
| Customer Street Address | Corresponds to the address node of contact.location |
| Customer Suburb | Corresponds to the suburb node of contact.location |
| Customer State | Corresponds to the state node of contact.location |
| Customer Postcode | Corresponds to the postCode node of contact.location |
| Customer Phone | Corresponds to the areaCode and telephoneNumber nodes of contact.phoneNumber |
| Customer SMS | Corresponds to the areaCode and telephoneNumber nodes of the contact.phoneNumber that has Allow SMS checked. |
| Customer Email | Corresponds to the emailAddress node of contact.email. |
| Patient Identifier | Corresponds to the id node party.patientpet |
| Patient Name | Corresponds to the name node of party.patientpet |
| Patient Species | Corresponds to the species node of party.patientpet |
| Patient Breed | Corresponds to the breed node of party.patientpet |
| Patient Sex | Corresponds to the sex node of party.patientpet |
| Patient Colour | Corresponds to the colour node of party.patientpet |
| Patient Date Of Birth | Corresponds to the dateOfBirth node of party.patientpet |
| Reminder Type Identifier | Corresponds to the id node of entity.reminderType |
| Reminder Type Name | Corresponds to the name node of entity.reminderType |
| Reminder Due Date | Corresponds to the endTime node of act.patientReminder |
| Reminder Count | Corresponds to the reminderCount node of act.patientReminder |
| Reminder Last Sent Date | Corresponds to the lastSent node of act.patientReminder |
Report fields
If you are trying to use the Jaspersoft iReports tool to build a report, you will need to know the names of the names of the data source fields.
The first step is to determine the template Type, from this you can get from the table below the name of the archetype. Note that three (those in CAPS) are not archetypes - see Special Reports below.
| Template Type | Archetype |
|---|---|
| Appointment | act.customerAppointment |
| Bank Deposit | act.bankDeposit |
| Customer Account Balance | CUSTOMER_BALANCE |
| Customer Counter Sale | act.customerAccountChargesCounter |
| Customer Credit | act.customerAccountChargesCredit |
| Customer Estimation | act.customerEstimation |
| Customer Form | act.customerDocumentForm |
| Customer Invoice | act.customerAccountChargesInvoice |
| Customer Letter | act.customerDocumentLetter |
| Customer Payment | act.customerAccountPayment |
| Customer Refund | act.customerAccountRefund |
| Customer Statement | act.customerAccountOpeningBalance |
| Grouped Reminders | GROUPED_REMINDERS |
| Message | act.userMessage |
| Patient Form | act.patientDocumentForm |
| Patient Image | act.patientDocumentImage |
| Patient Letter | act.patientDocumentLetter |
| Patient Medication Label | act.patientMedication |
| Patient Visit | act.patientClinicalEvent |
| Prescription | act.patientPrescription |
| Problem | act.patientClinicalProblem |
| Reminder Report | act.patientReminder |
| Stock Adjustment | act.stockAdjust |
| Stock Transfer | act.stockTransfer |
| Supplier Credit | act.supplierAccountChargesCredit |
| Supplier Delivery | act.supplierDelivery |
| Supplier Form | act.supplierDocumentForm |
| Supplier Invoice | act.supplierAccountChargesInvoice |
| Supplier Letter | act.supplierDocumentLetter |
| Supplier Order | act.supplierOrder |
| Supplier Remittance | act.supplierAccountPayment |
| Task | act.customerTask |
| Till Balance | act.tillBalance |
| Work in Progress Charges | WORK_IN_PROGRESS_CHARGES |
You can determine the available fields to use in the report by looking at the corresponding archetypes (see Administration|Archetypes).
For example, the act.customerAppointment has the following nodes:
        <node name="id" path="/id" type="java.lang.Long" hidden="true" readOnly="true" />
        <node name="name" type="java.lang.String" path="/name" hidden="true" minCardinality="1" derived="true"
            derivedValue="'Appointment'" />
        <node name="customer" path="/participations" type="java.util.HashSet" minCardinality="1" maxCardinality="1"
            filter="participation.customer" />
        <node name="patient" path="/participations" type="java.util.HashSet" minCardinality="0" maxCardinality="1"
            filter="participation.patient" />
        <node name="appointmentType" path="/participations" type="java.util.HashSet" minCardinality="1" maxCardinality="1"
            filter="participation.appointmentType" />
        <node name="startTime" path="/activityStartTime" type="java.util.Date" minCardinality="1" />
        <node name="endTime" path="/activityEndTime" type="java.util.Date" minCardinality="1" />
Each of these nodes may be used in reports as follows:
| Node | Jasper Expression Class | Jasper Field |
|---|---|---|
| id | java.lang.Long | $F{id} |
| name | java.lang.String | $F{name} |
| customer | java.lang.String | $F{customer.entity.name} |
| patient | java.lang.String | $F{patient.entity.name} |
| appointmentType | java.lang.String | $F{appointmentType.entity.name} |
| startTime | java.util.Date | $F{startTime} |
| endTime | java.util.Date | $F{endTime} |
Where a node refers to an archetype (e.g. the customer node is a collection of participation.customer), you can use "." to drill down on the nodes of that archetype.
In the above, "customer.entity.name" means:
- retrieve the object associated with "customer.entity"; and
- return its name node
Special Reports
These are special reports that are generated by running queries that:
- derive values
- return partial objects
- return multiple objects
For CUSTOMER_BALANCE, the fields are:
|
Field |
Type |
Description |
|---|---|---|
| customer.objectReference | org.openvpms.component .business.domain.im.common .IMObjectReference | The customer reference |
| customer.name | java.lang.String | The customer name |
| balance | java.math.BigDecimal | The customer balance |
| overdueBalance | java.math.BigDecimal | The customer overdue balance |
| creditBalance | java.math.BigDecimal | The customer credit balance |
| lastPaymentDate | java.util.Date | The customer's last payment date |
| lastPaymentAmount | java.math.BigDecimal | The customer's last payment amount |
| lastInvoiceDate | java.util.Date | The customer's last invoice date |
| lastInvoiceAmount | java.math.BigDecimal | The customer's last invoice amount |
| unbilledAmount | java.math.BigDecimal | The customer's unbilled amount |
For GROUPED_REMINDERS, the fields are:
| Field | Type | Description |
|---|---|---|
| customer | party.customerperson | The reminder customer |
| patient | party.patientpet | The reminder patient |
| reminderType | entity.reminderType | The reminder type |
| product | product.* | The reminder product |
| clinician | security.user | The reminder clinician |
| startTime | java.util.Date | The reminder start date |
| endTime | java.util.Date | The reminder due date |
| reminderCount | java.lang.Integer | The reminder count |
| act | act.patientReminder | The reminder act |
For WORK_IN_PROGRESS_CHARGES, the report is supplied with Invoices, Credits and Counter charges (act.customerAccountChargesInvoice, act.customerAccountChargesCredit, and act.customerAccountChargesCounter archetypes respectively), that have an In Progress, Complete or On Hold status.
The available fields are therefore the nodes present in each of these archetypes.
Reports and Documents
If you do need to create of modify documents and reports, the following should be useful.
OpenVPMS uses two 'vehicles' to generate printed (or pdf) output: OpenOffice (specifically its 'soffice' component) and JasperReports. Note that since OpenOffice can handle Microsoft Word documents, you can happily use Word rather than Open Office Writer to prepare letters and forms.
Which of these two is used depends on the document content set for the document template. (See Administration|Templates and Create/Edit Template.) If the document content is a .jrxml file, then JasperReports is used, if it is an .odt or .doc file then OpenOffice is used.
To create and edit the .jrxml files you use JasperSoft's iReports, specifically version 3.7.6. (The use of later versions is possible but the compatibility mode option needs to be enabled.)
Note that JasperReports is used for any document that has more complex datasets such as invoices, statements, reports etc as these typically have multiple rows of data and require groupings and other data processing functions not available in OpenOffice. These are also rarely changed except during implementation.
OpenOffice is used for customer, supplier and patient documents. These are more likely to be modified and added to by the practice so a standard word processor editor is more appropriate.
The reports and forms/letters/documents get data in two ways:
-
Reports (ie things run from the Reporting|Reports menu) are all handled by JasperReports. These MUST have their Report Type set to 'Report' in their document template. The report parameters (if any) are passed as 'Parameters' and the 'datasource' is set to access the MySQL database. The report then uses SQL to extract the required information from the MySQL database. Selection criteria and other parameters are entered via a report criteria screen.
-
Forms, letters, and system documents (ie invoices etc) may be handled by either JasperReports (for the complicated ones) or OpenOffice. For these the Report Type in their document templates will always be other than 'Report', eg 'Customer Invoice', 'Patient Letter', etc. In both cases an appropriate dataset is made available - and this is determined by the Report Type. For OpenOffice (or M/S Word) this is accessed via merge fields, ie the facility that is commonly used in word processors to do mail merge. For JasperReports, the 'datasource' is set to access this dataset. In both cases the field names are the same. Note that the term 'field name' is a little misleading - as well as things that look like names such as customer.entity.name and patient.entity.species, you can use more complicated expressions like [openvpms:get(party:getPatientOwner(.),'lastName')] and [macro:eval('standardConditions')]. Expressions are always enclosed by square brackets.
The available field names are documented here; the available expressions here.
Input parameters (commonly user input to letters) are entered via a parameter input screen.
Open Office Notes
The simplest way to generate a new .odt template is to use the sample templates included in the distribution. These call out almost all the available fields and you can copy the required fields from the sample document.
Microsoft Word Notes
The simplest way to generate a new .doc template is to use the sample templates included in the distribution. These call out almost all the available fields and you can copy the required fields from the sample document.
Note that although Word supports conditional fields, these are not implemented by the Open Office component used by OpenVPMS. Hence if you need conditional fields (eg to switch between 'him' and 'her' based on the patient's sex) then you will need to use .odt templates.
iReports Notes
The following is not intended to be 'how to use iReports' but rather a set of notes that may help you when you are examining an existing report and trying to understand how it works.
Field names: For reports, when the datasource is the MySQL database, the field names are the names of the fields returned by the SQL query. Otherwise the datasource is a data collection and the field names are used the access the data collection - either via simple archetype dot notation (eg customer.entity.name), or via xpath expressions enclosed in square brackets (eg [party:getPartyFullName(.)] ). While the former feels quite normal - ie using $F{customer.entity.name} is a reasonable syntax, the latter appears peculiar - $F{[party:getPartyFullName(.)]} does not look like a normal way to access something. However, it works - what is happening is that the OpenVPMS code examines the name of the field, sees that it starts with '[' and ends with ']' and knows to interpret the contents as an xpath expression.
Sorting and Grouping: The Grouping facility assumes that the records are appropriately sorted. That is, if you use grouping to organise the output by patient/date/product type then the data must be sorted in this order - defining the groups does not do the sorting for you. For SQL based reports, you do the sorting in the SQL query. Otherwise you can do it either in the datasource specification (see below) or using the inbuilt facility - this is accessed via the Report Query icon  on the Designer view, and then pressing the 'Sort Options...' button.
Note that using the inbuilt sort, you can sort using fields that are xpath expressions, whereas in the datasource specification (see below) you can only sort by node names. [For the inbuilt sort, you should also be able to sort using variables, but in version 3.7.6 there are bugs in this facility.]
Sub-reports: [Note that although JasperReports support sub-reports anywhere in the report, the OpenVPMS implementation only supports sub-reports in either the Detail or Summary bands.] When using sub-reports you must specify the datasource for the sub-report in the main report. If the main report is using the MySQL database as the datasource, then the datasource part of the sub-report field in the main report will be set like the following:

However, if the main report is not using MySQL as the datasource (ie this is the sub-report for Customer Invoices or Customer Statements) then the datasource part of the sub-report field in the main report will be set like the following:

The datasource expression can also have a second argument as follows:
$P{dataSource}.getDataSource("items", new String[]{"target.patient.entity.name", "target.startTime"})Here, the first argument "items" specifies the node in the report's data source (eg act.customerAccountChargesInvoice for an invoice), and hence this accesses the invoice's items. The strings in the second argument specify the names of the nodes to sort the data by. Note that these must be node names, they cannot be xpath expressions.
Now the 'items' node of the act.customerAccountChargesInvoice archetype is a collection of actRelationship.customerAccountInvoiceItem archetypes, and in these the node named 'target' is the collection of act.customerAccountInvoiceItem archetypes which are the invoice line items.
Hence in the sub-report, the field names are target.xxx where xxx is the node within the act.customerAccountInvoiceItem archetype.
Email Letterhead Support
If reports and documents are set up to be printed on letterhead paper, then if they are emailed rather than printed, one needs a facility to insert the letterhead when the item is being emailed but not if it is being printed.
This is achieved through the IsEmail property which is supported for OpenOffice and JasperReports templates.
To use it in OpenOffice templates:
- Create a new field by going Insert -> Fields -> Other -> User Field
- In Name, enter "IsEmail" (without quotes)
- In Value, enter "unset" (without quotes)
- Click on the green tick
- Create a section to display when printing by going Insert ->Section
- Name it "Print Letterhead"
- Tick the Hide box
- Enter: IsEmail == "true" in the With Condition box
- Click OK
- Repeat 5-9 for a section named "Email Letterhead" but enter IsEmail == "false" in the With Condition Box.
The "cartrophen first reminder.odt" and "desex first reminder.odt" templates in the release distribution demonstrate this.
To use it in JasperReports templates:
- Add a Boolean parameter, IsEmail
- For elements that should only be displayed when emailing, set their "Print When Expression" expression to: $P{IsEmail}.equals(Boolean.TRUE)
- For elements that should only be displayed when printing/previwing, set their "Print When Expression" expression to: $P{IsEmail}.equals(Boolean.FALSE)
Any of the JasperReports in the release distribution illustrate this.
Setup
This section contains topic relevant to setting up the system.
Note that if you do edit Administration|Organisation items (say to change an email address), then the new values will not become available until the next time you log on (because these organisation settings are fetched once at logon time to improve performance).
To get email to work you need to do the following:
For each Practice Location, define the various email related parameters (ie Mail Host, Port, Username, Password, and Connection Security). You need to do this for each Location even if the settings are the same for each.
Then define the Email contact, and if appropriate, add different ones for each applicable purpose (eg Billing, Correspondence, Reminder). Note that you can set the Email contacts at either the Practice or Location level. If you set them at the Location level, these will be used in preference to the those set at the Practice level.
If you are having problems, you can enable debugging by editing the mailSender bean in :
$TOMCAT_HOME/webapps/openvpms/WEB-INF/openvpms-web-app.xml
Change
<bean id="mailSender" class="org.openvpms.web.component.service.MailService" scope="prototype"/>
to
<bean id="mailSender" class="org.openvpms.web.component.service.MailService" scope="prototype">
    <property name="javaMailProperties">
       <props>
           <prop key="mail.smtps.debug">true</prop>
       </props>
    </property>
</bean>
You can then look in the log at $TOMCAT_HOME/openvpms.log for the debug output.
Multiple systems
You may want to run multiple OpenVPMS systems hosted in the one server, either for test and production systems, or in cases where multiple practices share the same server.
Note that if you are running multiple systems, it is important that you do not get confused about which system you are using. You can use a different screen colour for each system (see here for how to do this). You should also use different user login names and passwords (so as to prevent an unthinking person signing in to the wrong system). You should also set different database user names and passwords for each system.
One way to run multiple systems is of course to run each in its own virtual machine with these hosted on the one piece of hardware.
However, you can also host multiple systems on the one server. (Note however that if you use the ESCI facility, then you cannot host multiple systems on the one server.) The way to set this up is as follows:
1. install the first system as per the instructions in the readme.txt file.
2. for the next OpenVPMS system, install the OpenVPMS software in its own folder/directory, now referred to as <OPENVPMS_HOME_X>
3. the database access is defined in the file <OPENVPMS_HOME_X>/conf/hibernate.properties, specifically the three lines
hibernate.connection.url=jdbc:mysql://localhost:3306/openvpms
hibernate.connection.username=openvpms
hibernate.connection.password=openvpms
Hence for this OpenVPMS system we need to change the database name in the first line from openvpms to say openvpmsX. The user name and password should be changed to say openvpmsU and openvpmsP to decrease the likelihood of you getting confused and doing database operations on the wrong database.
To create the database, we need to edit the file <OPENVPMS_HOME_X>/db/create.sql so it reads as follows:
#
# Script to create the openvpmsX database, and add a single user 'openvpms',
# with all privileges
#

CREATE DATABASE `openvpmsX` /*!40100 DEFAULT CHARACTER SET utf8 */;

GRANT ALL PRIVILEGES ON openvpmsX.* TO 'openvpmsU'@'localhost'
    IDENTIFIED BY 'openvpmsP' WITH GRANT OPTION;

GRANT ALL PRIVILEGES ON openvpmsX.* TO 'openvpmsU'@'%'
    IDENTIFIED BY 'openvpmsP' WITH GRANT OPTION;

COMMIT;
where "openvmsX" is the name of the new database, "openvpmsU" the user name, and "openvpmsP" the password. You can now create the database as per the readme.txt, ie do
> cd <OPENVPMS_HOME_X>/db
> mysql -u admin -p < createdb.sql
You can now populate the database as per the readme.txt steps, or you can simply dump the contents of the base openvpms database, and then restore this into the new openvpmsX database.
4. Finally we need to set up the Tomcat application. The easiest way to do this is to first copy the <TOMCAT_HOME>/webapps/openvpms directory to <TOMCAT_HOME>/webapps/openvpmsX. You then need to edit two files as follows:
a) in <TOMCAT_HOME>/webapps/openvpmsX/WEB-INF/web.xml, the webAppRootKey value needs to be set to "openvpmsX" as per the following
    <!-- Needed by spring if you want to deploy app more than once as different name. Change value
      -  to something unique -->
    <context-param>
        <param-name>webAppRootKey</param-name>
        <param-value>openvpmsX</param-value>
    </context-param>
b) edit <TOMCAT_HOME>/webapps/openvpmsX/WEB-INF/classes/hibernate.properties so it matches <OPENVPMS_HOME_X>/conf/hibernate.properties - see step 3 above.
Now restart Tomcat and you can then access the new system at http://localhost:8080/openvpmsX/app
5. Repeat steps 2-4 for each addition system that you require.
Propercasing
Warning - this requires appropriate technical skills.
There are two ways of adjusting the propercasing facility: modifying the appropriate archetype to turn it off for a specific field; and editing the properties file. For the first, modify the appropriate node in the archetype to remove the propercase Assertion Descriptor. For the second, proceed as follows.
If you want to adjust how propercasing is performed on various words, you need to edit (after saving a copy) the file propercase.properties in the folder <TOMCAT HOME>\webapps\openvpms\WEB-INF\classes\localisation
Each line of the file has the format <keyword>.N = <string> where <keyword> is one of the keywords shown in the table below, N is a digit or digits, and <string> is the propercase version the string.
| Keyword | Meaning | Examples |
|---|---|---|
| space | Strings that must appear surround by spaces. | space.1 = & |
| spaceBefore | Strings that must appear with a space before them. | spaceBefore.1 = ( |
| spaceAfter | Strings that must appear with a space after them. | spaceAfter.1 = ) spaceAfter.2 = . |
| exceptions | Strings that are to be cased as given ignoring other case rules. |
exceptions.1 = von |
| startsWith | Strings that must appear with the specified case at the start of a word. Where they appear, they force capitalisation of the next character in the word. | startsWith.1 = Mac startsWith.2 = Mc startsWith.3 = d' startsWith.4 = ( startsWith.5 = ` startsWith.6 = " |
| contains | Strings that must appear with the specified case anywhere in a word. Where they appear, they force capitalisation of the next character in the word. | contains.1 = - contains.2 = ' contains.3 = 0 contains.4 = 1 contains.5 = 2 contains.6 = 3 etc for each digit |
| endsWith | Strings that must appear with the specified case at the end of a word. | endsWith.1 = 's |
Hence the "startsWith.1 = Mac" would force Macaw to MacAw but for the "exceptions.153 = Macaw".
Note that you can functionally 'comment out' an entry by adding a leading # (or any other character) because this changes the key from say 'startsWith' to '#startsWith' which will not be recognised and will be ignored.
SMS
To get SMS to work, you first need to have email working. Having done that you can proceed with the SMS setup discussed below.
Two email-to-SMS gateways are supported out of the box:
- SMSGlobal Email2SMS gateway (http://www.smsglobal.com )
To sign up, go to: http://www.smsglobal.com/en-au/solutions/signup_page.php
SMSGlobal allows you to send a small number of test messages for free after you register.
Now use Administration|Organisation|SMS Configuration: SMSGlobal Email2SMS
- Clickatell mail-to-SMS gateway (http://www.clickatell.com )
Clickatell allows you to send a small number of test messages for free after you register but sends a preformatted SMS until you pay.
To sign up:
- go to: http://www.clickatell.com/register/account_signup.php
- select the "Developers Central" product
After signing up, logon and click the 'Manage My Products' tab. Then click 'SMTP [Email to SMS]' link the click "Submit and Get API ID". The API ID is needed when configuring OpenVPMS.
Now use Administration|Organisation|SMS Configuration: Clickatell SMTP Connection
If you want to use another provider, then you should be able to do so using the Generic Gateway. You will need some knowledge of the gateway message format requirements and xpath expressions.
See Administration|Organisation|SMS Configuration: Generic Email Gateway
The SMSGlobal and Clickatell configuration screens hide the underlying detail, and indeed it is possible to configure an SMSGlobal or Clickatell gateway using the Generic configuration screens. Similarly, it is possible to create a tailored screen for another vendor. If you want to do this see here.
Having configured the sms gateway, you now need to set the practice to use the required gateway by using Administration|Organisation|Practice. Remember that you also need to set up email for the practice locations. Thus the SMS gateway is set at the practice level, but email is set at the location level.
Times, Dates and Language
This page discusses the problems of localisation.
Time
The time in OpenVPMS is set from the time in the 'server' machine - ie the one running the MySQL database and Tomcat application. If the user and the server are all in the same timezone, then there is no problem.
However, if you are using a hosting service somewhere else, then it may be necessary to set the server time to match the local time where your users are. [For example the OpenVPMS demo system runs on a server with its time set to GMT. If you log onto this from say Sydney, then early in the day you will find that 'today' on the server (and thus the default date on invoices you create) will be yesterday your time because GMT is 10 hours behind AEST.]
If you have users spread across multiple timezones, then you will need to educate those in the 'non-home' time zones that theirs will be different. Thus if you have a practice spread across the NSW/Queensland border but with headquarters in NSW, in summer your Surfers Paradise branch will be running an hour behind. In this case you probably want to run the appointment schedule for the Surfers branch on local time, but the timestamps on any activity will be NSW, not Queensland time.
Date Format
The date format used is set in the <TOMCAT_HOME>/webapps/openvpms/WEB-INF/classes/org/openvpms/web/resource/localisation/messages.properties file (or the local version - see Language below).
Specifically, if you need to use say a US date format, then you need to adjust the settings in this file. Note that as well as the date formats, you can also adjust the numeric formats if needed.
Language
OpenVPMS uses standard java i18n support so if you name your message properties file according to your locale settings, eg messages_fr.properties for France, then it will be used instead of the standard messages.properties.
Note that you can do minor language tweaks by editing the message.properties file. For example if you think that Organisation should really be Organization then you can change it here. [Though it would be better to create a message.properties-us file which includes both the spelling adjustments and the mm/dd/yy date formats.]
Style - Colours
For most things you can change the display colour via the appropriate Administration screen - for example Users to set the clinician colour on the scheduling and work list screens. However, for three things you have to change files in the styles directory.
The files default.stylesheet and default.properties, are located in the <TOMCAT_HOME>/webapps/openvpms/WEB-INF/classes/style folder. It is sensible to make a backup copy of these files before editing them. Having saved the file(s) you will need to restart Tomcat to get the changes to have effect.
Note that it may be better to use the site over-ride facility - see Style - Site.
The colours are set as Hex codes - see the colour block at the bottom of this page.
Appointment/Task Status
You can change the colours used to highlight the status of appointments on the scheduling screen and tasks on the work list screen.
In the default.stylesheet file look for lines containing ScheduleTable.xxx where xxx is PENDING, CHECKED_IN, IN_PROGRESS, etc. You will find in the following block a line like <property name="background" value="#ffffff"/>. Change the value as required.
Screen Colours
If you want to change the standard OpenVPMS green background on the screens to another colour, in the file default.properties, look for the line containing theme.colour = '#339933'. Change the 339933 to the get the required colour. In the same part of the file, you will also find the title, button and selection colours as well as the colours used for the various medical history items.
Reminder Status
You can change the standard green/orange/red settings for the reminder not due/due/overdue status.
In the file default.properties, look for the line containing reminder.notdue.colour. This and the due and overdue lines set the colours. Change as required - but note that this will not change the colour of the red bell icon used to warn of an overdue reminder.
History Colours
If you want to change the colours of items on the Medical Records screen, in the file default.properties, look for the line containing "# Patient history colours" - the following lines set the colours for the different items.
Sample Colours
The sample block below shows the hex codes of the set of 'web-safe' colours. You will find 'OpenVPMS Green' in the second column, 10 down. See also this forum post for a tool to compare colours.

Style - Column Widths
[1.7.1] You can adjust the size of some column widths to suit local usage by making changes in the default.properties file. This is located in the <TOMCAT_HOME>/webapps/openvpms/WEB-INF/classes/style folder. It is sensible to make a backup copy of the file before editing it. Having saved the file you will need to restart Tomcat to get the changes to have effect.
Medical Records: Clinician Width
You can change the size of the Clinician field (shown if you set the 'Show Clinician in History Items' option for the Practice). You may want to either increase this to show long names, or decrease it if you use just initials.
The width is controlled by the history.clinician.width setting.
Selector Field Width
You can change the size of the 'selector' fields - ie those with the binocular icon following them. You may want to do this if you find that the standard size is often too narrow to show all the data.
The width is controlled by the selector.width setting.
Style - Labels
The default for label alignment is left so that things look as follows:

However, you can change this to right so that the above becomes:

To change the label alignment you need to edit default.properties, located in <TOMCAT_HOME>/webapps/openvpms/WEB-INF/classes/style/default.properties- and having edited it (after first taking a backup copy) you need to restart Tomcat to get the changes to have effect.
Go to the section on Label alignment. i.e.:
 #
# Label alignment.
# This specifies the horizontal label alignment when:
# . editing and viewing objects
# . inputting report parameters
# Possible values are 'left' and 'right'
label.align = 'left'
and change 'left' to 'right'.
Note that it may be better to use the site over-ride facility - see Style - Site.
Style - Site
Instead of customising default.stylesheet and default.properties located in the <TOMCAT_HOME>/webapps/openvpms/WEB-INF/classes/style directory, you can place these changes into files named site.stylesheet and site.properties in the same directory, and they will override the default values. For site.stylesheet, enclose all styles in a root <stylesheet> element. For example:
 <stylesheet>
    <style name="SomeLayout" type="nextapp.echo2.app.SplitPane">
        <properties>
            <property name="resizable" value="false"/>
            <property name="separatorPosition" value="${SomeLayout.separatorPosition}"/>
            <property name="separatorHeight" value="0px"/>
        </properties>
    </style>
    <style name="SomeOtherLayout" type="nextapp.echo2.app.SplitPane">
        <properties>
    </style>
</stylesheet>
However, it is important to understand how the facility works. There are two problems:
1. styles cannot refer to styles defined in different stylesheets
So you can't have a base-name attribute in site.stylesheet that refers to a style defined in default.stylsheet. You need to either:
- incorporate the original style in the custom style
- copy the original style to site.stylesheet
2. styles that have the same name must all be copied
If a style name appears for different classes (e.g. "default" for nextapp.echo2.app.Label, and nextapp.echo2.app.WindowPane), and you want to customise the Label version, you have to copy all other occurences of "default" as well. This is due to a bug/feature in the echo2 framework, that replaces all instances of a style when merging stylesheets.
Tuning
This section covers areas that affect the performance of the system. It is anticipated that more topics will be added here in the future.
Medical Records Retrieval
The standard system can perform slowly when retrieving medical records for a patient with a long history. The apparent performance can be improved by limiting the number of visits retrieved for each query of the medical history. The standard system retrieves the complete medical history and then pages it out 20 visits at a time.
One can change this behaviour by limiting the number of visits on each query. If this is set to a number less than 20, then each 'page' of the medical history will display just that number of visits, and as you page through the history, a new query will be issued to get the next block of visits.
To limit the number of visits retrieved on each query to say 5, create a file called QueryFactory.properties containing one record as follows:
act.patientClinicalEvent org.openvpms.web.workspace.patient.history.PatientHistoryQuery,maxResults=5 This file needs to be placed in the folder <TOMCAT_HOME>/webapps/openvpms/WEB_INF/classes
Hardware Selection
As always, the general advice is to buy the fastest you can afford. Adding more memory will improve performance provided that MySQL is configured with large buffers. In fact, given a 64-bit operating system, there is no reason that the database cannot be held fully in memory.
MySQL
MySQL configuration is a black art. Parameters important for performance are:
innodb_buffer_pool_size - set as large as possible
query_cache_size - say 50MB
query_cache_type - ON
query_cache_limit - say 2MB
XPath Functions
OpenVPMS supports the XPath 1.0 functions and operators to perform expression evaluation within archetypes, macros, and reports.
By far the most commonly function is concat, used to concatenate strings. Hence concat('ab','34','ef') yields 'ab34ef'.
However, others are used. One terrifyingly complex example is that used to generate the customer's name. It is as follows:
concat(/details/companyName,substring(concat(/details/lastName,',',/details/firstName),0,number(not(/details/companyName))*string-length(concat(/details/lastName,',',/details/firstName))+1)) This returns the companyName if there is one, else lastName,firstName. It relies on the concatenation of two mutually exclusive strings, the first one being empty if the condition is false, the second one being empty if the condition is true. This is called "Becker's method", attributed to Oliver Becker.
In the above you can see the functions concat, substring, number, not, string-length, and the operators * and + being used.
The table below shows the available functions. (Others are defined but are not relevant to our use.)
| boolean(e) | Converts object e to Boolean type. False values include numeric zero, empty strings, and empty node sets; other values are considered true. |
| ceiling(e) | Returns the integer closest to infinity that is less than or equal to e. Examples: ceiling(5.9) returns 6; ceiling(-5.9) returns -5. |
| concat(e1, e2, ...) | Concatenates the string values of its arguments and returns the result as a single string. |
| contains(s1, s2) | True if string s1 contains s2. |
| false() | Returns the Boolean “false” value. |
| floor(e) | Returns the integer closest to minus infinity that is greater than or equal to e. Examples: floor(5.9) returns 5; floor(-5.9) returns -6. |
| normalize-space(s) | Returns the string s, except that all leading and trailing whitespace are removed, and all internal clumps of whitespace are replaced by single spaces. Note that a newline character counts as a whitespace character. |
| not(e) | Returns the Boolean complement of the truth value of expression e: true if e is false, false if it is true. |
| number(e) | Converts an expression e to a number. If e is not a valid number, you get the special numeric value NaN (not a number). If e is a Boolean value, you get 1 for true and 0 for false. |
| round(e) | Returns the integer closest to the value of expression e. Values with a fractional part of 0.5 are rounded towards infinity. Examples: round(5.1) returns 5; round(5.5) returns 6; and round(-5.5) returns -5. |
| starts-with(s1, s2) | True if string s1 starts with string s2. |
| string(e) | Converts e to a string. |
| string-length(s) | Returns the length of string s. |
| substring(s, n1, n2) | Returns a substring of s starting at position n1 (counting from 1), and ending n2 characters later, or at the end of the string, whichever comes first. You can omit the third argument, and it will return the substring starting at position n1 and going through the end of s. For example, "substring('abcdefgh', 3, 4)" returns "cdef". |
| substring-after(s1, s2) | If s2 is a substring of s1, returns the part of s1 after the first occurrence of s2; otherwise it returns the empty string. |
| substring-before(s1, s2) | If s2 is a substring of s1, returns the part of s1 before the first occurrence of s2; otherwise it returns the empty string. |
| translate(s1, s2, s3) |
The result is a copy of string s1 with each occurrence of a character from string s2 replaced with the corresponding character from string s3. If s3 is shorter than s2, this function will delete from its result any characters from s2 that don't correspond to characters in s3 eg translate(s1, '
', '') will strip any newline charcters from s1 and translate(s1, '
', ' ') will translate any newline charcters to spaces |
| true() | Returns the Boolean “true” value. |
Below are the operators used in XPath expressions. In the table below, e stands for any XPath expression.
| e1+e2 | If e1and e2are numbers, their sum. |
| e1-e2 | e1minus e2. |
| e1*e2 | The product of e1and e2. |
| e1 div e2 | If e1and e2are numbers, their quotient as a floating-point value. |
| e1 mod e2 | The floating-point remainder of e1divided by e2. |
| e1 = e2 | Tests to see if e1equals e2. |
| e1 < e2 | Tests to see if e1is less than e2. You can't say e1< e2inside an attribute: the less-than sign must be escaped as "<". |
| e1 <= e2 | Tests to see if e1is less than or equal to e2. |
| e1 > e2 | Tests for greater-than. |
| e1 >= e2 | Tests for greater or equal. |
| e1 != e2 | Tests for inequality. |
| e1 and e2 | True if both e1and e2are true. If e1is false, e2is not evaluated. |
| e1 or e2 | True if either e1or e2is true. If e1is true, e2is not evaluated. |
| /e | Evaluate estarting at the document node. For example, "/barge"selects the <barge>element that is the child of the document node. |
| e1/e2 | The /operator separates levels in a tree. For example, "/barge/load"selects all <load>children of the <barge>element child of the document node. |
| //e | Abbreviation for descendant-or-self::e. |
| ./e | Abbreviation for self::e. |
| ../e | Abbreviation for parent::e. |
| @e | Abbreviation for attribute::e. |
| e1|e2 | Selects the union of nodes that match e1and those that match e2. |
| * | A wild-card operator; matches all nodes of the proper type for the context. For example, "*"selects all child elements of the context node, and "feet/@*"selects all attributes of the context node's <feet>children. |
| e1[e2] | Square brackets enclose a predicate, which specifies an expression e2that selects nodes from a larger set e1.For example, in the XPath expression "para[@class='note']", the paraselects all <para>children of the context node, and then the predicate selects only the children that have an attribute class="note". Another example: "item[1]"would select the first <item>child of the context node. |
| $e | The dollar sign indicates that the following name is a variable name. For example, in an XSLT script, if variable n is set to 357, <xsl:value-of select="$n"/>is expanded to the string "357". |
New in 1.7
Prescriptions
This is the first release to support Prescriptions.
Prescriptions can be created and dispensed from within Patient|Medical Records and the Visit Editor.
Estimates
Estimates can now be created and managed from the Visit Editor.
Products
Price Export/Import
Product prices may now be exported to CSV files, and imported.
This enables practices to apply complex pricing strategies in Excel or OpenOffice, and import the changes to OpenVPMS.
Check-In Workflow
The Check-In workflow has had the following enhancements made:
- multiple patient forms and letters may now be printed. Previously, only a single patient form could be selected
- patient letters may prompt for parameters
- the patient forms and letters presented may be restricted to the Schedule or Work List
- prompting for patient forms and letters may be disabled
- prompting for patient weight may be disabled. This could be used for house-call schedules where there is typically no weighing facility
- available Work Lists may now be limited to the Schedule
For more information see the relevant administration sections:
Orders
Automatic Order Generation
Support has been added to generate orders for stock:
- below ideal levels
- at or below critical levels
Tills
Till Balancing
An optional two-step process has been added to clear Tills, to support practices that need to clear tills without interrupting collection of payments.
The Start Clear button on the Reporting|Till Balancing screen puts the selected Till Balance in a Clear In Progress state, so that new payments and refunds don't impact it while it is in the process of being balanced. Once it has been balanced, it may be cleared using the Clear button.
Reminders
Reminders requiring mailing can now be exported to a CSV file during reminder processing using Reporting|Reminders.
When sending emails, a list of possible 'To' addresses are displayed. These now include the relationship type of the email address, e.g. Customer, Referring Vet etc.
If a referring vet is listed, then any vet practice address associated with that vet will also be displayed.
Reporting
Extension Functions
Extension functions have been developed to support:
- querying patient medication. This can be useful for reporting on patient vaccinations
- BSA calculations. The functions are:
party:getWeight(patient)
party:getWeight(act)
party:getWeight(patient, units)
party:getWeight(act, units)
math:pow(value, exponent)
math:round(value, n)
These can be used to define macros like:
- expr:if($patient.species='Feline', math:round(0.001 * math:pow(party:getWeight($patient, "GRAMS"), 2 div 3), 2), 'Patient is not a cat')
- expr:if($patient.species='Canine', math:round(0.00101 * math:pow(party:getWeight($patient, "GRAMS"), 2 div 3), 2), 'Patient is not a dog')
See Party Functions and Math Functions for more details
Macros
Report Macros
Macros may now run reports. This can be used to accelerate entry of text in any text field by running a report. E.g. it can be used to generate email text and patient notes.
Macro Variables
Macros within the GUI can now use variables that refer to the current selections. E.g. the $customer variable refers to the selected customer, and $patient, the selected patient.
User Interface Enhancements
Context-Sensitve Help
Help for each screen can now be accessed by pressing Alt-F1.
In addition to the per-screen documentation, there is an Introduction, Concepts and Glossary, and Reference section.
Many thanks to Tim Gething for his enormous efforts putting this together.
Active Search Filter
Searches may now find active, inactive, or both active and inactive results, using the Active search filter.
This replaces the Include Deactived checkbox. The filter is a dropdown list, with the options:
- Yes - only include active results. This is the default
- No - only include inactive results
- Both - include both active and inactive results
If Both is selected, the results will include an "Active" column indicating if a result is active/inactive.
Cursor Position after Macro Expansion
When macros are expanded, the cursor will now move to the end of the expanded text. Previously, it would move to the end of the document.
NOTE: this functionality is not supported in Internet Explorer.
View/Edit Selection
When switching from viewing to editing an object, an attempt will be made to pre-select the field being viewed. E.g. if a customer phone contact was selected, this will be displayed when the customer is edited.
Show Clinician in History Items
A new Practice option, Show Clinician in History Items, may now be selected to add a clinician column in Patients|Medical Records. This displays the clinician associated with each patient history item. By default, it is unselected.
Patient Clinical Notes
The Notes field of Patient Clinical Notes has been increased to fill the available window width.
See the help documentation for a screenshot.
Letter Parameters
Letter parameter entry was previously limited to 5000 characters. This is no longer restricted.
Auto Logout
User sessions may now be configured to automatically logout if they are inactive for a certain amount of time.
See the Practice Configuration for instructions on its configuration.
Estimates
The layout of Estimates has changed so that:
- the Low Total and High Total now appear on the same line
- the Notes field is larger
See the help documentation for a screenshot.
Label Alignment
Field label alignment can now be changed so that labels are left or right justified.
New in 1.7.1
The full list of changes can be found here. The majority are bug fixes. Notable changes are listed below.
Products
Services - Selling Units
A Selling Units field has been added to service products so as to provide a quantity description for services. See here.
Product Export/Import Max Discount
Product Export and Product Import now support the price Max Discount field.
Stock Transfer and Stock Adjustment reason
Stock Transfer and Stock Adjustment transactions now include an optional reason field.
Stock Adjustment Quantity field renamed
When performing Stock Adjustments, the Quantity field has been renamed to Adjust Quantity By, to better indicate what it does.
Medical Records
Screen Appearance
- All the different type of items in the Medical Records screen can now have different colours. See here for how to modify them.
- You can now change the widths of some fields. See here.
- The quantity is now displayed after the label, to improve readability
SMS
Clickatell SMS Sender ID
The Sender ID can now be specified when sending SMSes via the Clickatell SMS service.
Users with an existing SMS Configuration: Clickatell SMTP Connection must create a new one in order to use this feature.
The Sender ID must be approved by Clickatell before if will be accepted.
International mobile numbers
Mobile numbers prefixed with the '+' may now receive SMS messages.
Troubleshooting
This page documents issues that may be encountered using OpenVPMS.
Failed to save <object>. It may have been changed by another user
This error occurs when two users edit the same object at the same time. When the second user saves their changes, OpenVPMS rejects them, to avoid the first user's changes being lost.
Failed to create document
This error typically indicates an issue connecting to the OpenOffice service.
On Windows, try terminating the soffice.bin and soffice.exe processes.
On Unix, try terminating the soffice.bin and soffice processes.
Failed to start OpenOffice service: Cannot run program "soffice.exe"
This error occurs when OpenOffice cannot be found in the path. The OpenOffice program directory must be in the PATH environment variable of the user that launches Tomcat.
See the Windows Installation for instructions on how to configure this for Windows.
Synchronisation errors
The message 'A synchronization error has occurred. Click "Ok" to re-synchronize.' will be displayed if you manage to open two OpenVPMS sessions with the same app number. ie normally the URL will be http://localhost:8080/openvpme/app/1
If you click the "Open new browser window" icon at the top right of the screen, this will create a new window with a unique URL, eg http://localhost:8080/openvpms/app/2 and this will work happily. However, if you open a second browser window or tab with same URL, then the synchronization error will occur.
Note that you can also get a synchronisation error if you have multiple windows open and you log out and in before all windows have expired. Fior example if you do the following:
- log in to window 1: URL = http://localhost:8080/openvpms/app/1
- open new window 2: URL = http://localhost:8080/openvpms/app/2
- log out of window 2
- log in to window 2: URL = http://localhost:8080/openvpms/app/1
- switch to window 1, and click something. You should get a synchronization error, if the window hasn't expired with a "Your session has been inactive for too long" message.
If you do get the error, just close one of the duplicate windows.