Stock Management
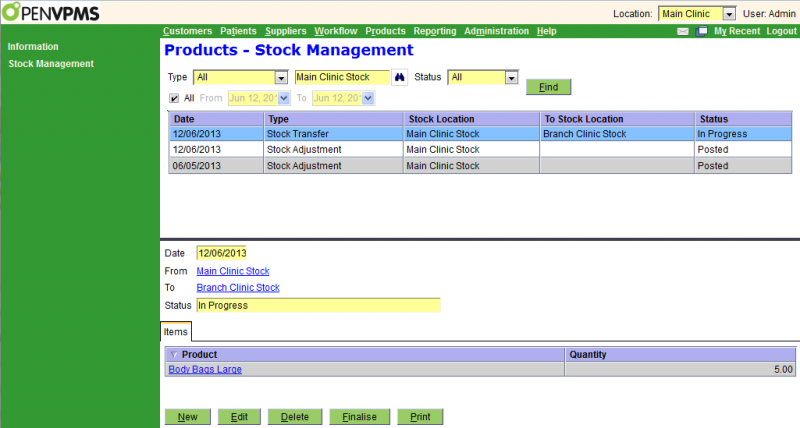
The Stock Management screen enables you to search for and display stock management transations, ie stock adjustments (where you are increasing or decreasing the stock of one or more items in a given stock location) and stock transfers (where you are transferring quantities of one or more items from one stock location to another).
A typical screen is as follows:

The top half of the screen is a standard select screen. The bottom half shows the details of the selected transaction. If you need clarification of the field contents, see Stock Adjustment and Stock Transfer
Buttons: For an 'In Progress' transaction the available buttons are shown above. For a 'Posted' transaction, only the New and Print buttons are shown (because one cannot Edit, Delete or Finalise a posted tranaction).
The Finalise button applies the stock changes and sets the status to 'Posted'.
Note that there are no reversal transactions to correct incorrect transfers and adjustments. To reverse a transfer you just use another transfer with the To and From locations swapped. To reverse an adjustment, you just use another adjustment with negative quantities.
Stock Adjustment Create/Edit
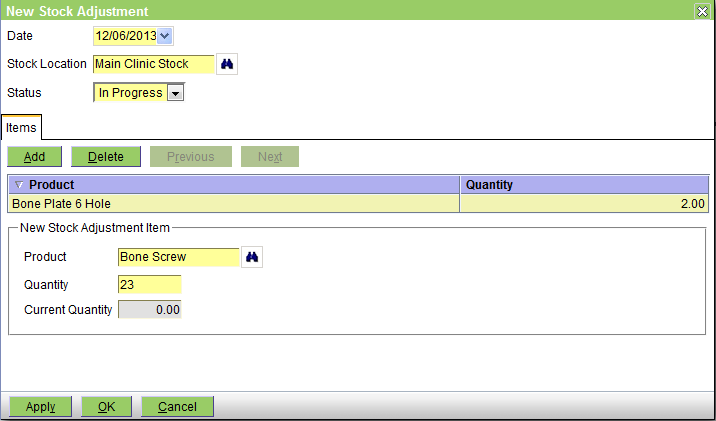
This is the screen used to create or edit a Stock Adjustment transaction.

The fields are:
Date - the date of the adjustment
Stock Location - the stock location at which the adjustment is to be done
[1.7.1] Reason - the reason for the adjustment. [This was added in 1.7.1 and hence is not shown in the above screen shot.]
Status - this can be 'In Progress' or 'Posted'. It will be 'In Progress' initially, and will change to 'Posted' when the adjustment is Finalised.
Items tab - this shows the line items in the adjustment, and the details of the selected item. The details fields are:
Product - the name of the product
Quantity - the amount by which the quantity is to be adjusted. This number can be negative to reduce the stock or positive to increase it. It is NOT the new stock in-hand (which will be the Current Quantity + Quantity entered when the transaction is finalised).
[1.7.1] This has been renamed to Adjust Quantity By, to better reflect what it does.
Current Quantity - this shows the current quantity
Stock Transfer Create/Edit
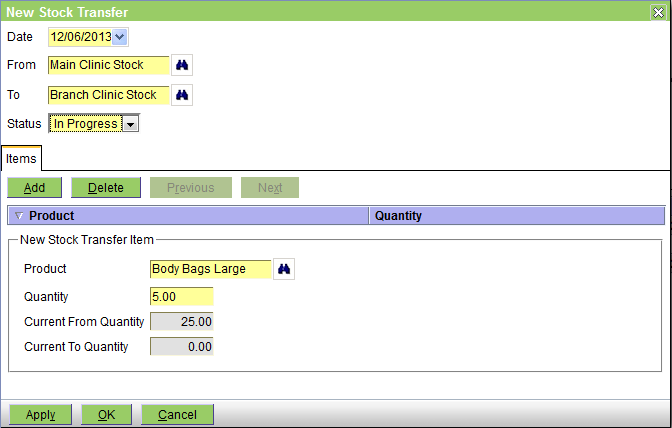
This is the screen used to create or edit a Stock Transfer transaction.

The fields are:
Date - the date of the transfer
From - the stock location from which stock is to be transferred
To - the stock location to which stock is to be transferred
[1.7.1] Reason - the reason for the transfer. [This was added in 1.7.1 and hence is not shown in the above screen shot.]
Status - this can be 'In Progress' or 'Posted'. It will be 'In Progress' initially, and will change to 'Posted' when the adjustment is Finalised.
Items tab - this shows the line items in the adjustment, and the details of the selected item. The details fields are:
Product - the name of the product
Quantity - the quantity to be transferred. It must be greater than or equal to 1.
Current From Quantity - this shows the current quantity in the From location
Current To Quantity - this shows the current quantity in the To location
Confirm Delete
When you press the Delete button on the Products|Stock Management screen, a confirmation window will appear. Press OK to confirm or Cancel to abort.
Confirm Finalise
When you press the Finalise button on the Products|Stock Management screen, a confirmation window will appear. Press OK to confirm or Cancel to abort.
Confirm New
This is the New Stock Management Act confirmation window. Select the type of act to be created and then use OK to continue or Cancel to abort. Note that if you have selected an act on the Stock Management screen, then this will already be selected in this window - thus you can normally simply click OK to proceed.