1.5 User Handbook Contents
This document is intended to provide basic user instructions to an average user. This includes mastery over all the basic functions in the system from the persective of a nurse, doctor, or business user.
This document does not cover administration, or implementation. Please see other resources for information on those topics.
The pages below are organized into chapters. Please feel free to comment, correct, edit, append, or anything else you can think of to improve this document!
System Overview
OpenVPMS is built on Web technologies. That is, it uses the very same technologies that power many popular websites. This has several advantages:
- Continued support of these tools due to the broad reach they have gained in the industry.
- Accessibility through standardized means -- the web browser.
- Scalability and robustness.
- Availability of documentation, libraries, and 3rd party support.
- Centralization for upgradability, data management, etc...
There are some disadvantages to web based technologies as well:
- The web is "stateless".
- Graphics are more difficult.
If you're not sure what that all means, don't worry about it. The trade-off is a good one.
In order to get started with OpenVPMS, it's useful to bear this in mind. Sometimes the user might think all the work being done is on the computer right in front of them. It's not the case here. All the work happens on a single server machine.
The intent of this book is not to describe, in gory detail, all the technologies behind OpenVPMS, but instead, to give the every day user a good guide in the usage of the system.
 Takeaway: All work done on the system is through a web browser.
Navigation
This part of the handbook is to help you get oriented within the system. It also offers information about the various modes of usage that you might encounter.
Navigation and Layout
Layout
Let's get oriented. The basic user interface for OpenVPMS looks like this:

There's a lot going on here. Let's step through each element.
Main Menu / Sections
In this top area, you'll be able to see all the primary sections of the system. You may not see all of them. Each of these sections houses a different type of functionality of the system. Here's brief list of what each section contains. (Note: This list is not remotely exhaustive!)
- Customers: Billing, account information, basic contact information, etc.
- Patients: Basic patient information, medical records, reminders, etc.
- Supplier: Suppliers and their contact information
- Workflow: Scheduling, task lists, messaging, investigations
- Products: The full product catalog, and configuration
- Reporting: Till balancing, financial reports, patient reports, reminder printing
- Administration: System setup
- Help: Help
You'll come to understand what is in each of these through usage of the system. You're encouraged to click through each one, and explore what information you can find in that section.
Submenus
Each section has its own list of subsections. These are different in each section you go to. We won't enumerate all of them here, but will discuss elements in each of these submenus throughout the rest of the handbook.
Tip: You can always tell where you are (main and submenu) by looking at the blue lettering at the top of the page. It's labeled "Current Selection" in the screenshot above.
Current Customer
To the left of the screen, the current customer and patient information is displayed. The most useful information about customers and patients is displayed here. This is to accelerate your workflow. It's not convenient to have to dig deeper into the customer and patient records to find basic information. You'll find information here such as:
- Contact information
- Alerts and warnings about the customer or patient
- Current balance
- Age, weight, breed
Other Elements
There are other elements on the main screen that aren't highlighted in the screenshot above. See if you can find them! Each of these has a useful function in the system.
Navigation
Action Buttons
Any of the large buttons, that are green rectangles in the screenshot above, perform a meaningful action in the system. You will find many of these throughout the system. Action buttons can have many meanings from deleting information, to finding or printing information.
These buttons are generally located at the bottom of a screen or pop-up window. When they are at the bottom of the window, remember that they apply to everything in that window. For instance, if I click an "Edit" button, it will then edit the entire record that is current displayed. Go ahead and try it!
Lists
Sometimes action buttons are not at the bottom of the screen. In this case, they are usually representing a list. The screenshot above has two big action buttons on the screen. Can you find them?
The reason the "Select" button is at the top is because it's controlling a list that is about to be displayed on the screen. You'll find this type of button throughout. Look for it in these areas:
- Patient lists for customers
- Invoice items
- Reports
- Product lists
You'll find that adding records to a list happens in two different ways. For larger things (top level data like customers and patients), there will be an action button ("New") at the bottom of the screen. For smaller items (like invoice items) you may find an "Add" button at the top of the list.
Tip: When editing lists, the current editing window counts as an item of the list. Go ahead and try it!
Shortcuts
For those that are inclined to be as efficient as they can, keyboard shortcuts are available. Anywhere that you see an underlined letter, you can hold down "Alt", and hit that letter (or number). This will have the same effect as clicking on it.
A second shortcut is the blue underlined items. These are hyperlinks. They will generally jump you to another section in the system. You'll find them almost everywhere throughout the system. It's part of what makes getting around very easy.
Searching
This chapter discusses the various ways to retrieve and input information. Getting familiar with the various ways to do this in OpenVPMS will help you navigate the system effectively. It turns out that finding and entering information rely heavily on one thing in OpenVPMS: searching.
There are numerous times that you might want to find information in OpenVPMS. Let's start with the simple case of looking up a user. Keep in mind, that this same strategy can be used for looking up prouducts, patients, and almost every other type of information you might be looking for.
Here's the select box in the patients section. You can get to this by clicking Patients->Select.
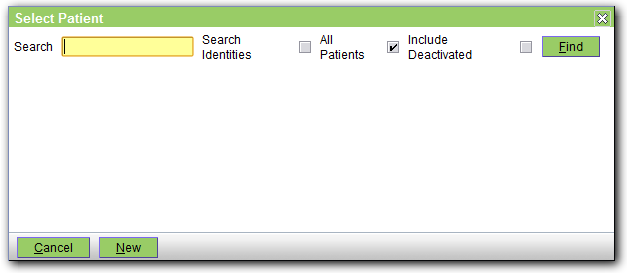
There are several elements here. Let's discuss each one.
First, you'll notice the search box. This is where you can enter the actual text that you're looking for.
Second, there is a series of tick boxes. Each tick box is to the right of the item it represents. Note that in the screenshot, the "All Patients" tick box is checked. This means that this search will search throughout all of the patients in the database. This is meaningful because the default in the system is to search through all the patients for the current customer. If no customer is selected, it will look through all the patients however.
Next, we see the Find button. You will see this button throughout the system. It's very important. Sometimes, it means that you'll initiate a search, and sometimes it will re-run an existing search that happens to be on the screen.
Tip: Get in the habbit of clicking the find button when you see it on the screen. This will refresh the information that is displayed.
At the bottom of the dialog box, you'll see the Cancel and New buttons. The Cancel button will close the window and stop the current search. The New button is there for convenience. If you happen to be looking for something that isn't in the system yet, you can click this to add that item.
Imagine that we're creating an appointment for a new patient. Maybe we're not sure that it's a new patient, so we search. Having not found the patient we're looking for, we can click New right from that screen to add the patient to the database. This is a convience feature because there is another (longer) way to add a patient that is discussed in the Patient section.
After clicking Find, you will see a list of all results in the system that match the criteria you've specified.
Wildcards
What if we only know part of the thing we're looking for? This could make it difficult to find a particular item. Not to worry, OpenVPMS has a mechanism for searching for just part of a string. In order to do this, we use the wildcard character "%". Take the following example:
 In this example, we were sure that our patient was "something" Vader, but couldn't remember the first part. To search for "something", simply put a "%" in the search string, as shown in the screenshot. Note that it has returned Darth Vader as a result. And before you ask, yes, this cat is actually named Darth Vader.
It also turns out that there is an implied "%" at the end of every search string. That means that these two search strings are identical: "%Vader" and "%Vader%". This again is for convenience. Generally, you would only need to type the first couple letters of the thing you're searching for and it will come up. If I'm looking for all the patients starting with "Fi", I can just enter "fi" and I'll get a list of "Fido", "Fidette", "Fidel" or any other "Fi%" name.
Tip: Searches are case insensitive. You don't need to capitalize anything.
Tip: You can hit enter instead of clicking find to run the search. Once you've found the item you're looking for, you can click on it to select it.
Lookups
There is another very frequent case that you'll be searching for information. These are lookups. There are many forms in the system that require you to enter information.
These fields are almost the same as the search dialog above, with one difference: searching is enabled right in the field you're trying to fill out. Let's take a look at an invoicing screen.
 This screen is discussed in detail in the Customers section of the manual.
The point of interest right now, is the binocular symbols just to the right of the Patient, Product, and Clinician fields.
As you may have guessed, clicking on the binoculars brings up the search dialog from above. You should have no problem finding items by clicking on the binocular, and the following the instructions above.
However, that can be tedious if you're entering a lot of data. So, the designers of OpenVPMS have made it easier by adding a shortcut. You don't have to click on the binoculars if you already know a little bit about what you're looking for.
Let's say that the patient Tiny needs a Collar. In order to add that to the invoice, I can simply type in the first couple letters and then hit enter.
If there are more than one thing that start with the letters I'd typed in, then it will display a list of possible matches. The same thing applies for any field with binoculars next to it. Many fields you'll use over and over.
For instance, if each Doctor's name starts with a different letter, you can simply type the first letter and hit enter in the Clinician field shown here. Also, the same restrictions as in the default search dialog apply. So, searching for a patient in this field, will limit the search to patients of the current client. All of these restrictions are designed to make using the system more efficient. Give it a try and see!
Tip: There's no need to go to the search dialog if the binoculars are there to help you.
Customers
This section is meant to deal with the customers section of OpenVPMS. In this section, you'll find all functions regarding customer interaction. These include billing, payments, basic information, patient lists, notes and alerts, et cetera.
The pages below represent each of the main functions that you can accomplish in this module. These pages are not meant to be specific to any submenu within the customers sections because some activities require probing into multiple submenus. Dealing with customer accounts is certainly one of these.
Basic Customer Information
We can get a pretty good handle on what types of information are in this screen by looking at the screen itself.
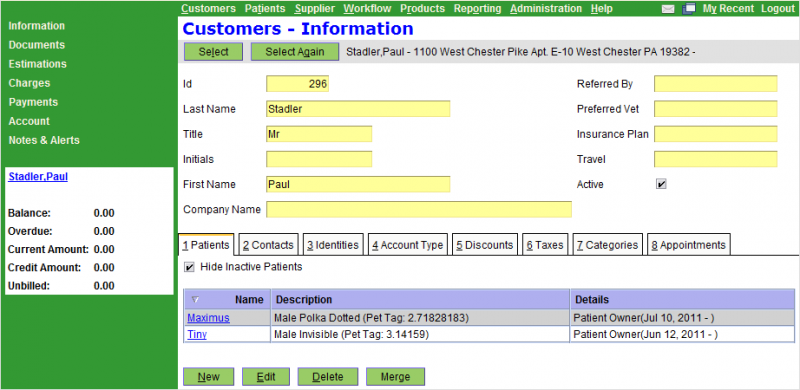
While the most basic information is shown directly on this screen, there are several other types of information that are in the tabs toward the bottom of the screen (Patients, Contacts, Identities, etc.). We'll step through all the elements of this screen.
Actions
The action buttons at the bottom are most likely fairly familiar to you at this point. Here's a description of their functions:
- New: Create a new customer
- Edit: Edit the current customer
- Delete: Delete the current customer
- Merge: Merge this customer into another customer
Tip: The "Merge" button, as shown above will not appear unless you're logged in as administrator.
Name and other Basic Information
The information that's shown right on this screen is the basic information. Here we must enter, at a minimum the name of the customer. All other fields are optional, but highly recommended.
Tip: In general, if there is a single value associated with a record (like Customer and Name), it will show in the main window. If there can be multiple values associated, then it is a list -- and will appear slightly differently, as some of the information in the tabs.
Tip: Your system administrator can configure your system to change the default value of the Title field, or any other pull-down type field.
Further Customer Information
The rest of the information for a customer is housed in the tabs toward the bottom of the screen. We'll discuss each one. Note that we won't put a screenshot of each one in this document, but you're encouraged at this point to click through each tab and get a feel for what information lives in each.
Patients
The patients tab is a list of patients for the current customer. You can add and remove patients to the current customer here. OpenVPMS is flexible in the way it handles the relationships between patients and customers. It's possible to have multiple owners associated with a single patient, as well as the more typical multiple patients to a single owner. Here, however, we're just showing what patients are associated with this customer.
It is also possible to add patients from here. When editing the record, and searching for a patient to add, you can click the "New" button directly from the search box and it will jump to the new patient screen. The details of this are covered further in the Patients section.
Contacts
All different types of contacts are consolidated into this one tab. The screenshot below shows this tab under the customer edit dilaog.
Tip: The customer edit button edits the entire customer record, not just the current tab or field.

As shown in this field, using the list edit modality (as discussed previously), you can add numerous types of contact information into this list. Contacts consist of Addresses (Location), Phone, Email, and Fax types of contact.
Often the system will look for this type of information when printing forms, invoices, or other types of documents. Forms will pull either a) the preferred contact address (there's a checkbox for that), or b) the first contact location the system encounters. For this reason, you must have at least one location and phone contact per customer.
Other Customer Functions
There are several other customer related functions that you can find in this section. They're not used as often, but are important to know about.
Documents
The documents section allows you to store documents associated with the customer. The types stored here are: Attachments, Forms, and Letters.
Estimations
Estimations are almost the same as invoices. The only difference is that they allow you to specify a minimum and a maximum for certain charges, mainly those that have a quantity attached.
Notes & Alerts
This is a general function that allows you to store notes and alerts about the customer. Alerts will show up the same way that patient alerts will show up - right in the current customer information area. Depending on your configuration, you may have certain pieces of information that you'd ilke to be sure are seen in reception. This make good alerts.
Payments, Charges, and Accounts
Account Basics
There are 4 primary types of transactions that are used to manage customer accounts in OpenVPMS: Invoice, Credit, Payment, and Refund. Understanding the relationship between these is necessary to being able to handle tasks such as invoicing customers.
![]() Let's start with this basic chart. This will become more clear as we discuss below. Basically, the four transaction types can be broken into smaller groups. Also, please note here that a positive account balance means the customer owes the practice money, not the otherway around.
Let's start with this basic chart. This will become more clear as we discuss below. Basically, the four transaction types can be broken into smaller groups. Also, please note here that a positive account balance means the customer owes the practice money, not the otherway around.
There are transactions that influence a customer's account because something happened, or some good changed hands. These are invoices and credits. Invoices and credits are opposites.
There are other transactions that represent the transfer of money. These are payments and refunds. Payments and refunds are opposites.
Tip: When a good is returned, a credit is processed, not a refund. A refund can later be processed if the customer wants money back, instead of having a negative account balance.
Navigation
In the Customer screen, there are 3 areas for working with transactions: Charges, Payments, and Account.
- Charges: For creating invoices and credits (returns).
- Payments: For creating payments and refunds.
- Account: For viewing all (finalized) account history. This is also used for more advanced transaction types - account adjustments.
As you can see, the opposites are grouped together.
Charges
Managing these transaction types generally means creating them, and then finalizing them. OpenVPMS allows for staging of each of these transaction types. This is very useful when trying to get ahead of the work. For instance, if you know a customer is coming to pick up a prescription later in the day, you can create that invoice immediately, and leave it in the staging area. It becomes a "Work in Progress". These are discussed further in the Reporting section.
Once an invoice is truly complete, generally just before the customer pays, it must be finalized. This moves it to the account balance, and out of the "Work in Progress" state.
Tip: Once finalized, transactions cannot be edited. This is to ensure proper accounting.
To create a new invoice, go to Charges and click "New", then select "Invoice". You will see a window appear that allows you to add sale items.

Once the invoice screen appears, you can add as many items as you wish. Note that you can override prices as you go. When you've completed all of them, click on "Ok". Note that this does NOT finalize the invoice. You've completed editing it, but you haven't actually billed the customer yet.
Once you're sure that it's ready to bill, click on the "Finalize" button. At this point, OpenVPMS will ask if you'd like to make a payment. This is a convenience because finalization almost always occurs just before a payment (you wouldn't otherwise be able to know if the customer wanted to purchase something more). If you click "Yes", it will jump to the payments section, as described below.
Payments
The payments area is simpler than charges because there is no staging area. It here we have basic payments, and refunds.
A refund would be useful if the customer had a negative account balance perhaps as a result of a credit (return). A refund is what allows the practice to pay him back for that refund. It will most likely be the least
In order to create a new payment, go to Payments and click "New", then select "Payment". You will see a window appear that allows you to add payment types.
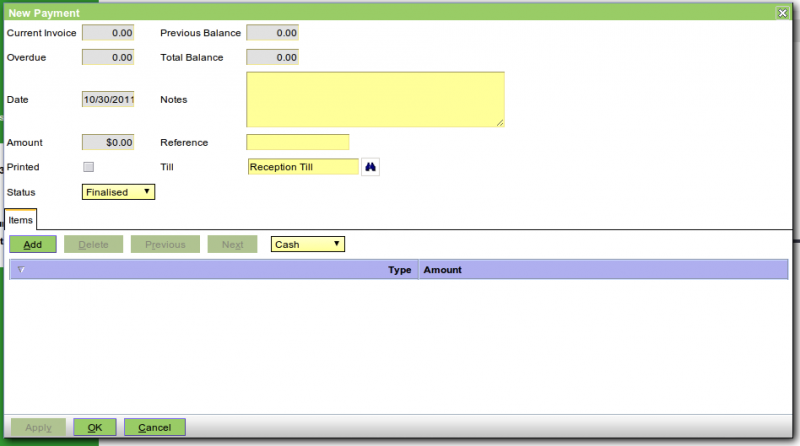
Next, click on the type of payment you would like to receive (Cash, Credit, etc). Once you've created the line-item, you can fill in the details for the payment. When done, click "Ok".
Note that OpenVPMS uses a list edit style for payments. The reason is because some customers will want to pay with multiple tender types. They may have some cash in their pocket, but want to cover the rest with a credit card. You can add multiple payment types by repeating the steps above with a different selection (before clicking "Add").
Tip: On cash transactions, after you've entered the tendered amount, hit Enter and OpenVPMS will calculate the change for you.
Workflow
As an aside, the workflow takes you through most of the steps above. There is no need to manually go and create an invoice. It is done automatically as part of the workflow. There are more details about this in the Workflow section.
Account
The account section displays a list of all transactions against a particular customer account. You can click on each one and see the details of it.
This section also has a facility to create more advanced transaction types. These can be created by clicking on the "Adjust" button. Here's an overview of each one:
- Credit Adjustment: Decrease the customer account balance.
- Debit Adjustment: Increase the customer account balance.
- Initial Account Balance: Self explanatory.
- Customer Bad Debt: Used for writing off debt.
Tip: Each transaction type above allows you to type notes along with it. Particularly in the advanced transactions, it is important to note why the transaction is being entered.
Patients
The patients area allows modification of basic patient information as well as all the medical history associated with a particular patient.
Basic Patient Information
The basic patient information screen is very similar to the basic customer information screen. There are some notable differences.
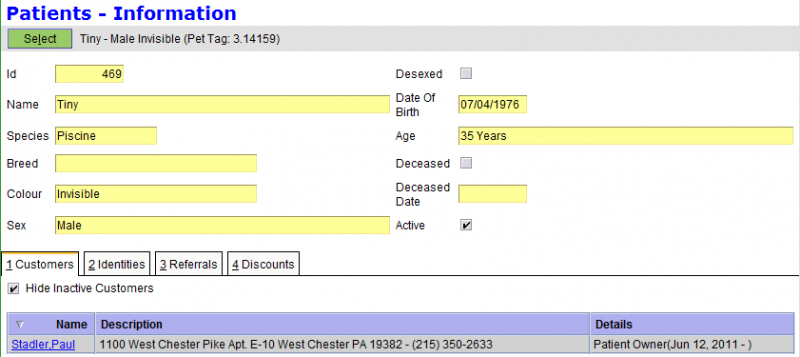
Name and Other Basic Information
The information shown at the top of the screen comprises the basic information for the patient. The various fields are relatively self evident.
Tip: ID numbers in OpenVPMS are unique, even across customers and patients. This number may be the easiest way to ensure everyone's talking about the same patient.
Tip: Note the record above has an 'Active' field. There's never a need to delete records from OpenVPMS... just deactivate them when you don't want to see them anymore.
Further Patient Information
The remaining tabs at the bottom each serve a different function specific to patients. Below is a description of each tab, and how it can be used.
Customers
The first question might be "Why is this a list?" It turns out that sometimes a patient will have more than one customer. It may be the case that you have decided to make customers individuals instead of couples perhaps, or you might have a boarding farm as a customer as associated with a patient, as well as the owner of the patient. This makes sense for numerous reasons.
This list can be edited just as any other list in OpenVPMS.
Identities
Identities in this context are very similar to identities in the customer context. This is a list of alternate ways to identify the patient. These ways can include:
- Alias: This would represent a secondary name, or nickname for the patient.
- Microchip: The number associated with the microchip can be entered via this tab. It can be retrieved through the search functionality.
- PetTag: Any tag that is associated with the patient can be put here.
As the need arises, patients can be found in OpenVPMS through these values.
Tip: In order to search for these items, be sure to click the "Search Identities" checkbox in the search window.
Referrals
Referrals provide a way to track where a patient was being seen previously, or where it will be seen in the future. The system allows specification of a single veterinarian stating whether it was referred from that doctor, or to that doctor.
Discounts
It's often the case that a particular patient will have a discount above and beyond what discounts the customer has. When a customer has a discount, it applies to all patients. When the patient has adiscount applied, it applies only to that patient.
Medical Records
One of the most important areas in the system, the Medical Records section allows control over all the records and history regarding a patient. To get to this area, click on Patients->Medical Records.
Once in the medical records section, you will see a series of tabs. Each of these allows you to view different aspects of the patient's history. There are also some tabs that allow you to control things such as reminders, alerts, etc. All of this is described below.

Summary
The summary section shows the top-level medical information that doctor's may want to look at first. This is a series of notes, and other elements of the patient record that compose the whole medical history for the patient.
The main grouping of this list is a visit. All medical records in this view must be associated with a visit. Generally, the workflow will create a visit for you, but sometimes you may need to create one manually. In order to create new items, including a visit, click "New" at the bottom of the screen. You will then be able to select the type of item you would like to create. Here's a brief list of things you can create in this screen:
- Attachment: This can be an attachment of any file to the record.
- Form: Forms are generally printed, and then filled out manually.
- Image: For attachement of any type of image, including animal photos, X-rays, et cetera.
- Investigation: Used for outside processes, such as bloodwork, etc.
- Letter: This is a document that would get printed out of the system and delivered to the customer.
- Medication: This is a medication. It permits printing of labels, etc.
- Note: This is where doctor's can add notes to the patient record.
- Problem: For taking note of a particular problem of a patient.
- Visit: The overall grouping item for all of the above.
Problems
It turns out that there is some structure underneath the overarching summary view above. The system is designed for doctors to create a "Problem" under their patient, and then associate notes directly with this problem. This is further useful because we can then track when the problems resolve. Once they resolve, they can be filtered and not shown any longer. This keeps what's being shown to the doctor relevant. It also makes sure the notes shown are directly linked to a problem. There can be no confusion regarding notes and medications, and what they are talknig about or designed to treat.
Tip: When you create a problem, and associate notes to it, they will all automatically show up in the summary view. The same goes for many documents that you can access from other places in the system.
To create a problem, click "New" and fill in the information. You can add notes and/or medication at the same time.
Reminders/Alerts
While these two things are grouped together, they have very diffirent functions in the system. They're discussed separately below.
Alerts
 Alerts are for flagging things that other staff at the practice might want to know about a patient, as soon as the patient walks in the door. Alerts can be configured (by your administrator) to have any text associated with them that you want, and the same goes for color. When you add an alert, it will show up in the current patient information area.
The screenshot to the right shows the alert "Aggression", which may or may not be setup on your system. Also note that it's color coded in red making it stand out. As soon as someone clicks on this client, presumably at check-in time, they will be able to see the alert. This will help keep the staff aware of any special precautions that need to be taken with this patient.
In orde to create a new alert click "New" and then select "Alert" from within the Reminders/Alerts tab.
Reminders
Reminders are useful for inside the practice, and for generating continued business from outside the practice. The general purpose of a reminder is to make sure that customers and doctors are aware of when a patient is due for a certain procedure, checkup, test, or any other thing.
Internal to the system, there are three values that are associated with a reminder. Your system administrator can help you set these values for each reminder.
- Reminder Interval: When added automatically, when should the next due date be?
- Sensitivity Interval: How long before (and after) the reminder, should we note it as relevant.
- Cancellation Interval: How long after the reminder, should we begin ignoring it?
Note the bell symbol in the picture above. That bell means that there are reminders for that patient. If you were to click the bell, you would see a list of reminders, color coded according to the above. They are coded as follows:
- Green: Not due yet.
- Yellow: Within the sensitivity interval above.
- Red: Late.
Printing reminders can be accomplished through the Reporting section. More discussion of this can be found there.
To create a new reminder, click "New", then "Reminder", and fill in all the fields. If there's a particular reminder that you don't see there, your system administrator can add a new reminder for you.
There are many different kinds of reminders, and they behave differently (depending on your configuration)! Some reminders can be set to be added to the patient record automatically when you sell a particular item. For instance, when you bill a customer for an annual examination, you can configure the system to automatically create a reminder for the next annual examination. Not only will the system create a new one, but it will mark the current one as completed.
We won't dive any deeper into this subject because a lot of it ends up being hidden from the users, and hence is much more relevant to the administrator. For now, just understand that some reminders get created automatically, and some don't. Work with your administrator to configure how they all behave.
Documents
The documents area is a way to see all documents associated with the current patient. Here you can create new documents, edit existing documents, and print any document.
Charges
The charges area shows all the invoice items that are associated with the current patient. This can be useful if you'd like to see what this patient has been charged for in the past.
Tip: The charges list displays charges and credits. To see just invoices or just credit, click on the "Types" pull-down and select one or the other.
Suppliers
The supplies section allows you to edit supplier information. This is a contact list that is not significantly different from the customer list. The difference is that these vendor data relate back to product and cost. The detailed usage of this is currently outside the scope of this basic user handbook.
Workflow
Practice management systems are great for managing all the data associated with the practice. Is it turns out, most practices have similar practices that can be generalized into shortcuts to help get work done. I think you'll agree that you couldn't imagine not having these shortcuts once you get used to them.
This section discusses the data that is related to, and the primary work flow functions. That is, how do we bring patients into the clinic, perform work, and then release them from the clinic. Workflow is all about things that change from minute-to-minute, not day-to-day... and all of those things are housed in this section.
The 3 C's
Workflow refers to all of the functionality within the workflow section of OpenVPMS. You'll find however, that because workflow is so entangled with the rest of the system (that's the point), that you'll see elements of it throughout the system. Those parts that you'll see most frequently, and the three most important elements of workflow are these.
Furthermore, as you have seen from all the other sections, there is a number of steps that you need to take to make sure that all the data are updated in the right places throughout the system. Workflow automates that process.
Usage Notes
There are several things that will assist you in using the "3 C's". Please pay very close attention to these.
- Each action (3 C's) kicks off a series of other actions throughout the system. This is a shortcut, on a grand scale.
- If ever clicking the "Cancel" during a workflow operation, it will cancel the workflow, not just that step. This seems to be particularly befuddling to new users. The simple solution is to never click cancel, and only click "Ok" or "Skip".
Check-In
Check-in refers to anytime a patient enters the practice in such a way that we want to monitor its status. (Almost all of the time.) The idea here is very similar if you were to go to the hospital yourself. The check-in process gears up the practice to accept a patient into the facility. Here is a list of all the things that occur during a check-in:
- Patient forms are printed
- Work-list task is created (and linked to appointment if checked-in from appointment)
- A visit is created in the medical records
- Medical records can be edited
- Weight entry occurs (optional)
- Appointment status is updated (to waiting)
Tip: If you don't use the workflow, you'll be stuck doing all this manually!
The check-in button is most prominently found in the patient information, and on the appointment schedule.
Consult
The consult activity is much simpler than the others. This generally allows one to:
- Edit the medical records
- Edit the invoice
Often, a doctor will be using this functionality. When they're complete, they can click "Complete". This will have the effect of updating the associated task or appointment to the "Billed" status -- meaning read to check-out.
Check-out
Check-out represents the departure of a patient. The Check-out workflow does the following (not in this order):
- Completes the worklist task.
- Completes the appointment.
- Prints all associated documents (including ones added through consultation).
- Allows for editing and finalization of the invoice (for last minute items).
- Payments can be made
Statuses
There are several status in the system that should be used as cues to move patients from one step to the next. We're only considering the status as shown on the schedule for now. There is an associated set of statuses for task lists that may be added in a later version of this document. Here's a brief list of them, and how to bring them about:
Appointment Status
- Pending - Default status when appointment created.
- Waiting - Check-in from the schedule.
- In-Progress - Consult activity from schedule (or Worklist)
- Billed - Consult activity with pressing "Complete" at end of consult workflow.
- Admitted - Set manually in the schedule.
- Cancelled - Set manually in the schedule.
- Complete - Check-out activity from schedule (or Worklist).
Notice how the more important statuses are a direct result of a workflow activity.
Scheduling
The scheduler is the mechanism in the system to plan out appointments, surgeries, boarding, or any other type of time slots that are planned in your practice. Here's that it looks like.

Elements
In the screenshot shown above, the practice has three separate schedules that they choose to show all on one screen. Your practice might have a very different setup, but the basics set out in this chapter will be the same for usage of the scheduling facility.
The top portion of the screen has various controls for showing different days, different time areas, and even entirely different schedules (technically views, please refer to administration documentation). Here's a brief overview of what each element does.
- View: Allows you to select different schedules or sets of schedules.
- Date: Allows you to choose which date is shown, advance or rewind by day or by week, and snap to today (the square button).
- Schedule: When there are multiple schedules shown at the same time, this will allow you to show just one of them. Note that some formatting and extra information will be lost when you do this.
- Highlight: There are several different ways to highlight the data. If you have many doctors in at once, you may want to highlight based on clinician. The highlight shown above is based on status -- meaning that Completed, In Progress, and Pending (for example) will all be different colors.
- Clinician: This allows you to sort for a specific doctor's appointments.
- Time: Often, the whole schedule won't fit on the screen. This allows you to narrow the time period of interest down to AM, PM, evening, etc.
Tip: Many of the features of OpenVPMS are configurable. Your screen may not look like this at all. Work with your administrator to setup what calendars and timeslots you'd like to see.
The remaining elements are the core part of the schedule. The time of the appointment is shown to the left and right, and the name of the schedules are listed across the top.
Creating an Appointment
In order to create an appointment, click the "New" button. You'll see this dialog come up.

Creating the appointment can be done by filling out all these fields. Note that the system will automacally populate some fields if they have already been selected in the system.
Here is a brief description of each field:
- Customer: The customer whose appointment it is.
- Patient: The patient whose appointment it is.
- Appointment Type: The system can allow for default scheduling based on appointment type. You can have 15 minute, 30 minute, or any other length of appointment associated with this field. You can also override the times using Start and End Time.
- Start Time, End Time: Self explanatory, the start and end times of the appointment.
- Reason: This useful field is shown on the schedule to indicate the basic reason for the appointment.
- Notes: This is for further details that might not be covered by the Reason field. These notes will appear in a baloon window when the mouse hovers over the appointment.
- Clinician: Who the patient is coming to see.
- Status: The current status of the appointment.
Tip: Multiple appointments can occupy the same time period on the schedule. Have your administrator turn this feature on. You'll notice that the schedule will create an extra column to accomodate.
In order to complete the appointment, ensure each of these fields is correct, and click "Ok".
"Ok" and "Apply" both save the work. The only difference is that "Ok" will close the window after it saves the work.
Editing an Appointment
To edit an appointment, you'll be dealing with exactly the same screen as when you add an appointment. The only difference is that you first need to click on the appointment.
You can tell when an appointment is selected by one of two ways:
- It will be highlighted (this works only in the multiple schedules view, not the single schedule view)
- You can also see which appointment is selected by confirming the customer and patient information on the side of the screen. When an appointment is selected, the current customer information area changes to the information for that appointment.
Next, to bring up the edit window, click on "Edit". You can now change the fields you'd like to change in the same way as when adding an appointment.
Other Functions
You'll notice there are several other functions available on this screen. Some of these (Consult and Checkout) are discussed extensively elsewhere (Workflow). Here's a brief description of each:
- Delete: Deletes the currently selected appointment.
- Print: For printing an appointment (appointments?).
- Consult: Workflow function for medical notes and invoicing.
- Checkout: Workflow function for invoicing and payment.
- OTC: Over the counter.
The only one worth discussing further here is OTC. The OTC functionality allows for reception to quickly make sales that have nothing to do with appointments. A good general policy is to tie as many sales to patients as possible, as a matter of record keeping. However, there are always those times that someone who may not even have any patients would like to purchase something. This button is a shortcut to a screen that permits this type of sale. It's place here so that you don't need to leave the schedule at the reception area.
Work Lists
Work lists are basically lists of tasks that are queued up for completion within the practice. To get to the this section, click "Workflow" then "Work Lists". You'll see the following when you get there.

This header section of the worklists area shows that worklist tasks can be filtered and highlighted in numerous ways, similar to the schedule view. Here's a brief list of how you can configure your view.
- View: The system will have been configured with 1 or more views into the worklists. Some have multiple worklists showing at once, and some show only one, or a subset of all worklists.
- Date: This works identically to how the schedule date controller works.
- Work List: Which worklist to view. This can filter the current view.
- Clinician: Show only tasks for a particular clinician.
- Highlight: Change the view highlighting to be based on Status, Event Type, or Clinician.
- Status: Show all tasks, just incomplete tasks, or just complete tasks.
Tasks in the worklists can be used for almost any type of task in OpenVPMS. There is however, one type of task that is automatically part of the system, and part of the overall workflow -- the Consultation.
Consultations
A consultation is the primary activity as related to an appointment. That is, a consultation gets linked to an appointment. When checking-in a patient from the schedule, this task gets automatically created.
The benefit here is that doctor's, theoretically, have no need to look at the schedule. They can merrily go from consultation to consultation, or surgery to surgery without worrying about scheduling and reception. Of course, many doctor's do care to look at the appointment schedule as well. And so, the "Consult" workflow action has been placed in both of these places.
Tip: Any changes to a patient appointment or task, affected through the workflow or otherwise, will result in changes to the task and the appointment.
It's important to realize that the task is completely separate (although linked) from the appointment. As such, it's important to manage both.
Roll Call
One of the most important uses of tasks is that they hold the information of when a patient was in the practice. This is valuable information, and should be preserved as well as possible. Many pratices, therefore, have setup separate task lists just to track hospitalization. This work list can therefore become a list of all hospitalized patients -- very useful at a glance.
Other uses can include medical observation (or boarding), general appointment scheduling, phone callback scheduling, etc. We won't dictate here what the optimal configuration for your practice is.
You can also transfer patients from worklist to worklist. Say for instance you had a worklist called "Consultation List" and had another worklist called "Hospitalized List". It's often the case that during a consultation, it's decided to hospitalize a patient. In this situation, you would "Transfer" the patient from the Consultation List to the Hosptilazed List.
Tip: When you do the "Check-in" workflow action, you can select what task list to create a task on.
Tasks in the Workflow
The tasks that make up the worklist are an integral part of the workflow. When you click on a task, you'll notice that the associated (3 C's) buttons appear at the bottom of the screen. You can interact with the task or the appointment to achieve the same result.
Messaging
 This section can be used for intraoffice communication. You can get to this section by clicking "Workflow" then "Messaging".
When you first get to the messaging area, you will see a list of messages to you, and their status.
To create a new message click "New" at the bottom of the screen. You will then see the screen to the right appear to create a new message. Fill out all the fields and then click "Ok".
The advantage of creating messages in this way is that the message can be directly linked back to the customer or patient within the system. It also reduces clutter throughout the practice. (Remember stick notes?)
Tip: A good habit is to check the messages section every day to see what new messages have been left for you!
Note that this mechanism is not recommended for things like patient callbacks. Messages are directed at a single individual. If work is to be shared amoung many individuals, it may make more sense to use the task list.
Investigations
Can someone else fill this in?... we're not using this fucntionality right now.
Products
Stubbing out for now
Product Types
There are several different types of product in OpenVPMS. The reason behind this is that different classes of product need to behave differently... and so they do!
One of the basic functions of the system is creating and maintaining products. It's unlikely that everyone in the practice will have this responsibility, but for those who do -- this section is crucial.
 Products are broken into three core categories in the system:
- Merchandise
- Services
- Medications
You'll notice that there are some other "types" available as well. We'll discuss those further below. The system uses this type to decide what to do with various products. Some need entries into the medical records, some need treatment in inventory, etc. It is possible that when creating an item, it may not fall into the category that you found most intuitive.
Merchandise
Merchandise is something physical. It may be taxed, or may not be taxed -- depending on your tax rules. The key thing to note about merchandise is that inventory is relevant, where it is not relevant for services (we have an infinite supply of service).
Generally, merchandise will have unit pricing -- that is, it's price is multiplied by how many the customer has purchased. Doggie biscuits are a great example of this.
Services
Services are products that are sold without inventory treatment. There is no supplier for these, other than people's time. These products will often have fixed pricing -- just a single price. A surgery is a great example of this product class.
Medications
Medications look similar to merchandise in that they can count inventory, however there is an impact by medications on the medical records. Any time a medication is sold, the user is able to attach usage notes, print a label, and insert that history into the patient's record.
Product Details
There is a large number of configuration settings for each product. Products are a very integral part of the system, and therefore can have influence on many other parts of the system. Setting up a product requires configuration of all these interactions that a product might make in the course of its sale. This section describes all these configurations. But first, let's have a look at the screen we'll be working in.
To get to this screen, choose a product, and click "Edit". Alternatively, you can create a new product, or copy an existing product to get to the same place. As you can see, the tabs are numerous. Below is a description of the information in each tab.
Caveat: To properly configure this, please work with your administrator. Adding products is not a trivial process because of the impact they have throughout the system.
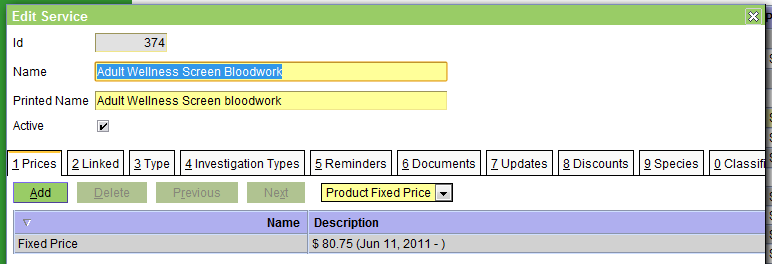
Prices
Prices come in three flavors in OpenVPMS: Fixed, Unit, and Markup. These are:
- Fixed: Regardless of quantity, will always be the same. This is useful for services, or anything that won't be counted at checkout.
- Unit: Just the opposite of of fixed, this price will be multiplied by the quantity when creating an invoice.
- Markup: This takes the cost of an item, and marks it up by a percentage.
Linked
This allows linkind to a price template. This is a method by which you can associate many products with a similar template to work from. This can be useful, for instance, to deal with dispensing fees.
Type
Product types can be arbitrarily created by your administrator. These product types are distinct from product classes (Merchandise, Service, Medication). Instead, these can be used to group products according to discounts and tax types for instance.
Investigation Type
This permits linking of an investigation to the product. When the product is added to an invoice, an investigation will automatically begin. This information will be attached to the patient record as a result.
Suppliers
This allows you to specify where you can obtain the item (if it is an item). This is the mechanism by which cost is specified in the system. The system also permits calculation of lead-time, and multiple suppliers for a single item.
Stock Location
This area lets you specify where the item is stored, and how it is tracked. It will trigger re-orders based on the critical quantity.
Reminders
When products are sold, reminders can automatically be generated. Note that the system does not support automatic completion of all reminders, but if it is configured to automatically generate a reminder based on a product sale, it will automatically complete all reminders that are in the same group as the one generated.
Documents
What documents are associated with the sale of this product?
Discounts
What discoutns are specific to this product? Discounting occurs when the discounts on the product, whether specified here, or through the product type match a discount in the customer account.
Species
Products can be limited to certain species. This helps ensure we don't sell fish food to a dog.
Updates
Certain products create changes to the status of the patient. This is controlled in this section. The updates available are:
- Patient Desexed: When selling the product, possibly a spay or neuter, the patient will be marked as desexed.
- Patient Deceased: When selling the product, presumably a euthanasia, the patient will be marked as deceased.
Classifications
Can someone fill in this section?
Identities
Can someone fill in this section?
Equivalents
If you stock more than one of a similar type of product, this allows you to specify that relationship. When one product is a substitute for another, then it should be marked as such here.
Taxes
Some products are taxed differently. The system supports specification of different types of taxes. Here, you can specify which taxes are applicable to the product.
Reports
The reporting section of OpenVPMS is possible the most comprehensive section that you'll deal with day-to-day. This area contains many types of reports. Hopefully the mystery can be mitigated in this section.
Till Balancing
Till balancing is how we keep track of money in OpenVPMS. At the end of the day, many practices will "close the till". This is the tool to accomplish that. First let's look at the display.

This screen allows you to search for balances using date criteria, as well as status. The status is either "Cleared" or "Uncleared" (or both).
When a balance is "Cleared", that money has been reconciled with what's actually in the till. The till comprises actual cash on hand, checks, and records of online transactions such as credit cards, EFT, or any other transfer types you have setup (such as debit). To clear the till, is to move money out of the operational part of the business. These funds are no longer available for refunds, or any other usage except depositing. This is covered in the deposit section.
Upon clicking on one of the balances that your seach yields, you will see all the payments associated with that balance in the area below.
Closing the Till
We presume that most practices will want to check the till balance daily. So, this makes a daily procedure, usually at the end of the day.
In order to close the till, first select the balance you want to clear. There should be only one that is unbalanced. Next, print (or preview) the current balance by using the "Print" action button at the bottom of the screen.
The goal, is to ensure that all the cash on hand, and receipts from electronic transactions match what OpenVPMS believes happened for the day. The printout will show totals for each transaction type. The sums of cash, cheques, credit on hand must match the printout. If it does not, then an adjustment must be made to document the discrepancy. When this happens, please work with your financial controller to reconcile the situation.
Once the balance has been confirmed, you can click the "Clear" action button at the bottom of the screen. This button will prompt you for a new "Float" balance. Type in the new amount of cash that has been left in the till. This is the balance that the practice will begin with the next day.
Once this is complete, remit all payments to whatever location has been established for this, and you're done!
Adjusting the Balance
Another button at the bottom of the screen is the "Adjust" action button. This button can be used to make an adjustment. If some money is not found, or there is extra money, this can help you balance the till. This functionality is considered advanced, and depending on policy, may be unused except for by your financial controller.
Deposits
The deposits section is for tracking bank deposits. This functionality outside the scope of this handbook at this time.
Debtors
Debtors are people that owe the practice money. This reporting section allows you to track who owes the practice money, and several other pieces of information to understand debt status.
More than just status, this section also allows you to take action against the debt, and file petitions for reclamation through whatever format you'd like. The default in the system is to send an account statement, but you can be more or less aggressive simply by changing reports (with the help of your administrator).
Let's take a look at the screen to understand a little more. To get to this section, click on "Reporting" then "Debtors".

The interface has several controls. Here's a brief summary of each:
- Customer Account Type: The type of customer you'd like to filter.
- Statement Date: The "as-of" date that you're interested in. This allows you to look and see who your debtors were at a particular point in the past.
- Balances: The type of balances you're searching for. Discussed below.
- Overdue From,To: How many days from the statement date are you interested in?
- Customer From,To: Searches for particular customer names.
- Exclude Credit: Shows only balances owed to the practice, not the other way around.
Searching
It's probably that you don't care about all your debtors at any given moment in time. The search functionality ("Find" button) lets you whiddle down the results until you find exactly the set of customers that you're interested in.
There are two types of balances that appear in the search: current and overdue. The current balances come from any invoice that is "Completed", but not "Finalized". All overdue balances have been finalized. You'll notice some overlap between the current balances here, and the works in progress report section. If, for example, we wanted to send notice to all customers that are overdue, we would want to filter out the current balances by selecting "Overdue" in the "Balances" selector.
The next filter we'll discuss is the "Overdue From,To" filter. Here, you can filter for balances based on their age. If, for instance we'd like to get all balances that are more than 90 days old, we might set the overdue "from" date to 90. If we wanted to find only balances overdue from 60-90 days of age, we could put in from=60 and to=90. Note that the balance type must be set to "Overdue" for this to work.
"Customer From,To" allows you to filter the list by customer names. If, for instance you wanted to process just names starting from A-F, you could simply put "A" in the from field and "G" in the to field. Note: it goes up until the last letter but doesn't include it.
Actions
Once you've found the set of debtors that you're interested, you can take action. The buttons at the bottom of the screen allow you to perform several actions. Here's a brief summary:
- Send All: Prints out the related report (default is Account Statement) for all customers in the list.
- Print: Prints a single related report for the selected customer.
- Report: Prints a report about all the customers in the list.
- End Period: Converts all completed invoices to finalized invoices.
Work in Progress
The Work in Progress area is a reporting area that shows all invoices that are "In Progress" or "Completed", but not finalized. We won't go deeply into this because it's rather straight forward. This area is mostly for house keeping.
Many practices may have a policy to prepare invoices ahead of when they're needed. A prime example of when this is benificial is when customers might be coming to pick-up medications or other items. It's useful to create those invoices ahead of time because it will facilitate a smooth checkout later. However, sometimes the customer never shows up. There is where you can see the progress of all those types of situtaions.
It is recommended that once works in progress reach a certain age, they are dispatched to maintain data cleanliness and to ensure that piles of unpurchased inventory are not accumulating anywhere in the practice.
Reminders
Reminders are a critical part of the business. They help make sure that you're effectively leveraging your customer base, and making sure their pets stay healthy. This reporting area helps you get from the reminders in the system, to actual print-outs (or email reminders) to communicate with your customers.
Here's a look at the basic screen:

This screen allows you to search for reminders, and then print them. The search functionality is similar to others in the system. You can select a start and end date (and a type of reminder if you wish), and click "Find" to generate a list.
Once you've generated the list, you'll notice several pieces of information about each reminder that's found. These are:
- Due Date: As entered in the system through the medical records.
- Next Due: Can someone offer a description of this field?
- Reminder Type: As configured in the system.
- Customer: The customer name.
- Patient: The patient name.
- Reminders Sent: How many reminders have been sent for the item due.
- Last Sent: The date this item was last sent.
- Error: Any error that has occured in generation of this reminder.
- Action: The next action to take when clicking "Send All".
Reminders are one of the more complex aspects of OpenVPMS. The implementation is extremely flexible, but as a result has some learning associated with it. We won't delve into the details of how to configure reminders here. This is a task for your system administrator and/or implementor.
Generating Reminders
To generate reminders, click "Send All" at the bottom of the screen. This will begin a process to print out all the reminders that are in the current search results.
Once they have been printed, they will be marked as sent in the system, and will not print again. If you have the need to reprint, you should do it immediately while the printing process is still active. Before closing the print window, the system will ask if you'd like to reprint. This is useful if there was some error with the printer, or otherwise.
If you'd like to generate a single reminder, you can use the "Print" button at the bottom of the screen. This won't mark the reminder is printed, but allows you to generate an individual reminder ad-hoc. Note however that this functionality does not work with grouped reminders.
Other Reports
The general reports section under "Reporting" is used for all other reports that you might want to run in the system. These reports are customizable and as such will be different for most implementations of OpenVPMS.
To run a report, click on it and then click "Run".
You'll notice that some reports will ask you for more information. When this happens, type in the information and click "Ok" to print the report.
Tip: Anytime you see "Preview", you can view the report without printing it.
In the process of running the report, it's also possible to export the data. This is useful if you'd like to perform some other calculation on the data, or send the information to someone in a different format.
Don't forget to get involved in the OpenVPMS community. There are many reports that users have created and have contributed back to the community that don't ship with OpenVPMS. Working with your administrator, you can load any of these community created reports.
Further Information
There is a wealth of other information available regarding OpenVPMS.
On the website you can find documention including:
- Implementation Documentation
- Frequently Asked Questions
- Demonstration System
- Developer Documentation
Aside from available documentation, there is a host of information in the searchable forums. If you have any questions, you might find an answer to it there. If you don't find your answer, you can ask the community.
If you would like to contribute to this documentation, please don't hesitate. Having read through to the end, you may find it lacking in certain areas. Don't stand for it! We'd love for you to contribute your opinion, or even better yet -- improved documentation.