Visit Editor
The Visit Editor allows you to do all the work of recording the activities in the visit.
It has a tabs for Summary, Invoice, Reminders/Alerts, Documents, Prescriptions and Estimates.
Although the Summary tab looks almost the same as the Patients|Medical Records screen Summary tab, it has two extra buttons at the bottom, OK and Cancel. OK means 'save any changes I have made and exit the visit editor'; Cancel means 'discard any changes I have made and exit the visit editor'.
These OK and Cancel buttons are present on all the tabs. Thus if you press OK on the Invoice tab, you will exit the Visit Editor. If you press OK but didn't intend to exit the Visit Editor, don't worry - just press the Consult button and that will return you to the Visit Editor.
Summary
This is the Summary tab of the Visit Editor. The screen shot below is taken from an active practice and hence some data has been intentionally blurred.
[Careful observers will also note that this is a screen shot from a system using a modified label for the Find button.]

The buttons are as follows:
OK - save any changes and close the Visit Editor
Cancel - cancel any changes and close the Visit Editor
New - add a new item to the medical record - a window will open allowing you to select the type
Edit - edit the selected item
Delete - delete the selected document - a confirmation window will be displayed
Print - print what is shown on on the screen (or preview it or email it)
Add Visit & Note - pressing this will generate a new visit entry (with Reason 'No Reason') and open the Create/Edit Note window so that you can add a note. This button should NOT be used to create a normal consult visit (for this you should use the Check-In button on the Workflow|Scheduling screen). It is intended for use when creating a note unrelated to another visit, say as a result of a phone call.
This screen is very similar to the Patients|Medical Records Summary tab - see this for further information.
Confirm Delete
When you press the Delete button on the Visit Editor|Summary screen, a confirmation window will appear.
Press OK to confirm or Cancel to abort.
Confirm New
This window is displayed when you press the New button on the Visit Editor's Summary screen. It allows you to select the type of medical record entry, alert/reminder, or document to be created. Select the required one and press OK, else Cancel to abort.

Invoice
This is the Invoice tab of the Visit Editor.
[Careful observers will note that this is a screen shot from a system using a modified label for the Find button and right justified field labels.]
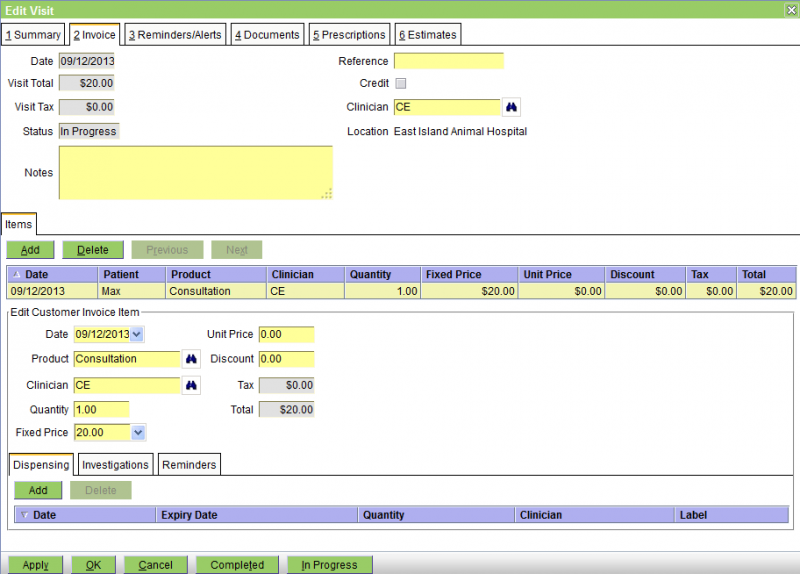
The buttons at the bottom are:
Apply - save any changes but do not close the Visit Editor
OK - save any changes and close the Visit Editor
Cancel - cancel any changes and close the Visit Editor
Completed - save any changes, set the Invoice Status to Completed, and close the Visit Editor
In Progress - save any changes, set the Invoice Status to In Progress, and close the Visit Editor
This screen works in a very similar manner to the Customer|Charges|Invoice edit screen - see this for more information.
Reminders & Alerts
This is the Reminders & Alerts tab of the Visit Editor. See Concepts|Reminders for background.
[Careful observers will note that this is a screen shot from a system using a modified label for the Find button and right justified field labels.]
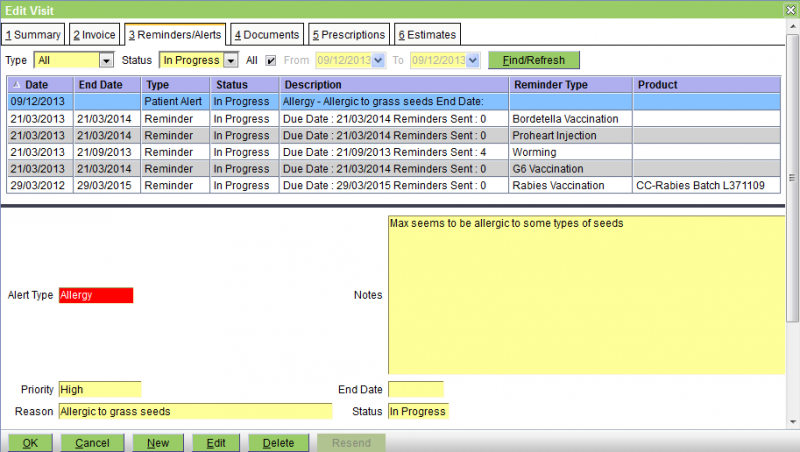
The non-standard buttons are as follows:
OK - save any changes and close the Visit Editor
Cancel - cancel any changes and close the Visit Editor
New - create a new alert or reminder
Edit - edit the selected item
Delete - delete the selected item - a confirmation window will be displayed
This screen is very similar to the Patients|Medical Records Reminders/Alerts tab - see this for further information.
Confirm Delete
When you press the Delete button on the Visit Editor's Reminders & Alerts tab screen, a confirmation window will appear.
Press OK to confirm or Cancel to abort.
Confirm New
When you press the New button on the Visit Editor's Reminders & Alerts tab screen, the window below will be displayed. Select the type of reminder that you require and and then press the OK button.

Confirm Resend
When you press the Resend button on the Visit Editor's or Patients|Medical Records' Reminders & Alerts tab screen, the following window will appear.
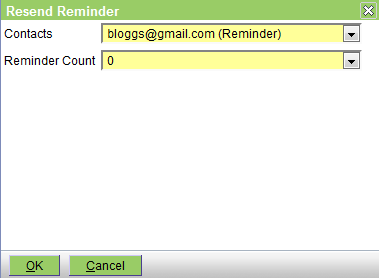
From the Contacts pulldown select the contact to be used. Note that all possible contacts will be listed, and those with a purpose 'Reminder' will be shown as per the above.
The Reminder Count pulldown lists the Reminder Counts of reminders that have already been generated. This enables you to resend, for example, the second reminder. The restrictions are that the reminder count must have an associated document template and cannot have its List field checked. Select the one you wish to use.
Press the OK button to proceed, Cancel to abort.
Depending on the type of the selected contact, either an email will be generated or a reminder printed.
Documents
This is the Documents tab of the Visit Editor. See Concepts|Documents for background.
[Careful observers will note that this is a screen shot from a system using a modified label for the Find button and right justified field labels.]
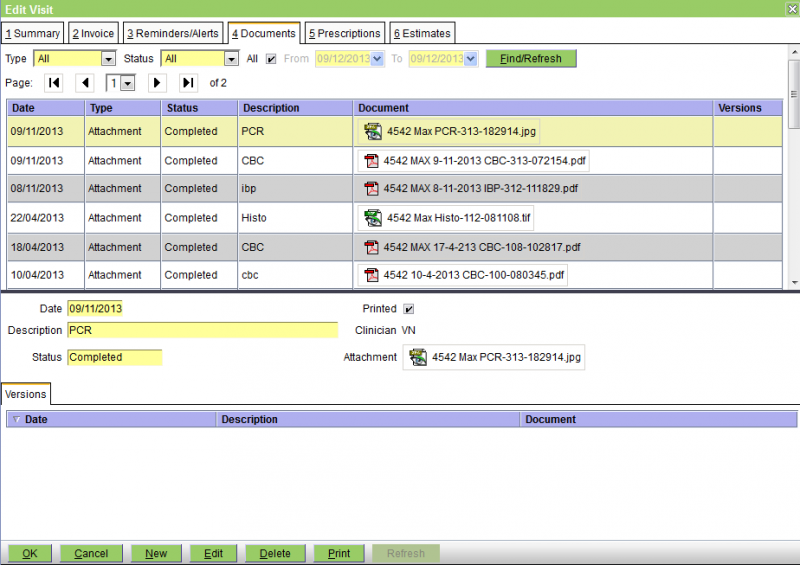
The buttons are as follows:
OK - save any changes and close the Visit Editor
Cancel - cancel any changes and close the Visit Editor
New - create a new document - a window will open allowing you to select the type
Edit - edit the selected document record. If the document has status Finalised you will not be able to edit the record.
Delete - delete the selected document - a confirmation window will be displayed. If the document has status Finalised you will not be able to delete it.
Print - print the selected document (or preview it or email it)
Refresh - (this button only appears when the selected document is a Letter) - refresh the document by regenerating it from its template - a confirmation window will be displayed.
This screen is very similar to the Patients|Medical Records Documents tab - see this for further information.
Confirm Delete
When you press the Delete button on the Visit Editor's Documents tab screen, a confirmation window will appear.
Press OK to confirm or Cancel to abort.
Confirm New
When you press the New button on the Visit Editor's Documents tab screen, the window below will be displayed. Select the type of document that you require and and then press the OK button.

Prescriptions
This is the Prescriptions tab of the Visit Vditor. See Concepts|Prescriptions for background.

The buttons are:
OK - save any changes and close the Visit Editor.
Cancel - cancel any changes and close the Visit Editor.
New - create a new prescription
Edit - edit the selected prescription. If the prescription has been fully dispensed or has expired, it cannot be edited.
Delete - delete the selected prescription. If the prescription has been dispensed or has expired, it cannot be deleted.
Print - prints the selected prescription.
Dispense - dispenses the selected prescription. This displays a medication window that allows the Date, Expiry Date and Clinician to be selected. The Label and Quantity are fixed
Cancel Prescription - cancels the selected prescription, if it hasn't been fully dispensed or expired.
For further information, see the Prescriptions Tab on the Patients|Medical Records screen.
Confirm Delete
When you press the Delete button on the Visit Editor's Prescriptions tab screen, a confirmation window will appear.
Press OK to confirm or Cancel to abort.
Estimates
This is the Estimates tab of the Visit Editor. See Concepts|Estimates for background.
It is very similar to the Customer|Estimates screen, except that entry is restricted to the current patient only. If an estimate exists for another patient, or an estimate contains multiple patients, then it will be excluded. [Careful observers will note that this is a screen shot from a system using a modified label for the Find button and right justified field labels.]
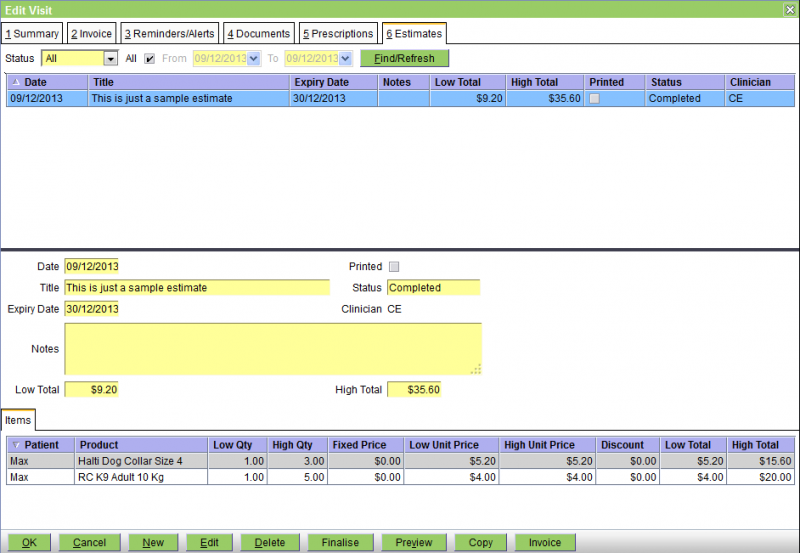
The buttons are as follows:
OK - save any changes and close the Visit Editor
Cancel - cancel any changes and close the Visit Editor
New - create a new estimate
Edit - edit the selected estimate
Delete - delete the selected estimate - a confirmation window will appear
Finalise - change the status of the selected estimate to Finalised - a confirmation window will appear. Finalising the estimate locks it from any further changes. If you confirm the Finalise, then a print window will open allowing you to print or email the estimate.
Preview - download and display the selected estimate
Copy - copy this estimate to create another one
Invoice - generate an invoice from this estimate
Confirm Delete
When you press the Delete button on the Visit Editor's Estimates tab screen, a confirmation window will appear.
Press OK to confirm or Cancel to abort.
Confirm Finalise
When you press the Finalise button on the Visit Editor's Estimates tab screen, a confirmation window will appear.
Press OK to confirm or Cancel to abort.
Confirm Invoice
When you press the Invoice button on the Visit Editor's Estimates tab screen, a confirmation window will appear.
Press OK to confirm or Cancel to abort.