Implementors Handbook
Documentation for implementors of OpenVPMS.
This documentation is all community contributed. Feel free to contribute your own documentation to the website so that other users can benefit.
Note that the online documentation contains sections covering installation. This documention is version specific, and should be consulted for information about the version you are installing.
Installation Documentation
This documentation is all community contributed. Feel free to contribute your own documentation to the website so that other users can benefit. If there is no documentation for your operating system please use the windows install docs as a guide and then contribute back the documentation to the community for your operating system.
NOTE: the online documentation contains sections covering installation.
This documention is version specific, and should be consulted for information about the version you are installing.
The OpenVPMS 2.3 installation documentation is located here.
Package Guidelines
This page contains the package guidelines for OpenVPMS as per the date this file was updated. Where a package mentioned here has been superseded by its maintainer we recommend the use of that new package unless specifically mentioned here.
Java
Oracle Java 8.x - Java Runtime Environment. (ie JRE)
Alternatively
Oracle JDK 8.x
OpenJDK 8.x
Apache Tomcat
Tomcat 7.x
OpenOffice
OpenOffice 4.x
Apache MySQL
Mysql 5.5.x
Mysql Connector for Java 5.x
Additional helpful but not required Software
Mysql Notifier 1.x
MySQL Workbench
JasperSoft Studio 6.x
Windows
Installing OpenVPMS on Windows 10
Contents
- Download Files
- Install Java8
- Set Java Environment Variable
- Open Port 3306 in your Windows Firewall
- Install MySQL
- Install MySQL GUI Tools
- MySQL Configuration
- Apache Installation
- Configure Apache Tomcat
- OpenOffice Installation
- Configure OpenOffice Path
- MySQL Database Driver Setup
- OpenVPMS Database Setup
- OpenVPMS Service User Setup
- Apache Tomcat Service Setup
- OpenVPMS Application Test/Run
- OpenVPMS Application From Other PCs on Network
Introduction
This tutorial describes one user's step-by-step installation of OpenVPMS 2.x on a PC with a Windows 10 32-bit or 64-bit operating system. Originally written with images for Windows 7, there have been some changes in software upgrades, appearance, links and images will be updated for Windows 10 if there's any significant difference. Update advice: Apps are updated and links are accurate as of 18 November 2021. This guide is not an official OpenVPMS guide.
When installing OpenVPMS you should
- be logged in on an account with Administrator privileges;
- consider disabling UAC will also smooth the installation process. This will become important especially when trying to configure Tomcat.
Download OpenVPMS Installation And Other Required Files
- Download the latest openVPMS Installation files.
Unzip the Installation Pack onto your C: drive. This should create a C:\openvpms-release-2.n.n folder with the necessary files to install OpenVPMS.
You don't need the version number in the folder name - it's fine to just rename the folder to "OpenVPMS". This will be useful if you have other software that accesses OpenVPMS: if you upgrade versions, you won't need to alter those other software packages.
Create a folder called, say C:\openVPMS\Installation Files.
- Download Open Office 4.1.n from openoffice.org and save in C:\OpenVPMS\Installation Files folder.
- Download Java 8 SE Runtime Environment from the Java Downloads page and save it to C:\OpenVPMS\Installation Files.
You only need the RunTime Environment version (64-bit or 32-bit).
Java 11 can be installed however there are a number of locale changes in Java 11, compared to Java 8. This causes differences in formatting for date functions that use the LONG, MEDIUM and SHORT date formats.
From my reading of the Oracle Binary Code License for Java 8 "Oracle grants you a non-exclusive, non-transferable, limited license without license fees to reproduce and use internally the Software complete and unmodified for the sole purpose of running Programs".
- Download the Windows MySQL 5.5.62 installation file from the MySQL archives site.site. Scroll down and select highest 5.5.nn version.
Select Windows Essentials (x86 for 32-bit or x64 for 64-bit) and download into C:\OpenVPMS\Installation Files
- Download the MYSQL GUI Tools from the MySQL archive site.
Select the Windowsx86 for 32-bit or x64 for 64-bit and save into C:\OpenVPMS\Installation Files folder. Yes I know this is deprecated but has the MySQL Administrator which makes for simple (and essential) admin connection and setup and is quicker to install (no requirement for MS Visual C++) than MySQL Workbench (however for running SQL queries and other tasks, Workbench is the accessory app of choice).
- Download the MYSQL Java Connector 8.0.nn from the MySQL site: click on Archives, then select 8.0.27 and Platform Independent .ZIP file and save into C:\OpenVPMS\Installation Files folder.
- Download Apache Tomcat (at time of writing current version is 9.0.x) from the Apache Software Foundation site.
Select the Core | 32/64-bit Windows Service Installer option and save into C:\OpenVPMS\Installation Files folder.
Start Installation
0. Back Up
Consider taking a System Image of your server before you start - sometimes timewise it's easier to revert to "start over" rather than fix recalcitrant errors.
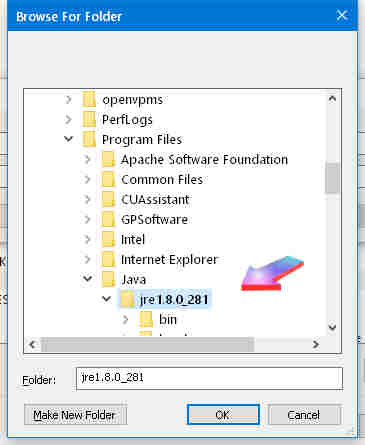
1. Install Java8 (updated)
Execute jre-8u281-windows-x64 (or x86 for 32-bit).exe and accept all defaults.
2. Set Java 8 Environment Variable (updated)
Right-Click on Computer icon on desktop, then click "Properties".
Click on Advanced System Settings (1), Advanced (2) and then Environment Variables (3):
Under System Variables (lower box - upper box is for User Variables), click on New(4), then enter JAVA_HOME and browse to the Java folder and press OK
The end result should look like this:
Click OK, OK, then close the remaining window.


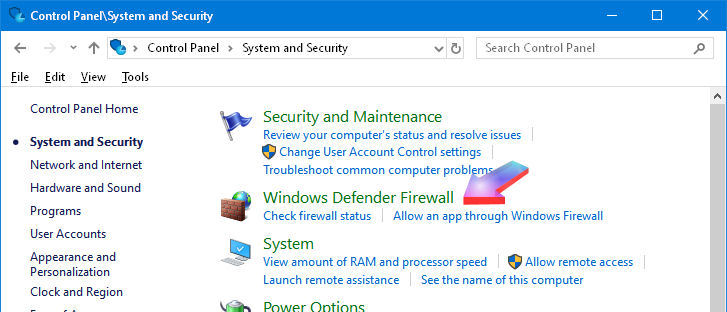
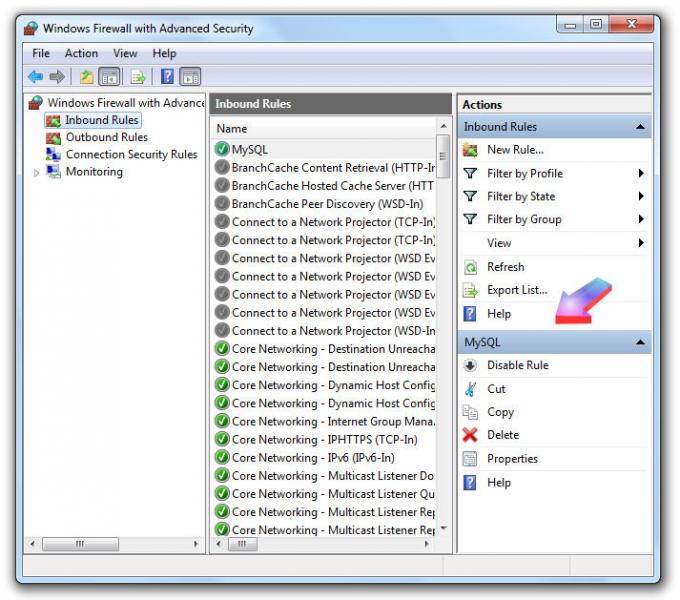
3. Open Port 3306 in your Windows Firewall
Click Start | Control Panel | System And Security:
Click on Windows Defender Firewall:
Click on Advanced Settings, then follow images as below:
You've confirmed the new rule, so close the window (click on red x).
If you're going to access OpenVPMS from other computers on a network within the clinic, you'll also need to allow port 8080.
Repeat the steps above, this time typing in 8080 as the TCP Port to allow and name it Openvpms.4. Install MySQL
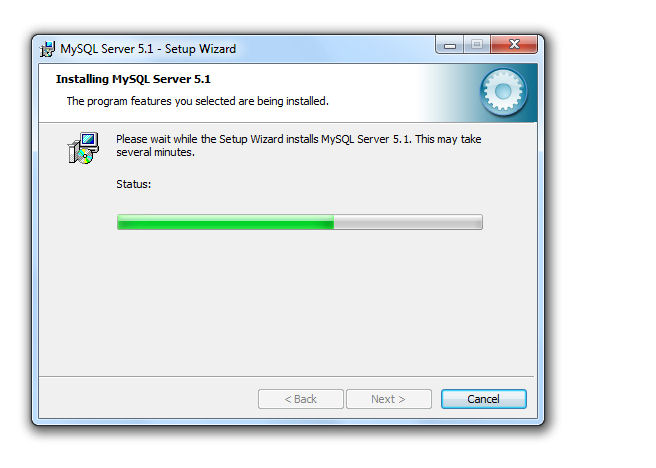
Double-click on the "mysql-essential-5.5.nn-win32.msi" file you have downloaded and follow the images below:
Be patient: at this point, it may take some time for the progress bar to start moving (on one of my PCs, over three minutes), so just leave the PC to do its work: the following screens should be self-explanatory: press Next when prompted to do so:
At next screen, DO NOT CLICK "Finish" until you read the following steps:
STOP HERE! (Don't click "Finish" just yet)
Leave the above window on the screen.
Why?
You need to set read/write permissions before configuration or the Configuration Wizard will fail at execution, thus:
Open Windows Explorer, browse to ProgramFiles\MySQL\MySQL Server 5.5.
Right-click on the folder and select Properties; un-check Read-Only tab:
Click on Security tab, then Edit, then Users:
Click on Allow | Full Control then click OK:
Ensure "Apply changes..." (1) is checked and click Ok Ok.
Now go ahead and click "Finish" to load the Configuration Wizard (2).
At this screen, click on the drop-down arrow and select \Data:
Your screen should then look like this: if it does, click Next to continue:
You now need to ensure all permissions are enabled. In previous Windows7 installation instructions, this step was placed here. However, in indows 10 pro, if you didn't un-set the read-only flag and set Full Control permissions before configuring MySQL the Configuration app would crash at the "Starting Service" button.
It won't hurt to check your permissions here before continuing.
- Click on "Computer" icon, browse to C:\Program Files\MySQL;
- right-click on MySQL Server 5.5 (1);
- select Properties and then click on Security (2) tab;
- select Users (3);
- then click Edit (4), click Users (5) and click to enable Full Control (6);
- and press OK.
5. Install MySQL GUI Tools
Double-click on the "mysql-gui-tools-5.0-r17-win32.msi" file you have downloaded to commence installation. Whilst this is an older app, you need this to configure MySQL in the next step. This step is essential but is not listed in the official OpenVPMS documentation
Click "Next" all the way through to complete default installation.
6. MySQL Configuration
Click Start | MySql | right-click MySql Administrator | More | Run As Administrator.
Click on the button with the ellipsis (...) arrowed in image below:
Click on New Connection:
Change New Connection to localhost then fill in the fields (root, openvpms, localhost) as per image below and click Apply | Close:
You should now be back at the opening screen: select localhost from the drop-down box and click OK
On the left-hand pane, click Startup Variables (1), then click on the InnoDB Parameters (2) tab.
Scroll down to, and check Buffer Pool Size (3) and type in 1024 (recommended for OpenVPMS with minimum of 4GB RAM).
Scroll down to, and check One File Per Table (4).
Click on Advanced Networking tab (5), enable Max. packet size and set to 16 M (6), then click Apply Changes (7) and close the window (8).
7. Apache Installation
Double-click on the "apache-tomcat-9.0.nn.exe" file you have downloaded to commence installation (app hasn't changed in appearance from 7->8->9); click Next;
Click Next;
Fill in User Name as admin and password as openvpms click Next;
Installer should find your Java installation without any intervention by you; if you have more than one, pick highest build number, then click Next
Accept default installation folder and click Install;
8. Configure Apache Tomcat
At this point you would normally click Start, right-click on Configure Tomcat and select Run As Administrator:
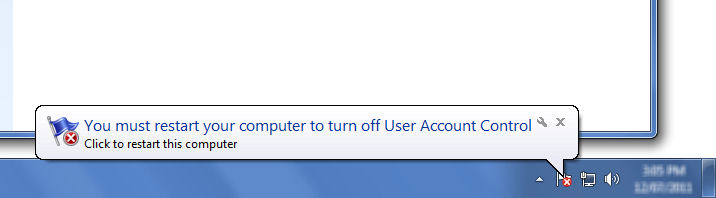
But unfortunately you would be presented with this error message:
You need to take two additional steps:
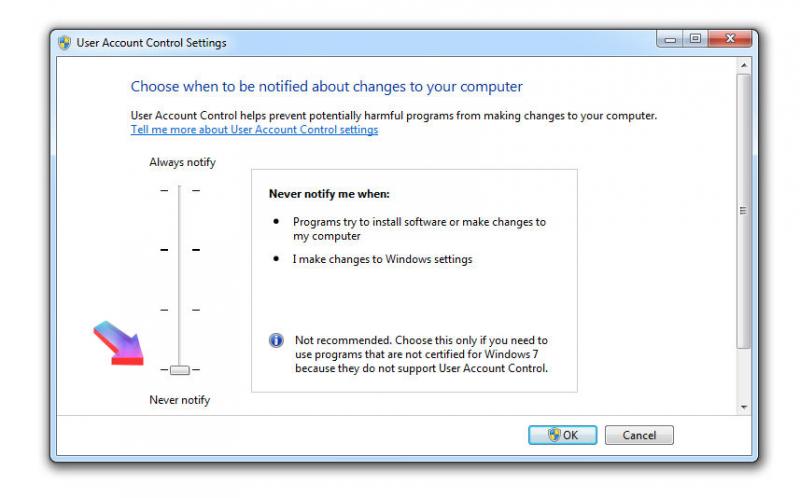
1. disable UAC. Click Start | Control Panel | System and Security | Change User Account Control Settings and set UAC to "Never Notify:
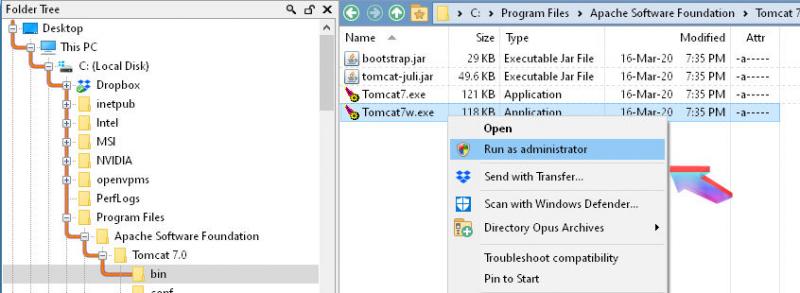
2. Browse to Tomcat 9.0\bin folder, right-click on Tomcat9w.exe and select Run As Administrator:
Click on Java tab. In Java Options, scroll down to the bottom and add the following two lines:
-XX:PermSize=128m
-XincgcSet Initial Memory Pool and Maximum Memory Pool to the same value, depending on the number of users; say 512 at a minimum. Try 1024 for 4GB memory or higher.
Changes required are highlighted in yellow in image below:
Click OK and close.9. OpenOffice Installation
Double-click on the "Apache_OpenOffice_4.n.n_Win_x86_install_en-GB.exe" file you have downloaded to commence installation; accept all default values as per the following images:
Once installed, start OpenOffice, fill in details and from the main menu select Tools | Options:
Click on On-line Update and un-check Check for updates automatically;
Click OK to close options.
Close OpenOffice.
10. Configure OpenOffice Path
Right-Click on Computer icon on desktop, then click "Properties".
Click on Advanced System Settings (1), Advanced (2) and then Environment Variables (3):
Under System Variables (lower box ), click on Path (4), then click Edit (5);
Press New (6), then Browse (7) and select c:\Program Files (x86)\OpenOffice4\program (8) and press Ok (9):
Click OK, then close the remaining window.Test your OpenOffice path configuration.
Click Start | Windows System | Command Prompt:
Type in swriter and press Enter. OpenOffice/Writer should start. Two reasons for doing this:
- If it does start, you've set the path correctly.
- OpenVPMS starts OpenOffice in the background; if OpenOffice is waiting for questions on registration and checking for updates to be answered, letter merging etc. won't work.
Reopening OO makes sure it is not asking for you to participate in surveys etc.
If all's well, close OpenOffice.11. MySQL Database Driver Setup
- Open the downloaded mysql-connector-java-8.0.nn.zip.
- Extract connector file mysql-connector-java-8.0.nn.jar to Tomcat library folder i.e C:\Program Files\Apache Software Foundation\Tomcat 9.0\lib.
- Extract the same connector to c:\OpenVPMS\lib folder.
So far so good, it should only have taken you eight minutes (or less) on an average >2018 PC to get to this point.
12. OpenVPMS Database Setup
Click Start | Windows System | Command Prompt, navigate to C:\OpenVPMS\bin.
Type in toolbox configure and press Enter.
{Note: if using Powershell instead of Command Prompt,you Right-Click-Start | WindowsPowerShell, navigate to C:\OpenVPMS\bin, you will need to type in ./toolbox configure and press Enter .}
Type in toolbox database --create -u root -p openvpms and press Enter.
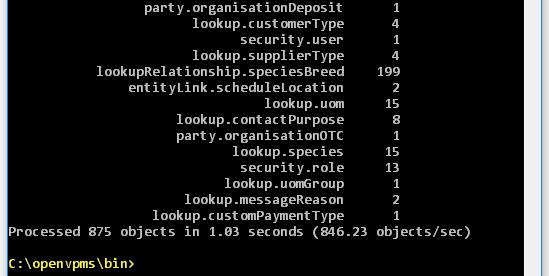
Type in dataload setup and press Enter. Lots of messages will scroll down the creen - first and last few shown here.
Type in toolbox template --load --size A4 --all and press Enter (type A5 if using that size of paper). Again lots of messages will scroll down the screen.
14. OpenVPMS Web Application Setup
Still at the Command prompt window at c:\openvpms\bin type toolbox war and press Enter.
Copy openvpms.war from c:\openvpms\webapps to c:\Program Files\Apache Software Foundation\Tomcat 9.0\webapps.
Copy the openvpms.war file from c:\openvpms\webapps
to Tomcat Webapps folder at C:\Program Files\Apache Software Foundation\Tomcat 6.0\webapps.
16. Apache Tomcat Service Setup
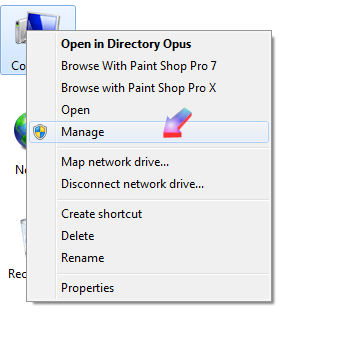
On the desktop, right-click on Computer icon and select Manage.
In Services and Applications, click on Services, right-click on Apache Tomcat 9 and select Properties. Click on General tab and change Startup type to Automatic.
Click OK to close.Click on Apache Tomcat 9, then click on Restart the service.
One last thing: right-click on Properties again, select General and check Startup Type: make sure it's set to Automatic, then click Ok, then Stop and then Restart the service. (Aggravatingly, after all this setup had been completed, I got a "refused connection" at Step 17 below. I went back to Tomcat Properties and found that the StartupType had reset itself(?) to Manual.)
17. OpenVPMS Application Test/Run
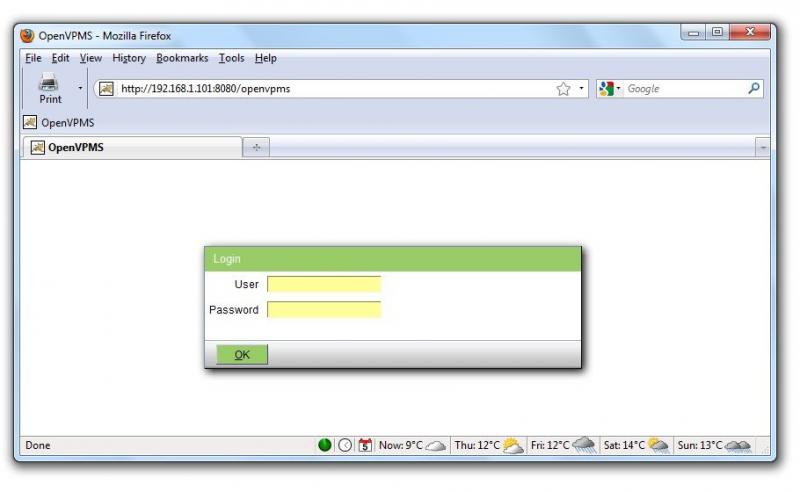
Open up your internet browser this address: http://localhost:8080/openvpms/app
Login to OpenVPMS using user 'admin' and password 'admin'
Eureka! It works!
18. OpenVPMS Application From Other PCs on Network
First, you need to establish the IPv4 address of your server (the PC that your OpenVPMS installation resides on):
Open a Command Prompt (Start | Windows System | Command Prompt) and type ipconfig and press Enter.
Look for the line IPv4 address: in the screenshot below, it's 192.168.1.101:
To start OpenVPMS on another PC on the network, you will need to type in http://IPv4_address:8080/openvpms; in example below, http://192.168.1.101:8080/openvpms:
However, there's a distinct possibility that you are told you can't connect to OpenVPMS.
Windows 10 now throws up another gotcha just when you thought you were home free! By default Windows sets networks as public, so when you try to log in to OpenVPMS from another PC on the network, you are denied access.
You need to set the network to Private on the PC containing OpenVPMS.
Follow these steps.
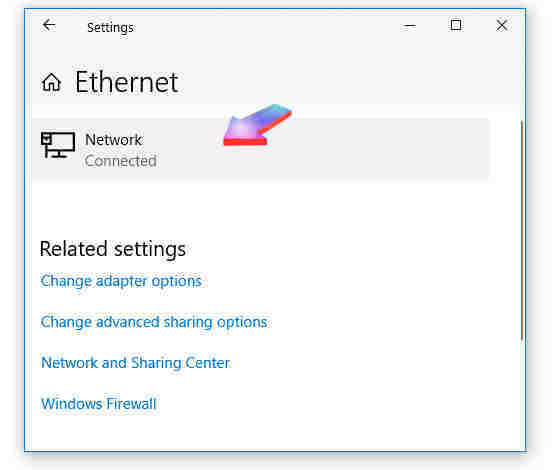
Click Settings (gear wheel) | Network & Internet:
Click Ethernet (or whatever your network is called):
Click Network:
Select Private as your Network profile and close. OpenVPMS should now load from your workstation machine.
Click here to move on to setting up OpenVPMS for use.
This resource is an openVPMS enduser-created tutorial. Constructive criticism and corrections welcome.


Setting up Win 7 tutorial
Awesome tutorial!
A couple notes on update.
1) If you use MySQL full install (aka all bells and whistles) as I needed it for other applications, the new *.msi ver 5.5 is broken. To fix change the data path to something else, c:\openvpms\data will work nicely:) Older versions the *.msi works I am told but I wanted the new version as of 11/12.
2) Difficult to run the mysql.exe file from the command prompt for the db imports on windows 7. I would suggest copying the mysql.exe file from c:\program files\mysql\bin to your Openvpms db directory. Then opening command prompt from accessories. Then change directory to your bin directory and then you can run mysql as the tutorial suggests. Perhaps with MySQL ver 5.5 that option as described in the tutorial has been removed??? Anyway that works well.
Other notes:
Anyways, did a little research and found "Jasper Studio" which is made by Jasper iReports and is very user friendly unlike simply iReports. It is made by the same company and open source. It actually will do the little boxes etc lol so more of my cup of tea since I paint as well and am well versed in Corel products. I would highly recommend it for anyone installing or tweaking their reports. I'll post a sticky in the Implementation documentation. I know, I know, another program to download, but well worth it.
Another issue was that the reports were read / write only thanks to Windows 7 security setting (why the primary user doesn't get admin rights seems rather strange, but I suppose if cell phones worked here etc and mobility then it might be useful to prevent tampering.... although I could think of better things to do but c'est la vie. So something to check if you are having problems.
Thanks again,
Don
cc:// implementation documentation
OpenVPMS Installation (Windows)
Important Note- when installing OpenVPMS you should be logged in on an account that has administrator privileges!
Download OpenVPMS Installation Files
- Download the latest OpenVPMS Installation files . The following assumes OpenVPMS 1.5.1 is being installed.
- Create a folder to unzip the release in. The following assumes a folder named C:\OpenVPMS
- Unzip the Installation Pack to the C:\OpenVPMS folder. This should create a C:\OpenVPMS\openvpms-release-1.5.1 folder with the necessary files to install OpenVPMS.
- Create a folder called C:\OpenVPMS\Installation
Open Office and JDK Installation
- Download Open Office from openoffice.org and save in C:\OpenVPMS\Installation folder.
- Double Click on the installation file in C:\OpenVPMS\Installation folder.
- Unpack to the default location (Desktop)
- Select Complete Installation
- Select File Types Open Office will be default application for. This is your choice !
- Remove Installation Files from Desktop.
- Start Open Office and set options as required.
Open Office Path Configuration
- In My Computer->Properties->Advanced->Environmental Variables double click on System Path variable and add path to OpenOffice program folder to end.
- Click OK to save settings.
JDK Configuration
In order for other applications to be able to find the java installation we need to set an environmental variable on the system.
- Using Windows explorer navigate the the location of the installed java installation.
- Highlight the address bar and copy using Control-C
- Right Click on My Computer and select Properties
- Click on the Advanced tab and then click on Environmental Variable button
- In the System variables section click New
- In Variable Name type JAVA_HOME
- In Variable value hit Control-V. This should enter the path name we copied before.
- Click OK on all open Dialogues.
MySQL Installation
- Download the Windows MySQL installation file from the MySQL site.
- Select Windows Essentials (x86) and download into C:\OpenVPMS\Installation
- Double click mysql-essential-5.0.45-win32.msi in c:\OpenVPMS\installation folder.
- Select Typical Installation
- Skip Sign Up
- Select Configure MySQL Server Now
- Select Developer Machine (Typically on server would select Server machine)
- Select Multifunctional Database
- Select Decision Support option (Larger installs would utilise manual connections settings. OpenVPMS application does connection pooling)
- Select Enable TCP/IP Networking
- Select Enable Strict Mode
- Select Standard Character Set
- Select Install as Windows Service
- Select Include Bin Directory in Path
- Enter the root password as openvpms twice
- Select Enable root access from remote machine
- De-select Anonymous User
- Click Execute
- Sometimes will fail on setting security and give option to Retry. Click Retry and should succeed.
MySQL Configuration
- Stop the MySQL database server. My Computer->Manage->Services->MySQL. Right Click and Stop.
- Navigate to MySQL application folder C:\Program Files\MySQL\MySQL Server 5.0
- Save copy of my.ini file
-
Double click on my.ini file at the bottom of the file add the lines
max_allowed_packet=16M
innodb_file_per_table - save the file
- Restart the MySQL server
MySQL GUI Tools Installation
- Download the MYSQL GUI Tools the MySQL site
- Select the Windows X86 option and save into C:\OpenVPMS\Installation folder.
- Double click on mysql-gui-tools-5.0-r12-win32.msi file in C:\OpenVPMS\Installation folder.
- Accept License
- Select default location
- Select Complete install
- Create shortcut to to MYSQL Administrator on desktop
MySQL Administrator Configuration
- Double Click MySQL Administrator icon
- Click Elipses next to Stored Connections
- Click New Connection Enter localhost, root, openvpms and localhost into fields.
- Click Apply and then Close Select stored connection and enter root password (openvpms) and click OK.
Apache Tomcat Installation
- Download Apache Tomcat and save in C:\OpenVPMS\Installation folder
- Double click on apache-tomcat-5.5.28.exe file in C:\OpenVPMS\installation folder.
- Select webapps in the available components
- Select default location.
- Set the admin password to openvpms
- Select the default JRE location. (If you happen to have mutliple JRE locations select the one installed during the Java SDK installation - Must at least be a 1.5XXX version)
- De-Select ReadMe and Run Apache Tomcat
Apache Tomcat Configuration
- Run Configure Tomcat from Apache Tomcat program menu.
- On Java tab in Java Options section add
-XX:PermSize=128m
-Xincgc
- Set Initial Memory Pool and Maximum Memory Pool to same value dependent on number of users. Suggest 512M.
- Clikc OK
IReport Installation
- Download IReport 3.0.0 from sourceforge and save to C:\OpenVPMS\Installation folder.
- Double click on the iReport installation file in the C:\OpenPMS\Installation folder.
- De-select sources
- Select default location
MySQL Database Driver Setup
- Download MySQL connector from MySQL and save to C:\OpenVPMS\Installation folder
- Copy the connector file mysql-connector-java-5.1.6-bin.jar found in the downloaded zip file to c:\OpenVPMS\openvpms-release-1.5.1\lib folder.
- Copy the same connector to Tomcat shared library folder i.e C:\Program Files\Apache Software Foundation\Tomcat 5.5\shared\lib
OpenVPMS Database Setup
- Open a command prompt.
- Navigate to C:\OpenVPMS\openvpms-release-1.5.1\db
-
Start the mysql command line client and enter the following commands
mysql -u root -p
mysql> source createdb.sql;
mysql> use openvpms;
mysql> source db.sql;
mysql> quit; - Navigate to C:\OpenVPMS\openvpms-release-1.5.1\bin
- To load the database with data suitable for a site converting from an existing system next enter dataload base
- To load the database with data suitable for a new site enter dataload setup
OpenVPMS Service User setup
- In My Computer -> Manage select Local Users and Computers -> Users
- Right click in User Pane and select New User...
- Enter user name and password as openvpms (you may use a different password for security but remember for later Apache Tomcat step)
- De-select change password at next login.
- Click Create.
- Double click new user in list and add to Administrators group.
- Logout and login as new openvpms user.
- Run open office and check no startup prompts.
- Logout and login as your local administrator.
OpenVPMS Application Install
- Copy openvpms.war file from c:\OpenVPMS\openvpms-release-1.5.1\webapps to Tomcat Webapps folder at C:\Program Files\Apache Software Foundation\Tomcat 5.5\webapps
Apache Tomcat Service setup
- In My Computer ->Manage ->Services right click the Apache Tomcat service and select properties
- On General tab select a Startup type of Automatic
- On Logon tab enter openvpms and your openvpms user account password setup above.
- Click on OK
- Start the service by right clicking and selecting Start
OpenVPMS Test
- Open up your Internet Browser and in the address enter http://localhost:8080/openvpms/app
- Login to OpenVPMS using user 'admin' and password 'admin'
OpenVPMS (1.2) Installation on Vista (FR)
Based on OpenVPMS Installation (Windows), here is the tasks list with plenty of screen shots I 've made while I installed OpenVPMS on the new computer with Vista (french version).
Linux
install problem
Tony, I'm trying to do a fresh build, and I'm failing at the step To build the archetypes: > cd openvpms-archetypes > maven -Dmaven.test.skip jar:install Based on the error (shown below) and poking around the ibibio site, it looks like at least one of the directories that it's looking for do not exist. Where would I fix this? Thanks Lee Error text: __ __ | \/ |__ _Apache__ ___ | |\/| / _` \ V / -_) ' \ ~ intelligent projects ~ |_| |_\__,_|\_/\___|_||_| v. 1.0.2 Attempting to download spring-aop-1.2.5.jar. Error retrieving artifact from [http://www.ibiblio.org/maven/springframework/jar s/spring-aop-1.2.5.jar]: java.io.IOException: Unknown error downloading; status code was: 301 WARNING: Failed to download spring-aop-1.2.5.jar. Attempting to download aopalliance-1.0.jar. Error retrieving artifact from [http://www.ibiblio.org/maven/aopalliance/jars/ao palliance-1.0.jar]: java.io.IOException: Unknown error downloading; status code was: 301 WARNING: Failed to download aopalliance-1.0.jar. Attempting to download drools-all-jdk5-2.1.jar. Error retrieving artifact from [http://www.ibiblio.org/maven/drools/jars/drools- all-jdk5-2.1.jar]: java.io.IOException: Unknown error downloading; status code w as: 301 WARNING: Failed to download drools-all-jdk5-2.1.jar. Attempting to download janino-2.3.8.jar. Error retrieving artifact from [http://www.ibiblio.org/maven/janino/jars/janino- 2.3.8.jar]: java.io.IOException: Unknown error downloading; status code was: 301 WARNING: Failed to download janino-2.3.8.jar. Attempting to download commons-beanutils-core-1.7.0.jar. Error retrieving artifact from [http://www.ibiblio.org/maven/commons-beanutils/j ars/commons-beanutils-core-1.7.0.jar]: java.io.IOException: Unknown error downlo ading; status code was: 301 WARNING: Failed to download commons-beanutils-core-1.7.0.jar. Attempting to download oro-2.0.8.jar. Error retrieving artifact from [http://www.ibiblio.org/maven/oro/jars/oro-2.0.8. jar]: java.io.IOException: Unknown error downloading; status code was: 301 WARNING: Failed to download oro-2.0.8.jar. The build cannot continue because of the following unsatisfied dependencies: spring-aop-1.2.5.jar (try downloading from http://www.springframework.org/) aopalliance-1.0.jar (try downloading from http://www.aopalliance.org/) drools-all-jdk5-2.1.jar (try downloading from http://drools.codehaus.org/) janino-2.3.8.jar (try downloading from http://www.janino.net/) commons-beanutils-core-1.7.0.jar (try downloading from http://jakarta.apache.org /commons/jxpath/) oro-2.0.8.jar (try downloading from http://jakarta.apache.org) Total time: 9 seconds Finished at: Sun Jan 14 23:10:54 EST 2007 C:\openvpms\openvpms-archetypes>Installing on FreeBSD...
Hi:
Just wondering if anyone has tried installing this on FreeBSD 7.0 RELEASE?
We have Tomcat5.5, Mysql 5.0.33, Sun JDK 1.5.0_13 running on a FreeBSD Machine and I can't seem to figure out how to get the database loaded.
If anyone has any experience or installation instructions, I would appreciate your help....
Regards,
Fred Schnittke
How to Setup Ubuntu Server ready to Install OpenVPMS
Install the Operating System
Install the appropriate Ubuntu Server operating system. If want a GUI you can do this with ubuntu desktop and then install all the dependencies as described. This setup has been tested on Ubuntu 9.10 but should work at least on 8.10 or more recent. If you are installing the server edition install mysql, tomcat6, LAMP stack and printer server when prompted during the installation process.
Install Required Software
From a command prompt install the following packages and their dependancies if they are not already installed:
sudo apt-get install mysql-server phpmyadmin tomcat6 tomcat6-admin libmysql-java
Make Required Configuration Changes
Increase Memory Limit of PHP
sudo nano /etc/php5/apache2/php.ini
Increase upload_max_filesize from 2M to 20M
This will allow you to import the database using phpmyadmin
Create a symbolic link for the mysql-java connector in tomcat
sudo ln -s /usr/share/java/mysql-connector* /usr/share/tomcat6/lib/
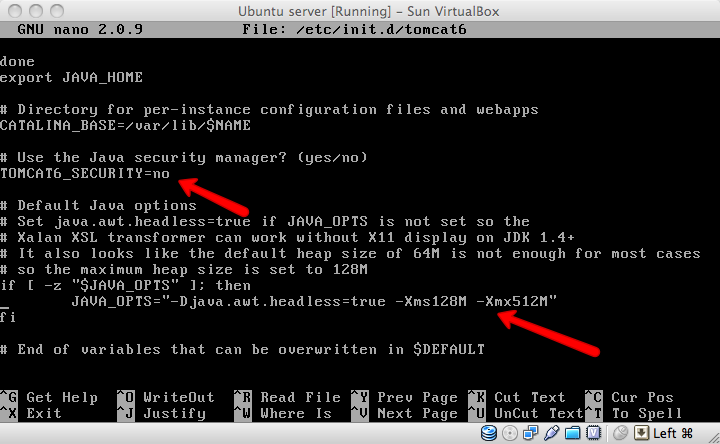
Change the ubuntu default settings in tomcat6
sudo nano /etc/default/tomcat6
- Increase tomcat memory by adding the following to the JAVA_OPTS line: -Xms128M -Xmx512M (This amount of memory seems to work well for me.)
- Disable the tomcat6 java security manager by changing the following line from the default '=yes' to: TOMCAT6_SECURITY=no. I'm no java security expert but from my reading this default setting is probably overkill and the webapp won't run with it turned on. Please correct me if there's a better way.
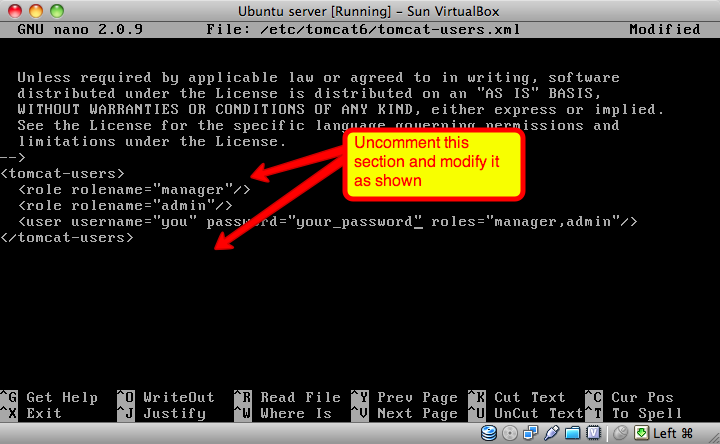
- Add a user to tomcat with admin and manager roles so you can access the web-manager
sudo nano /etc/tomcat6/tomcat-users.xml
Restart the services:
- Restart apache
sudo /etc/init.d/apache2 restart
- Restart tomcat
sudo /etc/init.d/tomcat6 restart
Note: if you get the message "Could not reliably determine the server’s fully qualified domain name, using 127.0.1.1 for ServerName" starting Apache, then you need to edit /etc/apache2/httpd.conf (which will initially be empty) to contain the one line
ServerName localhost
Then restart apache and the error should not appear.
Now we are ready to install OpenVPMS
Firstly, need to get the IP address of your server? Use the ifconfig command.
OpenVPMS installation instructions to follow
Enable OpenVPMS Logging in Ubuntu
Ubuntu mucks up the path for the log files to be written so by default it is trying to right them in the root directory and gets permission denied so you don't get any output.
To fix it correct the path in the log4.properties file in your OpenVPMS install:
sudo nano /var/lib/tomcat6/webapps/openvpms/WEB-INF/classes/log4j.properties
Change log4j.appender.fileout.File=openvpms.log to log4j.appender.fileout.File=/var/lib/tomcat6/webapps/openvpms.log
and
Change log4j.appender.fullout.File=openvpms-full.log to log4j.appender.fullout.File=/var/lib/tomcat6/webapps/openvpms-full.log
Now save your changes and restart tomcat and your log files should now be there.
Install Openoffice headless as a service in Ubuntu
It's taken me forever to figure out to get this going so now that I've found it out here's the solution (thanks to this post: http://code.google.com/p/openmeetings/wiki/OpenOfficeConverter#Starting_OO_in_headless_with_Version_OpenOffice_3.0_++)
First of all install the headless openoffice from the repositories:
sudo apt-get install openoffice.org-headless openoffice.org-writer openoffice.org-draw
The 2 latter packages are required or you will get an error message: This url is not supported
Now you need to create a script to start it as a service:
sudo nano /etc/init.d/openoffice.sh
Paste the following code into that file:
#!/bin/bash
# openoffice.org headless server script
#
# chkconfig: 2345 80 30
# description: headless openoffice server script
# processname: openoffice
#
# Author: Vic Vijayakumar
# Modified by Federico Ch. Tomasczik
#
OOo_HOME=/usr/bin
SOFFICE_PATH=$OOo_HOME/soffice
PIDFILE=/var/run/openoffice-server.pidset -e
case "$1" in
start)
if [ -f $PIDFILE ]; then
echo "OpenOffice headless server has already started."
sleep 5
exit
fi
echo "Starting OpenOffice headless server"
$SOFFICE_PATH -headless -nologo -nofirststartwizard -accept="socket,host=127.0.0.1,port=8100;urp" & > /dev/null 2>&1
touch $PIDFILE
;;
stop)
if [ -f $PIDFILE ]; then
echo "Stopping OpenOffice headless server."
killall -9 soffice && killall -9 soffice.bin
rm -f $PIDFILE
exit
fi
echo "Openoffice headless server is not running."
exit
;;
*)
echo "Usage: $0 {start|stop}"
exit 1
esac
exit 0
Exit the nano text editor saving the file as you do.
Now make the script executable:
sudo chmod 0755 /etc/init.d/openoffice.sh
Make it start automatically on reboot by executing this command:
sudo update-rc.d openoffice.sh defaults
Now start the service by running
sudo /etc/init.d/openoffice.sh start
Now all should be good!
Linux Install Guide
Introduction
This guide describes how to install OpenVPMS on your veterinary clinic.
The guide is intentionally brief and describes the most typical installation for OpenVPMS. After completing the installation, you will be ready to start using OpenVPMS for your veterinary clinic.
Installation checklist
OpenVPMS will run on most standard Sun JavaEE environments with an additional component of OpenOffice (used for document generation). You will need to make sure your einvornment includes:
- Java Development Kit
- Java Application Server
- Relational database with a type 4 database driver
- OpenOffice (headless version)
We have tested the following Sun JavaEE environments
- Apache Tomcat with mySQL
- IBM WebSphere Application Server Community Edition with mySQL and mySQL Connector/J
Note: Sun JavaEE applications like OpenVPMS can run on many different type of operating systems like Microsoft Windows, Mac OS X, Linux and more!
If you need help installing the prerequiste software, please see the Install Guide for those products.
Download and Install OpenVPMS
To perform the installation you will need to download and unpack the OpenVPMS installation files.
Download the latest installation archive from: http://www.openvpms.org/download
After downloading, unpack the ZIP file in a directory - <openvpms_tmp>.
Install the OpenVPMS database schema
Configures the database to store data using UTF8 (to support english and double-byte characters like Chinese). By default, mysql uses latin1 instead of UTF8 to store data. You need to add a configuration setting into your database so that the server and client does everything by UTF8.
MySQL Configuration - Linux (my.cnf) or Windows (my.ini):
[mysqld]
character-set-server=utf8
default-collation=utf8_unicode_ci

[client]
default-character-set=utf8
This populates the database with the database structure.
	Linux/Windows:
cd <openvpms_tmp>
cd db
mysql -u root -p
mysql> drop database openvpms;
mysql> source createdb.sql;
mysql> use openvpms;
mysql> source db.sql;
mysql> quit;
Note: This will create a database "openvpms" with username of "openvpms" and password of "openvpms".
Load default OpenVPMS data
This will load the database with the initial data needed for the application. It will setup a one vet veterinary clinic in Australia.
	Linux:
cd <openvpms_tmp>
cd bin
./dataload.sh setup

Windows:
cd <openvpms_tmp>
cd bin
dataload.sh setup
Note: This will create an administrator user account with username of "admin" and password of "admin". Retain this information for later when we first login to the system.
Configure the Java Application Server to support JasperSoft Reporting
JasperSoft needs to be configured to run in a headless mode for it to generate reports like invoices.
	Linux with IBM WebSphere Application Server Community Edition:
export GERONIMO_OPTS=-Djava.awt.headless=true

Linux with Apache Tomcat:
export CATALINA_OPTS=-Djava.awt.headless=true
Note: Suggested to put environmental settings in your shell startup so that you do not need to execute the command at each time before Java Application Server startup.
Start the OpenOffice daemon
OpenVPMS uses OpenOffice for form generation. As a result, we have to run OpenOffice in a headless mode so that when we generate form slike vaccinations certificates.
	Linux:
soffice.bin -headless -nofirststartwizard -accept="socket,port=8100;urp;" &
Note for Linux: It may help that you add soffice.bin in your path and make the OpenOffice daemon a startup service.
Start the OpenVPMS Document Import daemon
OpenVPMS has the ability to automatically import customer and patient records and patient investigations into the system. This daemon uses the automatic scheduling utility ("at" in Microsoft Windows or "cron" in Linux) provided by the operating system.
	Linux/Windows:
mkdir <openvpms-tmp>/docimport <openvpms-tmp>/docarchive
Within your automatic scheduling utility, set the OpenVPMS document import daemon to run.
	Linux:
echo "cd <openvpms-tmp>/bin/" > /etc/cron.hourly/openvpms-docimport.sh
echo "./docload.sh --byid --source <openvpms-tmp>/docimport --dest <openvpms-tmp>/docarchive --verbose" >> /etc/cron.hourly/openvpms-docimport.sh
chmod 755 /etc/cron.hourly/openvpms-docimport.sh
Install the Database type 4 driver
A database type 4 driver is used to connect the Java Application Server to the database.
Download and copy the mySQL connector/j jar file to <java_home>/jre/lib/ext. This will allow you to skip manually modifying your Java classpath.
Start the Java Application Server daemon
Follow the startup instructions in your Java Application Server.
Install the OpenVPMS Sun JavaEE Web Application Archive (WAR)
Follow the instructions in your Java Application Server to install WARs.
Start the OpenVPMS Sun JavaEE application
Follow the instructions in your Java Application Server to start WARs.
Configure the OpenVPMS
You're almost done. You'll need to setup Scheduling and Work List and once you're done, you'll have a fully working veterinary practice management software system.
Logging in for the first time
By default, the application would be available at http://localhost:8080/openvpms/. Use the username of "admin" and password of "admin" to first login to the system.
Setting up Scheduling
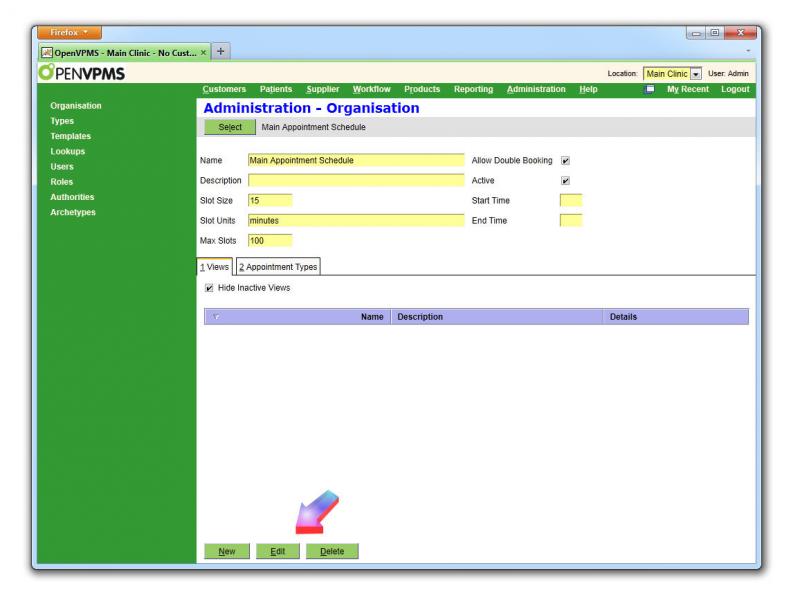
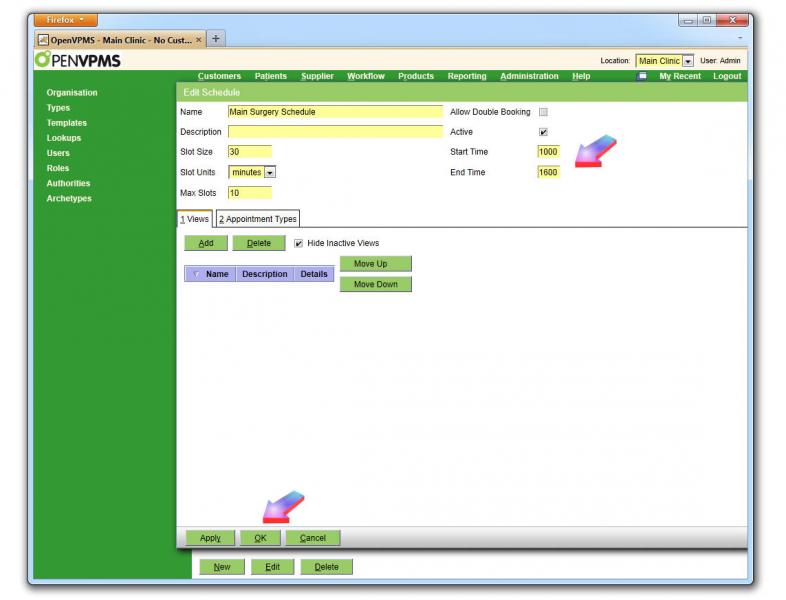
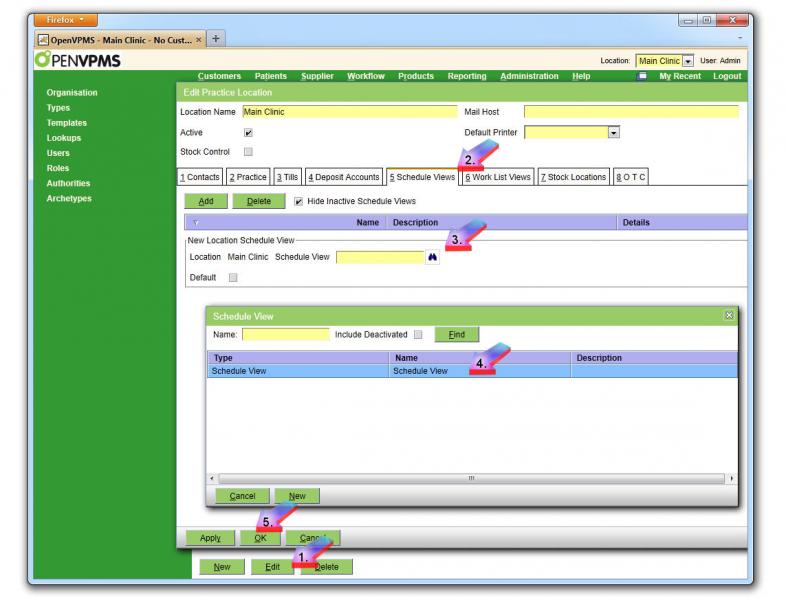
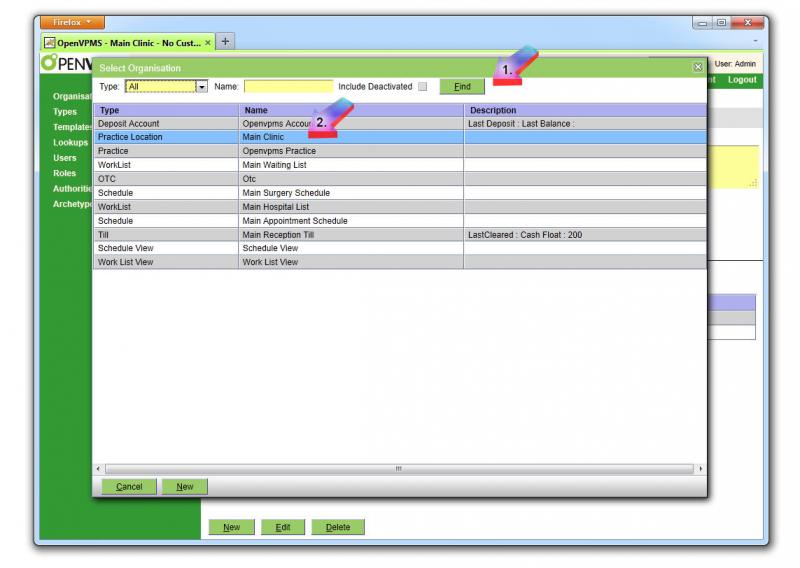
Navigate to "Administration" -> "Organization". Modify the "Main Appointment Schedule" and "Main Surgery Schedule" with start and end hours. Create a new "Schedule View" called "Schedule View". Add the "Main Appointment Schedule" and "Main Surgery Schedule". Click "Ok". Navigate back to "Administration" -> "Organization" and find "Main Clinic". Edit the "Main Clinic" and in the "Scheduling Views", add the "Schedule View" you just created. Save, logout and then re-login and you should be able to navigate to "Scheduling" and be able to add, modify and remove appointments.
Setting up Work List
Navigate to "Administration" -> "Organization". Create a new "Work List View" called "Work List View". Add the "Main Hospital List" and "Main WaitingList". Click "Ok". Navigate back to "Administration" -> "Organization" and find "Main Clinic". Edit the "Main Clinic" and in the "Work List Views", add the "Work List View" you just created. Save, logout and then re-login and you should be able to navigate to "Work List" and be able to add, modify and remove customers/clients on and off lists.
Note: Stock/Inventory Management module is not enabled by default.
Congratuations!
Your veterinary practice management software is now installed!
From this point, here are some other things you might need to customize before "production" use.
- Load customers
- Load patients
- Load products
- Documents templates
- And more!
Mac (OSX)
Quick guide to using openVPMS in OSX with mamp
Requirements:
- openvpms installation files
- MAMP (for mysql database)
- apache tomcat6
- Connector/J
- libreoffice
Download OpenVPMS Installation Files
Download the latest OpenVPMS Installation files. Create a folder within your home folder to unzip the release into.
The following assumes a user named user: Move the package to ~/user/openvpms and unzip the Installation Pack. This should create a ~/user/openvpmsopenvpms-release-x.x.x folder with the necessary files to install OpenVPMS.
Download and install MAMP
Installing MAMP provides a really easy way to configure and run MySQL. Download from http://www.mamp.info/en/downloads/
The free MAMP is fine, you don't need the paid pro version.
Download tomcat6
Download tar.gz core binary distribution of Apache Tomcat version 6 from http://tomcat.apache.org/download-60.cgi
Unpack it and then move it to your home directory so it will be in ~/user/apache-tomcat-6.x.x/lib/
Connector/J
Download the connector/J which is needed to connect openvpms to the database. You then extract it and copy the mysql-connector-java-x.x.x-bin.jar to:
- ~/user/openvpmsopenvpms-release-x.x.x/lib/
- ~/user/apache-tomcat-6.x.x/lib/
Libreoffice
Download libreoffice and install it
Setting the variables and paths
open a terminal window and edit your .profile file eg. type:
nano .profile
add the following to your .profile file
 export JAVA_HOME=/Library/Java/Home

export CATALINA_HOME=/users/user/apache-tomcat-6.0.35

export PATH=/Applications/LibreOffice.app/Contents/MacOS:$PATH
Installing a fresh installation
Start the mysql database using mamp. Using phpmyadmin (installed with mamp) go the import tab and navigate to ~/user/openvpmsopenvpms-release-x.x.x/db/createdb.sql
Import it and then navigate to ~/user/openvpmsopenvpms-release-x.x.x/db/db.sql and import it as well.
Now in a terminal window cd to ~/user/openvpmsopenvpms-release-x.x.x/bin
run the setup by typing
./dataload.sh setup
Copy the openvpms.war from ~/user/openvpmsopenvpms-release-x.x.x/webapps/ to ~/user/apache-tomcat-6.x.x/webapps/
Starting and stopping tomcat
Hopefully now you are ready to go. I installed this a long time ago so to the best of my knowledge I haven't missed any necessary configuration. To start and stop tomcat cd to ~/user/apache-tomcat-6.x.x/bin and then run
./startup.sh
or
./shutdown.sh
using the terminal
Once it starts up you should be able to access openvpms at http://localhost:8080/openvpms/app
Tweaks and customisation
Adding gzip compression to tomcat to improve speed.
Gzipping can result in a significant speed improvement in downloading of files from the tomcat server and is easily enabled in tomcat. When the client (browser) makes a http request it tells the server if it has the ability to deflate. If so the server can gzip files such as xml, css and javascript before they are sent to the client. Significant speed increases are seen in the OpenVPMS web application especially when served from a remote server.
To enable this feature edit the connector in tomcat's server.xml file and add the compression settings as below:
Connector port="8080" maxHttpHeaderSize="8192"

               maxThreads="150" minSpareThreads="25" maxSpareThreads="75"

               enableLookups="false" redirectPort="xxxx" acceptCount="100"

               connectionTimeout="20000" disableUploadTimeout="true" useBodyEncodingForURI="true"

               compressableMimeType="text/html,text/xml,text/css,text/javascript,text/plain" compression="on"

               compressionMinSize="2048" noCompressionUserAgents="gozilla, traviata" />
If you are using firefox you can use the Yslow plugin to check if gzipping is enabled or not. Yslow can also be used to tell you the speed prior to and following enabling compression.
Auto-capitalisation
Since version 1.4, I have been getting frustrated with this function taking capitals out of acronym like FIV (changing it to Fiv) when editing product names or adding few products or fees. Can it be turned off in some areas (it doesn't exist when writing client histories for example).
Glen
Greenvale
Configuring Your New Installation
Setting Up openVPMS: Configuration: Your First Steps.
CONTENTS
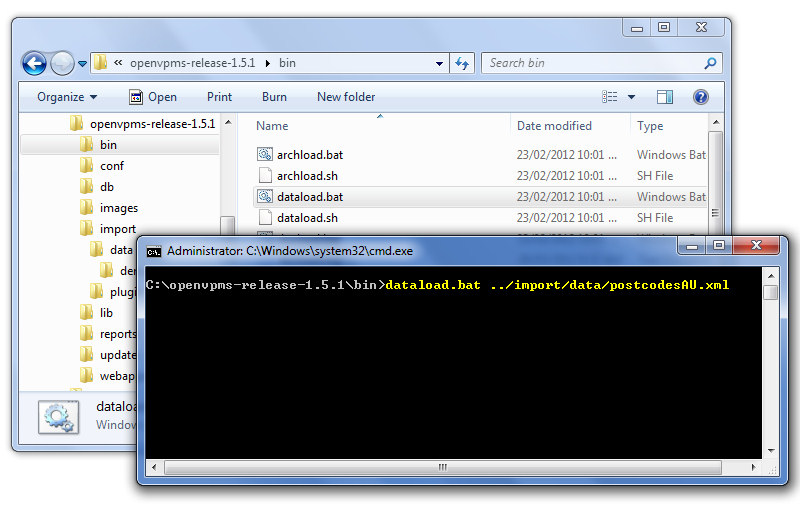
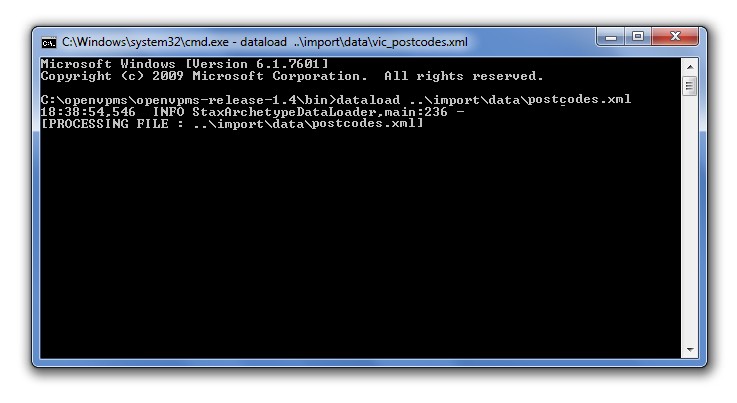
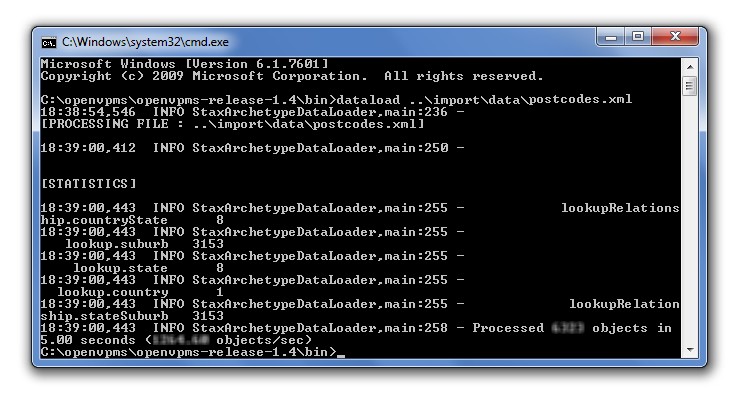
1. Adding Towns and States (all of Australia)
dataload.bat ../import/data/postcodesAU.xml
You will see a series of processing messages.......
.... and be returned to the Command Prompt when the dataload has completed.
Make sure you haven't added any states or suburbs first as this may cause duplicate errors and the load would fail.
Close the Command Prompt window when you're done.
2. Adding Your Clinic Details
Click Edit, delete "openvpms practice" and type in your clinic's name (6), click Contacts (7) | Add (8) and enter your clinic's address (9). Press Apply (10).
Click on Phone Number (11), enter your clinic area code and number (12), and click Apply (13).
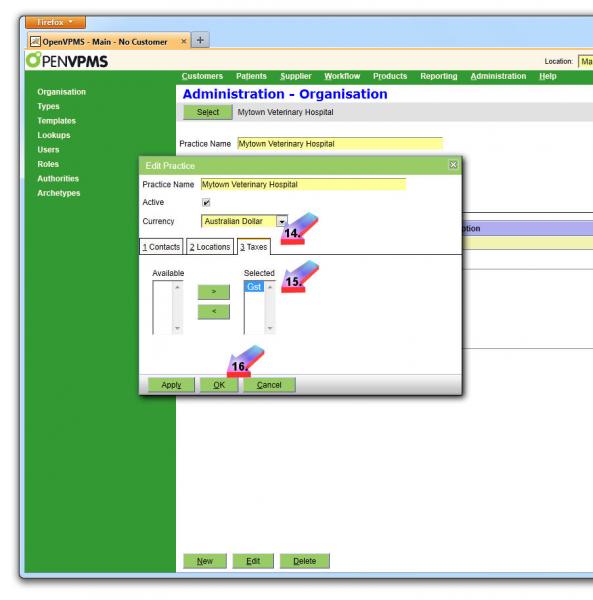
Click on Taxes (14), select Gst in left column and click on arrow to move into "Selected" column (15). Click Ok (16) to save changes and complete this section.
Click Administration | Organisation | Main.
In the same manner as decribed above, set up location and phone number.
Click on Practice | Add | Click on Binoculars | double-click on your hospital name.
Select your default printer from a drop-down box (this should be a printer installed to the server on which openVPMS resides either as a local or network printer).
If you're going to send email from openVPMS, you'll need to place the address of your ISP's smtp mail server here (as shown above). Look in the configuration of your email client (Outlook, Thunderbird, etc) for "outgoing mail server" for the server address. You'll need to add these to this screen: place your ISP's smtp server at Mail Host and your email address and passwords in the appropriate fields, as below:
Click Ok to save changes and complete this section.
3. Setting Up Scheduling
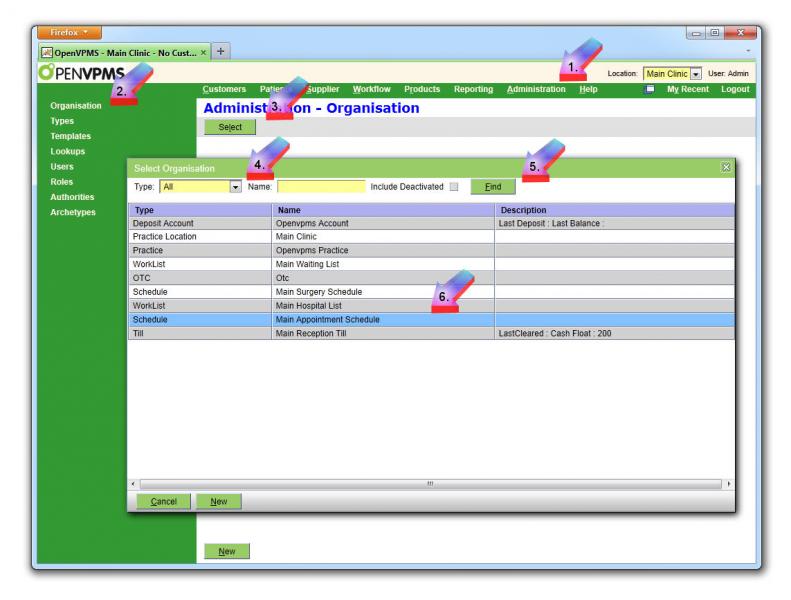
Click on Administration (1) | Organisation (2) | Select (3) | All (4) | Find (5).
Double-click on Main Appointment Schedule (6).
Click on Edit.
Fill in start and end times in 24 hour format (eg 0900), select slot size, and click OK.
Once again, click on Administration | Organisation | Select | All | Find .
Double-click on Main Surgery Schedule.
Fill in start and end times in 24 hour format (eg 0900), select slot size, and click OK.
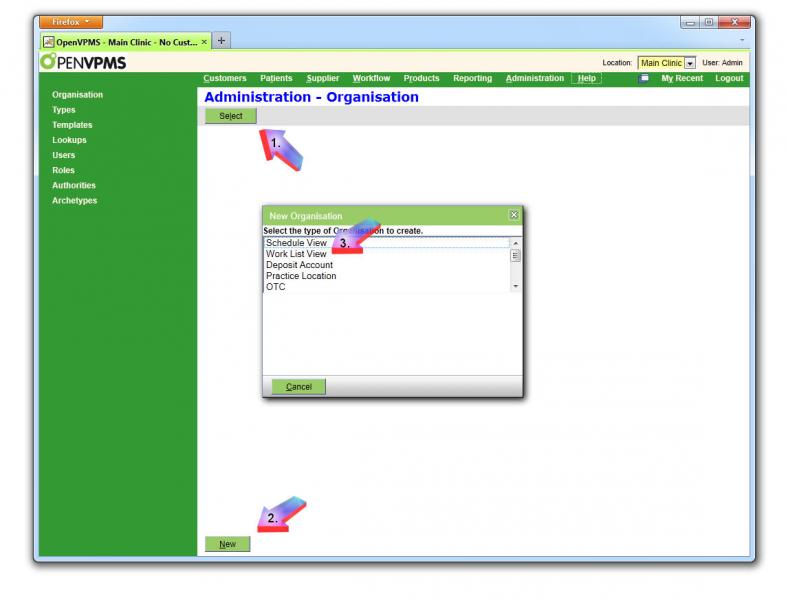
Create a new Schedule View called Schedule View.
Click on Administration | Organisation | Select | Schedule View | Find .
You'll see No results to display.
Click on New.
A new window pops up.
Type in Schedule View (1).
Click Add (2) | Binoculars {Search}.
Double-click on Main Appointment Schedule (4).
Window will close. Press OK (5).
Click Edit (1) | Add (2) | Binoculars {Search} (3).
Double-click on Main Surgery Schedule (4).
Window will close. Press OK (5).
Click on Administration | Organisation | Select | All | Find .
Double-click on Practice Location (Main Clinic).
Click Edit. A new window pops up.
Click Edit (1) | Add (2) | Binoculars {Search} (3).
Double-click on Schedule View (4).
Window will close. Press OK (5).
Log out, then log in again.
Click on Workflow | Scheduling and you should be able to add, modify and remove appointments.
4. Setting Up Work List
Your resultant screen should look like this:
Click on Administration | Organisation | Select | All | Find .
Double-click on Practice Location (Main Clinic).
Click Edit. A new window pops up.
Click Work List Views (2) | Add (3) | Binoculars {Search} (4).
Double-click on Work List View (5).
Window will close. Press OK (6).
Log out, then log in again.
Click on Workflow | Work Lists and you should be able to add, modify and remove clients on and off lists.

Compiled 10 August 2011 by Yuri Sos from many forum posts


Creating a Demo/Training Version of openVPMS on a Windows 7 Computer
CONTENTS
- Turn Off UAC
- Create Demo Database
- Prepare openvpms-demo
- Set Schema Privileges in MySQL Administrator
- Change Background Colour To Orange
- Restart PC And Test
Introduction
This tutorial describes step-by-step preparation of an alternate demo version of openVPMS for training purposes, allowing you to run the system without compromising your main installation.
You should be logged into the PC where openVPMS resides using an account with Administrator privileges.
1. Turn Off User Account Control (UAC)

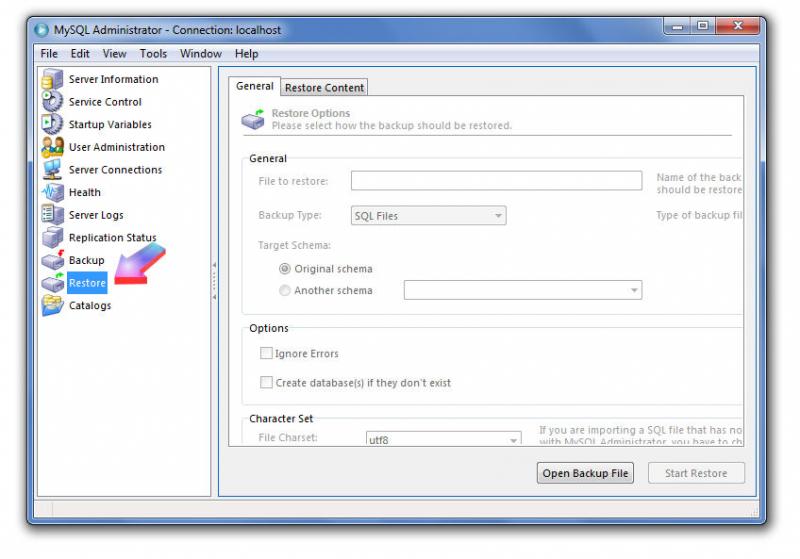
2. Create Demo Database
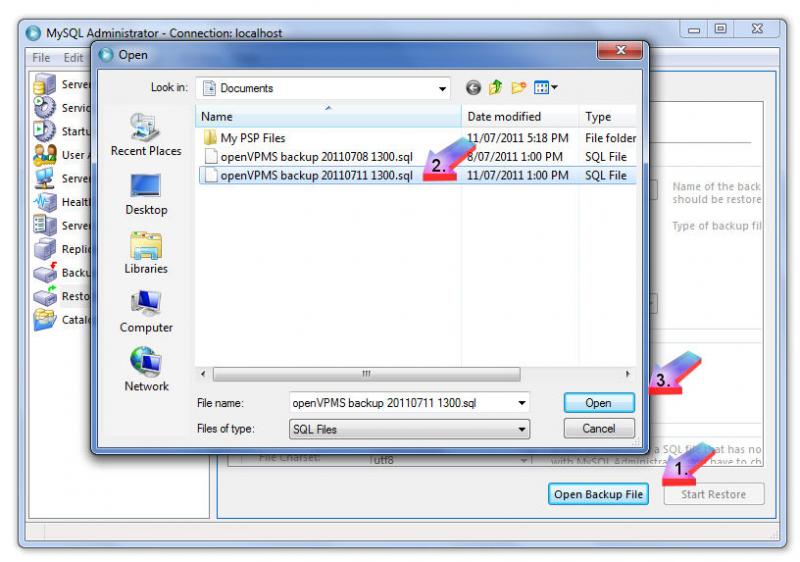
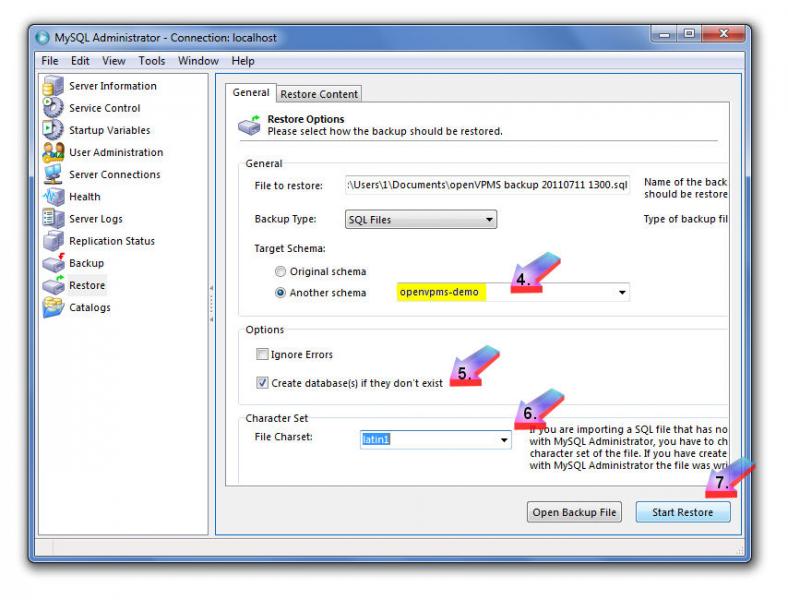
Click Open Backup File (1), select your file (2), and click Open (3):
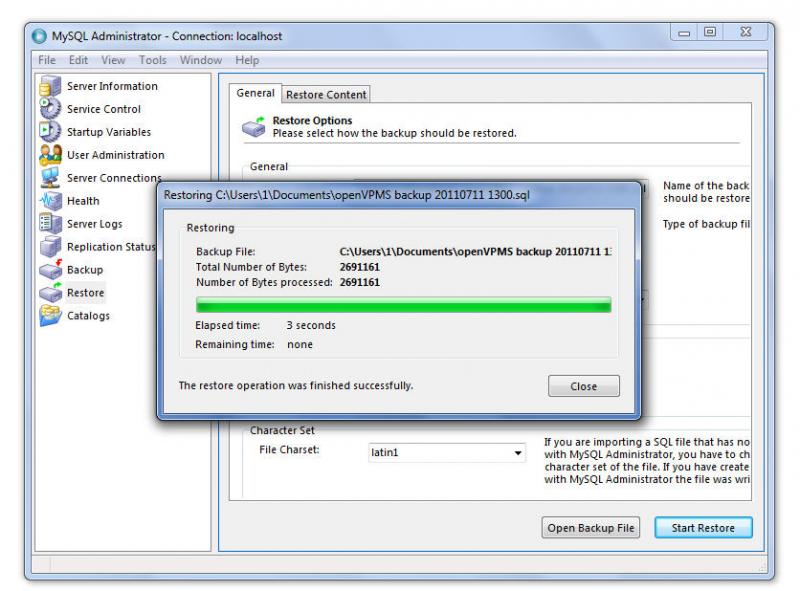
Once the operation is complete, click Close and exit MySQL Administrator.
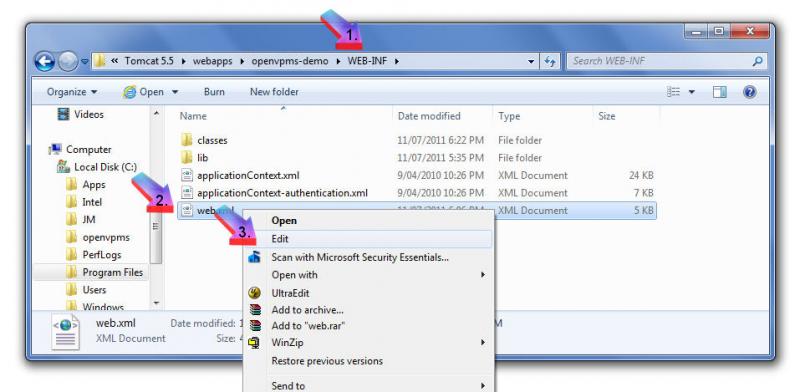
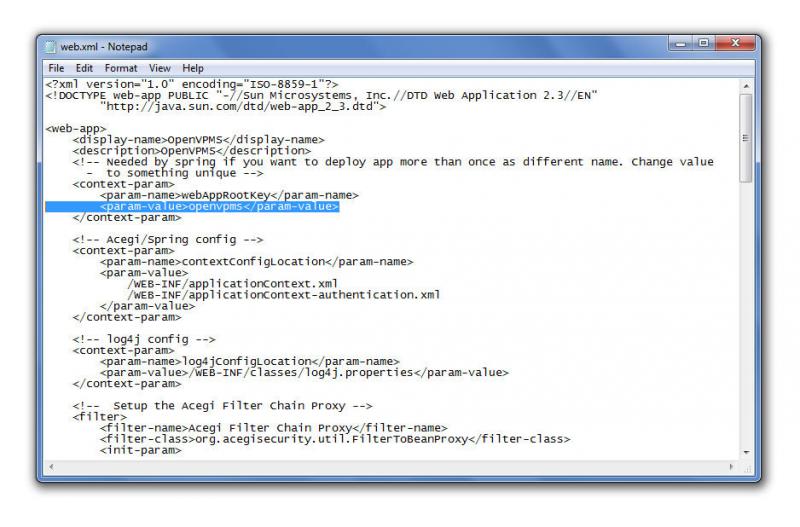
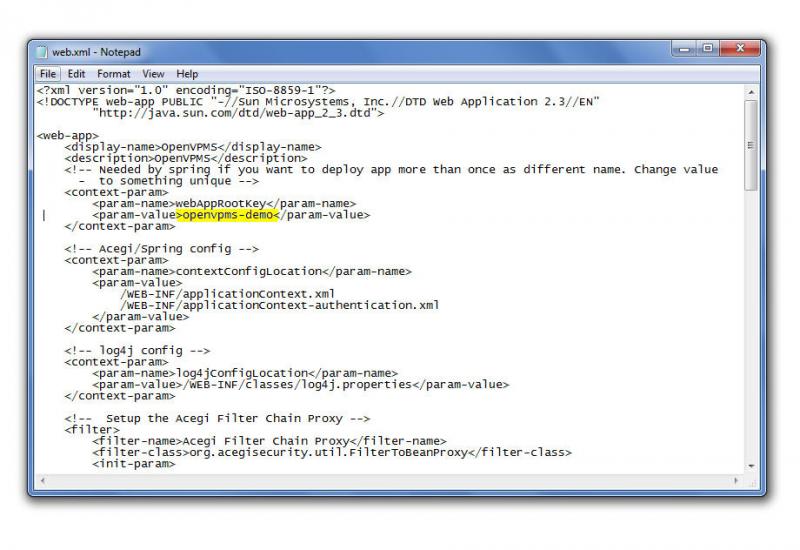
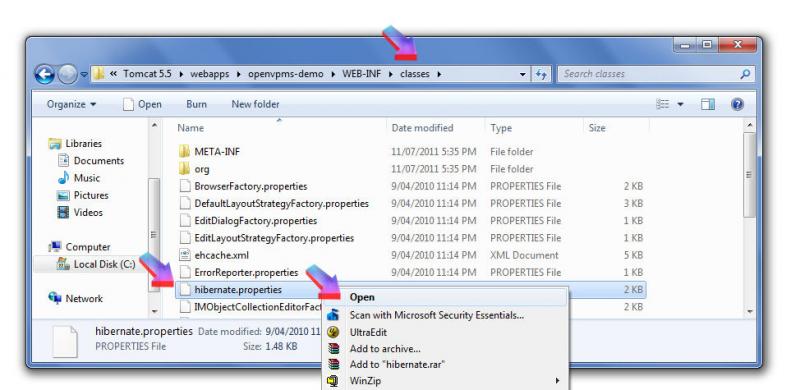
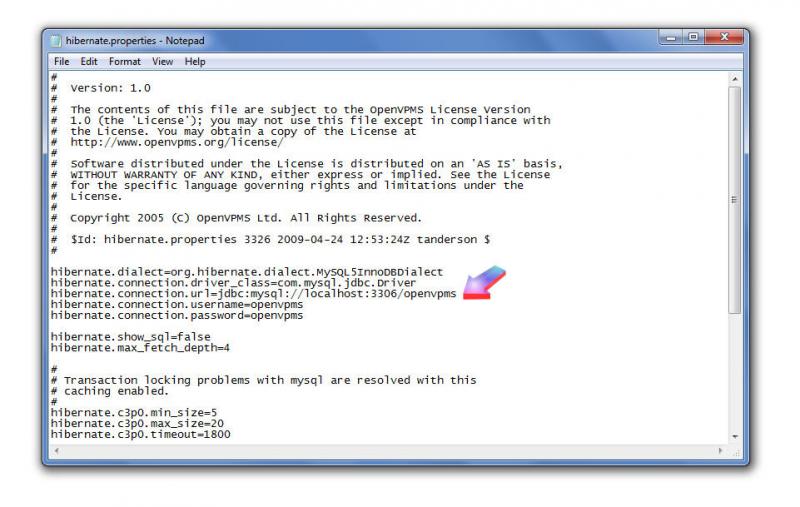
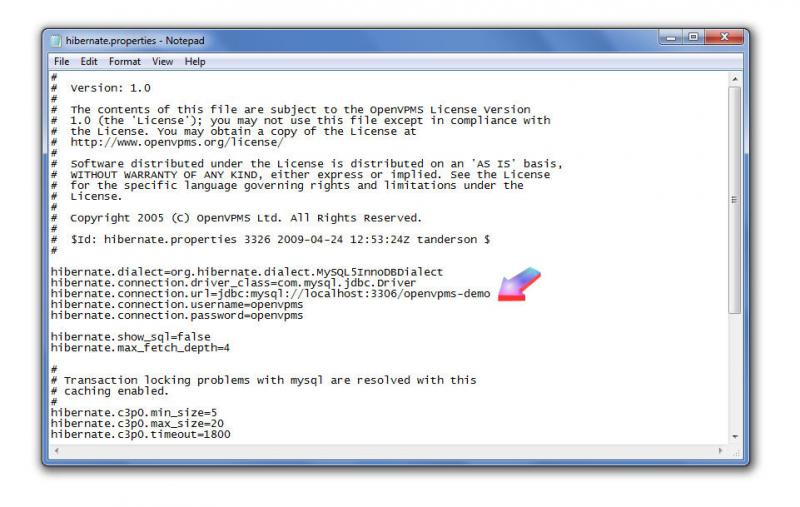
3. Prepare openvpms-demo
Change the openvpms in the highlighted line to read openvpms-demo, thus:<param-value>openvpms-demo</param-value>
hibernate.connection.url=jdbc:mysql://localhost:3306/openvpms-demo
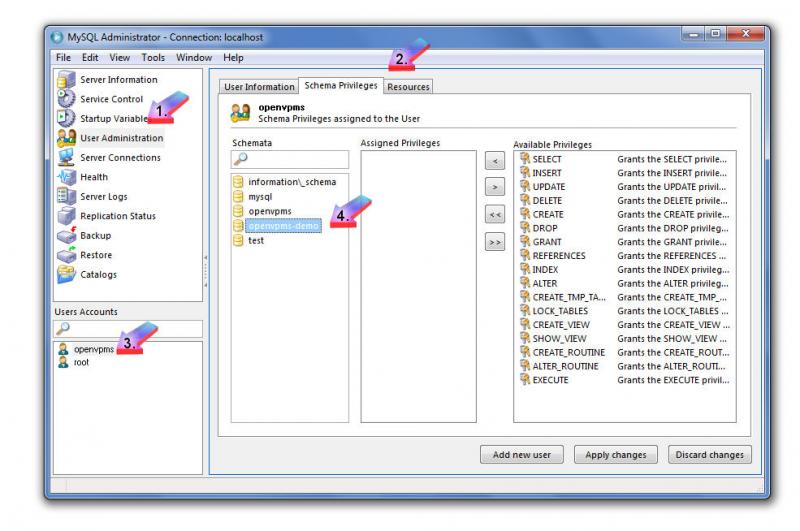
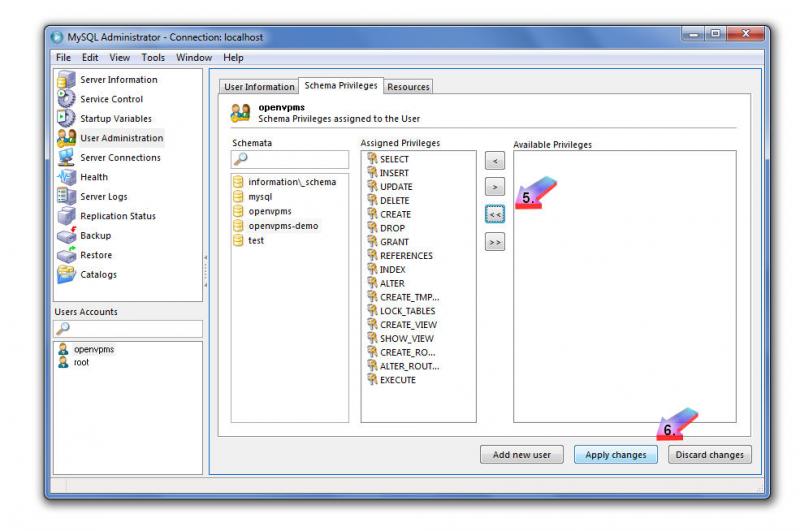
Save and close the file.4. Set Schema Privileges in MySQL Administrator
5. Change Background Colour To Orange
6. Restart and Test
Open Firefox and type in http://localhost:8080/openvpms-demo/app. Log in as admin/admin and you should have openVPMS in orange ready for you to use for training.
To start OpenVPMS-demo on another PC on the network, you will need to type in http://IPv4_address:8080/openvpms-demo; in example below, http://192.168.1.101:8080/openvpms-demo:
Hope this helps.
Created 20 July 2011 (Author: Yuri Sos)


Reminder Setup
Hi,
We are just setting up a new range of reminders and it's been ages since I've worked in this area so I'm a bit rusty. A couple of questions
Cancel Interval: If this is set a for example 2 years. What happens after two years?
Senstivity Interval: Is this to do with the reminder bells appearing? Can someone give me a refresher here?
Sandra.
Setting Up A Scheduled Task in Windows 7
Setting Up A Scheduled Task in Windows 7
This tutorial is essentially an appendix to the tutorial "Automatic Document Importing into OpenVPMS" as the method for setting up the Task Scheduler is different in Windows 7 to that of Windows XP.
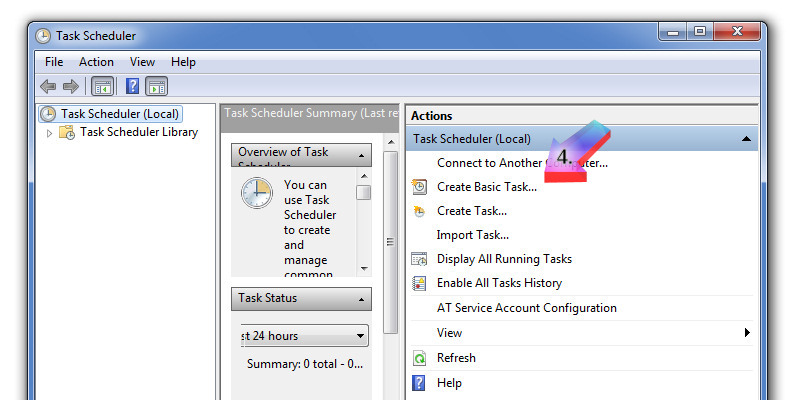
Click Start | Control Panel (1) | System and Security (2) | Schedule Tasks (3):

Click Create Basic Task (4):
Enter a Name(5) and Description (6) for the task, and click Next (7):

Click Daily radio button (8) and click Next (9):

Select Start date (usually left as Today) and a time (10) and click Next (11):

Click the Start A Program radio button (12) and click Next (13):

Copy this command line complete with quotes and paste into the Program/Script field (14):
C:\OpenVPMS\current\bin\docload.bat --byid --source c:\importfolder\in --dest c:\openvpms\importfolder\archive --verbose -o --regexp "^[a-zA-Z]{0,2}(\d+).*"Copy and paste this line into the Start In field (15).
C:\OpenVPMS\current\bin\

Note: once you've pasted in these two parameters, you will need to edit these lines as per the table below:
| C:\OpenVPMS\current | ---> | The location of your current OpenVPMS installation |
| c:\importfolder\in | ---> | The location of the folder containing incoming documents |
| c:\importfolder\archive | ---> | The location of the folder containing documents that have been successfully added to OpenVPMS |
| C:\OpenVPMS\current\bin | ---> | The location of the bin folder in your current OpenVPMS installation |
Once this has been done, click Next (16 in image above).
This message will appear - click Yes (17):

Click to check Open the Properties... box (18) and click Finish (19):

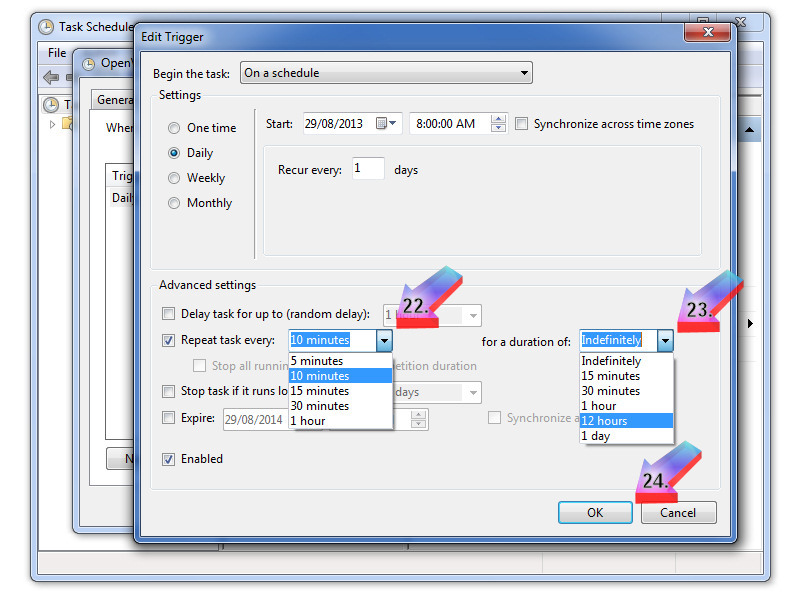
To fine-tune frequency of operation, click on Triggers tab (20) and then Edit (21):

Select how often (22) you want to run the scheduler and for how long (23) and click OK (24) :
You're done.
If you need to edit this task, click on Start | Control Panel (1) | System and Security (2) | Schedule Tasks (3) | Active Tasks (25), click on OpenVPMS DocLoader (26)....

.... and click on Properties (27):

You'll then be at the window as per image above at (20) and (21).
Page created 30-Aug-2013 by Yuri Sos
Setting up electronic deliveries from Provet
By using the electronic supply chain interface it is possible to receive deliveries electronically from Provet. The setup requires a fair bit of configuration but once setup is a massive time saver as deliveries no longer need to be manually entered.
After following these setup instructions you will also be able to order electronically from Provet using OpenVPMS.
Before doing this you need to setup the system with product supplier codes which match with the Provet codes.
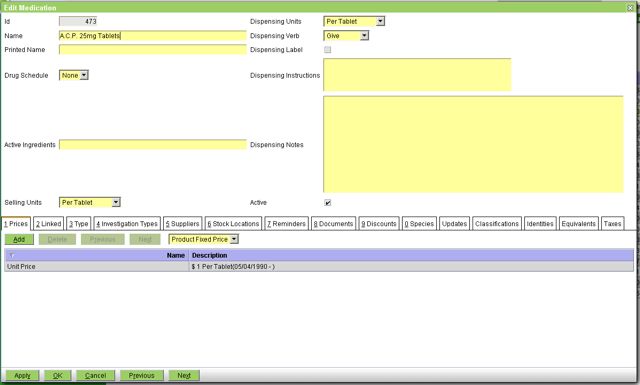
If you edit a product you will see the supplier tab.
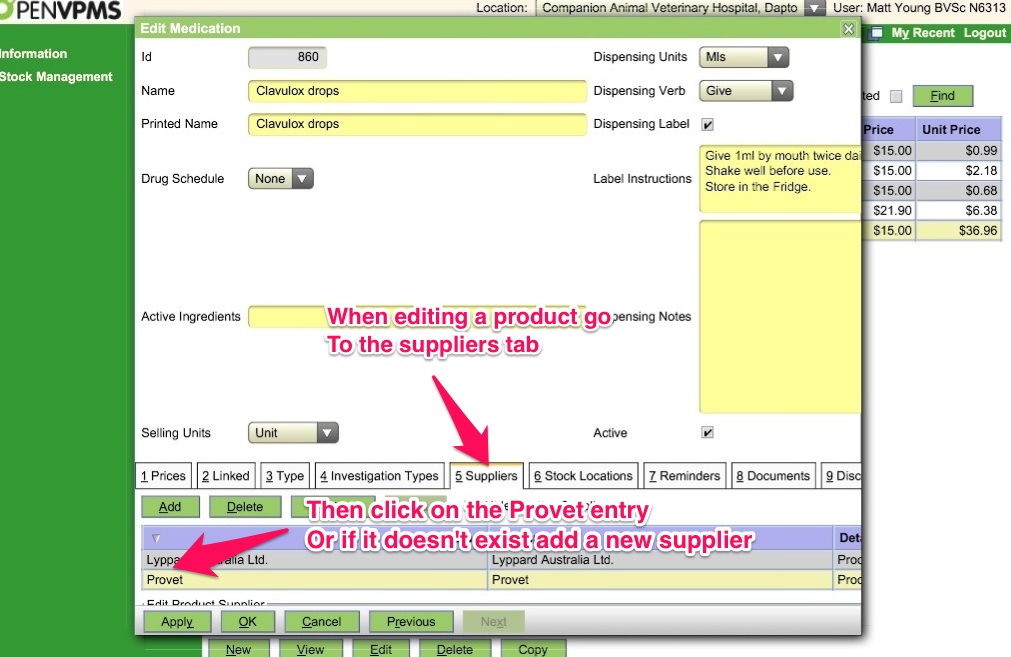
Select this and expand the Provet entry if it exists. If not add a new supplier (Provet). The critical information that needs to be entered is the reorder code which needs to be matched with a Provet code and the package size.

This can be done manually or you could get an implementer to do it in bulk for you. I contacted my rep and gave her a csv list generated using one of the reports in OpenVPMS of all products and then she added the Provet codes to each product for me. I then went through and manually updated the information.
Once that is setup you need to setup the connection to Provet. Go to suppliers > information and edit your Provet entry. The information is entered under the stock location. The service URL is https://vethub.provet.com.au/openvpms/registryservice.svc?wsdl

The other account information (password, etc) can be obtained via your provet account manager.
That completes the setup.
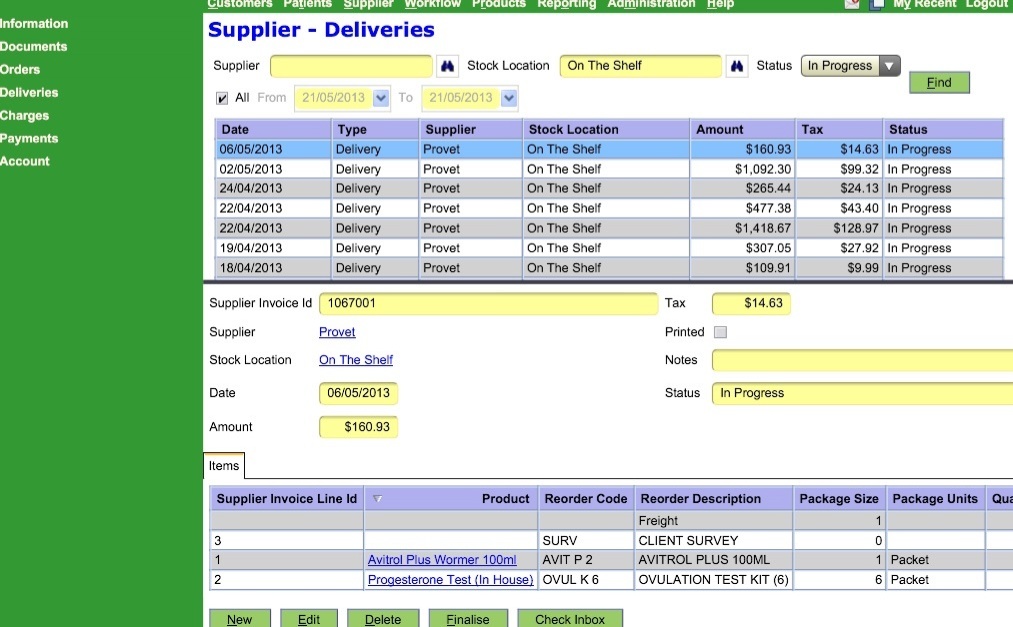
When the customer service staff enter your delivery you receive an email. In general I find that this occurs before the order arrives in most cases. When a delivery needs to be entered go to the suppliers > delivery workspace press the check inbox button (if it's not already showing). Then press the find button to refresh your screen. The invoices arrive as in progress deliveries. Edit the appropriate invoice and make any necessary adjustments. (Eg. Delete the lollies entry). Any products without Provet codes such as new products will need to be matched up with the product on your system but assuming you did all he hard work before this should be minimal. Once you have confirmed all is correct finalise the delivery.
Upgrade Documentation
Follow the instructions to upgrade your installation.
Updating OpenVPMS to 1.2-Beta-1
This page outlines the required steps to upgrade a 1.1 release OpenVPMS installation to release 1.2-Beta-1.
| Step | Description |
|---|---|
| Download OpenVPMS Installation Files |
|
| Stop Tomcat Service |
|
| OpenVPMS Database Upgrade |
|
| Download and install the Mysql JDBC driver | This release does not package the Mysql database JDBC driver that is required by OpenVPMS to talk to a Mysql database installation. This is due to license restrictions on the Mysql connector. Using your current OpenVPMS-1.1 installation you can copy the necessary files from this installation to the new 1.2 installation and Tomcat using these instructions:
|
| Reload the Archetypes |
|
| Update the OpenVPMS web application |
|
| Start Tomcat |
|
Updating OpenVPMS to version 1.1
This page outlines the required steps to upgrade a 1.0 release OpenVPMS installation to release 1.1.
| Step | Description |
|---|---|
| Download OpenVPMS Installation Files |
|
| Stop Tomcat Service |
|
| OpenVPMS Database Upgrade |
|
| Reload the Archetypes |
|
| Update the OpenVPMS web application |
|
| Start Tomcat |
|
Upgrading to OpenVPMS version 1.3
This page outlines the required steps to upgrade a 1.2 release OpenVPMS installation to release 1.3.
| Step | Description |
|---|---|
| Download OpenVPMS Installation Files |
|
| Stop Tomcat Service |
|
| Database Backup | The 1.2 to 1.3 database upgrade process is quite extensive so we strongly suggest performing a MySQL database backup prior to attempting the upgrade. Use the MySQl administrative tool or phpmyadmin under Linux to create a backup. |
| OpenVPMS Database Upgrade | Depening on the size of your OpenVPMS database the upgrade process can take some time so we suggest you give yourself plenty of time for the process to complete.
|
| Download and install the Mysql JDBC driver | This release does not package the Mysql database JDBC driver that is required by OpenVPMS to talk to a Mysql database installation. This is due to license restrictions on the Mysql connector. Using your current OpenVPMS-1.2 installation you can copy the necessary files from this installation to the new 1.2 installation and Tomcat using these instructions:
|
| Reload the Archetypes |
|
| Update the OpenVPMS web application |
|
| Start Tomcat |
|
| Software Configuration |
Version 1.3 consists of some significant software changes, specifically the new enhanced scheduler. You will need to do some significant configuration steps in order to get the Scheduling and Worklist workspaces operational. This includes:
This version also includes automatic post code lookups using a new suburb lookup. We suggest you:
If you have any questions on these ad other software changes please post them on the forum. |
Upgrading to OpenVPMS version 1.4
This page outlines the required steps to upgrade a 1.3 release OpenVPMS installation to release 1.4.
| Step | Description |
|---|---|
| Download OpenVPMS Installation Files |
|
| Stop Tomcat Service |
|
| Database Backup | The 1.3 to 1.4 database upgrade process is quite extensive so we strongly suggest performing a MySQL database backup prior to attempting the upgrade. Use the MySQl administrative tool or phpmyadmin under Linux to create a backup. |
| OpenVPMS Database Upgrade | Depending on the size of your OpenVPMS database the upgrade process can take some time so we suggest you give yourself plenty of time for the process to complete.
|
| Download and install the Mysql JDBC driver | This release does not package the Mysql database JDBC driver that is required by OpenVPMS to talk to a Mysql database installation. This is due to license restrictions on the Mysql connector. Using your current OpenVPMS-1.3 installation you can copy the necessary files from this installation to the new 1.3installation and Tomcat using these instructions:
|
| Reload the Archetypes |
|
| Update the OpenVPMS web application |
|
| Start Tomcat |
|
Upgrading to OpenVPMS version 1.5.1
Upgrading to v1.5.1 from v1.4
-
Download the OpenVPMS installation files from here. Unzip the installation pack onto your OpenVPMS server: this should create an openvpms-release-1.5.1 folder.
-
Back up your OpenVPMS database.
-
Stop Tomcat:
1. Right-click on Computer;
2. Click Manage;
3. Click Services and Applications | Services;
4. Click on Apache Tomcat n.n;
5. Click on Stop.
-
Navigate to db folder. Open Command Prompt (Ctrl-Shift-Right Click):
-
Start the mysql command line client and enter the following commands highlighted in yellow (don't leave out the semi-colon):
mysql -u root -p. Enter your password. Mysql prompt appears.
mysql> use openvpms;
mysql> source migrate-1.4-to-1.5.sql;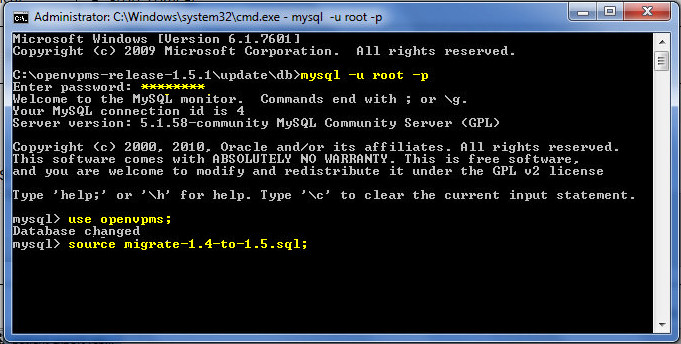
-
Allow command to run then quit;.

-
Copy connector.jar
from c:\openvpms-release-1.4\lib
to c:\openvpms-release-1.5.1\lib.
This file should already be in your Program Files\Tomcat n.n\shared\lib\ folder.
-
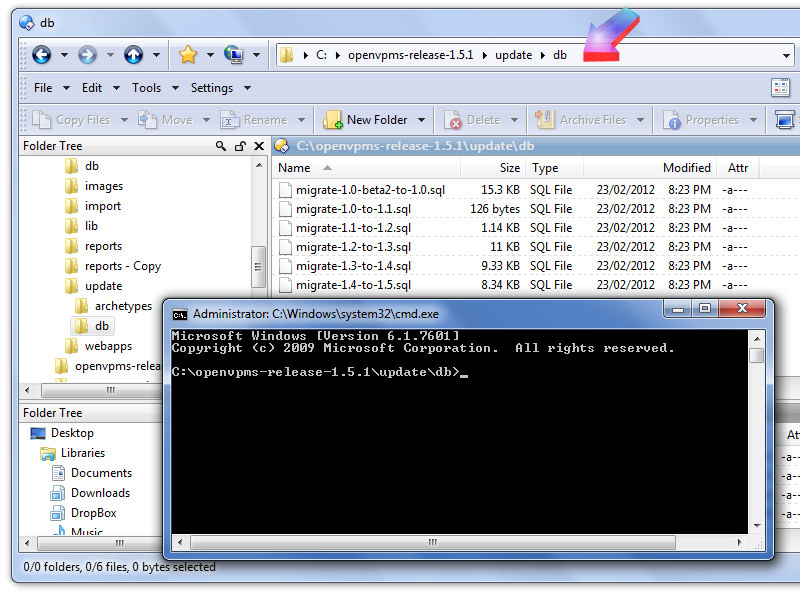
Browse to bin folder and open command prompt (Ctrl-Shift-Right Click):
Run archload. Close window when complete.
-
Navigate to C:\Program Files\Apache Software Foundation\Tomcat n.n\webapps.
Select and delete both the openvpms folder and the the openvpms.war file.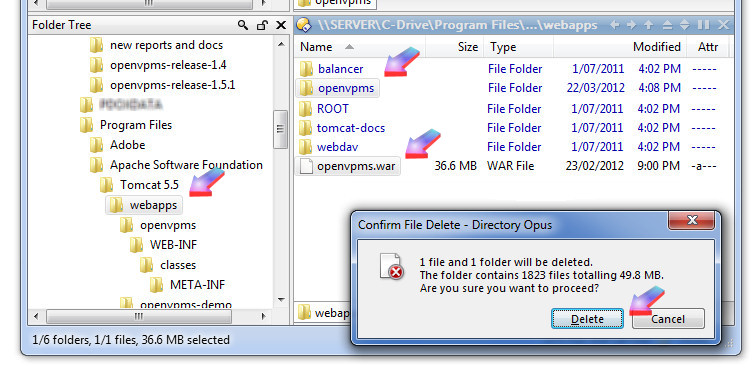
-
Copy .war file from c:\openvpms-release-1.5\lib
to C:\Program Files\Apache Software Foundation\Tomcat n.n\webapps:

-
Close everything. Restart Tomcat. Start openVPMS.

Created 21 Mar 2012, updated 7 Aug 2012
Upgrading to OpenVPMS version 1.6
Upgrading to v1.6 from v1.5.1
-
Download the OpenVPMS installation files from here. Unzip the installation pack onto your OpenVPMS server: this should create an openvpms-release-1.6 folder.
-
Back up your OpenVPMS database.
-
Stop Tomcat:
1. Right-click on Computer;
2. Click Manage;
3. Click Services and Applications | Services;
4. Click on Apache Tomcat n.n;
5. Click on Stop. -
Copy connector.jar from c:\openvpms-release-1.5.1\lib
to
c:\openvpms-release-1.6\lib.
This file should already be in your Program Files\Tomcat n.n\shared\lib\ folder (Tomcat v5 or lower) or Program Files\Tomcat 6.0+\lib\ folder (Tomcat v6 or higher).
-
Browse to bin folder and open command prompt (Ctrl-Shift-Right Click):
Run archload. Nothing is visible on the screen, but you'll notice lots of disk activity. After a minute or so, the prompt re-appears when the batch file has completed. Close window.
-
Navigate to C:\Program Files\Apache Software Foundation\Tomcat n.n\webapps.
Select and delete both the openvpms folder and the the openvpms.war file. -
Copy .war file from c:\openvpms-release-1.6\webapps
to
C:\Program Files\Apache Software Foundation\Tomcat n.n\webapps:
-
Close everything. Restart Tomcat. Start OpenVPMS: there will be a delay the first time you start OpenVPMS as Tomcat rebuilds its webapps openvpms folder; then it all works perfectly!

-
Click on the subscribe link to email OpenVPMS for your subscription registration key (use this link either to subscribe, or, if you already have a subscription, to obtain your key).
When you receive your registration key,download it to your hard drive.
Click on Administration | Organisation | Practice (1,2,3).
Click on Subscription (4) then Upload (5).
Browse to your saved subscription key (6) and Send it to OpenVPMS (7).
-
Your details are now embedded into OpenVPMS. Click OK to close this window.

-
You will see your subscription status whenever you log onto OpenVPMS.....

.....or whenever you click on Help.
Created 15 Aug 2012, updated 07 Jan 2013
1.5 Release Implementation Guide
This guide provides a valuable resource for implementers who want to understand some of the key software changes that have been incorporated in the 1.5 release. It does not detail all of the new features and improvements in the 1.5 Release but specifically details those new features and improvements that will require specific setup steps to be performed post the 1.5 upgrade.
In some instances the notes relate to significant changes in look and feel that may require additional user training.
The documentation is structured as a page per significant feature or improvement.
Customer Alerts
The customer notes area in OpenVPMS has been modified to split notes into notes and alerts. This was done to allow more detailed display of customer alert information in the customer summary section as well as to make customer alerts work the same way as patient alerts. These changes are detailed in the following JIRA request and you can see an example of the new customer summary display in this screenshot.
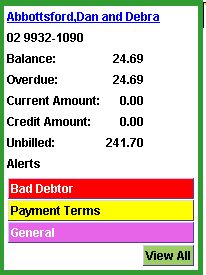
The previous Alert button has been replaced with specific coloured and prioritised buttons which can can clicked to get more detailed information. These alerts are also displayed while creating and editing appointments.
During the upgrade to 1.5 the database update script finds all the Customer Note Category lookups that are associated with Customer Notes that have the Alert flag ticked and then creates new Customer Alert lookups for these. The lookups have their Priority field set to High and their Colour set to Red. It then migrates all the existing Customer Notes that have alerts to be Customer Alerts and deletes them from the Notes.
In order to setup the colours and priorities of these new Customer Alert Type lookups you need to go into Administration -> Lookups and edit the newly created lookups to your desired settings.
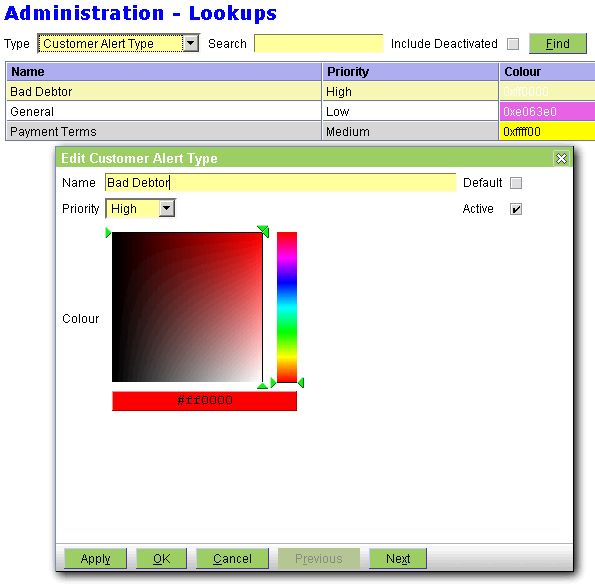
You are of course free to add additional Customer Alert Types.
From a user perspective they will need to told that they need to now make a decision in Customer -> Notes & Alerts which they will create. Only alerts will be displayed in the customer summary and new appointment screens.
Patient Alerts
In conjunction with the Customer Alert changes noted previously, release 1.5 has made some changes to the existing Patient Alerts feature.
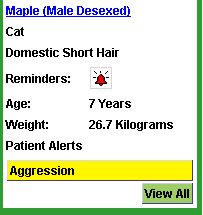
The previous Alert button has been replaced with specific coloured and prioritised buttons which can can clicked to get more detailed information. These alerts are also displayed while creating and editing appointments.
From a implementation perspective the only required task is to modify the existing Patient Alert Types to set their colour and priority. Again this is done in Administration -> Lookups as was the case with Customer Alert Types.
From a users perspective little changes except they do not need to click the Alerts button anymore.
Default View Highlight
You can set the default highlight for specific Schedule and Work List views as per Jira Entry.
To setup the default highlight edit the Schedule or Work List view from Administration -> Organisation as shown in this screen shot.

Templates
There are a number of template changes that effect general printing and the behaviour of printing.
Print Copies
Wherever you see an interactive print dialog in OpenVPMS you will now notice a Copies selector.

You can set the default copies for any specific template in the Administration -> templates workspace using the new Copies field.

If the Template Printer is setup to be interactive you will get a chance to modify this at the time of printing. If not then this will be the number of copies that will be printed automatically.
Preferred Print Mode
A new template option now allows you to control how printing certain templates behave during checkout and also when documents are created during invoicing certain products.
The new Preferred Print Mode field allows control over whether documents are printed immedaitely when created during charging, are printed at check-out or only printed manually.
The following outlines the behaviour of the three options.
Immediate. The document will be printed immedaitely when invoice is saved. If the template is set to interactive then it will prompt with the standard printer dialog which you can Skip if required. If you Skip the document will then be presented at check-out.
Checkout. The document will be presented at Check-out using the standard check-out printing dialog and will be automatically ticked. This is the default settings as this is the behaviour for all previous releases.
Manual. The document will not be printed immediately and will be presented at Check-out by unticked. Typcailly for forms that the user wishes to manually print or only occassionally print at check-out.
Interactive Reminders
Reminder Types and Product Reminder Links can now be set to display a new reminder dialog when reminders are generated through charging.
The Reminder Type Interactive flag is used as the default for any new Product Reminder interactive settings. That is if you link a reminder to a product the setting for Interactive for the link will be determined by the setting in the Reminder Type. This will not effect existing links just any new links created.
In the product you can nominate whether you want a specific reminder to be interactive or not overriding the original setting in the reminder type.
The default setting in non interactive so, from an implementers perspective, you will only need to modify those products that have reminder type links that you want to change to be interactive.
When set to interactive the users will get a new reminder dialog appear when they select the product with the default due date set to the interval defined for the product. They can accept or override this date.
Medical Records Improvements
By far the most significant User Interface and operational changes is Medical Records editing. These changes will be evident in the Patient ->Medical Records and the Check-In and Consult workflows. The changes are described in detail in the Direct Editing and Streamline Visits Item JIRA's.
This screen shot shows you the Consult workflow initial Edit Medical Records dialog. You will note the screen is actually the summary medical records screen and you can do all the normal filtering, scrolling and reviewing functions on this screen as you would do in the Patients - >Medical Records summary page.
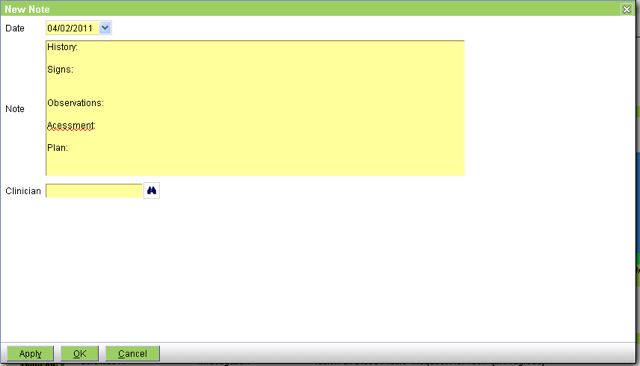
If you want to add a new entry just click on the New button and the following New Medical Record dialog will appear with the default entry being a Note.
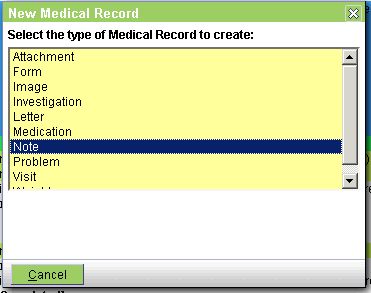
When you want to edit a specific medical record entry there is now no longer a need to select the appropriate visit, click Edit and then select the visit item to edit from the table (i.e note, investigation etc). Just double click on the entry on the summary screen and a edit dialog will appear as is shown below for a note.
All of these changes are designed to streamline editing Medical Records and to circumvent the locking issues when check-out and medical records editing happened simultaneously.
Charging Improvements
Although there are no new charging configuration options there has been a number of significant improvements to charging. These are primarily designed to streamline the charging and are outlined in this JIRA.
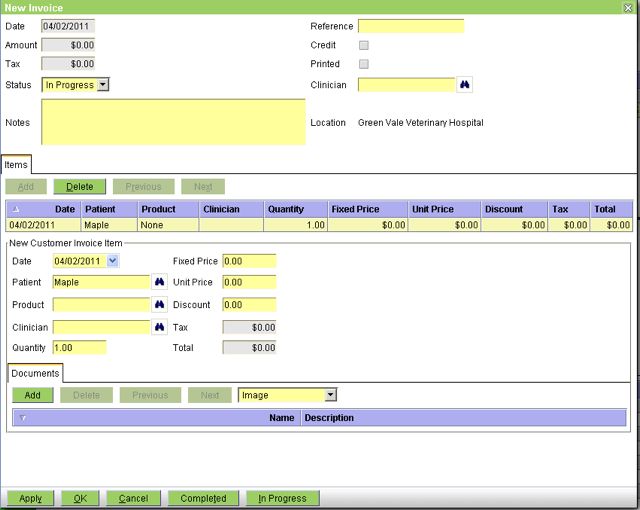
On entering the new invoice you will first notice that a new invoice entry has automatically been added and is ready to enter the patient or product.
You will note the additional buttons at the bottom of the invoice dialog. These allow you to save the invoice and simultaneously set the invoice to the desired status, Completed or In progress. The Ok button is still available allowing you save as normal leaving the status unchanged.
Next and Previous buttons and keyboard shortcuts have been added to allow you to easily move between invoice entries.
The Add button is disabled when you have a invoice entry that has not been completed (No Patient and/or Product selected).
Previously if you tried to Save the invoice and there was a entry without a Patient and/or Product you would get a validation error and have to enter the information or delete the entry. These entries are now automatically removed.
Macro Improvements
A popup Macro selector has been implemented as per this JIRA.
Also Macros can be used in Letter input fields as per this JIRA.
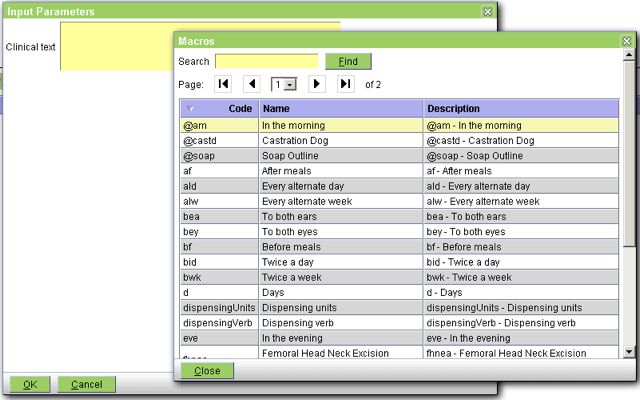
The Macro screen can be displayed in any text box field using the Alt-M keyboard shortcut.
Workspace Improvements
A number of workspaces in OpenVPMS have been changed to streamline bulk editing and viewing. These changes are detailed in this JIRA.
The workspaces that have changed are:
- Products -> Information
- Administration -> Organisation
- Administration -> Types
- Administration -> Lookups
- Administration -> Templates
- Administration -> Users
- Administration -> Roles
The idea is to allow the user to create a list then work from that list to edit the individual items. This is contrary to the current situation where selection of a product etc is done through the SELECT button. This means that the list dissapears after a selection is made and needs to be re created to make another selection. Here is an example using the Product -> Information workspace.

Double clicking on any table entry will automatically take you to a standard edit dialog for that entry as shown below.
You will note there are two(2) new buttons on the bottom of the dialog, Next and Previous. These allow you to move backwards and forwards through the previous filtered list making performing mass editing or viewing of details significantly easier.
Selection Ok or Cancel on the edit dialog will return you to the filtered list either saving or cancelling any changes made on that record respectively.
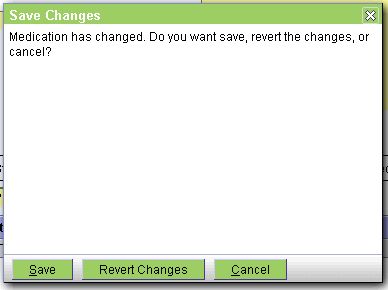
Should you edit something and not Apply the change before using the Next or Previous buttons the following dialog will appear giving you the option to Save, Revert or Cancel.
Stock Control Improvements
Stock control has been improved by allowing stock reordering preferences to be setup against specific products and stock locations as per this JIRA.
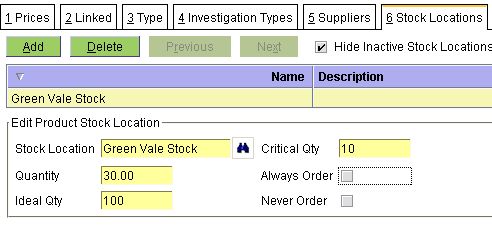
This in conjunction with a new Stock Reorder report can be used to generate a report of products that need reordering. This new report can be found in the Shared Resources area here.
Electronic Ordering and Deliveries
The OpenVPMS components of first release of the ESCI (Electronic Supply Chain Interface) project are included in version 1.5. In summary this includes the ability to send Orders electronically, receive electronic confirmation from the supplier that the Order was received, and receive electronic Delivery/Invoice information from the supplier.
In order to take advantage of these new features your current supplier needs to implement a set of standard ESCI services. Many Australian suppliers are in the process of developing these based on documentation and tools the ESCI project has already provided. When implementing these services you will work closely with your supplier to configure OpenVPMS for these electronic services.
From a practice and a user perspective the process is quite straight forward.
When you create an order and the supplier for the order is configured to send electronically, when the order is Finalised it will automatically sent to the supplier electronically.

If this is successful then a dialog will be displayed otherwise if connection cannot be made or there is an error in the order an error message will be displayed and the Order will remain In Progress.

You would have noticed in the Order screen shot above a new button Check Inbox. This button is available in both the Supplier ->Orders and Supplier -> Deliveries workspaces. This button will check all suppliers which are configured for electronic communications in your system and look for electronic Order Responses or Deliveries. It will process any found and generate messages in the Workflow -> Messages workspace as shown below.

When the supplier has processed the Order you will receive an Order Accepted or Order Rejected message and it will be linked to the details of the Order it relates to as shown above. The status of the Order in the Supplier -> Orders workspace will be modified accordingly.
The Order Invoiced message tells you you have received an Delivery notification. The details of the delivery are attached. Deliveries can be for one or more full or partial orders or not associated with a order at all.
You will find the received electronic Delivery in the Suppliers -> Deliveries workspace marked as In progress. You can then confirm this against the actual physical delivery and modify and Finalise as appropriate. On finalising stock and any price updates will occur.
From an OpenVPMS implementation perspective in order for OpenVPMS and the supplier to successfully interact electronically any Product Supplier information needs to include enough information for the supplier and OpenVPMS to understand which product is being ordered and correctly ascertain the number being ordered or delivered. In order to do this it is imperative that each product supplier has key supplier reorder information and the correct package description and units.

From an ordering perspective this provides the supplier with a product code they can recognise and the type of package and size you are after.
From an delivery perspective it allows OpenVPMS to ascertain the product being delivered and how to update the stock levels correctly for the number of selling units delivered. this is especially important if the Delivery is not associated with an electronic Order. i.e. a phone order where you are receiving an electronic delivery notification.
We suggest you work closely with your supplier(s) to implement these new features.
Patient Age Improvements
In the previous version the format of the patient age display in the Patient summary panel and the Patient Information screen was hard coded into the application. This release allows you to customise this to suit your practice needs.
Also the patient age at the time of each visit displayed in the Medical Record summary tab is now shown next to the visit details.
In order to customise the display you need to create a Duration Formats lookup in Administration -> Lookups and associate one or more Duration Format lookups to it as shown is this screen shot.
Each Duration Format shown in the list tells OpenVPMS whether to show years, months, weeks or days for any age up to and including the interval and units selected. It doesn't matter in what order you add the formats as OpenVPMS will order by ascending interval and select the first interval it finds that is greater than or equal to the patients age.
In the above example this means patients aged up to 3 months old will display in weeks and days, patients greater than 3 months old and up to 1 year old will display in months and weeks, patients greater than 1 year old and up to 3 years old will display in years and months, and patients greater than 3 years old will display in years only.
Although typically you wouldn't create more than one Duration Formats lookup you can and then you can select which one to utilise by associating with the Practice in Administration -> Organisation as shown in this screen shot.

Once a duration formats lookup is associated with the practice that format will be used to display patient ages. If no Format is specified in the Practice (the default) then the internal default patient age formatting is used (as per version 1.4 and prior).
SMS Features
This release includes the ability to generate SMS messages from the Customer summary panel and when viewing Contacts in the Customer Information workspace as shown below.
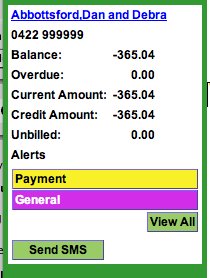
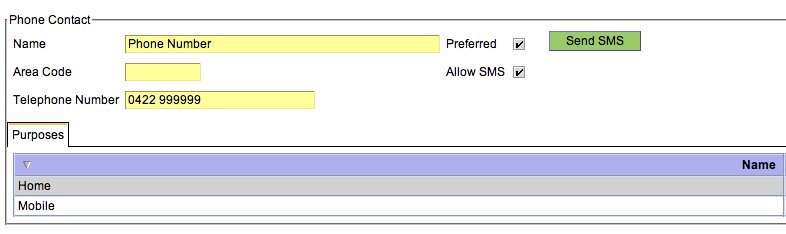
The Send SMS button will only appear if the SMS configuration has been completed as described below and the Customer has one or more phone contacts that have the Allow SMS flag ticked.
When the Send SMS button is clicked a dialog is dsiplayed allowing you to enter an SMS message and also, if there are more than one phone contacts that can SMS, allow syou to select the contact to use from a drop down list.
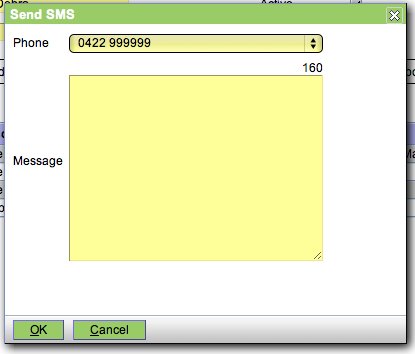
Please note the SMS mesage field displasy the number of charaters remaining in the message up to the limit of 160. You are free to utilise macros in the message field. Also implemented are some new macro tags which will allow you to automatically display customer and patient details. For example the following macro
concat('This is a test message to ', openvpms:get($customer,'name'), ' about their pet ', openvpms:get($patient,'name'))
will display
This is a message to Abbotsford, Dan and Debra about their pet Maple.You can use this feature to create many standard message macros suitable for your own practice.
SMS Configuration
OpenVPMS uses email to send SMS's so the selection of SMS provider is restricted to those providers that provide an Email to SMS gateway service. Fortunately most providers do provide this service so your choice is large allowing to shop on service and price rather than being restricted to one or only a few SMS providers.
In this release we have provided three(3) different SMS configuration options. Two(2) of these are for popular SMS providers, SMMSGlobal and Clickatell. The third configuration option is Generic and can be used for nearly any other SMS provider.
You will need to sign up with an SMS provider and setup your account and specific preferences with them before configuring OpenVPMS. Each provider will have their own specific setup requirements.
To add a SMS configuration firstly goto Administration -> Organisation and click New and select the appropriate SMS configuration option from the list.
SMS Global
The SMS Global configuration screen is shown below.

Country Prefix: This will be added to the front of the number to internationalise it.
Area Prefix: This will be removed from the front f the number to internationalise it.
From: Must match the sending email address settings when you setup email preferences in your SMS Global account. You can restrict which email address can initiate sending SMS's in the SMS Global account preferences on the SMS Global web site. Within these settinsg you can also stipulate if any SMS replies are sent to the sending or another email address.
Clickatell
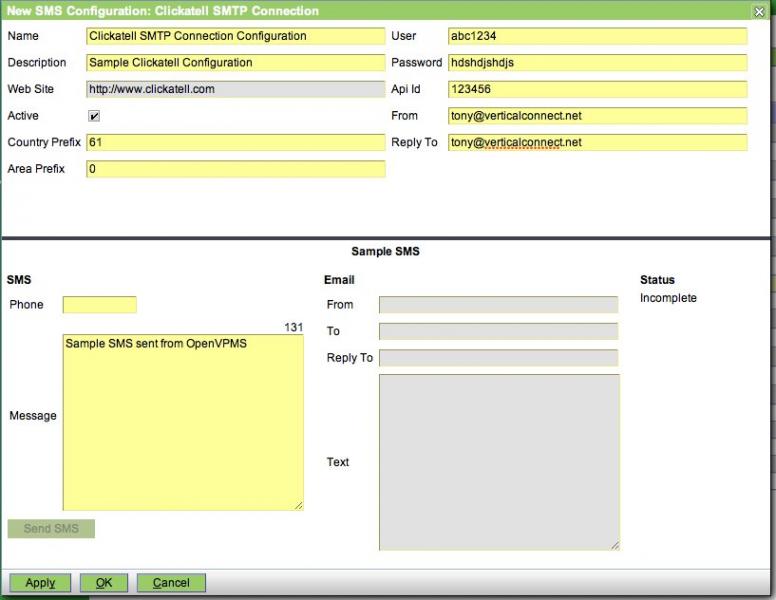
Clickatell has a more detailed configuration and is generally more secure as users need to know a few more details in order to send SMS's through their account.
User Id: Your Clickatell account user id.
Password: Your Clickatell account password.
API Id: Provide when you create account.
From: The from addres Clickatell require.
Reply To: The address any SMS responses are sent to.
Generic

The setup of the generic SMS configuration is beyond the scope of ths document. We suggest you utilise the Implementers forums to request any information about setting up the Generic SMS configuration for your SMS provider.
Note: In each of the configuration screens you have a test section which allows you to test the setup by entering a telephone number and message to send and clicking Send SMS. We suggest you use this to test both the SMS configuration and succesful receipt of email responses.
Practice Setup
Once you have created your specific SMS configuration you need to link it to the Practice as per this screen shot.

Anonymising a database
(Originally from Tim Gething's notes at http://www.openvpms.org/forum/how-anonymise-database )
The following may be used to anonymise an OpenVPMS 1.7.x database. The steps are as follows:
1. Back up the database
2. Restore the backup to a new server
3. Run the following script against the new server:
UPDATE contact_details
    SET value=concat((floor(rand()*9000)+1000),' ',(floor(rand()*9000)+1000))
    where name='faxNumber';
UPDATE contact_details
    SET value=concat((floor(rand()*9000)+1000),' ',(floor(rand()*9000)+1000))
    where name='telephoneNumber';
UPDATE contact_details
    SET value=concat((floor(rand()*9000)+1000),' ',CONV(10+FLOOR(RAND()*26),10,36),' Street')
    where name='address';
UPDATE contact_details
    SET value=concat(lower(CONV(10+FLOOR(RAND()*26),10,36)),(floor(rand()*9000)+1000),'@gmail.com')
    where name='emailAddress';

UPDATE entity_details
    SET value=concat(left(value,3),(floor(rand()*9000)+1000))
    where name='lastName';

UPDATE entity_details
    SET value=concat(left(value,1),(floor(rand()*9000)+1000))
    where name='firstName';

UPDATE entity_details
    SET value=concat(left(value,3),(floor(rand()*9000)+1000))
    where name='companyName';

UPDATE entity_details
    SET value=concat(upper(CONV(10+FLOOR(RAND()*26),10,36)),(floor(rand()*9000)+1000))
    where name='travel';

UPDATE entity_details
    SET value=concat(left(value,3),(floor(rand()*9000)+1000))
    where name='printedName';

UPDATE entities
    SET name=concat(left(name,3),(floor(rand()*9000)+1000))
    where arch_short_name like 'product.%';

UPDATE entity_identities
    SET identity=concat((floor(rand()*900)+100),'*',(floor(rand()*900)+100),'*',(floor(rand()*900)+100))
    ,name = identity
    where arch_short_name = 'entityIdentity.microchip';

UPDATE entities
    SET name=concat(left(name,3),(floor(rand()*9000)+1000))
    where arch_short_name='security.user' and length(name)>3 and name <>'admin';

UPDATE entities
    SET description=concat('Dr ',left(name,3),(floor(rand()*9000)+1000))
    where arch_short_name='security.user' and length(name)<=3;

UPDATE users
    SET password=concat('p',(floor(rand()*9000)+1000))
    where user_name <> 'admin';

UPDATE documents
    SET contents=0, checksum=0, doc_size=0
    where (mime_type <> 'application/vnd.oasis.opendocument.text' and mime_type<> 'text/xml');

UPDATE acts a
    join document_acts da on (da.document_act_id = a.act_id)
    join documents d on (d.document_id = da.document_id)
    SET d.contents=0, d.checksum=0, d.doc_size=0
where (a.arch_short_name = 'act.patientDocumentLetter'
  or a.arch_short_name = 'act.patientDocumentForm');

OPTIMIZE table documents;

#
# Remove ESCI passwords
#
update entity_relationships r, entity_relationship_details d
    set d.value = ""
where r.arch_short_name = "entityRelationship.supplierStockLocationESCI"
    and r.entity_relationship_id = d.entity_relationship_id and d.name in ("accountId", "username", "password");

#
# Disable jobs
#
update entities
set active = 0
where arch_short_name like "entity.job%" and active = 1;
Notes:
- If you use the above SQL, then all the customer data will be anonymised, however the derived fields will still contain the original address and phone number information. Hence you need to get this rebuilt. The easiest way is to use Administration|Archetypes to edit the party.customerPerson archetype. Change the derived value for the description node from "concat(party:getBillingAddress(.),' - ',party:getHomeTelephone(.))" to omit the central '-', ie "concat(party:getBillingAddress(.),' ',party:getHomeTelephone(.))" and then press Apply. When you get the 'Update Changed Nodes' window, press Cancel. Then change the derived value back again to re-insert the central '-', and this time, press the OK button on to get the changed nodes updated. This will rebuild the derived fields from the anonymised data.
- The above SQL leaves the admin user account unaltered. You should change its login password to say 'admin' so that you do not have to reveal your real admin password.
- The above SQL does not anonymise the patient names. If you feel that this is necessary then the following SQL will do the job:
UPDATE entities
    SET name=concat(left(name,2),(floor(rand()*9000)+1000))
    where arch_short_name='party.patientPet' and length(name)>2;
Data Migration
Data Migration
Notes from an RxWorks conversion
This is the beginning of a set of notes from my experiences in doing a conversion from RxWorks to OpenVPMS. This is not intended to be a polished document, but rather a set of notes on things I have come across. I will start this as one page, but as time goes on, I expect it will be restructured into a more accessible and logical form.
First some background: I know a lot about RxWorks and am familar with traditional relations databases, but this is the first time I have played with an entity-relationship database. The system I am converting runs 24/7 and hence I need a conversion process which is either fast enough to be done in say 3 hours, or can be pre-converted and then use catch-up/synchronise processing.
Dataload or Kettle plugin?
In case you didn't realise there are two ways of loading data into the OpenVPMS database, the dataload utility (which processes XML formatted data), or the OpenVPMS Loader plugin for Kettle.
The dataload utility has its place, and I use it to load a practice-tailored setup file that contains all the basic data including lookups, postcodes, etc etc.
However dataload does not have the performance required to load a large dataset. For this you need the Kettle plugin. (In my enviroment, Kettle can load 14000 customer records in 2 minutes, dataload needs an hour.)
Data conditioning
OpenVPMS provides very tight data validation through the use of lookup tables. RxWorks is far looser, and although it has lists for various items, it is not mandatory that the data entered matches whats in the lists. This means that any conversion from RxWorks needs to do a reasonable amount of data cleanup work. Fortunately Kettle is a good fast powerful tool for doing this. (The 2 minutes for 14000 customer records includes all the processing to correct the suburb names [found in either the RxWorks ADDRESS3 or ADDRESS2 slots], the titles, the account types, etc etc.)
SQL snippets
Because of the entity-relationship design, SQL queries are not as simple as with a traditional database. Put another way, it's not obvious how you have the write the query. Hence this collection of snippets.
SQL to show lookups
select lookup_id, name, code from lookups where arch_short_name = "lookup.suburb";
select lookup_id, name, code, arch_short_name from lookups where arch_short_name like "lookup.%";
Differences
Below are a number of differences that may need to be considered during conversion.
Appointment duration: RxWorks uses a start-time, duration setup; OPV uses start-time, end-time. Hence in general one calculates the end-time by adding the duration to the start-time. However, RxWorks will not let the appointment cross the midnight boundary, but OPV will. Hence to mimic RxWorks, you need to terminate any appointment that ends in the next day at midnight.
Negative invoices: RxWorks allows the total invoice amount to be negative, OPV does not. Hence, its tempting to simply convert these negative invoices into credits. However, if you need to link clinical event line items to invoices, then you cannot do this if the invoice containing the item has become a credit. The solution is to split the RxWorks negative invoice into a credit holding the negative items (which will normally be a discount line item) and an invoice holding the other items.
Standard labels: RxWorks has a concept of standard labels, OPV does not. Hence your product conversion code needs to generate specific label text for those products which use a standard label.
No temperature: RxWorks has fields for the patient temperature and weight; OPV has only weight. So unless you want to invent a temperature archetype and the support for it, you need to record the RxWorks temperatures in the Visit Notes field. You also need to educate the staff to record the temperature in the Visit notes.
Notes overflow: RxWorks uses a memo field (ie a huge text field) to hold visit notes; OPV provides 5000 characters. Hence your conversion code needs to be able to split long RxWorks visit notes in multiple OPV visit notes.
Summary/Reason: Rxworks also uses memo fields for other things, notably the visit summary; OPV's visit Reason field is 50 characters long. My solution was to put the first 50 characters in the Reason field, and if some were lost, to put the whole summary in the first line of the visit notes prefixed by "Summary:".
Other overflows: In the case of other overflows (such as the RxWorks Transaction Text going in the OPV Invoice Notes), I just discarded the excess - on the basis that although it is critical to keep the all of the medical history, the financial stuff is less important and can afford to lose text from the end of the invoice notes.
Discard old data: It is quite reasonable to discard some old information. In my case we discarded all counter sales over two years old, all quotes/estimates over 12 months old, all appoinment data over two years old, and all data pertaining to clients and patients whose records had been deleted. (RxWorks does not have full referential integrity and hence in some tables there will be records containing patients and/or clients who have been deleted.)
Database size: In these days of terabyte disks, one really does not have to worry about space occupied by the database. However the OPV database is much larger that the RxWorks database. Firstly the OPV database structure requires more space (I suspect about 50% more) for everything except the attachments. However, since in OPV, the attachments live inside the database, this adds hugely to the size. Moreover, most of the attachements are incompressible jpeg files.
This leads us to the offsite backup problem. Currently a zipped copy of the RxWorks database is FTP'ed offsite each night (around 150MB worth). The 5GB of attachments are copied to a removable disk once a week and this is held offsite.
With 5GB of attachments inside the OPV database, the nightly FTP is not going to work, and I do not currently have a solution to this problem. [Although the site is in Hong Kong where it is common to gigabit bandwidth available, in our our building, the uplink only runs at some 150Kbps.]
Conversion strategy
As I indicated at the beginning I need a conversion strategy that will work with a 24/7 business environment. I now know that we should be able to convert the system with about a 3 hour data-entry lockout. Hence the plan is as follows:
- shut down RxWorks and make a copy of the database
- restart RxWorks telling the night staff that they can use it to look up patient records, but that if they do any data entry, this will be lost
- convert everything except the >2year old visit and financial data (takes under 3 hrs)
- bring OPV up and tell the staff that they can do anything except look at >2year old records, and all attachments
- initiate the conversion of the >2year old data (takes about 2 hours)
- start genbalance running (takes about 45 minutes), and docload running (takes ???)
Note that implicit in the above is the fact that one can use OPV while the various load utilities (ie Kettle, genbalance, and docload) are running.
That's it for the moment. I may add more later and I will come back and fill in the ???? bits.
OpenVPMS Loader plugin for Pentaho Kettle
This documentation was generated as a result of using OpenVPMS 1.5 and Kettle 3.2
The OpenVPMS Loader Kettle plugin allows mass data to be loaded into the OpenVPMS database.
Since OpenVPMS uses an entity-relationship architecture, rather that the traditional relational database design, one needs a tool that understands the archetypes used by the system. Also, because one does not have the table record keys present in a relational database, there is the potentional problem that having say loaded customer Fred into the system, one cannot at a later time, load in Fred's pets - because Fred's identity number is not known (because it was generated internally by the loader). The Loader plugin provides for this by allowing you to specify an ID field that can be used at a later time to refer to the record previously loaded. Thus Fred's customer record can be loaded with say ID 'C004236' (with 004236 being his client number in some other database), and this ID can be used later when loading Fred's pets. This 'external-key to internal-id' data is recorded in the etl_log file in the database.
The Loader also automatically generates lookup data. Say that the customer archetype defines a field 'title' where the contents must be present in the title lookup table, then without auto lookup generation, you would have to first check the data set to be loaded to see what values are used for the titles (eg Mr, Ms, Dr, Professor, Mde, Doctor) and then create the title lookup table with these entries. With auto lookup generation, this is not necessary and the Loader will create the necessary entries for you. However, you do have the problem that if the incoming data quality is poor (with titles like Mr, MR, Mr. and M R) then you will end up with all these in the lookup table - and you will have to use the Replace facility to clean things up. Hence pre-cleaning of your data is recommended (and Kettle is a very good tool for doing this).
The Kettle Transform step definition window contains the following: (obvious things like the OK button are omitted)
ID Field Name: the name of the field which you want to use as your 'external-key'. This field can be left empty, but you will not be able to later refer to the records being loaded.
Batch Size: this set the number of records loaded before a commit is done. Increasing the number increases the performance at the cost of losing data if a abort occurs. So setting it to say 99999999 will ensure that only one commit is done at the end of the run, but if anything goes wrong nothing will be loaded because all records added will be rolled back out as a result of the transaction failure.
Actually - although the above is logical, its not true. Benchmarking has shown that 50 to 200 is a reasonable optimum for performance.
Generate Lookups: The checkbox is left from previous versions - lookup generation is now always enabled. See OVPMS-1240.
Skip Processed: This checkbox tells the loader what to do about pre-existing records with the same 'external-key'. ie if you have loaded Fred's record in a previous run, what happens when you try to load it again.
If checked, a row that has been previously processed successfully will be skipped.
If not checked, all rows will be reprocessed. Care needs to be taken as this can result in duplicate objects being created.
The following can be set for each field:
Field Name: the name of the field in the step's input record
Map To: The entry here identifies the field to be loaded.
For simple fields its the archetype name and field name, for example <party.customerperson>firstName.
For collections it will have a format like <party.customerperson>contacts[0]<contact.location>address where the index [0] defines this as the first contact.
For cases where you wish to refer to a specific identifier it will have a format like $CLID<party.customerperson>contacts[1]<contact.phoneNumber>telephoneNumber - here CLID is the name of the input field that contains the 'external key' of the customer record loaded earlier for which you wish to set the 2nd contact to be the specified phone number.
Note that the indexes are not absolute indexes - ie its not as though the collection has a set of numbered slots. The indexes serve only to separate the entries for the loader. Hence if we use the second form above (where we are specifying a contact for the customer referenced by $CLID) then the loader will just add this contact to to the customer - and if the customer had 6 contacts already, this will be the 7th, not the second as the [1] appears to indicate. Put another way, the ONLY time you need to use other than [0] as the index is when you happen to be loading multiple members of the collection in the one loader step such as in the example below.

Exclude null: This controls what happens when the incoming field has a null value.
If this is set to N, then a null input will be set on the output field, replacing any default value.
If this is set to Y, then a null input won't be set on the output field, and the default value will be set. If there is no default defined for the field, it will be set to null.
Hence this setting determines whether or not the default value is set for fields whose incoming value is null.
Note that in the supplier example above, the Y's set for the contacts mean that if a field (eg oFax) is null then no fax contact will be created. This means that one does not have to worry about having separate loader steps to cater for cases where some of the data is missing. You just code for thr full data set as above, and rely on Exclude null=Y to omit the fields for which you have no data.
For these cases one uses code like the following in a preceding Javascript step:
var oFax = ""; // init fax number to empty/null
if (SupplierFax != undefined) { //if fax set in data record
oFax = SupplierFax; //set it
}
Value: If you leave this blank, then the data from the incoming field is put into the 'map to' field. However, you can enter expressions here. These will normally operate on the incoming field data in some way as to produce a different value that is put into the 'map to' field. The incoming field data is referred to using '$value'. There are two common formats used here when we are processing fields that have lookup constraints:
a) the <archetype>$value form of the mapping is used when the value refers to an object identifier (see examples below), and implies that the item being referred to must have been previously loaded by the loader.
b) the <archetype>nodename=$value form is used when the value refers to something to be looked up. NOTE that at the current time (1.5.1) the lookup will not be successful if the value you are trying to match contains spaces. See OVPMS-1258
Exclude default objects: As of OpenVPMS 1.5, the "Exclude default objects" column is ignored - you can set it to Y or N. See OVPMS-1239 for details.
Value Examples:
Mapping using nodename= (here we are loading a customer and as part of this setting the account type)

Mapping using values: (here we are connecting previously loaded customers to previously loaded patients)

Error messages:
The Loader plugin is not very good at error checking. a) Kettle's 'Verify this Transformation' checker will not always reveal errors in your entries; b) when an error occurs during the run, the error message is likely to contain little useful data. However, you may find the following helpful.
Message: "Row doesnt contain value: {0}" errors on every row
Meaning: "You twit, you have specified a field name here that is not one of the input fields - check your spelling and capitalisation - also use Get Fields to grab the names of the incoming fields".
Message: "Unexpected error null:" as follows (where 'OpenVPMS Loader.0' is the step name:
OpenVPMS Loader.0 - ERROR (version 3.2.0-GA...) : Unexpected error: null
OpenVPMS Loader.0 - ERROR (version 3.2.0-GA...) : java.lang.NullPointerException
OpenVPMS Loader.0 - ERROR (version 3.2.0-GA...) : at org.openvpms.etl.load.RowMapper.mapValue(RowMapper.java:192)
OpenVPMS Loader.0 - ERROR (version 3.2.0-GA...) : at org.openvpms.etl.load.RowMapper.map(RowMapper.java:161)
OpenVPMS Loader.0 - ERROR (version 3.2.0-GA...) : at org.openvpms.etl.load.Loader.load(Loader.java:115)
OpenVPMS Loader.0 - ERROR (version 3.2.0-GA...) : at org.openvpms.etl.kettle.LoaderAdapter.load(LoaderAdapter.java:110)
OpenVPMS Loader.0 - ERROR (version 3.2.0-GA...) : at org.openvpms.etl.kettle.LoaderPlugin.processRow(LoaderPlugin.java:118)
OpenVPMS Loader.0 - ERROR (version 3.2.0-GA...) : at org.openvpms.etl.kettle.LoaderPlugin.run(LoaderPlugin.java:187)
Meaning: you have mis-spelled one of the Map To entries
Message: "Failed to retrieve object" as follows (where nnn is the row id and XXX is the value you are tyring to lookup)
OpenVPMS Loader.0 - Failed to process row nnn: Failed to retrieve object: <lookup.customerAccountType>XXX
Meaning: either you have used the 'object identifier' form rather than the 'code' form (see Value: above) or the object you are referencing really does not exist. See also etl_log below.
Boolean fields
Kettle understands boolean fields. OpenVPMS has boolean fields. However, fields being processed by the Loader should not be in boolean format but rather integer or numeric/precision 0. If you try to load a field like <party.customerperson>active with field typed as boolean, then it will always be set to False. You have to use a Select Fields (or other) step to change the meta data to Integer. Then the field will get loaded correctly. 1 = true, 0 false.
Tricks of the trade
dataload integration If you load data with the dataload utility, then although it uses ID's to link the data being loaded, these IDs are not added to the etl_log file and thus cannot be used by the Kettle loader. However, there is no reason why you cannot inject records into the etl_log file to allow you to link to the records that you loaded using dataload. The attached etl_users.ktr illustrates this. It grabs the user information loaded earlier by dataload and creates the necessary etl_log entries so that when using Kettle to load say visit data, it is easy to reference the associated users and clinicians.
separate steps for linking Because of OPV's entity-relationship structure, is it very common to need to link things together. One of the most basic is the need to link patients to customers. While you might think - load the customers first, then as I load each patient, I will link it to the appropriate customer. This doesn't work - as you attempt to create the link between the customer and patient, although the customer connection will appear to work, the patient end will not. What you need to do is use one transform to load the customers, then one to load the patients and finally a third to build the links between them. Below is an example of the mapping in the Loader transform step used to do this. Note that the ID Field Name for this step is oCRN. oCRN can contain anything that is different on each row - I used the row number of the record from the RxWorks Patient-Owner file I was loading. oCID is the ID of the customer loaded earlier and oPID the patient ID.

SQL editing Kettle uses SQL to pull data from the database you are converting. However, it has very very rudimentary facilities to let you develop the required SQL queries. In my case (converting from RxWork's Access database), I found it far easier to build the query in Access, then display the SQL equivalent and then copy and paste it into the Kettle Table Input step. Because of the join limitations of Access, in some cases you will have to build a prior query in Access (so that the SQL you use ends up using both the RxWorks tables and the prior query you created).
Debug info I found it very useful to have a Text File Output step at the end of the transform which dumped every field from every record/row into a CSV file. When there were errors, this enabled me to look both at the rows in which there were errors, but also at the data in the rows which did not cause an error.
Abort step I also found it useful to have an Abort step as the very last step. During development, you can limit the number of rows processed. When all is working, you just disable the link to the Abort step and all data will be processed. (And because of the 'Skipped Processed Records=Y' setting, the 50 rows at the beginning that loaded with no error will be skipped automatically.)
etl_log An understanding of the etl_log file structure is useful. [More correctly its a table - 'file' betrays my age.] If you use the MySQL Workbench or equivalent you will find that it has three fields of interest (as well as others):
row_id - this contains the value from the field set as 'ID Field Name'
archetype - this contains the archetype being loaded (eg entityRelationship.patientOwner in the example above)
loader - contains the name of the Loader step. This is useful in figuring out which transform/step resulted in this record (sorry 'row').
Hence a useful query is something like 'select * from etl_log where archetype="entity.investigationType" order by row_id;'
Note that since the lookups are done on the basis of archetype/row_id there absolutely no problem in using the same ID's for two different archetypes. There is a major problem if you use the same ID more than once for the one archetype. [There will not be any problem as the data is loaded, but if you ever need to reference it, you will get 'refers to multiple ...' errors.]
Product varieties OPV divides products into three varieties, medication, merchandise, and services, each with its own archetype. This means that when loading product data, you need to use three different OPV Loader steps, and steer the processing to use the appropriate one (see below). Hence your processing needs to have some method of deciding on the variety of the product. Bear in mind that only medications can have labels, hence if there is some product that you think of as merchandise, you will need to class this as medication if you need to be able to print a label for it. (The example I found was a shampoo, which required a 'for external use only' label.)
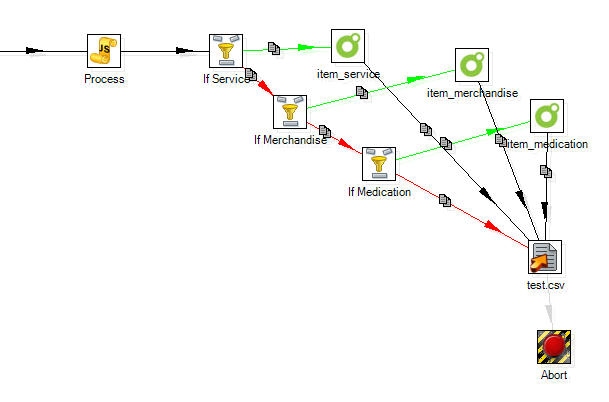
Need to Split Processing In some cases where you need to process medications, merchandise, and services it may be necessary to split the transform. That is, although you might think that its possible to use a transform with the above design with three separate loader steps, if you do this, you will get problems with Kettle running out of heap space. The solution is to clone the transform into 3, with each just processing one product variety. The problem seems to occur if the loader needs to update multiple records. For example the mapping given below (in which I am setting the product type for products loaded by an earlier transform) caused heap overflows if I used the above '3 loader steps in one transform' design, but ran happily when I split it into three transforms, one for each of service, merchandise and medications.

Reading the archetype As you are developing transforms you will want to refer to the archetypes. Don't using the Export facility on the Administration|Archetypes screen - it generates a very complete but overly complex adl file. If you do want to look at a file, grab a copy of the adl file from the <OPV-HOME>\update\archetypes\org\openvpms\archetype folders. Alternatively, look at the archetype via the Administration|Archetypes screen. Note however, that if you use View, you will not be able to see the full archetype. Specifically, if the archetype has a node that links to multiple archetypes (eg participation.product's entity node), then if you use View, you will only be shown one. To see all four you need to Edit the archetype.
More Kettle tips and tricks
This note serves to document things I have learnt using Kettle (3.2).
What Java? Kettle does not appear to function correctly with a 64-bit JVM. It does happily run with Java 8. If you do want to run Kettle (with a 32-bit JVM) and Tomcat (with a 64-bit JVM) on the same system, this is perfectly possible. My experience is on a windows system so I configured Tomcat using C:\Program Files\Apache Software Foundation\Tomcat 7.0\bin\Tomcat7w.exe to explicitly tell it where to get its JVM (in my case C:\Program Files\Java\jre1.8.0_45\bin\server\jvm.dll) and I set the path environment variable to have C:\Program Files (x86)\Java\jre1.8.0_45\bin at the beginning.
Installation To expand on the recipe given elsewhere:
Download and unzip Kettle. From version 1.4 we are compatible with version 3 of the PDI so you can download version 3.2 - BUT not yet (at version 1.6) compatible with version 4 of the PDI.
Unzip the OpenVPMSLoader.zip file found in the import/plugin folder in the openvpms distribution. This should be unzipped into plugins/steps folder in Kettle.
NOTE: Kettle 3.2 ships with version 2.0.6 of the Spring framework, whereas the OpenVPMS Loader plugin requires Spring 3.x. Hence you need to:
1. backup your Kettle installation directory
2. remove libext/spring/spring-core.jar
3. copy the OpenVPMS jars to libext/spring:
cp plugins/steps/OpenVPMSLoader/*.jar libext/spring/
4. Start Kettle
Failure to do the above will result in a "No application context specified" error when the OpenVPMS Loader plugin starts.
Kettle is a really neat powerful tool. You may find the following will save you some time.
Log size The internal log is not of infinite size. If something goes wrong and you have an error on every row, the earlier records will be discarded. Also after an overflow situation like this, Kettle seems to be unable to fully clear the log. That is, you can clear it, and it appears to empty, but when you start a new transform/job the old stuff re-appears. To fully clear the log after an overflow, stop and restart Kettle.
External log You can specify the log file for a job or transform. If you specify it for a job, then the settings apply to all the transforms in the job (unless you provide log settings for them). Note that the records are batched out into the log - the internal log runs ahead of the external one, and in the event of a crash (most commonly a java heap overflow), you will not get all records in the external log.
Minimum logging = no errors If you set the logging level to Minimum, then if your transform has errors, these will not show in the log.
Can detach and park If you have a job that consists of a number of jobs and/or transforms done in sequence, you may wish to re-run the transform omitting some of the transforms/jobs. The easiest way to do this is to delete the hop at each end of the string you don't to run, then move this out of the way, and rejoin things so as to omit the transform/jobs you don't want to run. See below.

Always turn off Lazy Conversion Some of the input steps have a 'Lazy Conversion' checkbox. Do not tick it - using this leads to peculiar error messages.
Trim memo fields Some databases support a long text field called 'memo'. If you are processing this data, and you want to log it via the Text File Output step, make sure that you trim back its lenght. Left unaltered the field lenght is over a million characters and this will cause a heap overflow.
No registry start It is possible to have Kettle crash leaving its repository containing a screwed up transform. This may lead to Kettle crashing on start. The fix is to tick the 'No Repository' box on the startup screen. Then you can can connect to the repository once Kettle has started.
Performance Herewith tips to get the maximum performance out of Kettle:
- Give MySQL lots of buffer space (I run innodb_buffer_pool_size=3G).
- If possible put the database on an SSD - perhaps not wise for production, but for the conversion phase, the faster the disk, the better.
- Where possible run transforms/jobs in parallel. Since the basic pattern of work is 'compute in Kettle, write to MySQL', it turn out that running two jobs in parallel has little effect on the run-time of each. Three or four is possible given suitable hardware. Running multiple jobs is just a matter of creating a job containing multiple sub-jobs - like the picture below. Right-click on the Start element and select "Launch next entries in parallel". Note that the complete job does not finnish until all the sub-jobs have finished. You will need to think about what things can and cannot be run in parallel. You can also split the load of one type of item (eg invoices) into multiple parts with each part loading a separate date range.

- Don't think that the OpenVPMS Loader 'Batch Size' parameter should be large. Experimentation shows that things go faster as it gets smaller: eg 500~112 minutes, 200~107 minutes, 50~96 minutes.
- If at all possible run kettle and MySQL on the same machine. For production you will want MySQL (and Tomcat) running on a dedicated server, but for conversion its better to run all on one system. [Currently I am running two invoice loads in parallel and this is resulting in over 3.3MB/sec of network I/O between Kettle and MySQL.]
The following points all apply to the 'Modified Java Script Value' transform step
Var's not required You only need to use "var" to define a variable if you need it in the next step. If its just an internal work variable, then don't use var.
Always turn off compatibility mode Always disable the compatibility mode. Compatibility should only be set if you have transforms from the earlier versions of Kettle.
Replace may need escape If you use the replace function, be aware that the second argument (string to look for) is in fact a regular expression, and thus that any regex meta characters will need escaping. Futhermore, since in javascript \ needs escaping, you need to double the backslash. Hence, to replace periods (.) by spaces you need replace(str,"\\."," ") and to replace backslashes themselves you need to quadruple them, ie replace(str,"\\\\","x") will replace \ by x. However, since the 'look for' string is a regex expression, you can use replace() to replace multiple characters at the same time.
Hence replace(str,"[\\-\\* ]","x") will replace every minus (-), asterisk (*), and space character by 'x'.
Regex is peculiar If you want to use the str2RegExp function, be aware that the required format of the regex string is not obvious. Firstly you MUST specify string start (^) and string end ($), and you MUST double every backslash. For example the string to look for any-chars9999 9999any-chars OR any-chars99999999any-chars (ie phone numbers) is: "^.*(\\d{4} \\d{4}).*|.*(\\d{8}).*$".
Be careful of plus Javascript uses the + operator to both add numbers and concatenate strings. It also has no specific variable typing facility, and can treat things that you think are numbers as strings. The expression (v1 + v2) may concatenate the two variables. If you need these to be treated as numbers either force the second to be converted to a number by using the Number() function [ie write the expression as (v1 + Number(v2))], or use the fact that the minus operator forces the variable to be treated as a number [ie write the expression as (-(-v1 - v2))].
Another Kettle sample
We run a ranking system for our customers - the top 5 by sales are classified as Platinum, ranks 6 though 25 as Gold, and 26 through 100 as Silver. We have Platinum, Gold and Silver customer alerts (with appropriate colours).
Although we have a report which lists the current customer ranks and what they should be, our staff were not getting the time to do the updates.
To automate the process I wrote some Kettle stuff that implements the following logic:
For each customer in the top 500 by sales volume over the last 180 days, calculate rank as platimum/gold/silver/none then:
If new rank = old rank
   If rank not = none
       update alert reason to 'Checked on date/time'
    Endif
    Exit
Else  (ie rank changed)
   If old rank not = none
       Set end date on existing alert to today, and status to COMPLETED
   Endif
   Create new plat/gold/silver alert
Endif
The attached zip file (renamed to .txt so I can attach it) contains the job and transforms.
The tricks are:
- empty the etl_log file to clean out any old stuff
- create a entry in the etl_log for the user 'sys' - who will be the author of the alerts
- for each top 500 customer create an entry in the etl_log
- both the above steps are necessary so that in the OpenVPMS Loader step we can create the required links to the author and customer.
Even if you don't want to create alerts this code illustrates how to use Kettle to load stuff which references existing data in the system.
Note that I considered writing some SQL to do the complete job, but decided that it was beyond my competance.
Using Kettle to load a product file
I happened to get involved in helping someone load product data from their supplier. (Their initials are CK and hence the file and transform names.)
You will probably have realised that loading OpenVPMS product data is not just a simple matter of loading up a flat file. To get things set up correctly not only do we need to link products to their supplier, but we need to set the Product Type (because a lot of the reporting in OPV has selection via product type, and because the product type also defines the invoice order and (optionally) discounts.
You may have also understood that OPV divides products into medications, merchandise, and services, and that our product loader has to cope with this.
Why Kettle? There is also the dataload tool, and its quite possible to use dataload to load product data. However, if you are starting from a data file provided by the product vendor, you need to process this in the xml format required by dataload. You almost need Kettle to do this processing, so you may as well use Kettle to do the load the data - it certainly gives us flexibility and powerful processing facilities.
If you look inside the attached zip (it has been renamed to ck.zip.txt so that I could attach it) you will find 5 kettle transforms and the kettle job that includes them (so you can run the job rather than the five transforms). There is also an extra transform (see below) than can be used to update prices at a later time. [Note however, that with the advent of the product export/import in OpenVPMS 1.7 this is not really useful.]
Also in the zip are two csv files. CK-supplier contains the single supplier, CK-products contains the products. Note that this is a severely truncated and editied product set. The orginal one contained some 7500 items and has been truncated to protect the supplier's commercial information.
The csv file was generated by loading the supplied text file into Excel and then manipulating it, adding the extra columns, and saving it as a CSV file. So if you want to use these transforms to load your own supplier's data, then you need to process this to match the format of this product file (or modify the transforms).
I also added extra columns as follows:
ProdClass - a single letter to indicate the type of product G=goods=merchandise; M=medication, S=service. If you add your own supplier's data, you can start by tagging everything as G, but you will need to go through and mark the things that should be medication as M. [Recall that medications have a DrugSchedule and a dispensing labels and instructions.] You can also add service items like Consults.
SupplierNo - this is set to 1 for every item. If you include products from another supplier, put 2 here and the add the corresponding line to CK-supplier
Markup - this is the markup index - see the code in the Process step of the CK Products transform, and adjust as you need.
Species - put the species here for items that are species specific. Instructions in the Process step of the CK Products transform. You can leave this column all blank if you want.
FixedPrice - this column is here if you want to add service products, or if you want to put a 'flag-fall' price on some goods or medications. [eg putting a fixed price of $10 on a can of dog food with a unit price of $3 means that 10 cans cost $10+10x$3 = $40.] No problem if you leave blank.
UOM - unit of measure for the item. If you have previously set up the 'Units of Measure' lookup, then you can use the appropriate codes here. No problem if you leave blank.
DrugSched - for the scheduled drugs, put their schedule here (ie S4, S8 etc). Note that although everything has a schedule (ie dog food is S1 - non-dangerous), only medications have a slot for the schedule. This means that if there is some item which you think of as merchandise, but it has a schedule that you need to record, then you Must make the item a medication.
ProdType - the Product Type for the item. What is set here needs to match the Name field in the CK_productTypes.csv file.
The transforms are as follows:
- CK Supplier loads the supplier(s) from the CK_supplier.csv file.
- CK Load Product Type loads the product types from the CK_productType.csc file.
- CK Products loads the products and their prices.
- CK Product Supplier links products to suppliers and adds in the supplier specific information.
- CK Set Product Type sets the product type for each product.
There is also a CK New Prices transform. This uses the same product input file (for simplicity sake) but just updates the prices. [Remember that in OPV a price update does NOT replace the previous prices – it just add the newer ones with the new date. Hence these supersede the old one, but you can see what the old prices were. This happens because the prices are ‘collections’. If you updated a simple field (like Name) then the new data will replace the old.]
Problems:
a) I have not set all the available datafields
b) you will see that I set both the product Name and Printed Name to the name from the Description field in the data file. OPV has done its 'properCase' processing of the Name field, but the standard archetype does not set properCase for the Printed Name field. If you want the name on invoices etc to come out the same as the proper cased name, delete line 2 of the mappings in each of the OPV Loader steps so that Printed Name does not get set (and will default to what is in the Name field).
c) you will have to adjust the folder names set in the xxx.csv steps. You will find that they are all set to " C:\Users\Tim\Documents\HKG Operations\OpenVPMS\Kettle\"
d) naming convention: all variables generated by the Process step are prefixed by 'o'. Hence fields like DrugSched come from the input file and have not been altered.
Using the Openvpms Docloader
Openvpms has a number of methods to enter data or information into your Openvpms MySQL instance. To convert large data sets the OPENVPMS Kettle Plugin for Pentaho Data Intergration version 3.2 should be used, however it is possible to use the dataloader and also the document loaders to enter some data. The dataloader parses a properly structured XML file and loads it into the database, creating the correct linkages as it does so.
The DocumentLoader loads patient or customer documents or attachments into the Database. This article will summarize the available options when using the document loader. Further details explaining how to implement an automatic loader that can load lab results is details here.
http://www.openvpms.org/documentation/automatic-document-importing-openvpms
This will cover the arguments we can use with the docloader
--byid (-i) or --byname (-n) You must use one of these options otherwise the docloader fails.
1.--byid (-i) Using this options looks for an investigation ID to attach the file to. If you specify byid you can also specify
--source (-s) the source directory to load from (default ./)
--dest (-d) the destination to archine processed documents
--regexp a java regexp statement to allow correct parsing of the document name to extract the ID
Default Value = [^\\d]*(\\d+).*
--overwrite (short flag -o ) if used allows you to overwrite existing documents rather than add a new one.
--recurse (short flag -r) if set that will scan the source recursively
--type(-t) I believe you can specify the archetype shortname you are targetting. If not set it will default to Patient Investigations. The archetype short name. May contain wildcards. ie act.*Document*
--context (-c) Default ./applicationContext.xml Please rememeber the .bat or .sh usually sets this to ../conf/applicationContext.xml. So usually you should not set it.
--verbose (-v) Verbose Logging..Logs verbose message to the log or console.
--failonerror (-e) fails on any error. Used for testing purposes usually.
2. --byname (-n) Using this option Load files by matching their names with document acts"
You can only set source, destination, recursive and type when this option is used. Overwrite, and regexp are ignored.
iReports - tips and tricks
NOTE that this is a first draft and may contain errors - if you see any, please comment.
The following may help when you start trying to edit or create reports for OpenVPMS.
Version: although iReports is now up to version 5, for the current version of OpenVPMS (1.6) you need to use iReports 3.7.6.
Manual: you may find that http://jasperreports.sourceforge.net/JasperReports-Ultimate-Guide-3.pdf is useful.
Concepts: OpenVPMS uses two types of 'reports' - those that you run as Reports and which use SQL to extract data from the database, and those that are invoked by various document Print requests - and for these the OpenVPMS code provides the data to the report. For the SQL ones you can use the Preview function with iReports to test your report. For the others, you cannot (unless you are clever and dummy up the required data) so testing is a matter of uploading your new/modified report into the appropriate OpenVPMS report template, and then printing an invoice (or whatever).
Data Source: in order to use the preview function, you have to tell iReports what the data source is. When you start iReports, the initial display (after you dismiss the 'new version available' message box) looks like the following:
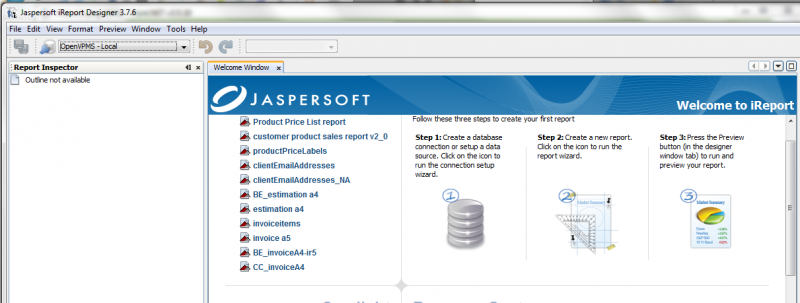
As it says, step 1 is to create the database connection. You need to create a "Database JDBC Connection". You can see in the top left, I have previously created what I called "OpenVPMS - Local". Clicking the 'Report Datasources' button to the left of this shows the available data sources. Below is what I have with the 'OpenVPMS - Local' one (my default) expanded.

If you don't set up the datasource, then by default you will be using iReports 'empty datasource' and your report preview will show nothing.
---to be continued---