Suppliers
The Supplier workspace is used to handle suppliers.
Information
This screen displays information about the current supplier - or if there is no current supplier, a Select button allowing you to select one and a New button to create one.
Depending on the type of supplier, the details are shown in slightly different ways as follows:
For Manufacturers: (for the meanings of the fields, click here)

For Supplier Organisations: (for the meanings of the fields, click here)
For Supplier Persons: (for the meanings of the fields, click here)

For Vet Practices: (for the meanings of the fields, click here)

For Veterinarians: (for the meanings of the fields, click here)

Edit Manufacturer
This is the screen used to create and edit manufacturers. For background see Concepts|Suppliers.

The fields in the header are as follows:
Id - the ID
Company Name - the name of the manufacturer
Notes - any notes you want to add
Active - uncheck this box to deactivate the manufacturer
See Tabs for a description of the fields in Contacts tab.
The Representatives tab is used to set the Supplier-Persons that this manufacturer employs. Note that an organisation can have zero, one or more representatives defined. As can be seen above the fields are:
Contact - the representative
From Date - the date on which the relationship started
To Date - the date on which the relationship ended
Edit Supplier (Organisation)
This is the screen used to create and edit supplier organisations. For background see Concepts|Suppliers.

The fields in the header are as follows:
Id - the ID
Company Name - the name of the supplier organisation
Notes - any notes you want to add
Active - uncheck this box to deactivate the supplier
See Tabs for a description of the fields in the common tabs, Contacts, Account Type, Categories, and Suppliers.
The Representatives tab is used to set the Supplier-Persons that this organisation employs. Note that an organisation can have zero, one or more representatives defined. As can be seen above the fields are:
Contact - the representative
From Date - the date on which the relationship started
To Date - the date on which the relationship ended
Edit Supplier (Person)
This is the screen used to create and edit supplier persons. For background see Concepts|Suppliers.

The fields in the header are as follows:
Id - the ID
Title - the name of the supplier organisation
First Name - the first name
Initials - the initials
Last Name - the last name
Notes - any pertinant notes
Active - uncheck this box to deactivate the supplier
See Tabs for a description of the fields in the common tabs, Contacts, Account Types and Categories.
The Organisations tab is used to set the Supplier-Organisations that this person belongs to. Note that they can belong to zero, one or more organisations. As can be seen above the fields are:
Supplier - the organisation
From Date - the date on which the relationship started
To Date - the date on which the relationship ended
Edit Practice
This is the screen used to create and edit supplier practices. For background see Concepts|Suppliers.

The fields in the header are as follows:
Id - the ID
Practice Name - the name of the supplier organisation
Notes - any notes you want to add
Active - uncheck this box to deactivate the supplier
See Tabs for a description of the fields in the common tabs, Contacts and Categories.
The Vetinarians tab is used to set the Supplier-Veterinarians that this practice employs. Note that a practice can have zero, one or more vets defined. As can be seen above the fields are:
Veterinarian - the vet
From Date - the date on which the relationship started
To Date - the date on which the relationship ended
Edit Veterinarian
This is the screen used to create and edit supplier veterinarians. For background see Concepts|Suppliers.

The fields in the header are as follows:
Id - the ID
Title - the name of the supplier organisation
First Name - the first name
Initials - the initials
Last Name - the last name
Notes - any pertinant notes
Active - uncheck this box to deactivate the supplier
See Tabs for a description of the fields in the common tabs, Contacts and Categories.
The Practices tab is used to set the Supplier-Practices that this vet belongs to. Note that they can belong to zero, one or more practices. As can be seen above the fields are:
Practice - the Supplier Practice
From Date - the date on which the relationship started
To Date - the date on which the relationship ended
Tabs
This page documents the various common tabs on the on the supplier edit screens.
The common tabs are: Account Type, Categories, Stock Locations, and also Contacts. (Note that since the latter is also used for customers, practice and practice locations, it is documented in Concepts|Contacts.)
Account Type tab
This is used to set the Supplier Account Type. Note that this is an information setting - it does not affect the way in which the system treats suppliers.

Choose the account type from the list. Those available are set via Administration|Lookups|Supplier Account Type.
Categories tab
This is used to set the categories (zero, one, or more) to which the supplier belongs.

Use the arrows to move the selected item from the Available list to the Selected list and vice versa.
Note that those available are drawn from differents list depending on the type of supplier you are editing - see Concepts|Categories.
Stock Locations tab
This is needed only if you use the ESCI facility - if you don't use this, don't bother with this tab.

The fields are:
Stock Location - the stock location
Account ID - the account number }
Service URL - the URL }that the ESCI facility uses to access this supplier
Username - the user name }
Password - the password }
Pressing the Test button checks that these settings work.
Confirm Delete
When you press the Delete button on the Suppliers|Information screen, a confirmation window will appear. Press OK to confirm or Cancel to abort.
If the selected supplier is not in use and can be deleted, the window will simply ask you to confirm the delete. Press OK to confirm or Cancel to abort.
If it cannot be deleted because it is in use, the text will be "xxxx has relationships and cannot be deleted. Do you want to deactivate it instead?" (where xxx is the name of the supplier you are trying to delete). Pressing OK will unset its Active flag, Cancel will abort.
Confirm New
This window allows you to select the type of supplier to be created. Select the required one and press OK, else Cancel to abort.

SMS
This is the screen used to compose and send an SMS message. For background, see Concepts|SMS.

The fields are as follows:
Phone - the phone number to which the SMS will be sent. If the supplier has multiple phone contact numbers that are SMS enabled, then there will be a pull-down list for you to select from.
Message - the text of the SMS message - a maximum of 160 characters. The counter on the top of the box (96 in the above sample) shows how many more characters you can enter before your text will be truncated.
Press the OK button to send the SMS.
Documents
This screen displays the documents for the current supplier - or if there is no current supplier, a Select button allowing you to select a supplier.
This screen shows the details of the supplier's Documents. As you can see below, there are three different types: Attachments, Letters and Forms. The first two support 'versions', ie previous revisions of the document. See Concepts|Documents for background.

The top half of this screen functions like a standard select screen. As well as by date, you can select by:
Type - this can be set to All (ie all document types), or Attachment, Form or Letter
Status - this can be set to All, In Progress, Completed, or Finalised
The table shows the documents that match the selection criteria. The column headings are self explanatory. Clicking on the entry in the Document column will cause the document to be downloaded and displayed. Note that for Letters the Document column shows two icons like  . If you click on the right-hand one, the pdf file containing the letter will be downloaded and displayed. If you click on the left-hand one (or the name of the document) then the word processing document will be downloaded and you can open it in your word processor and save it and then edit it. (You need to save it as it is opened read-only.) After editing the file, you can then use the Edit button to edit the letter and upload the revised file.
The bottom part of the screen shows the details of the selected document.
The buttons are:
New - create a new documment - a window will open allowing you to select the type
Edit - edit the selected document record (not the document itself - though see above). If the document has status Finalised you will not be able to edit the record.
Delete - delete the selected document - a confirmation window will be displayed. If the document has status Finalised you will not be able to delete it.
Print - print the selected document (or preview it or email it)
Refresh - this button only appears when you have a non-finalised letter selected. Pressing it will (if the letter was generated from a template) refresh the letter by regenerating it from the template. This is useful if you have modified the template. A confirm window will be displayed.
Create/Edit Attachment
This is the screen used to create or edit an attachment document in the supplier's Documents list. See Concepts|Documents for background.
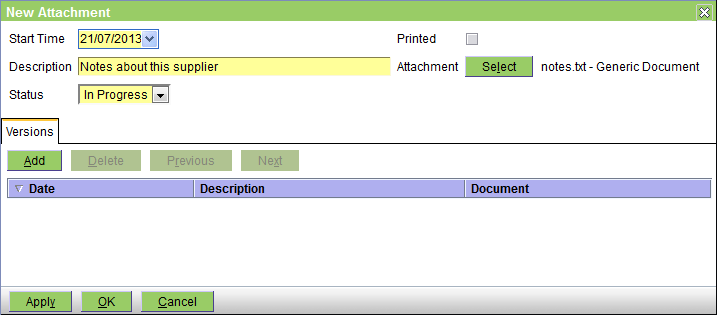
The fields are as follows:
Start Time - the date on which the entry was created - defaults to today
Description - any pertinent description
Status - this can be In Progress, Completed, or Finalised. In Progress implies that you are still working on this; Completed implies that you have finished - but the entry can still be editied; and Finalised means that it is really complete and can no longer be edited.
Printed - this box will be checked when the form has been printed
Attachment - press the Select button to attach the file - after the file is attached its name (notes.txt in this case) is shown here.
The Versions tab shows the previous versions. Note that you can use the Add button to add another, but you can also use the Select button. If you use the Select button to attach another file, then the previous 'top' version will just be pushed onto the version list.
Create/Edit Form
This is the screen used to create or edit a form document in the supplier's Documents list. See Concepts|Documents for background.

The fields are as follows:
Start Time - the date on which the entry was created - defaults to today
Description - any pertinent description
Status - this can be In Progress, Completed, or Finalised. In Progress implies that you are still working on this; Completed implies that you have finished - but the entry can still be editied; and Finalised means that it is really complete and can no longer be edited.
Printed - this box will be checked when the form has been printed
Form - select the form to print - these are the document templates that are of Type 'Supplier Form'
Create/Edit Letter
This is the screen used to create or edit a letter document in the supplier's Documents records. See Concepts|Documents for background. As discussed there, you can either generate a letter from a template, or upload any file.
First let's look at the screen shot for a new letter:

The fields are as follows:
Start Time - the date on which the entry was created - defaults to today
Description - any pertinent description
Status - this can be In Progress, Completed, or Finalised. In Progress implies that you are still working on this; Completed implies that you have finished - but the entry can still be editied; and Finalised means that it is really complete and can no longer be edited.
Printed - this box will be checked when the letter has been printed
Template - if you want to generate the letter from a template, enter the template here - these are the document templates that are of Type 'Supplier Letter' - the generated document will be an editable word processing file
Document - if you want to simply upload a file as a letter, press the Select button. A document select window will open allowing you to select the required file. If you upload a word processing file (rather than say a pdf or scanned image of a letter) then you will be able to edit it if needed.
Now the edit screen. The senario is as follows: you created an editable letter as above. Then you decided that you needed to modify it, so on the Suppliers|Documents screen, you selected the letter and then clicked on the actual letter to download it and open it in your word processor. You then saved a copy (as say Survey Letter-2), edited in the required changes and then saved it.
On the Suppliers|Documents screen you now press the Edit button to get the Edit Letter screen. You then press the Document Select button - this will open a browse window to allow you to select your 'Survey Letter-2' and upload it. The screen will then appear as below. The initial version has been saved as the previous version, and your new one as the new current version.

As intimated above, the Versions tab shows the previous versions. Note that you can use the Add button to add another, but you can also use the Select button. If you use the Select button to attach another file, then the previous 'top' version will just be pushed onto the version list.
Parameters
If a template containing parameters is selected (i.e. Fill-In fields in Microsoft Word, or Input Fields in OpenOffice Writer), a window will be displayed prompting for the values of those parameters. On OK, these will be merged with the document.
Confirm Delete
When you press the Delete button on the Suppliers|Documents screen, a confirmation window will appear. Press OK to confirm or Cancel to abort.
Confirm New
This window allows you to select the type of supplier document to be created. Select the required one and press OK, else Cancel to abort.

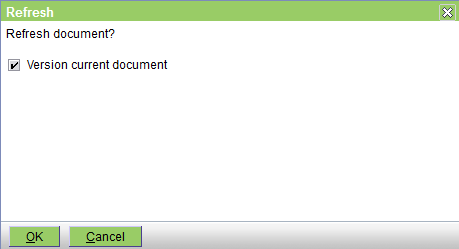
Confirm Refresh
If you press the Refresh button on the Supplier|Documents screen, then the window below will be displayed. Clicking OK will regenerate the letter from the template. If you leave the 'Version current document' box checked, then the previous version of the letter will be saved as the previous version, otherwise it will not be.
Pressing the Cancel button will abort the operation.
Orders
This screen displays the current orders. Note that when you first open this screen after logging on, no orders will be displayed, even though there are some - press the Find button to display all orders that are in progress with delivery pending for all suppliers and all stock locations.
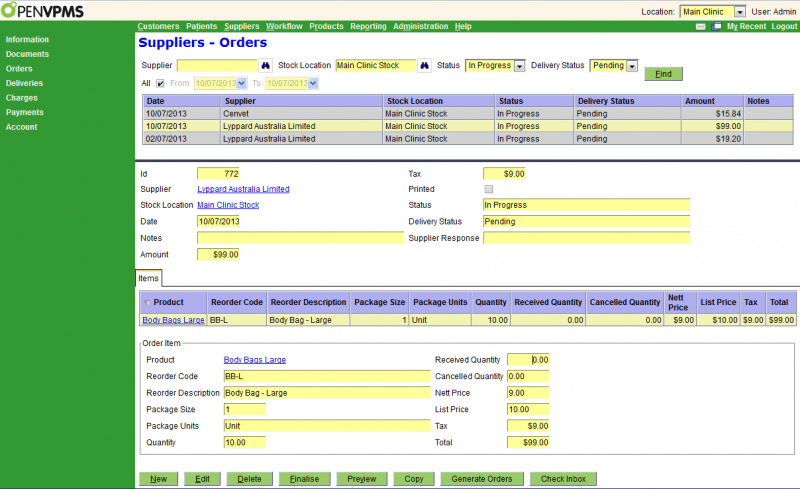
The top part of the screen is a standard select screen. The bottom part displays the selected order and line item details.
Apart from the date, the selection fields are:
Supplier - the supplier - leave blank to select all suppliers
Stock Location - the stock location - leave blank to select all stock locations
Status - can be All or one of the allowed statuses
Delivery Status - can be All or one of the allowed delivery statuses
The fields in the order header are as follows:
Id - the ID of the order
Supplier - the supplier to whom the order is being made
Stock Location - the stock location for which the product is being ordered
Date - the date on which the order was created
Notes - any pertinant notes to the supplier - these will be displayed on the order
Amount - the amount payable to the supplier (ie the sum of the line item total amounts)
Tax - the total tax amount included in Amount
Printed - the checkbox will be ticked if the order has been printed
Status - the order status
Delivery Status - the delivery status
Supplier Response -the response (if any) from the supplier (eg 'widgets on backorder' or 'widgets no longer available')
The Items tab shows the line items in the order. If you select one, its details will be displayed as follows:
Product - the product being ordered - note that this is our product name, as opposed to the supplier's (given by Reorder Code and Description). This is a link and you can click on it to get to the Product|Information screen for this product.
Reorder Code & Description, Package Size & Units - see see the Suppliers tab of the Products|Information screen
Quantity - the quantity ordered
Received & Cancelled Quantity - the quantity received and cancelled
Tax - the total tax payable for this line item
Total - the total line item amount - this will equal the Quantity times the Nett Price plus the Tax.
Buttons: For an 'In Progress' order the available buttons are shown above. If there are no orders displayed, then only New, Generate Orders, and Check In-Box are displayed. For a 'Finalised' order, the Delete and Finalise buttons will not be displayed. Apart from the standard ones, the buttons are as follows:
Finalise - initiatiate the process of placing the order. A confirm window will be displayed to let you confirm the Finalise. If you press OK, the order status will be set to 'Finalised'. A print window will be displayed to let you print, preview or email the order.
Preview - displays the order that will be sent to the supplier
Copy - copy this order to generate another - you would probably use this to make a copy of a previously completed order so that the items on it can be re-ordered. The new order will be presented in the Order Edit screen so that you can make any adjustments necessary.
Generate Orders - run the Generate Order process to generate the orders - this will bring up a confirmation window to allow you to specify the supplier and stock location. See here for help if you are not generating the orders you expect.
Check Inbox - pressing this checks to see if there are any messages from the ESCI interface, and if so sets the red 'have messages' alert in the messages icon at the top left of the screen. If the alert comes on, then you can use Workflow|Messaging to examine the messages.
Generate Orders
This window is displayed when you press the Generate Orders button on the Suppliers|Orders screen.

The fields are as follows:
Stock Location - use the pull-down to select the required stock location or choose All to process all stock locations
Supplier - use the pull-down to select the supplier, or choose All to select all suppliers
Generate orders for stock:
- below ideal levels - this is the default, only items whose stock is below their idea level are processed
- at or below critical levels - choose this to only process items whose stock is at or below their critical level
The buttons are:
OK - generate the orders - after the orders are generated a window will appear saying home many orders were generated
Cancel - abort
Note that the ordering algorithm is fairly simple:
- only the preferred supplier set for the product is considered - thus if product X is out of stock, and the supplier selected on the Generate Orders screen is NOT the preferred supplier for the product (but is one the other suppliers listed for the product) then the item will NOT be ordered.
- the preferred supplier can be specified by the product stock location, or by the product's suppliers. If both are specified, the supplier on the product stock location takes precedence.
- there is no fancy calculation involving usage rates and lead times
- if the current stock quantity is negative, then it is assumed that there is zero stock (and not say -6 of them)
- existing orders are scanned for any that are for the product for the selected stock location from any supplier and that have order status other than Cancelled, and delivery status other than Full, and the number on-order is calculated as ordered less received less cancelled since this gives the number still to come
- the quantity ordered is (ideal-level - current-stock - on-order)
- the supplier's package size is taken into account - ie if 14 are required, and the package size is a box of 12, then 2 boxes (ie 24 units) will be ordered
Multiple products are included on the one order, and there will be separate orders for each supplier/stock location.
Note that the orders are simply generated. You can edit them before finalising the order.
Edit Order
This is the screen used to edit orders.

The fields in the order header are as follows:
Id - the ID of the order
Supplier - the supplier to who the order is being made
Stock Location - the stock location for which the product is being ordered
Date - the date on which the order was created
Notes - any pertinant notes to the supplier - these will be displayed on the order
Amount - the amount payable to the supplier (ie the sum of the line item total amounts)
Tax - the total tax amount included in Amount
Printed - the checkbox will be ticked if the order has been printed
Status - the order status
Delivery Status - the delivery status - note that you cannot change this here
Supplier Response - the response from the supplier - note that you cannot enter this here (because if you are editing the order it has not been finalised and thus cannot have been sent to the supplier)
The Items tab shows the line items in the order. Use the Add and Delete buttons to add and delete items from the order.
The line item fields are as follows:
Product - the product being ordered - note that this is our product name, as opposed to the supplier's (given by Reorder Code and Description). This is a link and you can click on it to get to the Product|Information screen for this product.
Reorder Code & Description, Package Size & Units - see see the Suppliers tab of the Products|Information screen - note that you edit the values for this order here, but for permanent changes you need to edit the product|supplier information
Quantity - the quantity ordered
Received & Cancelled Quantity - the quantity received and cancelled - which you cannot set here
Nett Price & List Price - again these are taken from the Product|Supplier settings and you edit the values for this order here, but for permanent changes you need to edit the product|supplier information
Tax - the total tax payable for this line item
Total - the total line item amount - this will equal the Quantity times the Nett Price plus the Tax.
Confirm Delete
When you press the Delete button on the Suppliers|Orders screen, a confirmation window will appear. Press OK to confirm or Cancel to abort.
Confirm Finalise
When you press the Finalise button on the Suppliers|Orders screen, a confirmation window will appear. Press OK to confirm or Cancel to abort.
If you press OK the order status will be set to Finalised and you will be able to print the order.
Deliveries
This screen displays the deliveries and returns for the selected supplier and stock location. Initially the screen looks as follows:

The top part of the screen is a standard select screen. Enter the required Supplier and Stock Location. You can select one of the following statuses: All, Cancelled, In Progress or Posted.
After finding orders, and selecting an order and a line item the screen looks as follows:

For details on the fields in the header and the Items tab, see Edit Delivery.
For details on the fields in the Order tab, see Edit Order.
For a Posted delivery the buttons are as follows:
New - create a new delivery or return
Invoice - create the invoice for this delivery. The delivery status will be set to Posted. Note that you will not be able to do any more changes to this delivery, and the system will not object if you have only had a part delivery (eg 3 items delivered out of 6 ordered) - because what you are doing is creating the invoice for the part delivery. Note that the invoice is normally created as the second step of the Finalise process - see below.
Reverse - create a return note to reverse the selected delivery - a confirm window will be displayed
Check Inbox - pressing this checks to see if there are any messages from the ESCI interface, and if so sets the red 'have messages' alert in the messages icon at the top left of the screen. If the alert comes on, then you can use Workflow|Messaging to examine the messages.
For an 'In Progress' delivery, the buttons are New and Check Inbox and also:
Edit - edit the delivery
Delete - delete the delivery/return - a confirm window will be displayed
Finalise - finalise the delivery/return indicating that it is ready for invoicing/crediting. A confirm window will be displayed - if you OK the finalisation, the status will be change to 'Finalised'. You will also be asked if you want to create a supplier invoice/credit note for the delivered/returned items.
If you edit the delivery, you can change the supplier information (ie the Reorder Code & Description, Package Size & Units, List and Nett prices), and when the delivery is finalised, these will be updated in the product's Supplier information for this supplier. You can also enter any batch information for the delivered products. You can also add items to the delivery - you will want to do this if you ordered product X but they delivered product Y, or if what was delivered consists of two or more batches (because one line item can only contain one set of batch information).
Select
This is the screen used to select the order line items for which you want to create a delivery. The picture below shows the screen after a supplier and stock location (for which there are outstanding orders) have been entered and the Find button pressed.

The screen will show the line items for all the current finalised orders for which there have been no deliveries yet.
You can see that there are two types of rows in the table, the first shows just the order date, and the second the line item(s). In the above picture there are two orders, each with one line item.
Check the appropriate boxes. If all the line items in an order are being delivered, check the order date row - this will automatically select all items in that order. If only some line items are being delivered, check those and not the order date row.
If you got a part delivery of an item (ie you ordered 20 and got 15), then tick the line - so that this line item gets included in the delivery record, which then you can edit to correct the delivered quantity from 20 to 15.
Press OK to continue, or Cancel to abort.
Edit Delivery
This screen is used to create and edit deliveries.

The fields in the header are as follows:
Supplier - the supplier
Stock Location - the stock location
Date - the date of the delivery
Amount - the sum of the line item amounts
Tax - the total tax included in the Amount
Printed - this box will be checked when the delivery note has been printed
Notes - any pertinent notes
Status - this initially set to In Progress, but can also be set to Cancelled or Finalised
The Items tab shows the items being delivered, and the details for the selected line. These are as follows:
Product - the product - this is our name for the product
Batch Number - the product batch number - optional
Expiry Date - the product expiry date - optional
Manufacturer - the product manufacturer - optional
Reorder Code & Description - the supplier's identification of the item
Package Size & Units - the package details
Quantity - the quantity being delivered - this defaults to the quantity ordered, but you can see in the above that we have said that only 3 of the 6 ordered have been delivered
Nett Price - the tax-excluded price from the supplier
List Price - the supplier's list price
Tax - the title tax for the line item
Total - the total tax-included amount for the line item
If you modify any of the supplier information fields (eg Reorder Code & Description, Package Size & Units, Nett & List prices), then when the delivery is finalised, this information will be updated in the product's supplier information.
If the Auto Price Update flag is set (see here), then the product's Cost and Sell prices will also be updated if you modified the Package Size and/or List price.
Note that if this delivery item is linked to an order item, then you will not be able to modify the Product (even though it is an editable field). That is, if you ordered a X but they delivered a Y, then you cannot change X to Y in the delivery line item - you have to delete the X delivery item and add a new delivery item for Y. [You will also have to edit the order to cancel the X's otherwise they will be oustanding on the order.
If you do add a delivery item, make sure that you press Enter after entering the Product name - this will call in all the supplier information so that you can check it and update if required.
Product Batches
If a delivery line item has a Batch Number or Expiry Date, a Product Batch will be created when the delivery is finalised, if no Product Batch exists for the product with those details. The Product Batch matching the details will be linked to the Stock Location of the delivery.
Edit Return
This screen is used to edit a supplier return. It has the same fields as the Edit Delivery screen.
Confirm Finalise
When you press the Finalise button on the Suppliers|Deliveries screen, a confirmation window will appear. Press OK to confirm or Cancel to abort.
If you press OK the delivery note status will be set to Finalised and you will be able to print the delivery or return note.
Confirm Invoice
When you finalise a delivery on the Suppliers|Deliveries screen, you will be asked if you want to invoice the supplier. If you OK that, then this confirmation window will appear. Press OK to confirm or Cancel to abort.
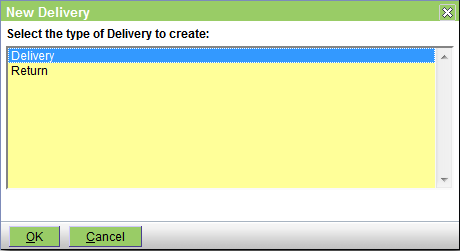
Confirm New
This window allows you to select the type of delivery to be created. Select the required one and press OK, else Cancel to abort. Note that since Delivery is the default type and OK is the default button, you can just press Enter to create the delivery transaction.
Confirm Reverse
When you press the Reverse button on the Suppliers|Deliveries screen, a confirmation window will appear. Press OK to confirm or Cancel to abort.
?? need more ???
?? correct URL ???
Charges
This screen displays the charges for the current supplier - or if there is no current supplier, a Select button allowing you to select a supplier.
Note that 'charges' are the invoices (or credits) that are currently in progress. If you need to look at previously completed invoices etc, then you use the Supplier|Account screen.

The top part of the screen is a standard select screen. If you need to change the supplier, press the Select button. The bottom part displays the selected invoice and line item details.
Apart from the date, the selection fields are:
Type - you can select All, Credit, or Invoice
Status - can be All, Completed, In Progress, or On Hold
The fields in the invoice/credit note header are as follows:
Start Time - the date on which the invoice/credit note was created
Amount - the total tax-included amount of the invoice/credit note
Credit - this checkbox will be checked if this is a credit note, otherwise (for an invoice) it won't be
Printed - the checkbox will be ticked if the invoice/credit note has been printed
Status - the invoice/credit note status
The Items tab shows the line items in the invoice/credit note. If you select one, its details will be displayed as follows:
Date - the date on which the line item was created
Product - the product being ordered - note that this is our product name, as opposed to the supplier's (given by Reorder Code and Description)
Quantity - the quantity ordered
Unit Price - the unit nett tax-excluded price of the item
Tax - the total tax payable for this line item
Total - the total line item amount - this will equal the Quantity times the Unit Price plus the Tax.
Buttons: For an 'In Progress' transaction the available buttons are shown above. If there are no transactions displayed, then only New is displayed. Apart from the standard ones, the buttons are as follows:
Finalise - initiatiate the process of finalising the transaction. A confirm window will be displayed to let you confirm the Finalise. If you press OK, the status will be set to 'Finalised'. A print window will be displayed to let you print, preview or email the invoice.
Preview - displays the invoice/credit note
Edit Credit
This is the screen used to create and edit supplier credit notes.

The header fields are as follows:
Start Time - the date on which the credit note was created
Amount - the amount of the credit note - this is the sum of the line item amounts
Printed - this checkbox will be checked when the credit note is printed
Status - is initially set to In Progress, and can also be set to On Hold or Finalised
The Items tab allows you to add, delete, view and edit the line items. The fields are as follows:
Date - the date on which the line item was created
Product - the product - note that this is our product name, as opposed to the supplier's (given by Reorder Code and Description). Note also that there is no check that the product selected is in fact provided by the currently selected supplier.
Quantity - the quantity
Unit Price - the unit nett tax-excluded price of the item
Tax - the total tax payable for this line item
Total - the total line item amount - this will equal the Quantity times the Unit Price plus the Tax.
Edit Invoice
This is the screen used to create and edit supplier invoices.

The header fields are as follows:
Start Time - the date on which the invoice was created
Amount - the amount of the invoice - this is the sum of the line item amounts
Printed - this checkbox will be checked when the invoice is printed
Status - is initially set to In Progress, and can also be set to On Hold or Finalised
The Items tab allows you to add, delete, view and edit the line items. The fields are as follows:
Date - the date on which the line item was created
Product - the product - note that this is our product name, as opposed to the supplier's (given by Reorder Code and Description). Note also that there is no check that the product selected is in fact provided by the currently selected supplier.
Quantity - the quantity
Unit Price - the unit nett tax-excluded price of the item
Tax - the total tax payable for this line item
Total - the total line item amount - this will equal the Quantity times the Unit Price plus the Tax.
Confirm Delete
When you press the Delete button on the Suppliers|Charges screen, a confirmation window will appear. Press OK to confirm or Cancel to abort.
Confirm Finalise
When you press the Finalise button on the Suppliers|Charges screen, a confirmation window will appear. Press OK to confirm or Cancel to abort.
If you press OK the invoice/credit note status will be set to Finalised and you will be able to print the invoice/credit note.
Confirm New
This window allows you to select the type of charge to be created. Select the required one and press OK, else Cancel to abort.

Payments
This screen displays the payments for the current supplier - or if there is no current supplier, a Select button allowing you to select a supplier.
Note that 'payments' are the payments (or refunds) that are currently in progress. If you need to look at previously completed payments etc, then you use the Supplier|Account screen.

The top part of the screen is a standard select screen. If you need to change the supplier, press the Select button. The bottom part displays the selected transaction and line item details.
Apart from the date, you can select by:
Type - you can select All, Payment or Refund
The fields in the payment/refund header are as follows:
Date - the date on which the payment/refund was created
Amount - the total tax-included amount of the payment/refund
Printed - the checkbox will be ticked if the payment/refund has been printed
Status - the payment/refund status
The Items tab shows the line items in the payment/refund. If you select one, its details will be displayed. These vary depending on the payment/refund type. See Edit Payment and Edit Refund for details.
Buttons: For an 'In Progress' transaction the available buttons are shown above. If there are no transactions displayed, then only New is displayed. Apart from the standard ones, the buttons are as follows:
Finalise - initiatiate the process of finalising the transaction. A confirm window will be displayed to let you confirm the Finalise. If you press OK, the status will be set to 'Finalised'. A print window will be displayed to let you print, preview or email the payment/refund.
Preview - displays the payment/refund
Create/Edit Payment
This is the screen used to create and edit supplier payments.
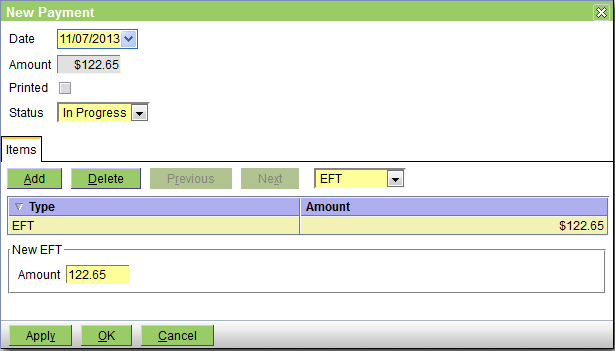
The header fields are as follows:
Date - the date on which the payment was created
Amount - the amount of the payment - this is the sum of the line item amounts
Printed - this checkbox will be checked when the payment is printed
Status - is initially set to In Progress, and can also be set to On Hold or Finalised
The Items tab allows you to add, delete, view and edit the item items. The pull-down allows you to select the payment type to be one of Cash, Cheque, Credit Card, or EFT.
The table shows the line items - normally there will be only one.
The item detail area changes depend on the payment type. The picture above shows EFT.
For Cash it is as follows:

The fields are as follows:
Amount - this will default to the amount owed
Rounded Amount - this is the rounded equivalent of Amount using the minimum cash denomination and rounding mode set for the currency - see Administration|Lookups|Currency
Tendered - the amount tendered
Change - this will be Tendered less Rounded Amount
For Cheque it is as follows:

The fields are as follows:
Amount - this will default to the amount owed
Drawer - the name of the drawer of the cheque
Branch - something that identifies the branch of the bank. For Australian usage this is the BSB (Bank State Branch) number.
Bank - select the bank using the pull-down. The values allowed are set via Administration|Lookups|Bank.
For Credit Card it is as follows:

The fields are as follows:
Amount - this will default to the amount owed
Credit Card - select the credit card using the pull-down. The values allowed are set via Administration|Lookups|Credit Card.
Edit Refund
This is the screen used to create and edit supplier refunds.
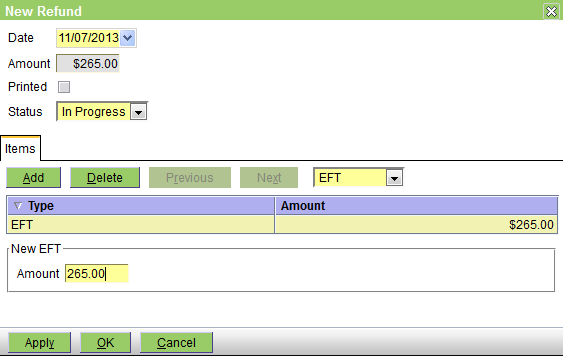
The header fields are as follows:
Date - the date on which the refund was created
Amount - the amount of the refund- this is the sum of the line item amounts
Printed - this checkbox will be checked when the refund is printed
Status - is initially set to In Progress, and can also be set to On Hold or Finalised
The Items tab allows you to add, delete, view and edit the item items. The pull-down allows you to select the refund type to be one of Cash, Cheque, Credit Card, or EFT.
The table shows the line items - normally there will be only one.
The item detail area changes depend on the payment type. The picture above shows EFT.
For Cash it is as follows:

The onlly field is:
Amount - the amount to be refunded
For Cheque it is as follows:

The fields are as follows:
Amount - the amount to be refunded
Drawer - the name of the drawer of the cheque
Bsb - something that identifies the branch of the bank. For Australian usage this is the BSB (Bank State Branch) number.
Bank - select the bank using the pull-down. The values allowed are set via Administration|Lookups|Bank.
For Credit Card it is as follows:

The fields are as follows:
Amount - the amount to be refunded
Credit Card - select the credit card using the pull-down. The values allowed are set via Administration|Lookups|Credit Card.
Confirm Delete
When you press the Delete button on the Suppliers|Payments screen, a confirmation window will appear. Press OK to confirm or Cancel to abort.
Confirm Finalise
When you press the Finalise button on the Suppliers|Payments screen, a confirmation window will appear. Press OK to confirm or Cancel to abort.
If you press OK the payment/refund status will be set to Finalised and you will be able to print the payment/refund.
Confirm New
This window allows you to select the type of payment to be created. Select the required one and press OK, else Cancel to abort. Note that since Payment is the default selection, and OK the default button, you can simply press the Enter key to create a new payment.

Account
This screen displays the account for the current supplier - or if there is no current supplier, a Select button allowing you to select a supplier.
Note this screen displays the completed financial transactions (ie invoices, payments, etc etc). If you need to look at invoices and payments that are in progress, then you need to use the Supplier|Charges or Supplier|Payments screens.
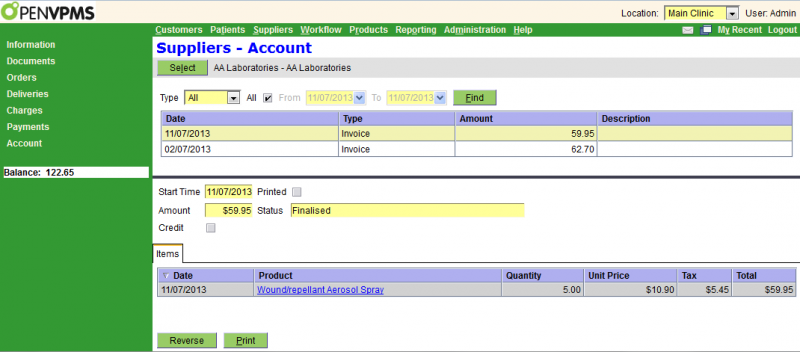
The top part of the screen is a standard select screen. If you need to change the supplier, press the Select button. The bottom part displays the selected transaction and its line item details.
Apart from the date, you can select by:
Type - you can select All, Credit, Invoice, Payment or Refund
The fields in the item header are as follows:
Start Time - the date on which the transaction was created
Amount - the total tax-included amount of the transaction
Credit - this checkbox will be checked if this is a credit note or refund, otherwise (for an invoice or payment) it won't be
Printed - the checkbox will be ticked if the transaction has been printed
Status - the transaction status
The Items tab shows the line items in the transaction . If you select one, its details will be displayed as follows:
Date - the date on which the line item was created
Product - the product - note that this is our product name, as opposed to the supplier's (given by Reorder Code and Description)
Quantity - the quantity
Unit Price - the unit nett tax-excluded price of the item
Tax - the total tax payable for this line item
Total - the total line item amount - this will equal the Quantity times the Unit Price plus the Tax.
Buttons: The buttons are as follows:
Reverse - create a transaction to reverse the selected one. A confirm window will be displayed to let you confirm the reversal. See Confirm Reverse.
Print - prints the transaction - a Print Confirm window will open allowing you to print, preview or email the transaction.
Confirm Reverse
When you press the Reverse button on the Suppliers|Account screen, a confirmation window will appear. Press OK to confirm or Cancel to abort.
If you press OK the reversing transaction will be generated as follows:
| Transaction | Reversing Transaction | Find in |
|---|---|---|
| Invoice | Credit | Charges |
| Credit | Invoice | Charges |
| Payment | Refund | Payments |
| Refund | Payment | Payments |
You will then need to edit if necessary, and then finalise the created transaction.
Select
The Supplier select screen is displayed whenever you are looking for a supplier. It works like a standard select screen.

This is a standard select screen. The Type can be set to All or one of the different types of supplier - see Concepts|Supplier.
The column headings need no explanation.