Types
The Administration|Types screen is a select screen that allows you to select the specific Type to be viewed or maintained. Below is the screen as initially displayed but with the Types pull-down list showing.
Note that if you do edit Administration|Types items (say to change an an appointment type colour), then the new values will not become available until the next time you log on (because these type settings are fetched once at logon time to improve performance).

Each Type has its own view/edit screen.
Appointment
This screen allows you to create/view/edit the details for each Appointment Type. This and Organisation|Schedule determine what appointment types can be made.

The fields are as follows:
Appointment Type - it's name
Description - you can use this to clarify the type of appointment
Colour - used to set the colour used to identify appointment types in the schedule screen. You use the mouse to select the colour via the colour and luminosity/hue boxes. If you want to check the colours of the different appointment types, the easiest way to do this is to view the appointment type and then to use the Next and Previous buttons to run back and forth through the different types.
Note that you should avoid the 'light cream' colour f2f3b3 which displays as follows: 
because this is used to highlight the selected item on the Workflow|Scheduling screen.
Active - uncheck the box to deactivate the Appointment Type
Send Appointment Reminders - if this box is checked, SMS reminders may be sent automatically for appointments with the appointment type, providing that their schedule also has Send Appointment Reminders checked.
Cage Type
This screen allows you to create/view/edit Cage Types.
These are used to:
- indicate that an appointment Schedule is used for boarding or in-hospital stay
- determine charges for the Schedule

The fields are as follows:
- Name - the name of the Cage Type
- Description - the description of the Cage Type
- Active - determines if the Cage Type is active or inactive. If it is inactive, it is not available for selection.
- First Pet Product - Day - the product that is charged for day boarding
- Second Pet Product - Day - the product that is charged for day boarding for other pets belonging to the same customer in the same cage (i.e. the first pet is charged using the First Pet Product - Day). Optional
- First Pet Product - Overnight - the product that is charged per night for one pet.
- Second Pet Product - Overnight the product that is charged per night for other pets belonging to the same customer in the same cage (i.e. the first pet is charged using the First Pet Product - Overnight). Optional.
- Late Checkout Time - the time after which a fee is charged for late checkout. Optional.
- Late Checkout Product - the product that is charged for late checkout. Optional.
The products may be templates with weight rules, in order to support weight-based charging.
Cage Type Invoicing Rules
All charges are based on the time of check-in, and time of check-out. The appointment times are not used charging purposes.
Single Pet
Single pets are charged the First Pet Product - Day, if they check-in and out on the same day.
If they stay multiple days, they are charged First Pet Product - Overnight, with the quantity determined set to the number of days beween the current date and the pet's visit date. Any time is ignored.
Multiple Pets, Same Cage
If a customer has multiple pets in the same cage, and the pets are entering and leaving on the same days:
- The heaviest pet is charged as per the Single Pet rule above. The heaviest pet is selected to ensure that weight based templates are applied uniformly.
- For single day stay, subsequent pets in the cage are charged Second Pet Product - Day, if present. If none is defined, they will be charged First Pet Product - Day.
- For multiple day stay, subsequent pets in the cage are charged Second Pet Product - Overnight, if present. If none is defined, they will be charged First Pet Product - Overnight.
Multiple Pets, Same Cage, Different Days.
If a customer has multiple pets in the same cage, but the pets are entering and leaving on the different days, the Single Pet rule above applies to each pet.
Multiple Pets, Different Cages
Multiple pets in different cages are each charged using the Single Pet rule above.
Late Checkout
If a Cage Type specifies a Late Checkout Time and Late Checkout Product, and the time at checkout is greater, then the Late Checkout Product will be charged, with quantity 1.
Note:
- the late checkout charge does not apply if the pet overstays, but leaves before the Late Checkout Time. It will be charged for the additional day(s) using the rules above.
- if a customer does a late checkout and has multiple pets, the Late Checkout Product for each Cage Type may be charged to the invoice.
Calendar Block
Calendar Block Types are used by Calendar Blocks to:
- determine how the Calendar Block is displayed
- reserve Calendar Blocks to specific customers

The fields are:
Name - the name of the Calendar Block Type
Description - optional description
Colour - used to set the colour used to identify blocks in the schedule screen. You use the mouse to select the colour via the colour and luminosity/hue boxes. If you want to check the colours of the different types, the easiest way to do this is to view the type and then to use the Next and Previous buttons to run back and forth through the different types.
Note that you should avoid the 'light cream' colour f2f3b3 which displays as follows: 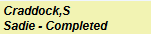
because this is used to highlight the selected item on the Workflow|Scheduling screen.
Active - uncheck the box to deactivate the Calendar Block Type
Reserve For Account Types - specifies any Customer Account Types to reserve times for.
Reserve For Customer Types - specifies any Customer Types to reserve times for.
Discount
This screen allows you to create/view/edit the Discount Types. See also Concepts|Discounts.

The fields are as follows:
Name - the name of the discount
Description - a description that serves to clarify the name
Discount Type - either Percentage (ie a percentage of the amount), Fixed (ie a fixed amount), or At-cost + Rate + Tax
Rate - either the fixed amount (for the Fixed type), or the percentage amount (for the Percentage and At-cost types)
Include Fixed Amount - check this box if the discount is to apply to the fixed component of the product price as well as its unit component
Active - uncheck this box to deactivate the discount
Note that the 'At-cost + Rate + Tax' type is so-named to reflect how the discount amount is calculated. Whereas with a Percentage discount of 10%, the sale price is reduced by 10% and thus the discount amount is 10% of the original sale price.
With an At-cost discount of 10%, the item is sold for (cost+10%)+tax, and thus the discount amount will depend on the markup.
Select
This is the screen used to select a Discount Type or a Discount Type Group. It works like a standard select screen.
Discount Group
This screen allows you to create/view/edit the Discount Groups. These are used to group together Discounts so that multiple discounts can be more easily set for a customer or patient. See also Concepts|Discounts.

The fields are as follows:
Name - the name of the discount group
Description - a description that serves to clarify the name
Active - uncheck this box to deactivate the discount group
Discounts Tab - used to add and delete the discount types in the group. Its fields are:
Discount - enter the name of the Discount or use the binoculars to display a list to select from
From and To Dates - these define the inclusive dates between which the discount applies. The From date is mandatory, the To date can be left unspecified and in this case means 'forever'.
Note that you cannot add the same discount type more than once, ie the group can only contain one of each discount type.
Select
This is the screen used to select a Discount Type to be included in a Discount Type Group. It works like a standard select screen.
Investigation
This screen allows you to create/view/edit the details for each Investigation Type. These define the Investigations that can be:
- linked to a product via its Investigations tab
- added to the medical record
- automatically ordered via of an HL7 Laboratory

The fields are as follows:
| Name | the name of investigation type |
|---|---|
| Description | you can use this to clarify the type of investigation |
| Active | uncheck the box to deactivate the Investigation Type |
| Universal Service Identifier | the identifier for the Investigation, when ordering it via an HL7 Laboratory. |
| Laboratory | the HL7 Laboratory, if the Investigation is ordered automatically. Note that the Universal Service Identifier must also be set. |
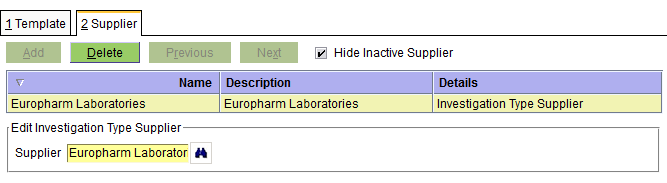
| Template tab | this is used to display, add, modify and delete the Document Template. If one is specified then it defines the document that will be printed when the investigation is initiated. It is normally some sort of form that can be used to request the required test(s). A maximum of one template can be specified. |
| Supplier tab | this is used to display, add, modify and delete the associated Supplier. If one is specified then will be displayed on the Workflow|Investigations screen. A maximum of one supplier can be specified. |
Product
This screen allows you to create/edit/view the details for each Product Type. Each Merchandise, Medication, and Service Product can be given a Product Type. These allow you to:
a) determine how the product appears on the invoice
b) set different taxes by product type
c) set different discounts by product type

The fields are as follows:
Product Type - it's name
Description - you can use this to clarify the type of product
Invoice Sort Order - the lower the number set here, the earlier the item appears on the invoice. See below.
Detail on Invoice - untick this box if you want all the invoice items of the same type combined as one line item on the invoice. See below.
Active - uncheck the box to deactivate the Product Type
Pharmacy - this is only required if you use the HL7 facility where it is used the set a Pharmacy or Pharmacy Group for all products of this Type
Taxes tab
This is used to display/set the taxes applicable to the Product Type. To adjust, click the tax in the Available or Selected box and then click the > or < button respectively.
Discounts tab
This is used to display/set the discounts applicable to the Product Type. The fields are as follows:
Discount - enter the Discount Type or click the binoculars to select one. Note that you cannot attach Discount Type Groups to a Product Type, only a Discount Type. You can add one or more.
From Date - the date from which the discount will apply
To Date - the date to which the discount will apply - left unspecified this means 'forever'
If you are using the standard invoice documents (or customised ones based on the standard versions), then invoice format depends on the 'Use Product Types' setting in the Letterhead record. If this is unchecked, then the Product Type is ignored. If it is checked then:
- the line items are grouped by patient, date, then by Invoice Sort Order, then by product name.
- if Detail On Invoice is not checked for a given Product Type, then the product line items with that type are not displayed and only the total for the Product Type is shown. If the total is zero the line will be suppressed. Hence if you have some 'no charge' products (such a dummy products used only to create a set of reminders) then you can assign them Product Type 'No Charge' and set this without the Detail On Invoice flag set, and if all the No Charge products do in fact have no charge, then the No Charge line will be suppressed.
Reminder
This screen allows you to view/edit the details for each Reminder Type. For general information on the Reminder system, see Concepts|Reminders. See also Stopper Reminders below.

The fields are as follows:
Reminder Type - its name
Description - you can use this to clarify the type of reminder
Active - uncheck the box to deactivate the Reminder Type
Group - check this box if you want multiple reminders to the one customer to only generate one reminder letter. See also the Grouped Reminders discussion below.
Interactive - check this box if you want confirmation when this type of reminder is generated as a result of using a product to which the reminder is attached (such as a vaccination). Note that this sets the default setting of the Interactive flag for this reminder. However, each product that uses this reminder can have its own setting of the Interactive flag. Specifically, this means that if you have existing products using this reminder, then altering the Interactive setting here will have no effect - you will have to go and set the Interactive flag as required for each product that uses this reminder.
Reminder Interval - the number of 'Interval Units' from the time that the reminder is created until it is due
Interval Units - you can set this to years, months, weeks or days
Cancel Interval - the number of 'Cancel Units' after a reminder is due that it is automatically cancelled. This should be set to be a little more than the Overdue Interval set for the "last" template that you have - ie the one with the highest Sent Count. If you set it less than the last Overdue Interval, then the reminder will be cancelled before all the reminders that you planned have been sent.
Cancel Units - you can set this to none, years, months, weeks or days
Sensitivity Interval - the number of 'Sensitivity Units' that determines the colour of the reminder when displayed on the Patient Information & Medical records screens when you click the Reminders bell icon in the left panel. It shows as follows:

If a given reminder has a sensitivity period of two weeks, then up until two weeks before the reminder is due, it will be shown in green; in the two weeks prior to and after the due date, it will be shown in orange; and after two weeks after the reminder date, it will be shown in red.
Sensitivity Units - you can set this to none, years, months, weeks or days
Templates tab - this is used to display and edit the Document Template to be used when printing reminders of this type. You should have at least one template defined. You can set up multiple templates so that different reminder notices are generated for the initial reminder and first, second, etc overdue notices. (If you don't have any templates, then when the reminders are processed using Reporting|Reminders, any reminders of this type will be skipped and nothing can be sent to the customer. However, the reminder is displayed in the Patients|Medical Records screen, and thus does function as an aide-memoire to clinicians and staff.) The fields are as follows:
Document Template - enter the name of template or use the binoculars to search for one. Note that the template that you specify must have its Type (see Templates|Edit) set to Patient Letter, unless you have checked Group (see above) in which case it must be set to Grouped Reminders. If you tick the List box (see below), then the document template will not be used, but you still must specify a template.
Reminder Count - this is the reminder number, 0 for the initial one, 1 for the second etc.
Overdue Interval and Overdue Units - these set the times between the initial and following reminders. The Interval should be set to zero for the initial (Reminder Count 0) template, and increasing intervals for the second, third etc.
List - if this box is ticked then no individual reminder notice is generated, but instead the customer and patient details are printed on a list
Export - this can be used if reminder mailouts are handled via a third party. When ticked, customers that want reminders mailed will have their details exported to a file during reminder processing using Reporting|Reminders. See here for details of the export format.
SMS - this can be used to specify that reminders should be sent via SMS, if customers have a phone contact with 'Allow SMS' ticked. If a customer doesn't have an SMS contact, then reminders are sent using their default reminder contact.
A typical template setup might have these entries:
- Reminder Count: 0 Overdue: 0 days Document: Vaccination reminder - First List: unchecked
- Reminder Count: 1 Overdue: 30 days Document: Vaccination reminder - Second List: unchecked
- Reminder Count: 2 Overdue: 60 days Document: Vaccination reminder - Second List: checked
This will send a first reminder letter on the due date of the initial reminder, a second reminder 30 days after the due date of the initial reminder and then print the reminder details on a report 60 days after the due date of the initial reminder. The latter will show up with Action 'List' in the Reporting|Reminders screen. The two former ones will show up as Post or Email dependent on the customers preferred mode of communication. Note that for the above (with Reminder Count 2 overdue at 60 days), a Cancel Interval of say 90 days would be appropriate.
Species tab - this is used to display and edit the species to which this reminder can apply. You don't have to use this facility. It is only needed if you want to ensure that species specific reminders are applied only to the relevant species. To adjust, click the species in the Available or Selected box and then click the > or < button respectively.
Groups tab - this is used to display and edit the group(s) to which this reminder belongs. To adjust, click the group in the Available or Selected box and then click the > or < button respectively.
You don't have to use this facility. It is only needed if you want to group reminders so that generating reminder B will complete an existing reminder A. Use Administration|Lookups|Reminder Groups to create a group names say G, and the use the Groups Tab to make both reminders A and B members of group G.
"Stopper" Reminders
You may want to create a special reminder whose purpose is simply to complete other reminders. Consider the following:
Senario - have a new puppy and so manually create Desex reminder for 4 months forward. When we do the actual Desex operation we want this reminder to disappear, but with no creation of any future reminder.
Solution:
- create a reminder group called say Desex-G
- create the Desex reminder as normal, but with group Desex-G
- create Desex-Complete reminder with a zero Interval and zero Cancel Interval, and also set the group Desex-G
- for all desex products, set the reminder type as 'Desex-Complete'
Now when we invoice the Desex operation, a new Desex-Complete reminder will be created. This will complete the original Desex reminder.
If a customer has multiple reminders of types that have the Group box ticked, then these, irrespective of the Document Template specified for the applicable reminder count, will use the Document Template that has Type 'Grouped Reminders' - PROVIDED that the action is Post or Email. Consider the following, and assume that the action is Post in all 4 cases:

If both the G6 and Proheart reminder types have their Group box ticked, then one document will generated for Sir Humphry; it will be generated using the Grouped Reminders Document Template, and it will list the 4 reminders shown.
If only the G6 reminder type has the Group box ticked, then 3 documents will be printed: one Grouped Reminder for the G6 vaccinations showing both Dotty and Twiglet, and two Proheart reminders, one for Dotty and one for Twiglet, generated using the Document template specified for the reminder count. If Twiglet did not have a G6 vaccination due, then there would still be 3 documents, with the Grouped Reminder being replaced by a G6 vaccination reminder letter for Dotty.
That is, if the Group boxes are ticked, then the Grouped Reminder Document Template will be used - but ONLY IF there are multiple reminders. If the customer only has one reminder (and thus there is no need to group them) then the Document Template used is that specified in the Reminder Type's Templates tab for the applicable reminder count.
Note that there should only be a single Document Template of Type 'Grouped Reminders' available - either because there is only one in the system, or a single one is specified in the Practice Location or Practice Templates tab.
A sample Grouped Reminders document template is included in the standard system. It will need tailoring for your practice.
Note that any Email Template linked to Grouped Reminders template follows the same format. This enables the emailed group reminders to contain both a summary of the reminders in the email body, as well as in the attachment.
Task
This screen allows you to view/edit the details for each Task Type. This and Organisation|Work List determine what appointment types can be made.

The fields are as follows:
Task Type - its name
Description - you can use this to clarify the type of task
Colour - used to set the colour used to identify task types in the worklist screen. You use the mouse to select the colour via the colour and luminosity/hue boxes. If you want to check the colours of the different task types, the easiest way to do this is to view the task type and then to use the Next and Previous buttons to run back and forth through the different types.
Note that you should avoid the 'light cream' colour f2f3b3 which displays as follows:
because this is used to highlight the selected item on the Workflow|Work Lists screen.
Active - uncheck the box to deactivate the Task Type
Confirm Delete
When you press the Delete button on the Administration|Types screen, a confirmation window will appear.
If the selected Type is not in use and can be deleted, the window will simply ask you to confirm the delete. Press OK to confirm or Cancel to abort.
If it cannot be deleted because it is in use, the text will be "xxxx has relationships and cannot be deleted. Do you want to deactivate it instead?" (where xxx is the name of the item you are trying to delete). Pressing OK will unset its Active flag, Cancel will abort.
If it is in use but can be deleted, the text will be "xxxx has relationships. Are you sure want to delete? This operation cannot be undone." (where xxx is the name of the item you are trying to delete). Pressing OK will delete the item as well as all references to it, Cancel will abort.
Confirm New
This is the New Type confirmation window. Select the Type to be created and then use OK to continue or Cancel to abort. Note that if you have selected one on the Type screen, then this will already be selected in this window (even if it is not showing in the list of types) - thus you can normally simply click OK to proceed.