Upgrade Documentation
Follow the instructions to upgrade your installation.
Updating OpenVPMS to 1.2-Beta-1
This page outlines the required steps to upgrade a 1.1 release OpenVPMS installation to release 1.2-Beta-1.
| Step | Description |
|---|---|
| Download OpenVPMS Installation Files |
|
| Stop Tomcat Service |
|
| OpenVPMS Database Upgrade |
|
| Download and install the Mysql JDBC driver | This release does not package the Mysql database JDBC driver that is required by OpenVPMS to talk to a Mysql database installation. This is due to license restrictions on the Mysql connector. Using your current OpenVPMS-1.1 installation you can copy the necessary files from this installation to the new 1.2 installation and Tomcat using these instructions:
|
| Reload the Archetypes |
|
| Update the OpenVPMS web application |
|
| Start Tomcat |
|
Updating OpenVPMS to version 1.1
This page outlines the required steps to upgrade a 1.0 release OpenVPMS installation to release 1.1.
| Step | Description |
|---|---|
| Download OpenVPMS Installation Files |
|
| Stop Tomcat Service |
|
| OpenVPMS Database Upgrade |
|
| Reload the Archetypes |
|
| Update the OpenVPMS web application |
|
| Start Tomcat |
|
Upgrading to OpenVPMS version 1.3
This page outlines the required steps to upgrade a 1.2 release OpenVPMS installation to release 1.3.
| Step | Description |
|---|---|
| Download OpenVPMS Installation Files |
|
| Stop Tomcat Service |
|
| Database Backup | The 1.2 to 1.3 database upgrade process is quite extensive so we strongly suggest performing a MySQL database backup prior to attempting the upgrade. Use the MySQl administrative tool or phpmyadmin under Linux to create a backup. |
| OpenVPMS Database Upgrade | Depening on the size of your OpenVPMS database the upgrade process can take some time so we suggest you give yourself plenty of time for the process to complete.
|
| Download and install the Mysql JDBC driver | This release does not package the Mysql database JDBC driver that is required by OpenVPMS to talk to a Mysql database installation. This is due to license restrictions on the Mysql connector. Using your current OpenVPMS-1.2 installation you can copy the necessary files from this installation to the new 1.2 installation and Tomcat using these instructions:
|
| Reload the Archetypes |
|
| Update the OpenVPMS web application |
|
| Start Tomcat |
|
| Software Configuration |
Version 1.3 consists of some significant software changes, specifically the new enhanced scheduler. You will need to do some significant configuration steps in order to get the Scheduling and Worklist workspaces operational. This includes:
This version also includes automatic post code lookups using a new suburb lookup. We suggest you:
If you have any questions on these ad other software changes please post them on the forum. |
Upgrading to OpenVPMS version 1.4
This page outlines the required steps to upgrade a 1.3 release OpenVPMS installation to release 1.4.
| Step | Description |
|---|---|
| Download OpenVPMS Installation Files |
|
| Stop Tomcat Service |
|
| Database Backup | The 1.3 to 1.4 database upgrade process is quite extensive so we strongly suggest performing a MySQL database backup prior to attempting the upgrade. Use the MySQl administrative tool or phpmyadmin under Linux to create a backup. |
| OpenVPMS Database Upgrade | Depending on the size of your OpenVPMS database the upgrade process can take some time so we suggest you give yourself plenty of time for the process to complete.
|
| Download and install the Mysql JDBC driver | This release does not package the Mysql database JDBC driver that is required by OpenVPMS to talk to a Mysql database installation. This is due to license restrictions on the Mysql connector. Using your current OpenVPMS-1.3 installation you can copy the necessary files from this installation to the new 1.3installation and Tomcat using these instructions:
|
| Reload the Archetypes |
|
| Update the OpenVPMS web application |
|
| Start Tomcat |
|
Upgrading to OpenVPMS version 1.5.1
Upgrading to v1.5.1 from v1.4
-
Download the OpenVPMS installation files from here. Unzip the installation pack onto your OpenVPMS server: this should create an openvpms-release-1.5.1 folder.
-
Back up your OpenVPMS database.
-
Stop Tomcat:
1. Right-click on Computer;
2. Click Manage;
3. Click Services and Applications | Services;
4. Click on Apache Tomcat n.n;
5. Click on Stop.
-
Navigate to db folder. Open Command Prompt (Ctrl-Shift-Right Click):
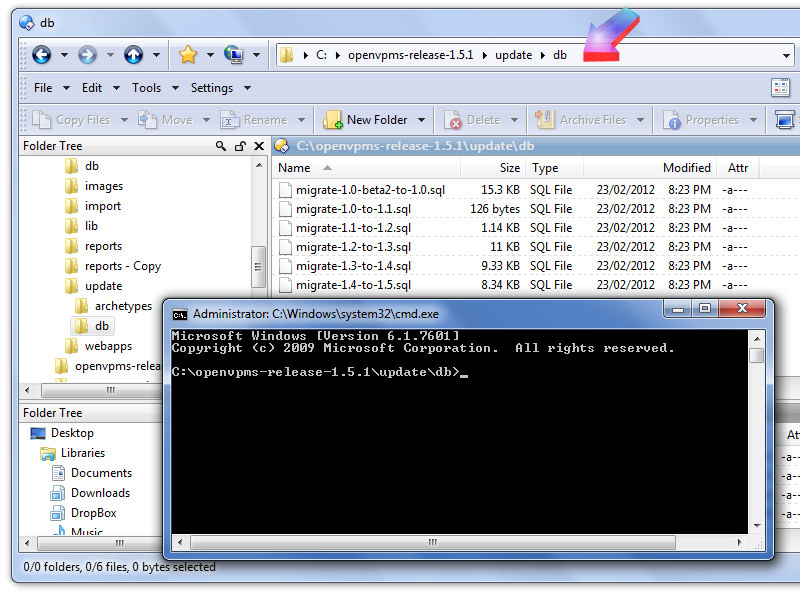
-
Start the mysql command line client and enter the following commands highlighted in yellow (don't leave out the semi-colon):
mysql -u root -p. Enter your password. Mysql prompt appears.
mysql> use openvpms;
mysql> source migrate-1.4-to-1.5.sql;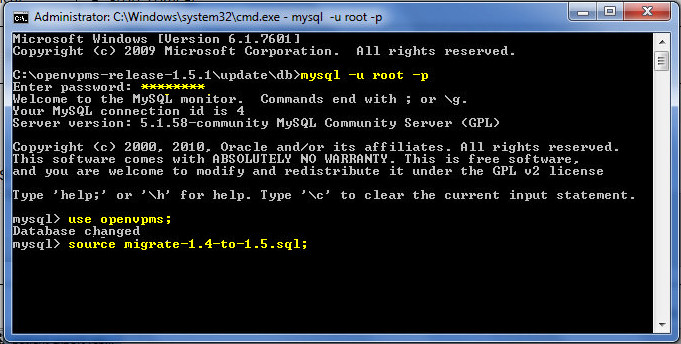
-
Allow command to run then quit;.

-
Copy connector.jar
from c:\openvpms-release-1.4\lib
to c:\openvpms-release-1.5.1\lib.
This file should already be in your Program Files\Tomcat n.n\shared\lib\ folder.
-
Browse to bin folder and open command prompt (Ctrl-Shift-Right Click):
Run archload. Close window when complete.
-
Navigate to C:\Program Files\Apache Software Foundation\Tomcat n.n\webapps.
Select and delete both the openvpms folder and the the openvpms.war file.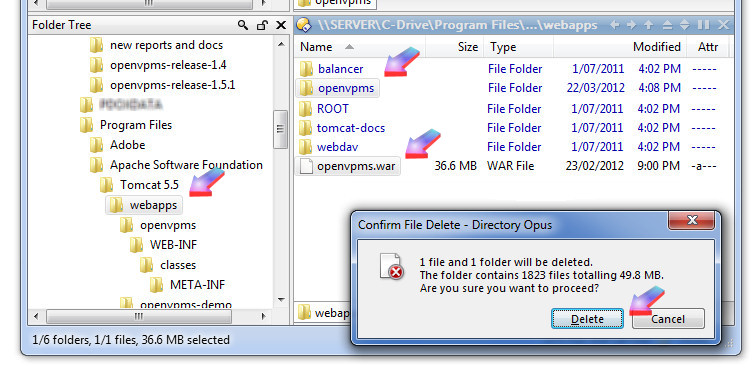
-
Copy .war file from c:\openvpms-release-1.5\lib
to C:\Program Files\Apache Software Foundation\Tomcat n.n\webapps:

-
Close everything. Restart Tomcat. Start openVPMS.

Created 21 Mar 2012, updated 7 Aug 2012
Upgrading to OpenVPMS version 1.6
Upgrading to v1.6 from v1.5.1
-
Download the OpenVPMS installation files from here. Unzip the installation pack onto your OpenVPMS server: this should create an openvpms-release-1.6 folder.
-
Back up your OpenVPMS database.
-
Stop Tomcat:
1. Right-click on Computer;
2. Click Manage;
3. Click Services and Applications | Services;
4. Click on Apache Tomcat n.n;
5. Click on Stop. -
Copy connector.jar from c:\openvpms-release-1.5.1\lib
to
c:\openvpms-release-1.6\lib.
This file should already be in your Program Files\Tomcat n.n\shared\lib\ folder (Tomcat v5 or lower) or Program Files\Tomcat 6.0+\lib\ folder (Tomcat v6 or higher).
-
Browse to bin folder and open command prompt (Ctrl-Shift-Right Click):
Run archload. Nothing is visible on the screen, but you'll notice lots of disk activity. After a minute or so, the prompt re-appears when the batch file has completed. Close window.
-
Navigate to C:\Program Files\Apache Software Foundation\Tomcat n.n\webapps.
Select and delete both the openvpms folder and the the openvpms.war file. -
Copy .war file from c:\openvpms-release-1.6\webapps
to
C:\Program Files\Apache Software Foundation\Tomcat n.n\webapps:
-
Close everything. Restart Tomcat. Start OpenVPMS: there will be a delay the first time you start OpenVPMS as Tomcat rebuilds its webapps openvpms folder; then it all works perfectly!

-
Click on the subscribe link to email OpenVPMS for your subscription registration key (use this link either to subscribe, or, if you already have a subscription, to obtain your key).
When you receive your registration key,download it to your hard drive.
Click on Administration | Organisation | Practice (1,2,3).
Click on Subscription (4) then Upload (5).
Browse to your saved subscription key (6) and Send it to OpenVPMS (7).
-
Your details are now embedded into OpenVPMS. Click OK to close this window.

-
You will see your subscription status whenever you log onto OpenVPMS.....

.....or whenever you click on Help.
Created 15 Aug 2012, updated 07 Jan 2013