Products
The Products workspace is used to handle products.
Information
The Product Information screen is shown below. Note that this is a product selection screen - it displays limited information about the product(s) found by the selection - detailed information is displayed when you view or edit the product. When first used, it will be empty. The picture below shows it after a selection has been done.

This works as a standard select screen.
Type - allows you to select the type of product.
Pricing Group - this is displayed if Pricing Groups have been configured and the current user is an adminstrator. It defaults to the Pricing Group of the current Practice Location. Only those prices that match the selected Pricing Group or have no Pricing Group will be displayed in the Fixed Price and Unit Price columns.
The column headings require no explanation except to note that:
Description - will be the same as Name except for Template products (where it will be blank)
Prices - are shown as tax-inclusive or tax-exclusive based on the practice Show Prices Tax Inclusive setting.
The standard buttons have their standard meanings. In addition,
Copy lets you create a new product by cloning it from the selected one. Note that EVERYTHING is copied - including any current stock holdings. Hence after the copied product is created, you will need to edit it to zero the stock quanties and make any other required adjustments.
Export initiates the Price Export process by displaying the Export Prices window. See also Concepts|Pricing Updates.
Import initiates the Price Import process by displaying an upload window to let you select the file to be imported.
Synchronise with Smart Flow Sheet sends product changes to Smart Flow Sheet. See Synchronising products for more details.
Note that the Edit, Delete, Copy, Export, Import and Synchronise with Smart Flow Sheet buttons will not be present unless the user's categories include 'Administrator'. See also Concepts|Users.
Confirm Copy
When you press the Copy button on the Products|Information screen, a window like the following will be displayed. Pres OK to proceed, Cancel to Abort.

Confirm New
This is the New Product confirmation window. Select the type of Product to be created and then use OK to continue or Cancel to abort. Note that if you have selected a type on the Product screen, then this will already be selected in this window - thus you can normally simply click OK to proceed.
Create/Edit/View Medication
This is the create/edit/view screen for Medication products, ie items which are sold (like merchandise) but which being medication, also need drug labels, dispensing notes, a drug schedule and list of active ingredients.

The fields are as follows:
Id - the ID of the product
Name - its name
Description - optional description
Printed Name - the name that will be displayed when the invoice etc is printed. If omitted, then the Name will be used.
Drug Schedule - the applicable drug schedule (None, or S1 through S8)
Active Ingredients - you can list the active ingredients here. The standard prescription print template will display this text with the label 'Strength'.
Concentration - the medication concentration. This is:
- required for dose calculations, if doses are used
- used when synchronising products with Smart Flow Sheet. For Smart Flow Sheet, medications with a Concentration must also have Dispensing Units
Selling Units - the units by which this is sold (eg Unit, Ampoule, Bottle, Box, etc). The available choices are set by the Administrator|Lookups|Units of Measure screen.
Dispensing Units - the units by which this is dispensed - the same choices as Selling Units.
Dispensing Verb - the applicable dispending verb (None, Administer, Apply, Give, Inject). This and the Dispensing Units are commonly used in macros to generate dispensing labels.
Dispensing Label - check this box if a dispensing label should be printed for this product
Label Instructions - the preset text for the label - this can be added to prior to printing
Type - this is used to set the Product Type - see Concepts|Products. If you are using product types, then you really need to set the type for every product.
Product types can be arbitrarily created by your administrator. These product types are distinct from product classes (Merchandise, Service, Medication). Instead, these can be used to group products according to discounts and tax types for instance. See Administration|Types|Product Type.
Pharmacy - this is only required if you use the HL7 facility where it is used the set a Pharmacy or Pharmacy Group for this product. Note that this can also be set via the Product Type and this may be more convenient if many products use the same pharmacy or pharmacy group.
Use only in Templates - if ticked, indicates that the product can only be use in charges and estimates via a Product Template.
Patient Identity - used to indicate that a Microchip, Pet Tag, or Rabies tag should be added to the patient when the product is charged.
Active - uncheck this box to deactivate the product
Dispensing Notes - here you can add notes (eg Dose - Dogs: 2.5mls bid, Cats: 1ml bid). These will be displayed on the Create/Edit Medication screen
See Tabs for a description of the fields in the various tabs.
Create/Edit/View Merchandise
This is the create/edit/view screen for Merchandise products. See Concepts|Products for background information.

The fields are as follows:
Id - the ID of the product
Name - its name
Printed Name - the name that will be displayed when the invoice etc is printed. If omitted, then the Name will be used.
Selling Units - the units by which this is sold (eg Unit, Ampoule, Bottle, Box, etc). The available choices are set by the Administrator|Lookups|Units of Measure screen.
Type - this is used to set the Product Type - see Concepts|Products. If you are using product types, then you really need to set the type for every product.
Product types can be arbitrarily created by your administrator. These product types are distinct from product classes (Merchandise, Service, Medication). Instead, these can be used to group products according to discounts and tax types for instance. See Administration|Types|Product Type.
Pharmacy - this is only required if you use the HL7 facility where it is used the set a Pharmacy or Pharmacy Group for this product. Note that this can also be set via the Product Type and this may be more convenient if many products use the same pharmacy or pharmacy group.
Use only in Templates - if ticked, indicates that the product can only be use in charges and estimates via a Product Template.
Patient Identity - used to indicate that a Microchip, Pet Tag, or Rabies tag should be added to the patient when the product is charged.
Active - uncheck this box to deactivate the product
See Tabs for a description of the fields in the various tabs.
Create/Edit/View Price Template
This is the create/edit/view screen for Product Price Templates. These are used to set standard prices that can be used by actual products.

The fields are as follows:
Id - the ID of the template
Name - its name
Active - uncheck this box to deactivate the product
See Tabs for a description of the fields in the Price tab. Note that for Product Price Templates you can only set a Fixed price, and not the Unit price. That is, you can only use standard pricing for the fixed component of a product's price.
Create/Edit/View Product Template
This is the create/edit/view screen for product Templates. These are used to group a number of products together so that time is saved when generating invoices and estimates.

The fields are as follows:
Id - the ID of the template
Name - its name
Description - used to clarify the name if necessary
Print Aggregate - if checked, the template will be printed as an aggregate in charges and estimates. If unchecked, each line item produced by the template will be printed.
Type - this is used to set the Product Type - see Concepts|Products. These aren't required for Templates but may be used for classification and reporting.
Use only in Templates - if ticked, indicates that the product can only be used in charges and estimates via another Product Template
Active - uncheck this box to deactivate the product
Invoice Note - if present, this is added to the invoice note of the invoice. It is added to any pre-existing text and does not replace it. If a template is used in an Estimate, the Invoice Note will be included when the Estimate is invoiced.
Visit Note - if present, this is added to the medical record as a note.
Includes are the items that the template includes. These can be either products or templates.
An included item may have a:
- Low and High Quantity. These are used to specify the low and high quantities for the item when the template is used in a estimate. The High Quantity is used when the template is used in an invoice.
- Weight, used to conditionally include the item based on patient's weight. There are 3 fields: the lower and upper limits and the units (which can be Kilograms, Grams, Pounds or None - if None is specified then any lower and upper limits will be ignored). To be included the patient weight must be greater than or equal to the lower limit and less than the upper limit. Note that the program will not detect over-lapping weight ranges as an error, but will use the first matching one. As indicated in the above screen shot, properly set weight data will include a set that has 0 as a lower limit, and 999 (ie large) as an upper limit. Note also that the system does not require that the weight units used here are the same as the weight units used for the patient's weight.
- Skip If Missing, used when the Practice Use Location Products option is selected. If the product is not available at the location and it is:
- unselected, template expansion will fail with an error message.
- selected, it will be skipped, and no error will be displayed.
This can be used to conditionally include location-specific products.
- Zero Price indicator. When selected, the item will be given a zero fixed and unit price when the template is used. This can be used for items that aren't charged for, but are included for stock control purposes.
- Print indicator. Determines if zero-priced items should be printed in charges and estimates. Only applies when Print Aggregate is unchecked.
If the template includes other templates, then when the template is used, any repeated product will have its quantities summed so that it only appears once in the invoice or estimate.
If the included template has a quantity other than 1, then this is used to multiply the quantities of the included products. Hence if Template A includes 2 of Template B and Template B includes 3 of Product X, then the total quantity of Product X will be 2x3=6.
Note that a template cannot include itself - either directly or indirectly (ie A includes B which includes A). The first will cause an immediate error and you will not be able to save the template. The second will cause an error when the template is used.
Medications with Doses
If a template includes a Medication with doses, the calculated dose will override the Low and High Quantity, except when the Low Quantity is zero.
See Tabs for a description of the fields in the other various tabs.
Create/Edit/View Service
This is the create/edit/view screen for products that are Services.

The fields are as follows:
Id - the ID of the product
Name - its name
Printed Name - the name that will be displayed when the invoice etc is printed. If omitted, then the Name will be used.
Selling Units - the units by which this is sold (eg Unit, Hour, Day, etc). The available choices are set by the Administrator|Lookups|Units of Measure screen. Note that for most services, this can be left at the default (normally Unit), and it only needs to be set for services like Boarding and Theatre Time that will be sold in quantities other than one.
Type - this is used to set the Product Type - see Concepts|Products. If you are using product types, then you really need to set the type for every product.
Product types can be arbitrarily created by your administrator. These product types are distinct from product classes (Merchandise, Service, Medication). Instead, these can be used to group products according to discounts and tax types for instance. See Administration|Types|Product Type.
Use only in Templates - if ticked, indicates that the product can only be used in charges and estimates via a Product Template.
Patient Identity - used to indicate that a Microchip, Pet Tag, or Rabies tag should be added to the patient when the product is charged.
Active - uncheck this box to deactivate the product
See Tabs for a description of the fields in the various tabs.
Export Prices
The Export Prices window is used to export OpenVPMS product prices to a CSV (comma separated values) file.
The exported prices can be manipulated in a spreadsheet program such as Microsoft Excel or OpenOffice Calc, and imported using Price Import.
Note that prior to OpenVPMS 1.9, exported and imported prices were tax-inclusive. Now all prices are tax-exclusive.

Prices can be selected for export using the following criteria:
- Type - one of Medication, Merchandise, Product Price Template, Service, or All. Note that you cannot export Templates - if you want to do some editing of these, you have to do them one by one.
- Search - enables the products to be queried by name or identity
- Search Identities - if selected, products are queried by identity
- Include Deactivated - if selected, inactive products are included in the search
- Product Type - the type of the product. E.g "Desexing", "Euthanasia".
- Species - queries products by species
- Income Type - queries products by income type. E.g. "Medication", "Professional"
- Product Group - queries products by product group. E.g "Fees", "Grooming"
- Prices - one of:
- Current - exports the fixed and unit prices for a product that are active at the current time
- All - exports all fixed and unit prices for a product. This may be used to export the price history
- Range - exports all prices for a product active within the range specified by the From and To fields
- Pricing Group - exports prices by Pricing Group. One of:
- All - export all prices, regardless of Pricing Group
- None - export prices with no Pricing Group
- Group Name - export prices with the specified Pricing Group, or no Pricing Group
- From - used to set the price From Date, when querying prices in a range
- To - used to set the price To Date, when querying prices in a range
- Include Linked Prices - if selected, prices linked from Product Price Templates will be included in the exported data
Export File Format
The exported data is a comma-separated-values file, containing the following columns:
| Column | Required | Type | Description |
|---|---|---|---|
| Product Id | Yes | Integer | The product identifier. |
| Product Name | Yes | String | The product name. |
| Product Printed Name | No | String | The product printed name. If different to that stored, updates the product's Printed Name. |
| Fixed Price Id | No | Integer | The fixed price identifier, used when updating an existing fixed price. |
| Fixed Price | No | Decimal | The tax-exclusive fixed price. If unspecified, no fixed price will be created/updated. |
| Fixed Cost | No | Decimal | The fixed cost. Only used if a fixed price is specified. Defaults to 0.0 if unset. |
| Fixed Price Max Discount | No | Decimal | The fixed price maximum discount, expressed as a percentage. Required if a fixed price is specified, optional otherwise. |
| Fixed Price Start Date | No | Date | The date the fixed price starts on. Required if a fixed price is specified, optional otherwise. |
| Fixed Price End Date | No | Date | The date the fixed price ends on. If unspecified, the fixed price will have no end date. |
| Default Fixed Price | No | Boolean (true/false) | Indicates if a Fixed Price is the default price for the date range. Only applicable if there are multiple fixed prices. |
| Fixed Price Groups | No | String | A space separated list of Pricing Group codes that are associated with the fixed price. |
| Unit Price Id | No | Integer | The unit price identifier, used when updating an existing unit price. |
| Unit Price | No | Decimal | The tax-exclusive unit price. If unspecified, no unit price will be created/updated. |
| Unit Cost | No | Decimal | The unit cost. Only used if a unit price is specified. Defaults to 0.0 if unset. |
| Unit Price Max Discount | No | Decimal | The unit price maximum discount, expressed as a percentage. Required if a unit price is specified, optional otherwise. |
| Unit Price Start Date | No | Date | The date the unit price starts on. Required if a unit price is specified, optional otherwise. |
| Unit Price End Date | No | Date | The date the unit price ends on. If unspecified, the unit price will have no end date. |
| Unit Price Groups | No | String | A space separated list of Pricing Group codes that are associated with the unit price. |
| Tax Rate | No | Decimal | The sum of tax rates for the product, expressed as a percentage. This must be valid on import, but is otherwise ignored. |
| Notes | No | String | Price notes. At present, this is used to report if a price is linked from another product. |
Note that the markup and tax-inclusive prices are not exported as they can be derived.
To calculate the markup from the exported columns use:
- Unit Price Markup = (Unit Price / Unit Cost - 1) * 100
- Fixed Price Markup = (Fixed Price / Fixed Cost - 1) * 100
To calculate tax-inclusive prices, use:
- Tax-inclusive Unit Price = Unit Price * (1 + Tax Rate / 100)
- Tax-inclusive Fixed Price = Fixed Price * (1 + Tax Rate / 100)
See Pricing Updates for instructions on manipulating the exported data.
Import Prices
The Import Prices window is used to import product prices from a CSV (comma separated values) file in the format produced by Export Prices.
Only those prices that have changed will be displayed. Where a value has changed, both the old (as strike-through text) and new value will be displayed. In the example below, the fixed prices have been increased by 20% and their start dates set.

Click OK to save the price changes.
Click Cancel to cancel importing the prices.
Price Import Date Formats
When importing prices, a Price Import Date Format window may be displayed:

This is displayed if the dates in the import document can be interpreted in different ways.
Select the appropriate date format and click:
- OK to import the document
- Cancel to cancel the import
Price Import Errors
Imported prices are validated for correctness prior to being saved. If errors are detected, these are displayed. E.g.:

The possible errors and their causes are outlined below:
| Error | Cause |
|---|---|
| A Value for <column name> is required | A mandatory value is missing. Values for Product Id and Product Name must always be provided. The Fixed Price Start Date and Unit Price Start Date need only be provided if a corresponding price is specified. |
| '<some value>' is not a valid value for <column name> | An invalid value has been specified for an Id, Price, Cost or Date column |
| Expected name: <product name> | The specified Product Name differs from that stored. Both the Product Id and Product Name must match that of an existing Product. |
| Product not found | The product with the specified identifier cannot be found |
| Unit price dates overlap an existing unit price |
A unit price has been specified that has a date range that intersects another unit price. |
| Price with identifier <price Id> not found | A price with the specified Fixed Price Id or Unit Price Id cannot be found. |
| Cannot update linked price |
An attempt has been made to update a fixed price linked from a Price Template. These prices can be updated via the Price Template. |
| Cannot determine which end date to use to close existing price. |
Multiple Fixed and/or Unit Prices have been specified for a product, and an existing price needs to have its To Date set to avoid price overlaps. This can be corrected by specifying a To Date for the existing price. |
| Cannot close existing price. Its start date would be greater than its end date. |
A new price has been provided that has a From Date that overlaps an existing price that has no To Date. and the calculated To Date for the existing price would be greater than its From Date. This can be corrected by specifying a later From Date for the new price. |
| Duplicate fixed price | Duplicate Fixed Price Id values have been specified, with different details for the other columns. |
| Duplicate unit price | Duplicate Unit Price Id values have been specified, with different details for the other columns. |
Tabs
This page documents all the possible tabs on the create/edit/view windows for the various type of product.
Use the following links to jump to the required tab:
Prices Doses Linked Investigation Types Suppliers Stock Locations Reminders Alerts Documents Discounts Species Updates Classifications Identities Equivalents Taxes Locations
Note that in many cases, the tabs have a Hide Inactive xxxxx checkbox. This is present when the item being attached to the product (ie the linked-to product, the reminder, the supplier, etc) can be deactivated. In this case the item will remain attached to the product, but the item will not be displayed and the product will act as though the item was not attached. You can have these inactive items displayed by unchecking the Hide Inactive xxxxx box.
Prices tab
This tab is used to set the product's price. See also Concepts|Pricing.
The price type selector is used to select Fixed (as shown below) or Unit when adding a new price. A product can have multiple current fixed prices, but only one unit price. As shown below, the fixed prices can be named. When entering an invoice, if the product has multiple prices, there will be a pull-down to let the appropriate one be selected. This facility is normally used for service products so that you can have one product, say Surgery, with three prices, Simple, Standard, and Complicated. The item will be shown on the invoice as 'Surgery' and with the selected price. Alternatively, if you want the invoice to show 'Surgery - Simple', 'Surgery - Standard', or 'Surgery - Complicated', then you need to have three separate products.

The Fixed Price fields are as follows:
Name - the name of the price that will be displayed in the pull-down on the invoice entry screen
Cost - the ex-tax cost of the product. It defaults to 0.
Markup - the markup (as a percentage). It defaults to 100.
Price - the price, exclusive of tax. You can either enter the price, or set the cost and markup and the system will calculate the price.
Tax-inclusive Price - the price, inclusive of tax, and rounded according to the price rounding convention. This is calculated from the price, and any tax rates associated with the product, product type, or practice.
If the Tax-inclusive Price is entered, the tax-exclusive Price will be calculated.
Max Discount - the maximum discount allowed - see Concepts|Discounts - Calculation
Default - check the box to make this the default price. If multiple prices are set, the default is the one initially selected.
From & To Date - these set the applicable dates. An unspecified To Date means 'forever'. If/when you adjust a price, it is sensible, not to just simply edit the price, but to do as follows. Edit the entry to set its To Date, then add a new price using the same date as the From Date. In the above, you can see that the 'Small' price was increased from $14.30 to $14.96 on 24 June 2012. Note that if you add a new price without 'closing off' the old one, then for Fixed prices, both will be available; for Unit prices, the oldest one will be used. Hence you should always 'close off' the old price.
Although you enter only the date, the system keeps full date/time. Hence, if you enter a new price at 3.15pm with its From date set tomorrow (and also set the old price's To date to tomorrow), then the price will change at 3.15pm tomorrow.
Pricing Group tab - this is used to set or unset the pricing group(s) - see below.
As you can see below, for Unit Prices the fields are the same except that there is no Name field.

Pricing Groups
If Pricing Groups have been configured, a Pricing Group filter is displayed. This has options:
- All - display all prices, regardless of Pricing Group
- None - display prices with no Pricing Groups. These are available to all Practice Locations
- Group - display prices with the specified Pricing Group, or that have no group
Selecting a particular Pricing Group will display the prices that are available to a Practice Location configured with that Pricing Group.
Note that the Pricing Group column will be suppressed in the None case, otherwise it displays the Pricing Group(s) or blank if there is no Pricing Group set for that price.

Pricing Groups may be assigned using the Pricing Groups tab.
Doses tab
The doses tab is used during charging and estimating to automatically calculate the quantity of a product from the patient weight, drug concentration and rate for the patient species.
Quantities calculated from doses:
- override any quantity specified by a template, except in the case of a Low Quantity of zero
- are highlighted in blue to indicate they have calculated
- override the High Quantity from an Estimate, when the Estimate is invoiced.
This is because the quantity needs to reflect the patient weight at the time of invoicing.

The fields are:
Species - the species that the dose applies to. If unset, it applies to all species
Weight - the patient weight range the dose applies to. The lower end of the range is inclusive, the upper end, exclusive
Rate - the dose rate
Round To - the number of decimal places to round the calculated quantity to. For injections, rounding to 1 or 2 decimal places can be used. For tablets, 0 decimal places may more appropriate.
Dose Selection
Doses are selected on the basis of a patient's weight and species.
If a product has a dose for a species and weight range that matches that of the patient, this will be selected over a dose for all species and the same weight range.
Dose Calculation
For medications with doses for the patient species and weight range, the quantity is calculated as:
quantity = weight * rate / concentration
where:
- weight is the patient weight, converted to the same units as the dose
- rate is the dose rate
- concentration is the drug concentration specified on the product
Linked tab
This allows standard pricing to be used for the Fixed component of the price. One very common use is for dispensing fees.
First you need to set up the standard prices using Product Price Templates, then you can link 'real' products to the templates. Just as you can set multiple fixed prices for a product, you can link to multiple price templates.
Note that the linked prices do not override any fixed prices set for the product, they just add to them. Thus when invoicing, the Fixed price pull-down will show both the linked and product prices.

The fields are:
Price Template - used to select the required Product Price Template
From & To Date - these are the same as used in the Prices tab
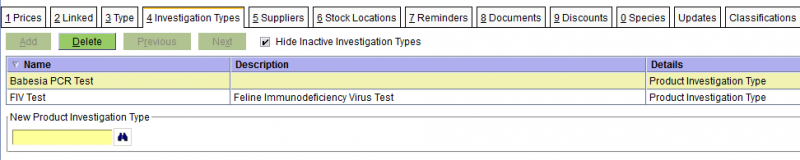
Investigation Type
This is used to set Investigation Types for the product - see Concepts|Investigations. A product can have zero, one, or multiple investigation types linked to it.
Suppliers tab
This is used to define the Supplier(s) for the product, and is only needed if you use the Stock Control facility.
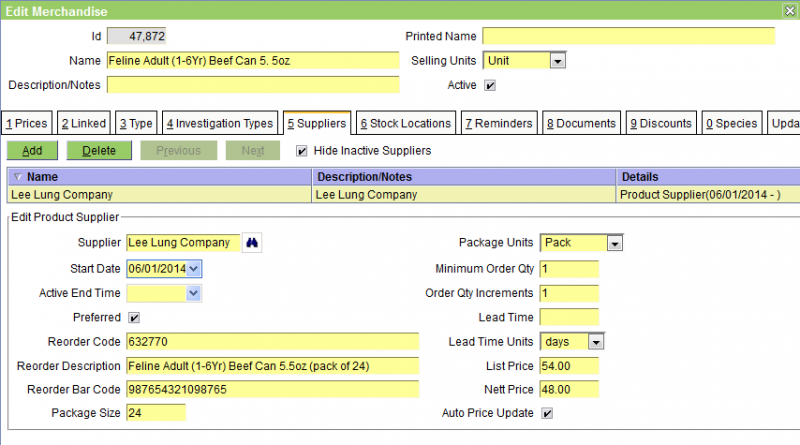
The fields are as follows:
Supplier - the supplier - this can be either a supplier organisation or a supplier person. See Concepts|Suppliers.
Start Date - the date from which this supplier can be used
Active End Time - the date after which the supplier should not be used to create orders
Preferred - check this box if this is the preferred supplier for this product.
Reorder Code - the part number/product code by which the supplier knows this item - if this is omitted no part number/product code will be shown on the order
Reorder Description - the description by which the supplier knows this item - if this is omitted then the Product Name will be shown on the order. Note that in the above screen snippet, the Reorder Description is indeed different from the Product Name - in this case we sell individual cans of pet food but buy them from the supplier in packs of 24.
Reorder Bar Code - the supplier's bar code for the item - remember that if two suppliers both sell widgets then their bar codes will be different
Package Size - this field is not shown on the order. The system uses the Package Size field to do things like "need to order 37 cans, but the package size is 24 so I will order 2".
Package Units - this field is shown on the order to describe the quantity being ordered.
Minimum Order Qty - the minimum order quantity that the supplier will accept. Note that this field is not currently used by the system, it is for documentation only.
Order Qty increments - the increment in order quantity. Again, this field is not currently used by the system, it is for documentation only.
Lead Time & Units - the lead time, ie the time from order until delivery. These fields are not currently used by the system, they are for documentation only.
List Price - this is your 'tax excluded' price for the item from the supplier - it is not displayed on the order. Note that both this and the Nett price are the prices for the item being ordered - in the above example the pack of 24 cans (and not the individual can price).
Nett Price - this is the 'tax excluded' price from the supplier, and will be displayed on the order. Note that the Nett Price is the price that the practice pays for the product. It will either be the same as the List Price, or will be lower because the practice receives a discount from the supplier.
Auto Price Update - check this box to automatically update product Cost and Sell prices when:
- editing a product to change the supplier's List Price or Package Size
- a delivery containing the product is Finalised which has a modified List Price or Package Size
In order for prices to update, the product must have:
- a Product Supplier relationship linked to an active supplier
- Auto Price Update set true
- a non-zero List Price
- a non-zero Package Size
but see also Ignore Price Decreases in the Practice record.
The product's prices are updated as follows:
- Cost Price = List Price / Package Size
- Unit Price = (Cost Price * (1 + Markup/100) ) * (1 + Tax/100)
Notes:
- This updates the existing Unit Price rather than creating a new Unit Price.
- If there are multiple prices for different pricing groups, all are updated.
- When a delivery is finalised, any line items with updated Package Size or Units, or List or Nett Prices, will update the Product Supplier information, irrespective of the Auto Price Update setting.
Generating Orders
Note that the system's 'Generate Orders' function will only generate orders for a product that has low stock if:
- the product has a supplier specified and the supplier's Preferred box is checked, or the stock location indicates a preferred supplier
- the Package Size set for the preferred supplier is greater than zero
- the Ideal and Critical quantities must be greater than zero
Stock Location tab
This tab lets you examine the stock at a stock location and to set ordering parameters.

The fields are:
Stock Location - the applicable stock location
Quantity - the current quantity in stock at this location. Note that you not normally edit this value. If you do need to adjust the stock holding, then you should use the Products|Stock Management|Adjust transaction.
Ideal Qty - the ideal stock level - the ordering system can reorder stock to get back to this level
Critical Qty - the critical stock level - the ordering system can reorder if the in-stock quantity drops below this level
Always Order - check this box if stock is to be reordered if the in-stock quantity is below the ideal level
Never Order - check this box if stock is never to be ordered
Preferred Supplier - specifies the supplier for the product, at this stock location only. Used by Generate Orders to override the default preferred supplier, specified on the Suppliers tab.
The algorithm used by the system to to calculate the order quantities (when the Generate button on the Suppliers|Orders screen is pressed) is as follows:
 Calculate predicted stock P = current stock + qty on order and not yet delivered or cancelled
Let I = ideal quantity, C = critical quantity
If P <= C, then order (I - P)
Note that the above algorithm does not use the Always & Never order check boxes (but this is planned for a future enhancement). Also the algorithm is more complex than the above because it also takes into account the supplier's package size.
Reminders tab
This tab is used to set the reminder(s) to be created when the product is invoiced. See also Concepts|Reminders.

The fields are as follows:
Reminder - the required reminder type
Interactive - check this box if, when the product is added to the invoice, a window is to be displayed to allow the reminder to be skipped (ie not created) or to enable the editing of the reminder parameters. If the box is not ticked then the reminder will be created without further intervention. Note that when a reminder is added to the product, the initial setting of this flag is taken from the Reminder Type definition - see Administration|Types|Reminder Types.
Period & Period Units - these set the period of the reminder, ie the time from when it was created until it becomes due. Note that these settings override the interval set for the reminder type. Also, if Interactive is set, then these can changed when the reminder is created.
Alerts tab
This tab is used to set the types of patient alerts to be created when the product is invoiced. i.e. each Patient Alert Type will be used to create a corresponding Patient Alert when the product is charged.
Documents tab
This tab defines what documents, if any, are to be printed when the product is used (ie invoiced). The documents are defined by their Document Templates - see Administration|Templates. The Type set for the templates should be 'Patient Form' or 'Patient Letter'. Patient Letter templates may have parameters; these will be prompted for when the product is invoiced.

Discounts tab
This tab sets the discounts that apply to this product. See Concepts|Discounts. Note that although discounts have been set for the product in the picture below, it is far more usual to set the discounts via the Product Type, rather than against the product itself.

The fields are:
Discount - select the required discount
From & To Date - set the dates for which the discount applies - a blank To Date means forever
Species tab
This tab is used to set the species to which the product applies. If none are set then it applies to all, else if one are more are set, then it applies to just those. This facility ensures that we don't sell fish food to a dog. The available species are set via Administration|Lookups|Species.

Updates tab
This tab is used to set what updates will occur if the product is used (ie invoiced). For example if a cat is spayed, then we want to automatically set its desexed status. Similarly if there is a burial charge, then the animal can be automatically deactivated and its Date Deceased set. The available updates are set via Administration|Lookups|Demographic Updates.

The classification tab is used to indicate the product group(s) and/or product income type(s) to which this product belongs. See Concepts|Classifications.

Identities tab
This tab is used to set the identities for a product. See Concepts|Identities and Concepts|Barcodes.
The pull-down is used to select the type of identity, Code or Bar Code.
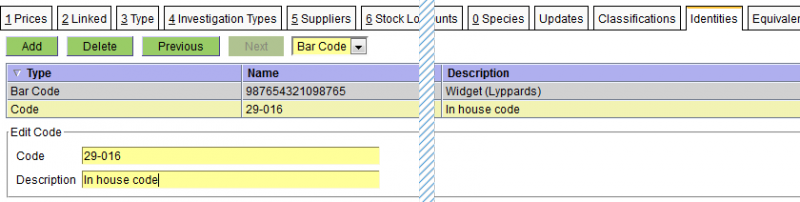
The Description field is used simply to document the code or barcode if desired.
Note that if you purchase the same widget from two suppliers, then each will have its own bar code, and both bar codes should be entered here so that the system can recognise both brand A and brand B widgets.
One further possible used of identities is as follows: say you want to have a product name in a second language (to support sales of this product on a web site). Then you could set the Code to 'Cantonese' and the description to ADVANTIX小狗小型犬(0-4KG) for the product whose (English) name is 'Advantix Pup & Small Dog (0-4Kg)'.
Equivalents tab
This tab allows you specify any products that are functionally equivalent to this one. Note that this simply a way of documenting any equivalent products. ie when you enter the product on an invoice, the system does not inform you that there is an equivalent.

Taxes tab
This tab allows you to set the applicable taxes for the product if this is necessary. Normally it is not because taxes are normally set at the Product Group or Practice level. See Concepts|Taxes.

Locations tab
This tab is displayed for Service and Template products when the Practice Use Location Products option is selected, and allows the selection of the products to be restricted to particular practice locations.
This is useful in multi-location practices, where not all products are available at all locations.

Stock Management
The Stock Management screen enables you to search for and display stock management transations, i.e. stock adjustments (where you are increasing or decreasing the stock of one or more items in a given stock location) and stock transfers (where you are transferring quantities of one or more items from one stock location to another).
You can also export and import stock quantity information - this is useful for stocktaking. You export the data for the Stock Location and products to be counted, then count the stock and update the New Quantities in the CSV file and then import it to generate a Stock Adjustment transaction which you can then Finalise to adjust the stock quantities.
A typical screen is as follows:

The top half of the screen is a standard select screen. The bottom half shows the details of the selected transaction. If you need clarification of the field contents, see Stock Adjustment and Stock Transfer
Buttons: For an 'In Progress' transaction the available buttons are shown above. For a 'Posted' transaction, only the New and Print buttons are shown (because one cannot Edit, Delete or Finalise a posted tranaction).
The Finalise button applies the stock changes and sets the status to 'Finalised'.
Note that there are no reversal transactions to correct incorrect transfers and adjustments. To reverse a transfer you just use another transfer with the To and From locations swapped. To reverse an adjustment, you just use another adjustment with negative quantities.
Export - initiates the Export Stock process.
Import - initiates the Import Stock process.
Stock Adjustment Create/Edit
This is the screen used to create or edit a Stock Adjustment transaction.

The fields are:
Date - the date of the adjustment
Stock Location - the stock location at which the adjustment is to be done
Status - this can be 'In Progress' or 'Finalised'.
Reason - an optional reason describing the adjustment.
Items tab - this shows the line items in the adjustment, and the details of the selected item. The details fields are:
Product - the name of the product
Adjust Quantity By - the amount by which the quantity is to be adjusted. This number can be negative to reduce the stock or positive to increase it. It is NOT the new stock in-hand (which will be the Current Quantity + Adjust Quantity By entered when the transaction is finalised).
Current Quantity - this shows the current quantity
Stock Transfer Create/Edit
This is the screen used to create or edit a Stock Transfer transaction.

The fields are:
Date - the date of the transfer
From - the stock location from which stock is to be transferred. A user can transfer from any stock location associated with their Practice Locations.
To - the stock location to which stock is to be transferred. A user can transfer to any stock location. This allows stock to be transferred to another location without giving a user full access to that location.
Reason - an optional reason describing the transfer.
Status - this can be 'In Progress' or 'Finalised'.
Items tab - this shows the line items in the adjustment, and the details of the selected item. The details fields are:
Product - the name of the product
Quantity - the quantity to be transferred. It must be greater than or equal to 1.
Current From Quantity - this shows the current quantity in the From location
Current To Quantity - this shows the current quantity in the To location
Confirm Delete
When you press the Delete button on the Products|Stock Management screen, a confirmation window will appear. Press OK to confirm or Cancel to abort.
Confirm Finalise
When you press the Finalise button on the Products|Stock Management screen, a confirmation window will appear. Press OK to confirm or Cancel to abort.
Confirm New
This is the New Stock Management Act confirmation window. Select the type of act to be created and then use OK to continue or Cancel to abort. Note that if you have selected an act on the Stock Management screen, then this will already be selected in this window - thus you can normally simply click OK to proceed.
Export Stock
The Export Stock window is used to export OpenVPMS stock quantities to a CSV (comma separated values) file.
The exported data can be manipulated in a spreadsheet program such as Microsoft Excel or OpenOffice Calc, and imported using the Import button.

Stock can be selected for export using the following criteria:
- Type - one of Medication, Merchandise or All
- Search - enables the products to be queried by name or identity
- Search Identities - if selected, products are queried by identity
- Include Deactivated - if selected, inactive products are included in the search
- Product Type - the type of the product. E.g "Desexing", "Euthanasia".
- Stock Location - the stock location to export stock for. Defaults to that for the current Practice Location
- Income Type - queries products by income type. E.g. "Medication", "Professional"
- Product Group - queries products by product group. E.g "Fees", "Grooming"
- Zero negative quantities - if selected, any stock that has a negative quantity will have its New Quantity set to zero.
Export File Format
The exported data is a comma-separated-values file, containing the following columns:
| Column | Required | Type | Description |
|---|---|---|---|
| Stock Location Id | Yes | Integer | The stock location identifier. |
| Stock Location Name | Yes | String | The stock location name. |
| Product Id | Yes | Integer | The product identifier. |
| Product Name | Yes | String | The product name. |
| Selling Units | No | String | The product selling units. |
| Quantity | Yes | Decimal | The current stock quantity |
| New Quantity | Yes | Decimal |
The new stock quantity. This will be the same as Quantity, unless the Quantity is negative and Zero negative quantities is selected. In this case, New Quantity will be 0. |
Import Stock
The Import button initiates the Import Stock process by displaying an upload window to let you select the file to be imported.
The file must have the same format as that exported via Export Stock. However, you can add extra columns on the right (such as Remarks, Counted By, etc) to help with the stocktake process and these will be ignored. You cannot have extra rows containing stocktake instructions etc - the only rows allowed are the header and stock data rows.
If the file can be imported, a new Stock Adjustment will be created, containing a adjustment for each line of the imported file where the New Quantity is different to Quantity. The Adjust Quantity By is calculated as New Quantity - Quantity.
The Stock Adjustment status is set to In Progress, allowing it to be edited. To apply the changes, it must be Finalised.
Import Errors
If there are errors detected in the import file, these will be displayed and the file not imported.

The possible errors and their causes are outlined below:
| Error | Cause |
|---|---|
| A value for <column name> is required |
A mandatory value is missing. Values for Stock Location Id, Stock Location Name, Product Id, Product Name, Quantity and New Quantity must always be provided. |
| '<some value>' is not a valid value for <column name> | An invalid value has been specified for Stock Location Id, Product Id, Quantity or New Quantity. |
|
Expected '<name 1>' but got '<name 2>' |
A Stock Location Name or Product Name has been provided that is different to that stored. |
| Stock location not found | The stock location with the specified identifier cannot be found. |
| Product not found | The product with the specified identifier cannot be found |
| Expected <value 1> for Stock Location Identifier but got <value 2> | A different Stock Location Identifier has been entered to that already present. An import file can only have data for a single Stock Location. |
Batches
Product Batches are used to associate a batch number, expiry date, and manufacturer with a particular product.
The Batches screen supports:
- querying Batches by batch number, expiry date, product, stock location, active status and manufacturer
- creating new batches
- viewing and editing batches
- deleting batches
When first used, the screen will be empty. The picture below shows it after a selection has been done.

Create/Edit/View
This is the Create/Edit/View screen for product Batches.

The fields are:
Id - the internal identifier for the batch.
Batch Number - the manufacturer's identifier for the batch.
Product - the product the batch is for.
Expiry Date - the batch expiry date.
Description - batch description.
Active - uncheck this box to deactive the batch.
Manufacturer - the batch manufacturer.
Stock Locations
The Stock Locations tab is used to track the locations where a batch is located. Each Batch Stock Location identifies the location, and the date range that the batch is active for at that location.
If a batch has run out at Location A, but not Location B, set the To Date for Location A to today's date. It will no longer be displayed in queries at Location A.
If a batch has run out at all locations, then the Active flag can also be unticked.
Product Select
The Product Select screen is displayed whenever you are looking for a product. Sometimes, you will not be able to look for all types of products because it does not make sense to do so (eg when doing a stock transfer, you can only transfer types where stock is held, ie medication and merchandise).
It works like a standard select screen (and in fact you will find that the example used to explain how select screens work is in fact the Product Select screen).