Workflow
The Workflow workspace is use to handle workflow related items. See also Concepts|Schedules, Work Lists and Workflow.
Scheduling
This screen displays two tabs:
- Appointments - the diary of appointments and their status. The buttons allow you to move the appointment through its various stages from new to completed. For background see Concepts|Schedules, Work Lists and Workflow.
- Free Appointment Slots - provides a facility to find free appointment slots
Appointments
The appointments tab displays data in several modes:
Note that the left hand panel displays the current customer and patient. This will change as the different appointments are selected. Below the Bourke/Muffett appointment is selected (note the italic font).
First the multi-schedule display.

This is essentially a select screen. The selection fields area as follows:
View - this is used to select the Schedule View to be used
Schedule - this can be set to All or any one of the Schedules that are part of the current Schedule View. If you select other that All, then the schedule will be displayed in single schedule mode - see below.
Clinician - this can be set to All or any one of the clinicians. If you select a clinician, then all the appointments for clinicians other that the one selected will be 'greyed out'.
Date - the date selector  allows you to enter a date, go back or forth one day, or one week (the outer arrows), or, with the black square, select today.
Highlight - this can be set to Clinician, Event Type or Status and changes the colours used to display each appointment
Time - this can be set to All, Morning, Afternoon, Evening, AM or PM. This sets the part of the day for which the schedule is displayed. Note also that if there is part of the day for which the schedule is not available then there will be no slots in that part. In the picture, the Surgery starts at 8am but the main clinic not until 9am.
The display area consists of one column per schedule, each showing the events that match the selection conditions. Events may be appointments or calendar blocks; calendar blocks can be used to block out parts of a schedule to restrict appointment creation.
What is displayed for each appointment is set via the Administration|Organisation|Schedule View screen. Here you can see that this view is set to display the customer, patient and status (but not the clinician).
If a bell icon is displayed, it indicates that an SMS reminder may be sent for the appointment:
- a grey bell indicates no reminder has been sent
- a gold bell indicates a reminder has been sent
- a red bell indicates a reminder could not be sent. The Reminder Error field in the appointment will display the reason.
The buttons are as follows: (see below for when the various buttons are displayed)
New - create a new appointment in the currently selected time slot. To select a time slot, click it and it will display  in the slot, then press the New button (or click the slot again) and the New Appointment screen will open. The new appointment will have status Pending.
Edit - edit the selected event
Delete - delete the selected event. A confirm window will appear. Note that you cannot delete appointments that have status Completed - if you really do need to delete a completed appointment, first edit it to change the status to other than Completed.
Print - print the selected appointment.
Mail - email the selected appointment.
Check-In - initiates the check-in process }
Consult - opens the Visit Editor window } click here for details
Check-Out - initiates the check-out process }
Transfer - transfers a patient to a Work List }
OTC - Over The Counter sale - opens the New Counter Sale window to allow you to make an OTC sale
New Flow Sheet - creates a Smart Flow Sheet for the patient associated with an appointment.
Remind - sends an appointment reminder SMS for the selected appointment.
Block - creates a new calendar block in the current selected time slot.
Moving an event
To move an appointment or calendar block to another date/time, either:
- edit it and change the start and end times; or
- 'cut and paste' it:
- select the event by clicking on it
- cut it using Ctrl-X
- navigate to the day and schedule that you want
- click on the new time slot so that appears
- paste it using Ctrl-V
Cut and paste allows the event to be moved to another schedule.
Copying an event
To copy an event to another date/time, either use 'copy and paste':
- select the event by clicking on it
- copy it using Ctrl-C
- navigate to the day and schedule that you want
- click on the new time slot so that appears
- paste it using Ctrl-V
The single-schedule display is as follows:

The selection fields and buttons are the same as for the multi-schedule display.
The display area columns are as follows:
Time - the slot start time
Status - the appointment status - which will be (in logical order) one of Pending, Waiting, Admitted, In-Progress, Billed, Completed, or Cancelled. Note that the status 'Checked-In' is translated here to 'Waiting' with the time since checked-in - see the 9.30 slot in the picture above.
Appointment Type - the type of appointment - those available are set via Administration|Types|Appointment Type
Customer - the customer - note that the name is a link - clicking on it will take you to the Customers|Information screen
Patient - the patient - note that the name is a link - clicking on it will take you to the Patients|Medical Records screen
Notes - the notes for the appointment
The multi-day display is the default display for Schedule Views that have Multiple Day View selected:

The selection fields and buttons are the same as for the multi-schedule display. It adds:
Dates - this allows the date range to be selected:
- Month - displays a month of appointments
- Fortnight - the default. Displays 2 weeks of appointments
- Week - displays a week of appointments
- Day - the same as the multi-schedule display
Show - this determines how schedules are displayed
- All - displays all schedules as they appear in the selected View
- Cages - displays schedules grouped by their Cage Type, with:
- total slots by Cage Type
- available slots by Cage Type, by day
- Summary - similar to the Cages view, except that the appointment details are displayed as one of:
- B - indicates that the pet is boarding, i.e. is staying overnight
- D - indicates that the pet is in for the day only
- > - indicates that the pet is leaving on the day
- Check-Ins - displays all schedules that have check-ins for the selected day
- Check-Outs - displays all schedules the have check-outs for the selected day
The display area consists of one column per day, and one row per schedule, each showing the appointments that match the selection conditions.
Appointments that start on a date before the first displayed date have an  icon.
icon.
Appointments that end on a date after the last displayed date have an  icon.
icon.
Available Buttons
The following table shows when each button is displayed.
| Button | Displayed When |
|---|---|
| OTC | Always |
| New | Time slot selected |
| Edit | Event selected |
| Delete | Event selected |
| Appointment selected | |
| Check-In | status = Pending |
| Consult | status = In-Progress, Billed, Completed Note that if you press Consult on a Completed or Billed appointment, then the Visit Editor opens so that you can add to the visit record |
| Check-Out | status = In-Progress, Billed, Completed Note that if you press Check-out on a Completed appointment, a new invoice will be opened so that you can add items to it. |
| Transfer | status = Checked-In, In Progress, Admitted, Billed, Completed |
| New Flow Sheet | An appointment is selected and Smart Flow Sheet is configured for the Practice Location. |
| Remind | The selected appointment has status Pending, the appointment is either for today or in the future, and the customer can receive SMS messages. |
| Block | Time slot selected |
Find Free Appointments
The Find Free Appointments tab simplifies locating free appointment slots.
The upper part of the screen displays the query critiera. The lower part, the free slots matching the criteria.
Below, the query is for free slots in the Main Appointment Schedule from the 1/7 to the 3/7 between 10:00am and 1:00pm that are at least 1 hour in length.
Four matches have been shown. Clicking on one of these will switch to the appropriate Schedule View on the Appointments tab, selecting the Schedule time.

View - this is used to select the Schedule View to be used.
Schedule - this can be set to All, or any one of the Schedules that are part of the current Schedule View.
From - the date to start searching from.
To - the date to search to.
From Time - the time of day to start searching from. If not set, this defaults to the time the schedule starts at.
To Time - the time of day to search to. If not set, this defaults to the time the schedule ends at.
Duration - the minumum duration to search for. This defaults to the minumum duration of the selected Schedule(s).
Clinician - filters by clinician. The clinician must be rostered on within the date range.
Cage Type - filters by Cage Type. This is only displayed when Schedules have Cage Types.
Boarding Schedules
Find Free Appointments can be used to locate consecutive days in boarding schedules. These should be configured to either have no Start Time nor End Time set, or to start at 0:00 and end at 24:00.
Appointment
This window is used to create and edit an Appointment.

The fields are:
Customer - the customer - this is a mandatory field
Patient - the patient - this is an optional field
Appointment Type - the type of the appointment.
Start Time - the date and time that the appointment will start
End Time -the date and time that the appointment will end. If the practice operates on a 24 hour basis, you can create the appointment to run across the midnight boundary - ie start 23:00 on 3/7/13 and end at 00:30 on 4/7/13. For multi-day (such as Boarding) appointments, you can enter a relative date such as 7d and this will set the end time to 7 days after the start time. (Note that using relative dates normally sets a date relative to the current date - in this case it is relative to the appointment start date.)
Duration - the appointment duration, expressed in days, hours and minutes.
Repeat - determines the appointment recurrence. See Repeating Appointments below.
Reason - the reason for the appointment - the available reasons are set using Administration|Lookups|Visit Reason and Administration|Lookups|Visit Reason (VeNom). Note that this will be placed into the Visit Reason field when the appointment is checked-in. Note that if you key in something (say x) and press enter, you will be shown all reasons containing 'x', eg Desexing, Discuss X-Ray, and X-Ray - ie the search is "contains 'x'" rather than "starts with 'x'".
Notes - any pertinent notes
Clinician - the clinician - this is an optional field
Status - the status can be one of (in logical order) Pending, Checked-In, In Progress, Admitted, Billed, Completed or Cancelled
Author - the user that created the appointment
Send Reminder - displayed if appointment reminder SMS messages can be sent to the customer. Reminders can be sent if:
- SMS is configured
- the customer has an SMS contact
- the appointment Schedule has Send Reminders ticked
- the appointment Type has Send Reminders ticked
Online Booking - if ticked, this appointment was created using the Online Booking interface.
If the first two are true, but not the last two, then an SMS Reminder can still be sent manually. If the first three are true, but not the last, Send Reminders will be displayed, but the check box will be disabled and un-ticked. Changing the Appointment Type to one that supports reminders will enable the checkbox.
Reminder Sent - displayed if a reminder has been sent for this appointment
Reminder Error - displayed if a reminder couldn't be sent, and indicates the cause of the error.
Customer & Patient Alerts - if the customer or patient has any current alerts, these are displayed.
Note that normally both the status and the completed date/time are updated by the system's workflow processing when you use the Consult (sets status In Progress) and Check-Out (sets status Completed and the Completed date/time) buttons on the Work List screen, and Complete/Finalise (sets status Billed) button on the Invoice screen.
The two status settings not set automatically by the workflow processing are Cancelled and Admitted. You set Cancelled to show that an appointment has been cancelled. Admitted can be used to indicate that the patient has been admitted to hospital.
Appointment Type
The Appointment Type determines the default duration of an appointment and how it is displayed.
The available types and their duration are set via Administration|Organisation|Schedule.
Repeating Appointments
Appointments can be made to repeat one or more times, to form a series of appointments. Each appointment in the series:
- has the same details as the first appointment
- can be edited independently of the series
This can be used to schedule a follow-up appointment, or recurring appointments e.g. Puppy Class.
Repeat Options
Appointments can be made to repeat:
- Daily
- Every day
- On weekdays
- Every N days
- Every Sunday...Saturday
- Weekly
- Every Week
- Every N weeks
- Monthly
- Every month
- Every N months
- On the first..fifth or last Sunday...Saturday every N months
- On the 1..31 or last day(s) every N months
- Yearly
- Every year
- Every N years
- On the 1..31 January...December every N years
- On the first..fifth or last Sunday...Saturday of January...December every N years
Appointments repeat until a specified date, or number of times. If you use 'until date' you can use the relative date facility - eg 0ye will set the end of the current year, and 6me will set the end of the 6th month ahead.
Restrictions
- at most only 364 recurring appointments can be scheduled (i.e. for a total of 365 in a series)
- if an appointment is set to repeat on a day that is not available, it is skipped. E.g specifying a monthly repeat on the 31st of the month will skip all months without 31 days.
Calendar Block
A Calendar Block is a block of time in a schedule that can be used to:
- limit scheduling of appointments
- reserve the schedule for specific customers

The fields are:
Block Type - the type of the block, e.g. Public holiday, Reserved for Puppy School etc
Name - the name of the calendar block. If none is specified, the Block Type name will be displayed. E.g. the Block Type may be Public holiday, and the Name Easter.
Start Time - the date and time that the block will start
End Time -the date and time that the block will end. If the practice operates on a 24 hour basis, you can create the appointment to run across the midnight boundary - ie start 23:00 on 3/7/13 and end at 00:30 on 4/7/13. For multi-day calendar blocks, you can enter a relative date such as 7d and this will set the end time to 7 days after the start time. (Note that using relative dates normally sets a date relative to the current date - in this case it is relative to the start date.)
Duration - the calendar block duration, expressed in days, hours and minutes.
Repeat - determines the calendar block recurrence. This has the same options as Repeating Appointments.
Notes - optional notes.
Author - the user that created the calendar block.
Block Type
The Block Type:
- provides a default name for the calendar block, if no Name is specified
- determines the colour of the block in the schedule
- can be used to reserve times for customers
Reservations
By default, a Calendar Block will allow appointments to be scheduled during the block period, with a warning.
A Calendar Block may be used to reserve times in a schedule by selecting a Block Type that is specifies reservations for particular customers. An appointment will only be allowed to be created if a customer is one of the types identified by the Block Type.
Restrictions
Calendar blocks may not overlap existing appointments or other calendar blocks.
Confirm Delete
This screen is displayed when you initiate the deletion of an appointment on the Workflow|Scheduling screen.
Press OK to confirm else Cancel.
Copy Series

The Copy Series window is displayed if a repeating Appointment or Calendar Block is selected for copying and:
- there are future events in the series; or
- all event in the series are in the future
Selecting:
|
copies the current event block |
|
creates a series containing the current and subsequent events |
|
copies all events in the series |
For appointments, all copied appointments have Pending status.
Delete Series

The Delete Series window is displayed if a repeating appointment or calendar block is selected for deletion and:
- there are future events in the series; or
- all events in the series are in the future
Selecting:
|
deletes the current event |
|
deletes the current event, and all subsequent events |
|
deletes the current event and all other events in the series |
Edit Series

The Edit Series window is displayed if a repeating appointment or calendar block is edited and:
- there are future events in the series; or
- all events in the series are in the future
Selecting:
- Only this ...:
- the Repeat field cannot be changed
- changes are not propagated to other events in the series
- This and all future ...:
- the Repeat field can be changed. This does not affect prior events.
- changes to the event are propagated to all subsequent events
- The entire series
- the first event in the series is edited
- the Repeat field can be changed. This affects all subsequent events
- changes to the event are propagated to all subsequent events
Move Series

The Move Series window is displayed if a repeating appointment or calendar block is selected for moving and:
- there are future events in the series; or
- all events in the series are in the future
Selecting:
|
moves the current event |
|
moves the current and subsequent events |
|
moves all events in the series |
Work Lists
This screen is used to display the Work Lists - ie the list of tasks and their status. The buttons allow you to move the task through its various stages from pending to completed. For background see Concepts|Schedules, Work Lists and Workflow.
The screen displays data in two modes, multi-list and single list. Note that the left hand panel displays the current customer and patient. This will change as the different tasks are selected. Below the Casbolt/Bree task is selected (note the italic font).
First the multi-list display.
This is essentially a select screen. The selection fields area as follows:
View - this is used to select the Work List View to be used
Work List - this can be set to All or any one of the Work Lists that are part of the current Work List View. If you select other that All, then the work list will be displayed in single list mode - see below.
Clinician - this can be set to All or any one of the clinicians. If you select a clinician, then all the tasks for clinicians other that the one selected will be 'greyed out'.
Date - the date selector allows you to enter a date, go back or forth one day, or one week (the outer arrows), or, with the black square, select today. Note that the date controls what is displayed as:
startTime <= day 23:59:59 and (endTime >= day 0:0:0 or endTime is null)
Functionally, this means that completed tasks will only be displayed if they were completed on the selected date.
Highlight - this can be set to Clinician, Event Type or Status and changes the colours used to display each task
Status - this can be set to All, Incomplete, or Complete
The display area consists of one column per work list, each showing the tasks that match the selection conditions. What is displayed for each task is set via the Administration|Organisation|Work List View screen. Here you can see that this view is set to display, the customer, patient and status (but not the clinician). The i balloon  indicates that there is a note for the task - clicking the balloon will display the note. (If the task has been created as a result of checking-in a patient, then the task note will generated from the appointment reason and any appointment note.)
The buttons are as follows: (see below for when the various buttons are displayed)
New - create a new task in the currently selected work list. You may find it more obvious to click in the half slot at the bottom of the tasks in the desired work list column - this will display in the slot, then click it again (or press the New button) and the New Task screen will open.
Edit - edit the selected task.
Delete - delete the selected task.
Print - print the selected task.
Mail - email the selected task.
Consult - opens the Visit Editor window. } click here for details
Check-Out - initiates the check-out process . }
Transfer - transfers the task to another work list. If the target work list has:
- templates or Use All Templates is ticked, a Print window will be displayed listing the available templates to print.
- Create Flow Sheet ticked and Smart Flow Sheet is configured and the patient has a current Visit and no Flow Sheet, one will be created.
OTC - Over The Counter sale - opens the New Counter Sale window to allow you to make an OTC sale.
New Flow Sheet - creates a Smart Flow Sheet for the patient associated with a task.
The single-list display is as follows:

The selection fields and buttons are the same as for the multi-list display.
The display area columns are as follows:
Started - the time at which the task was created - not that only hours and minutes are shown even if the task was started say 3 days ago
Status - the task status - which will be (in logical order) one of Pending, In Progress, Billed, Completed, or Cancelled
Task Type - the type of task - those available are set via Administration|Types|Task Type
Customer - the customer - note that the name is a link - clicking on it will take you to the Customers|Information screen
Patient - the patient - note that the name is a link - clicking on it will take you to the Patients|Medical Records screen
Notes - the notes for the task
Time - the time (in hours and minutes) since the task was started
Available Buttons
The following table shows when each button is displayed.
| Button | Displayed When |
|---|---|
| OTC | always |
| New | work list selected |
| Edit | task selected |
| Delete | task selected |
| task selected | |
| task selected | |
| Consult | status = In-Progress, Billed |
| Check-Out | status = In-Progress, Billed |
| Transfer | status = Pending, In-Progress, Billed |
| New Flow Sheet | a task is selected, and Smart Flow Sheet is configured for the Practice Location |
Task
This window is used to create and edit a Work List Task.

If you are creating a new Follow-Up task the screen will look like:

The fields are:
Customer - the customer - this is a mandatory field
Patient - the patient - this is an optional field
Work List - (present only when creating a new Follow-Up task) - used to select the work list to which the task is to be added. The available worklist are those set for the current clinician, current user and current practice location (via Administration|Users and Administration|Organisation|Practice Location). The initially selected one is that set as the first on the clinician's list of Follow-Up work lists; and if s/he has none, the from the user's list and if they have none then from the Practice Location's list.
Task Type - the task type - see Administration|Types|Task Type
Started - the date and time that the task was started
Completed - the date and time that the task was completed
Notes - any pertinent notes
Clinician - the clinician - this is an optional field
Status - the status can be one of (in logical order) Pending, In Progress, Billed, Completed or Cancelled
Note that normally both the status and the completed date/time are updated by the system when you use the Consult (sets status In Progress) and Check-Out (sets status Completed and the Completed date/time) buttons on the Work List screen, and Complete/Finalise (sets status Billed) button on the Invoice screen.
Confirm Delete
This screen is displayed when you initiate the deletion of a task on the Workflow|Work Lists screen.
Press OK to confirm else Cancel.
Worklist Document Print
This print window is displayed if there are documents available for printing as part of the worklist transfer process. Those available are defined by the Template settings for the Work List - see Administration|Organisation|Worklists.

Check those documents to be printed, and then press OK to process them. Press Skip to skip printing any documents.
If a letter to be printed has parameters, a prompt will be displayed allowing them to be entered.
The documents selected will be saved, available from Patients|Medical Records|Documents.
The standard Print window will be displayed. Pressing OK on this will print the documents. Press Cancel if you do not want them printed - the documents will be available in Patients|Medical Records|Documents.
Messaging
This is the screen used to manage messages. For background, see also Concepts|Messages.

The screen is in two halves, the top is a standard select screen, the bottom displays the selected message, and then there are buttons to create, process and print the messages.
In the top half:
Type - selects the type of message (All, System, or User)
Status - selects the message status (Completed, Pending or Read). Newly received messages will be Pending until read by the To addressee, then Read, and then (when the Completed button is pressed), Completed.
Dates - normally you can leave the All box checked, otherwise uncheck it and enter the required from and to dates
User - by default this will be set to your user name, but you can enter any name in order to see the messages to that user. Note that you cannot enter a user-group name.
The column headings are as follows:
Date - shows the date and time, or if it's today then just the time
Description - the message subject
From - the user who sent the message
Reason - the message reason
Status - its status. This will be Pending, Read (ie read by the To addressee), or Completed.
Item - this field will be blank for User messages, but may contain information for System messages
In the bottom half the fields are self-explanatory, except for the following:
From & To - note that these user names are links, and clicking on them will redisplay the screen with the User set to the name you clicked. Hence you can quickly switch to see the messages for the from or to person.
Customer & Patient - similarly, these are links to take you to the customer or patient workspace
Buttons - these are as follows: (only New will be visible if no message is selected)
New - create a new message.
Reply - reply to the message.
Forward - forward the message.
Delete - delete the message.
Complete - change the message status to Completed.
Print - print the message.
Mail - email the message.
Note that you can forward and reply to completed messages - the resulting message will be 'Pending'.
Confirm Delete
This is the Message Delete Confirmation window. Press OK to delete the message, else Cancel.
New/Reply/Forward
This is the screen used to create, forward or reply to a message.

The fields are as follows:
From - this will always show your name, you cannot pretend to be someone else
To - enter the names of the User(s) or User Group(s) to whom you wish to send the message. Multiple names must be separated by semi-colons. This is in fact a search field (even though it does not have the binoculars icon) and you can enter just 'r' to select Receptionists.
If you are replying to a message, then this will be prefilled with the sender's name.
Subject - you must enter a subject. If you are replying, then original subject will be shown prefixed by "Re: "; if forwarding then by "Fwd: ".
Customer & Patient - use these to enter the customer and patient, if applicable. If you are creating a message and do have a current customer and patient in the Customer and Patient workspaces (which will be the case most of the time), then they will be shown here. Hence if you want to send a message unrelated to the customer and patient, you will need to clear these two fields.
If you are forwarding or replying to a message, these will be set from the original message.
Reason - select the reason from the pull down list. The system comes with two, Phone and Other, but your admisistrator can add more using Administration|Lookups|Messsage Reason.
Message - enter the message text. As with any text field, you can use macros if you want. If you are replying to a message then the original text will be shown prefixed by a line giving the date/time and sender of the original message. Similarly, if you are forwarding a message, the complete header (To/From/date,time/Subject) and text will be shown.
Note that the message text is optional - ie you can send a 'subject only' message like "Staff meeting 8am Wednesday - Be There".
Press Send to send the message, Cancel to abort.
Investigations
This Investigations screen is used to display the status of investigations. For background see Concepts|Investigations.

This is a standard select screen. As well as the date range you can select by:
Search - use this to locate investigations by patient names or investigation identifier.
Status - can be set to All, Cancelled, Finalised or In Progress - see below.
Order Status - can be set to Incomplete, Pending, Sent, Received, or Reviewed - see below. If set to Incomplete, this will match investigations that are not Reviewed.
Location - filters by the practice location where the investigation was created. Restricted to the locations visible to the current user. Investigations with no location (i.e. investigations created prior to OpenVPMS 1.8) will always be displayed.
Clinician - filters by the clinician who created the investigation.
Investigation Type - filters by investigation type.
The column headings are as follows:
Date - the date on which the investigation was initiated
Investigation Type - the type of investigation - clicking on the link takes you to the Administration|Types|Investigation View screen to view the details
Customer - the owner of the patient at the time of the investigation.
Patient - the patient - this is a link and you can click on it to go to the patient's medical records screen
Request Id - the unique number that identifies the investigation
Status - the status - see below
Order Status - the order status - see below
Product - the product that invoked the investigation, or, if the investigation was manually initiated, the product (if any) specified
Clinician - the name of the clinician (note that in this example the practice is using the convention of using 'short names' for their clinicians) - clicking on the link takes you to the Workflow|Messaging screen to display messages to this clinician.
Location - the practice location where the investigation was created. For investigations with no location (e.g. those created prior to OpenVPMS 1.8), this will display None.
Supplier - the organisation doing the test or procedure - clicking on the link takes you to the Suppliers|Information screen to display the supplier's details
Report - if results have been received, they will be shown here - clicking on the link will display or download the result image/document. Note that in the above screen shot you can see that the majority of the results files have the investigation number as the first part of the file name - this allows the automatic loading of the results file by the document loader program.
The Status will be one of the following:
- In Progress - the initial status
- Cancelled - the investigation has been cancelled
- Finalised - the investigation has been finalised and only limited editing is supported.
The Order Status will be one of the following:
- Pending - the order/lab request is yet to be sent. This is the initial status.
- Sent - the order/lab request has been set. This is automatically set for HL7 Laboratory orders.
- Received - the results have been received. This is set by the document loader utility or the Document Loader Job when they import the results.
- Reviewed - the results have been reviewed
All of these can be set manually.
The View and Edit buttons have their standard meanings.
Visit Editor
The Visit Editor allows you to do all the work of recording the activities in the visit.
It has a tabs for Summary, Invoice, Reminders/Alerts, Documents, Prescriptions and Estimates.
Although the Summary tab looks almost the same as the Patients|Medical Records screen Summary tab, it has two extra buttons at the bottom, OK and Cancel. OK means 'save any changes I have made and exit the visit editor'; Cancel means 'discard any changes I have made and exit the visit editor'.
These OK and Cancel buttons are present on all the tabs. Thus if you press OK on the Invoice tab, you will exit the Visit Editor. If you press OK but didn't intend to exit the Visit Editor, don't worry - just press the Consult button and that will return you to the Visit Editor.
Summary
This is the Summary tab of the Visit Editor. The screen shot below is taken from an active practice and hence some data has been intentionally blurred.
[Careful observers will also note that this is a screen shot from a system using a modified label for the Find button.]

The buttons are as follows:
OK - save any changes and close the Visit Editor.
Cancel - cancel any changes and close the Visit Editor.
New - add a new item to the medical record - a window will open allowing you to select the type.
Edit - edit the selected item
Delete - delete the selected record - a confirmation window will be displayed.
Print - print what is shown on on the screen.
Mail - email what is shown on the screen.
External Edit - this button appears if the selected record is a document that can be edited in OpenOffice. Clicking this will launch the OpenOffice editor to edit the document directly, avoiding the need to download, edit and re-upload the document.
This screen is very similar to the Patients|Medical Records Summary tab - see this for further information.
Confirm Delete
When you press the Delete button on the Visit Editor|Summary screen, a confirmation window will appear.
Press OK to confirm or Cancel to abort.
Confirm New
This window is displayed when you press the New button on the Visit Editor's Summary screen. It allows you to select the type of medical record entry, alert/reminder, or document to be created. Select the required one and press OK, else Cancel to abort.

Invoice
This is the Invoice tab of the Visit Editor.
[Careful observers will note that this is a screen shot from a system using a modified label for the Find button and right justified field labels.]
The buttons at the bottom are:
Apply - save any changes but do not close the Visit Editor
OK - save any changes and close the Visit Editor
Cancel - cancel any changes and close the Visit Editor
Completed - save any changes, set the Invoice Status to Completed, and close the Visit Editor
In Progress - save any changes, set the Invoice Status to In Progress, and close the Visit Editor
This screen works in a very similar manner to the Customer|Charges|Invoice edit screen - see this for more information.
Reminders
This is the Reminders tab of the Visit Editor. See Concepts - Reminders for background.
The buttons are as follows:
OK - save any changes and close the Visit Editor
Cancel - cancel any changes and close the Visit Editor
New - create a new reminder
Edit - edit the selected reminder
Delete - delete the selected reminder - a confirmation window will be displayed
This screen is very similar to the Patients - Medical Records - Reminders tab - see this for further information.
Confirm Delete
When you press the Delete button on the Visit Editor's Reminders tab, a confirmation window will appear.
Press OK to confirm or Cancel to abort.
Confirm Resend
When you press the Resend button on the Visit Editor's or Patients|Medical Records' Reminders & Alerts tab screen, , the following window will appear.
From the Contacts pulldown select the contact to be used. Note that all possible contacts will be listed, and those with a purpose 'Reminder' will be shown as per the above.
The Reminder Count pulldown lists the Reminder Counts of reminders that have already been generated. This enables you to resend, for example, the second reminder. The restrictions are that the reminder count must have an associated document template and cannot have its List field checked. Select the one you wish to use.
Press the OK button to proceed, Cancel to abort.
Depending on the type of the selected contact, either an email will be generated or a reminder printed.
Alerts
This is the Alerts tab of the Visit Editor. See Concepts - Alerts for background.
The buttons are as follows:
OK - save any changes and close the Visit Editor
Cancel - cancel any changes and close the Visit Editor
New - create a new alert
Edit - edit the selected alert
Delete - delete the selected alert. This will display a confirmation window. Select OK to delete the alert, or Cancel to keep it.
This screen is very similar to the Patients - Medical Records - Alerts tab - see this for further information.
Documents
This is the Documents tab of the Visit Editor. See Concepts|Documents for background.
[Careful observers will note that this is a screen shot from a system using a modified label for the Find button and right justified field labels.]
The buttons are as follows:
OK - save any changes and close the Visit Editor
Cancel - cancel any changes and close the Visit Editor
New - create a new document - a window will open allowing you to select the type
Edit - edit the selected document record. If the document has status Finalised you will not be able to edit the record.
Delete - delete the selected document - a confirmation window will be displayed. If the document has status Finalised you will not be able to delete it.
Print - print the selected document.
Mail - email the selected document.
Refresh - (this button only appears when the selected document is a Letter) - refresh the document by regenerating it from its template - a confirmation window will be displayed.
This screen is very similar to the Patients|Medical Records Documents tab - see this for further information.
Confirm Delete
When you press the Delete button on the Visit Editor's Documents tab screen, a confirmation window will appear.
Press OK to confirm or Cancel to abort.
Confirm New
When you press the New button on the Visit Editor's Documents tab screen, the window below will be displayed. Select the type of document that you require and and then press the OK button.

Prescriptions
This is the Prescriptions tab of the Visit Vditor. See Concepts|Prescriptions for background.

The buttons are:
OK - save any changes and close the Visit Editor.
Cancel - cancel any changes and close the Visit Editor.
New - create a new prescription
Edit - edit the selected prescription. If the prescription has been fully dispensed or has expired, it cannot be edited.
Delete - delete the selected prescription. If the prescription has been dispensed or has expired, it cannot be deleted.
Print - prints the selected prescription.
Mail - emails the selected prescription.
Dispense - dispenses the selected prescription. This displays a medication window that allows the Date, Expiry Date and Clinician to be selected. The Label and Quantity are fixed
Cancel Prescription - cancels the selected prescription, if it hasn't been fully dispensed or expired.
For further information, see the Prescriptions Tab on the Patients|Medical Records screen.
Confirm Delete
When you press the Delete button on the Visit Editor's Prescriptions tab screen, a confirmation window will appear.
Press OK to confirm or Cancel to abort.
Estimates
This is the Estimates tab of the Visit Editor. See Concepts|Estimates for background.
It is very similar to the Customer|Estimates screen, except that entry is restricted to the current patient only. If an estimate exists for another patient, or an estimate contains multiple patients, then it will be excluded. [Careful observers will note that this is a screen shot from a system using a modified label for the Find button and right justified field labels.]
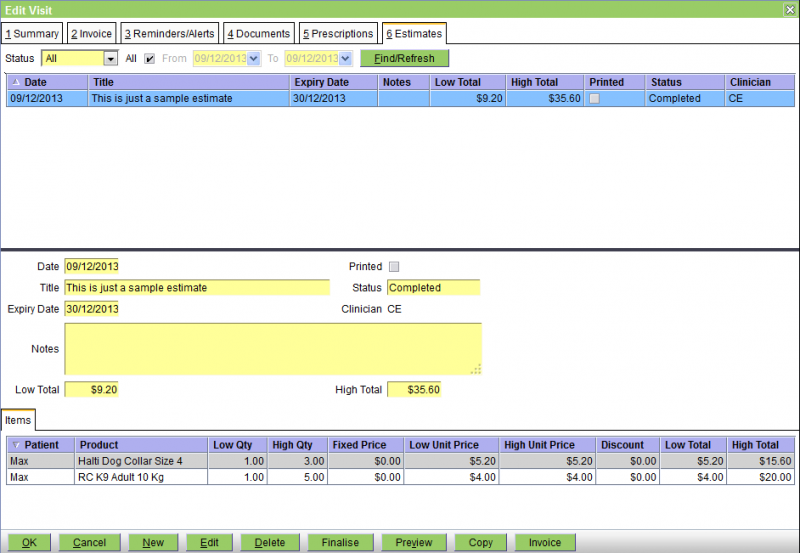
The buttons are as follows:
OK - save any changes and close the Visit Editor.
Cancel - cancel any changes and close the Visit Editor.
New - create a new estimate.
Edit - edit the selected estimate.
Delete - delete the selected estimate - a confirmation window will appear
Finalise - change the status of the selected estimate to Finalised - a confirmation window will appear. Finalising the estimate locks it from any further changes. If you confirm the Finalise, then a print window will open allowing you to print or email the estimate.
Print - print the selected estimate.
Mail - email the selected estimate.
Copy - copy this estimate to create another one.
Invoice - generate an invoice from this estimate. To ensure that the that the correct clinician is recorded when an estimate is invoiced, the clinician is prompted for unless:
- the current user is a clinician, and;
- Use Logged In Clinician is enabled.
Confirm Delete
When you press the Delete button on the Visit Editor's Estimates tab screen, a confirmation window will appear.
Press OK to confirm or Cancel to abort.
Confirm Finalise
When you press the Finalise button on the Visit Editor's Estimates tab screen, a confirmation window will appear.
Press OK to confirm or Cancel to abort.
Confirm Invoice
When you press the Invoice button on the Visit Editor's Estimates tab screen, a confirmation window will appear.
Press OK to confirm or Cancel to abort.
Check-Out Print
The window below is displayed at the end of the check-out process when there are documents to be printed. Thes may be invoices, certificates and forms, etc.

Ensure the ones you want printed are checked, and uncheck all the rest. The buttons are as follows:
OK - initiate the printing of the selected documents
Skip - skip the printing
Cancel - abort the check-out
Mail - bring up an email write screen so that the selected documents can be emailed
Customer Orders
The Customer Orders screen displays the status of customer orders and returns.
Orders and returns are created:
- by Pharmacy Services when pharmacy products are dispensed
- when treatments are given in Smart Flow Sheet that have billing enabled
Returns are created by Laboratory Services when laboratory orders are cancelled.

Query
Customer orders can be queried by:
| Type | The customer order type. Defaults to All, indicating all order types. |
| Status | The customer order status. Defaults to In Progress. |
| Date Range | Filters orders and returns based on their creation date. If All is selected, no filtering occurs. |
| Location | The practice location where the order was created. Restricted to the locations visible to the current user. |
| Customer | The customer that the order belongs to |
| Clinician | The clinician responsible for the order |
Actions
The following actions may be performed:
| New | Create a new order or return. |
| View | View the selected order/return. |
| Edit | Edit the selected order/return. |
| Delete | Delete the selected order/return. |
| Invoice | Where possible, OpenVPMS will automatically process orders and returns during the Check-In, Consult, and Check-Out worfklows. This button can be used to charge orders and returns outside of workflows. See Order Charging and Return Charging below |
| Print the selected order/return. | |
| Email the selected order/return. |
Order Charging
If the selected order does not relate to an existing invoice, a new Invoice will be created.
If the order relates to an existing invoice, and the invoice is:
- In Progress - the order will update the invoice. For each corresponding line item:
- The order Quantity will be added to the Received Quantity
- The invoice Quantity will be set to the new Received Quantity
- Finalised - and the order quantity is:
- equal to the invoice quantity - the order will be Finalised
- greater than the invoice quantity - a new Invoice will be created. The new line item quantity will be the difference between the order and invoice quantity.
- less than the invoice quantity - a new Credit will be created. The new line item quantity will be the difference between the invoice and order quantity.
Warning: if there are multiple orders or returns relating to a single invoice, and that invoice is Finalised, these will not be taken into account when determining the new Invoice/Credit quantity.
Return Charging
If the selected return relates to an existing invoice, and the invoice is:
- In Progress - the return will update the invoice
- Finalised - a new Credit will be created
Laboratory Returns
Laboratory Returns are different to other Returns in that their only action is to set the corresponding Investigation status to Cancelled. They don't change the Invoice Quantity, nor do they create a Credit if the Invoice is Finalised.
This is because there is not a 1:1 mapping between Invoice Items and Investigations. If a Laboratory Return is received, any Invoice amendments must be done manually.
Customer Pharmacy Order
A Customer Pharmacy Order is created when external services dispense a medication, merchandise or service product.

Where possible, these will be automatically invoiced during charging.
They will need to be processed manually via Customer Orders if:
- they were initially ordered via an invoice that has been Finalised, or has been subsequently deleted
- they are incomplete (e.g. the product in the external system doesn't match that in OpenVPMS). Incomplete orders need to be corrected before they can be invoiced.
See Order Charging for a description on how orders are invoiced.
Customer Pharmacy Return
A Customer Pharmacy Return is created when an external service:
- amends or removes dispensing of a medication, merchandise or service product; and
- the original dispense has already been invoiced

Where possible, these will be automatically invoiced during charging.
They will need to be processed manually via Customer Orders if:
- the invoice that they relate to that has been Finalised, or has been subsequently deleted
- they are incomplete (e.g. the product in the external system doesn't match that in OpenVPMS). Incomplete returns need to be corrected before they can be invoiced.
See Return Charging for a description on how returns are invoiced.
Rostering
The Rostering workspace provides support for scheduling employees in shifts.
This can be used to ensure:
- employees are available to work on a particular day
- clinicians can be scheduled to appointments
The screen displays two views of these shifts:
- Areas - displays shifts by Roster Area
- Employees - displays shifts by User
In both, new Shifts are created by clicking on an empty cell.
The buttons are as follows:
| Edit | Edit the selected shift |
| Delete | Delete the selected shift |
Copying a shift
To copy a shift to another date/time, either use 'copy and paste':
- select the shift by clicking on it
- copy it using Ctrl-C
- navigate to the desired day
- click on the new time slot so that appears
- paste it using Ctrl-V
Moving a shift
To move a shift to another date/time, either:
- edit it and change the start and end times; or
- 'cut and paste' it:
- select the shift by clicking on it
- cut it using Ctrl-X
- navigate to the desired day
- click on the new time slot so that appears
- paste it using Ctrl-V
Cut and paste allows the shift to be moved to another area or employee.
Shift
A Shift is used to roster an employee to an area for a period of time.
An employee can only be rostered to a single area at a time.
The fields are:
| Start Time | The time that the shift starts |
| End Time | The time that the shift ends |
| Duration | The length of the shift |
| Employee | The rostered on user This is restricted to users that work at the practice location. |
| Area | The roster area |