Payments, Charges, and Accounts
Account Basics
There are 4 primary types of transactions that are used to manage customer accounts in OpenVPMS: Invoice, Credit, Payment, and Refund. Understanding the relationship between these is necessary to being able to handle tasks such as invoicing customers.
![]() Let's start with this basic chart. This will become more clear as we discuss below. Basically, the four transaction types can be broken into smaller groups. Also, please note here that a positive account balance means the customer owes the practice money, not the otherway around.
Let's start with this basic chart. This will become more clear as we discuss below. Basically, the four transaction types can be broken into smaller groups. Also, please note here that a positive account balance means the customer owes the practice money, not the otherway around.
There are transactions that influence a customer's account because something happened, or some good changed hands. These are invoices and credits. Invoices and credits are opposites.
There are other transactions that represent the transfer of money. These are payments and refunds. Payments and refunds are opposites.
 Tip: When a good is returned, a credit is processed, not a refund. A refund can later be processed if the customer wants money back, instead of having a negative account balance.
Navigation
In the Customer screen, there are 3 areas for working with transactions: Charges, Payments, and Account.
- Charges: For creating invoices and credits (returns).
- Payments: For creating payments and refunds.
- Account: For viewing all (finalized) account history. This is also used for more advanced transaction types - account adjustments.
As you can see, the opposites are grouped together.
Charges
Managing these transaction types generally means creating them, and then finalizing them. OpenVPMS allows for staging of each of these transaction types. This is very useful when trying to get ahead of the work. For instance, if you know a customer is coming to pick up a prescription later in the day, you can create that invoice immediately, and leave it in the staging area. It becomes a "Work in Progress". These are discussed further in the Reporting section.
Once an invoice is truly complete, generally just before the customer pays, it must be finalized. This moves it to the account balance, and out of the "Work in Progress" state.
Tip: Once finalized, transactions cannot be edited. This is to ensure proper accounting.
To create a new invoice, go to Charges and click "New", then select "Invoice". You will see a window appear that allows you to add sale items.

Once the invoice screen appears, you can add as many items as you wish. Note that you can override prices as you go. When you've completed all of them, click on "Ok". Note that this does NOT finalize the invoice. You've completed editing it, but you haven't actually billed the customer yet.
Once you're sure that it's ready to bill, click on the "Finalize" button. At this point, OpenVPMS will ask if you'd like to make a payment. This is a convenience because finalization almost always occurs just before a payment (you wouldn't otherwise be able to know if the customer wanted to purchase something more). If you click "Yes", it will jump to the payments section, as described below.
Payments
The payments area is simpler than charges because there is no staging area. It here we have basic payments, and refunds.
A refund would be useful if the customer had a negative account balance perhaps as a result of a credit (return). A refund is what allows the practice to pay him back for that refund. It will most likely be the least
In order to create a new payment, go to Payments and click "New", then select "Payment". You will see a window appear that allows you to add payment types.
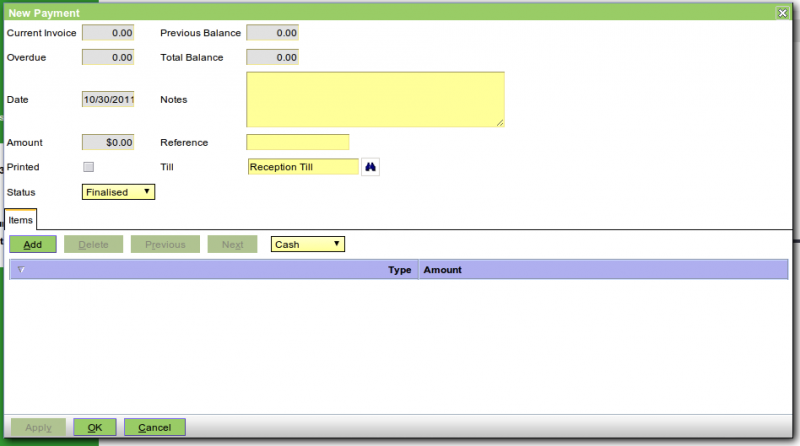
Next, click on the type of payment you would like to receive (Cash, Credit, etc). Once you've created the line-item, you can fill in the details for the payment. When done, click "Ok".
Note that OpenVPMS uses a list edit style for payments. The reason is because some customers will want to pay with multiple tender types. They may have some cash in their pocket, but want to cover the rest with a credit card. You can add multiple payment types by repeating the steps above with a different selection (before clicking "Add").
Tip: On cash transactions, after you've entered the tendered amount, hit Enter and OpenVPMS will calculate the change for you.
Workflow
As an aside, the workflow takes you through most of the steps above. There is no need to manually go and create an invoice. It is done automatically as part of the workflow. There are more details about this in the Workflow section.
Account
The account section displays a list of all transactions against a particular customer account. You can click on each one and see the details of it.
This section also has a facility to create more advanced transaction types. These can be created by clicking on the "Adjust" button. Here's an overview of each one:
- Credit Adjustment: Decrease the customer account balance.
- Debit Adjustment: Increase the customer account balance.
- Initial Account Balance: Self explanatory.
- Customer Bad Debt: Used for writing off debt.
Tip: Each transaction type above allows you to type notes along with it. Particularly in the advanced transactions, it is important to note why the transaction is being entered.
- Printer-friendly version
- Login or register to post comments


