Schedule
This screen is used to create/edit/view the Schedules. These together with the views (see Organisation|Schedule View) determine how the Workflow|Scheduling screen works. It also sets options to control the check-in behaviour. See also the note at the bottom about * as the default appointment type.

The fields are as follows:
Name - the name of the schedule
Description - serves to clarify the name
Slot Size - this and Slot Units defines the size of each slot in the schedule
Slot Units - can be set to minutes or hours
Allow Double Booking - check this box to allow multiple appointments to be scheduled at the same time. Note that due to a current bug overlapping bookings do not display correctly when a single schedule is shown on the Workflow|Scheduling screen.
Active - uncheck this box to deactivate the schedule. Note that if you do deactivate a schedule because it is no longer needed, then you should also remove this schedule from any schedule views in which it is used, otherwise the Workflow|Scheduling screen will happily display and let you use a schedule that has been deactivated.
Start & End Time - these define the work day - ie the times between which appointments can be booked. If left unset, they default to 08:00 to 18:00 respectively. Enter either in hh:mm or hhmm format. If you enter just the hour the minute portion will be set to the current time (ie 9 yields 9:13 if the current time is 11:13).
If you set say 18:00 as the end time, then the last slot shown on the schedule will start at the slot size before this, ie 17:45 if you have a 15 minute slot size.
For a practice that operates on a 24hour basis, you can set the start time to 00:00 and the end to 24:00.
Use All Work Lists - if this box is checked, then when an appointment if checked-in from this schedule, you will be able to choose any work list, otherwise only the worklists defined in the Work Lists tab will be available
Input Weight - if this box is checked, then as part of the check-in, the New Weight screen will be displayed so that the patient's weight can be entered
Use All Templates - if this box is checked, then as part of the check-in, all patient form and letter document templates will be displayed for you to select from, otherwise only those defined in the Templates tab will be available
Views tab - used to set the Schedule Views which this Schedule is included in
Appointments Types tab - as shown below, this is used to view, add and delete the Appointment Types that are valid for this Schedule.

The fields are as follows:
Appointment Type - the appointment type (the available types are determined by the Administration|Types|Appointment screen)
No of Slots - the lenght of this appointment type in this schedule
Default - check this box if this is the default appointment type.
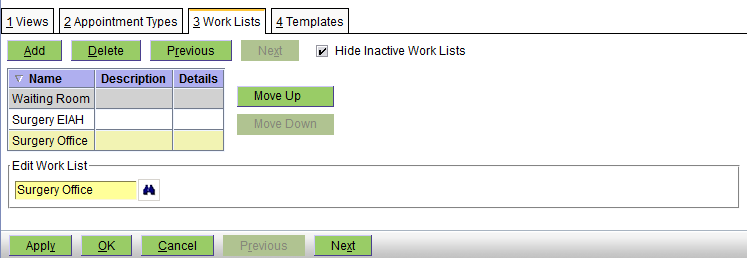
Work Lists tab - as shown below, this is used to view, add and delete the Work Lists you can choose from when checking-in an appointment on this schedule.

As you can see you can add, delete and modify the set of work lists, and also change the order in which they are listed (so that the most common one can be put at the top).
Templates tab - as shown below, this is used to view, add and delete the patient form and letter document templates that will be presented to choose from when checking-in an appointment on this schedule

As you can see you can add, delete and modify the list of templates, and also change the order in which they are listed (so that the most common one can be put at the top of the list).
Note that in order to enable the quickest possible selection of the Appointment Type on the Workflow/Scheduling screen, you should define an appointment type "*" (description 'unspecified') and make this the default. With this as the default, then when you create an Appointment when you press the binoculars for the Appointment Type field, you will see the complete list of available Appointment Types. Alternatively, when you tab to the Appointment Type field, (which selects the *), you can then type the first letter of your required Appointment Type (eg c for Consult, h for Health-check, etc - assuming you have set the other appointment types so that each start with different letters).


