Create/Edit
This screen is used to create or edit the patient record.
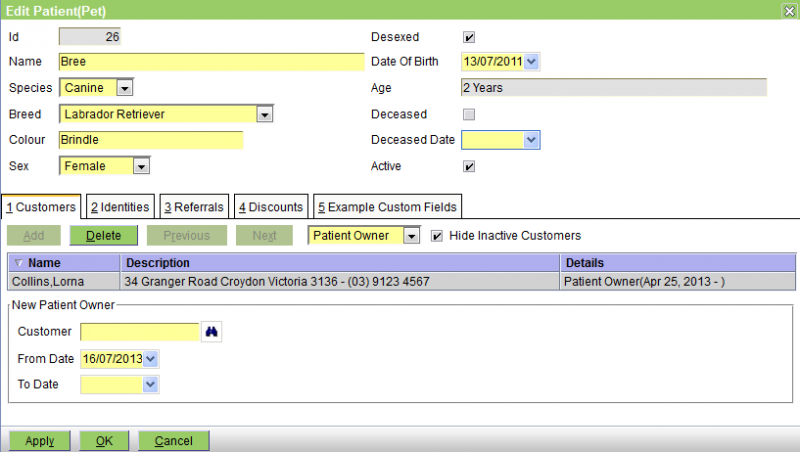
The fields in the header are as follows:
Id - the patient's ID
Name - the patient's name
Species - the species - choose from the ones available - this are set via Administration|Lookups|Species. This is a mandatory field.
Breed - the breed - choose from those available - these are set via Administration|Lookups|Breed. You can set this to None. Note that it is possible that a new patient is a breed that is not on the list. If you are not an administrator (and thus cannot add the new breed), you should set the breed to the special value 'New Breed' - as shown below, this will cause the New Breed field to be displayed so that you can enter the appropriate data. Note that in the example below, this system has a species 'Other' defined to allow for the case where the species is also new.

It is also suggested that after you have set the New Breed, and entered the patient's other details, that you call up Workflow|Messaging and send a message to the administrator saying 'need new species/breed Snake - Ball Python'. Note that the customer and new patient name will be automatically included in the message.
After the Administrator has set up the new breed, you can then go back and edit the patient to change the Breed from 'New Breed' to the correct one.
Colour - enter the colour
Sex - choose one of None, Female, Male, or Unspecified
Desexed - check the box if the patient has been desexed
Date of Birth - the patient's DOB
Age - this will display the patient's age in Patient Age Format set for the practice - see Administration|Organisation|Practice
Deceased - check the box if the patient is deceased - this will set the Deceased Date to today, and untick the Active box
Deceased Date - date of death - this cannot be in the future, and if set, the Deceased check box must also be checked and the Active box unticked. If you enter a date and there was previously none, then the Deceased box will be ticked and the Active box unticked.
Active - untick this to deactivate the patient
See also Local Procedures.
The tabs are Customers, Identities, Referrals, Discounts, and perhaps Custom Fields - these are documented below.
Note that in some cases, the tabs have a Hide Inactive xxxxx checkbox. This is present when the item being attached to the patient (ie the patient-owner, the patient-location, the referral or the discount) can be deactivated (either by unsetting its Active flag, or if its To Date is in the past). In this case the item will remain attached to the patient, but the item will not be displayed and the patient will act as though the item was not attached. You can have these inactive items displayed by unchecking the Hide Inactive xxxxx box.
The Customers tab
This tab is used to add/delete/edit a) 'Patient Owner' records and b) 'Patient Location' records.
Patient Owner - A patient can have multiple owners either at the same time (because the ownership is shared) or sequentially (because the patient passes from one owner to another).
The screen is as follows:
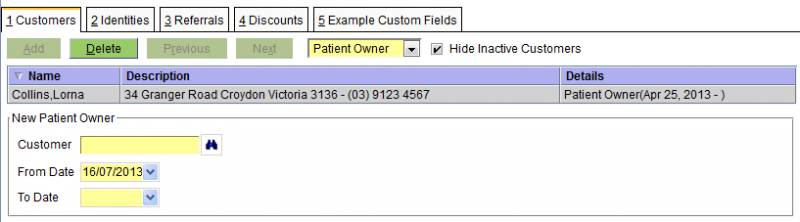
The fields are:
Customer - the name of the customer
From Date - the date from which the ownership started
To Date - the date on which it ended
Note: Although shared ownership of a patient is allowed, you need to set this up by editing the customer's patient-owner entries to add another customer. If you edit the patient's customer-owner entries you will change the ownership of the patient, ie terminate the old ownership and start a new one.
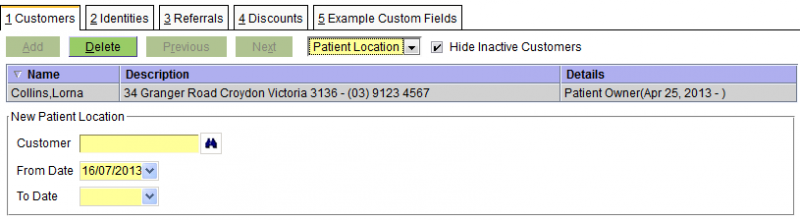
Patient Location - the screen snippet is below, but see the discussion in the customer edit page.
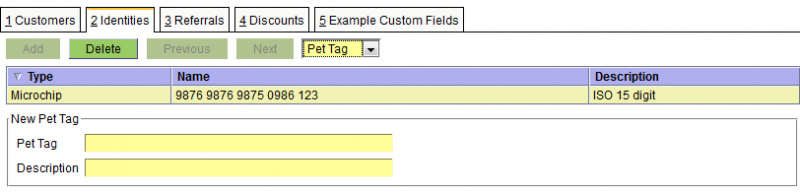
The Identities tab
The Identities tab is used to set the patient's identities. Patients have three types of identities, Microchip, Pet Tag, and Alias. These are discussed in this order below.

The Microchip fields are:
Microchip - the microchip number/code
Description - an optional description of what the code represents
Implant Site - the site where the microchip is implanted. [The pull-down provides the four standard implant sites. If necessary these can be expanded by modifying the entityIdentity.microchip archetype.]
Implant Date or Scan Date - the date when the microchip was implanted, or when it was last scanned
The Pet Tag fields are:
Pet Tag - the Pet Tag number/code
Description - an optional description of what the code represents
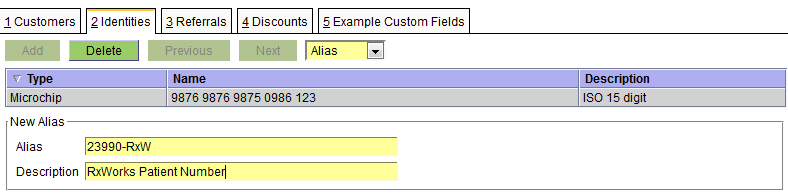
The Alias fields are:
Alias - the alias - this can be anything appropriate
Description - an optional description of what the alias represents (in the above case 23990 was the client number in the RxWorks system that this data was converted from)
You might also was to use the Alias Identify for a real alias such as the 'kennel name' BREEAMBERARGENTINA - no wonder they call him Bree for short ;-)
The Referrals tab
The Referrals tab is use to record both 'Referred To' and 'Referred From' referrals. As can be seen from the two snippets below, the fields for each are identical.
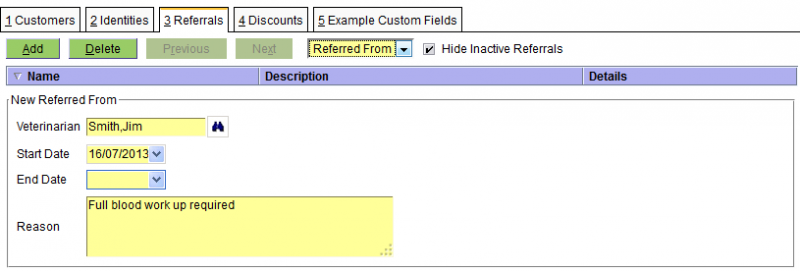

The fields are as follows:
Veterinarian - the vet - this is one of the Supplier/Vets - see Concepts|Suppliers for background. Note that if this is a new vet, then you can use the New button on the Veterinarian screen (displayed when you press the binoculars) to quickly make a new Supplier/Vet record. You can also enter the vet's practice name to get a listing of all vets in the practice.
Start Date - the start date of the referral
End Date - the end date of the referral
Reason - the reason for the referral
The Discounts tab
This tab is used to set the discounts that apply to the customer - see Concepts|Discounts for background.
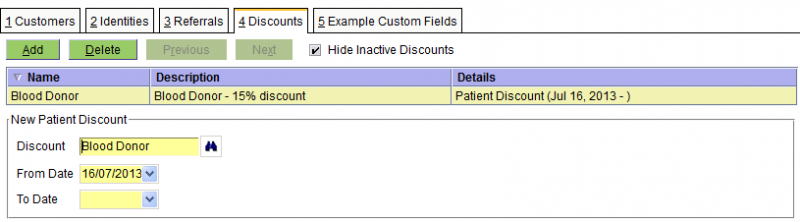
The fields are:
Discount - the discount - note that this can either be a discount, or a discount group
From Date - the date from which the discount applies
To Date - the date on which the discount ends
The Custom Fields tab(s)
See Administation|Lookups|Species for a discussion of the custom fields facility.

The fields here will depend on the specific customer fields archetype.


